Table of Contents >> Show >> Hide
- What Is an Auto Chicken Farm in Minecraft?
- Why Build an Automatic Chicken Farm?
- Materials You Need
- How the Farm Works
- Step-by-Step Guide: How to Build an Auto Chicken Farm in Minecraft
- Step 1: Place the Collection Chest
- Step 2: Attach a Hopper to the Chest
- Step 3: Build the Lower Chicken Chamber
- Step 4: Add the Lava
- Step 5: Place the Dispenser
- Step 6: Add a Hopper Feeding Into the Dispenser
- Step 7: Build the Adult Chicken Chamber
- Step 8: Build the Redstone Clock
- Step 9: Add Chickens and Start the Farm
- Testing the Farm
- Common Problems and How to Fix Them
- Java vs. Bedrock: Does This Farm Work in Both?
- Tips to Make Your Auto Chicken Farm Better
- Is an Auto Chicken Farm Worth It?
- Best Places to Build an Automatic Chicken Farm
- Experience Notes: What I Learned from Building Auto Chicken Farms
- Conclusion
- SEO Tags
There are two kinds of Minecraft players: the ones who lovingly raise animals in a cozy barn, and the ones who look at a chicken and think, “You could be part of a fully automated food supply chain.” If you are in the second group, congratulations. You are about to learn how to build an auto chicken farm in Minecraft that collects eggs, hatches chicks, cooks adult chickens, and stores cooked chicken and feathers with almost no babysitting.
An automatic chicken farm is one of the best early-to-midgame redstone builds because it solves several problems at once. You get a steady food source, a supply of feathers for arrows and books, and a compact introduction to hoppers, dispensers, comparators, and redstone pulses. Best of all, the design is small enough to fit behind your starter base, under a barn, or inside a suspiciously cheerful chicken-shaped statue.
This guide focuses on a simple lava-based automatic chicken cooker that works in the spirit of classic Minecraft designs: adult chickens sit in an egg-laying chamber, hoppers collect the eggs, a dispenser throws those eggs into a lower chamber, baby chickens grow safely, and once they become adults, lava cooks them. It sounds slightly villainous, but in Minecraft terms, it is just responsible meal prep.
What Is an Auto Chicken Farm in Minecraft?
An auto chicken farm in Minecraft is a redstone-powered machine that uses natural chicken behavior and item movement systems to produce resources automatically. Adult chickens lay eggs every few minutes. When eggs are thrown by a player or fired by a dispenser, they have a chance to spawn baby chickens. Baby chickens are short enough to avoid certain lava setups, but once they grow into adults, they become tall enough to touch the lava and drop cooked chicken and feathers.
The farm works because Minecraft’s mechanics line up beautifully. Chickens produce eggs. Hoppers move items. Dispensers throw eggs. Redstone tells the dispenser when to fire. Lava handles the cooking. A chest stores the results. It is basically a tiny blocky restaurant with no employees, no customer service desk, and a health inspection rating we will politely not discuss.
Why Build an Automatic Chicken Farm?
1. It Gives You Reliable Food
Cooked chicken restores hunger and is easy to carry in stacks. Once the farm is running, you can stop interrupting your mining trips to chase pigs across a hillside like a hungry maniac. Your food chest gradually fills while you build, mine, trade, enchant, or get lost in a cave you definitely promised yourself you would not explore.
2. It Produces Feathers
Feathers are useful for crafting arrows and books. If you use bows often, fight the Ender Dragon, explore trial chambers, or like having a backup ranged weapon, feathers are worth collecting. A chicken farm gives you a passive feather supply without requiring a giant fenced pen full of birds screaming at sunrise.
3. It Teaches Redstone Basics
This build is a great redstone lesson because it uses practical components instead of scary wall-sized circuits. You will learn how hoppers transfer items, how dispensers activate, how comparators detect items, and how a simple redstone loop can automate a process. In other words, it is Redstone 101 with snacks.
Materials You Need
Before building your Minecraft auto chicken farm, gather the following materials. The exact block choices can vary, but avoid wooden slabs near lava unless you enjoy surprise campfires inside your base.
- 1 chest or double chest
- 2 to 3 hoppers
- 1 dispenser
- 1 redstone comparator
- 1 redstone repeater
- 3 to 6 redstone dust
- 1 building block for the circuit base
- Glass blocks for visibility
- Solid building blocks for the frame
- 1 stone slab or non-flammable slab
- 1 lava bucket
- Temporary blocks for placement
- Seeds to lure chickens
- At least 2 chickens to start, though more is better
If you are building in Survival mode, the most expensive part is usually the hopper cost because hoppers require iron. If iron is still rare in your world, build the basic storage first, then expand the chicken chamber later. A small working farm is better than a grand unfinished machine that only produces regret.
How the Farm Works
The farm has three main zones: the egg chamber, the hatching chamber, and the collection system.
The Egg Chamber
This is the top area where adult chickens live. They stand on top of hoppers. When they lay eggs, the eggs fall into the hoppers instead of sitting on the ground. The hoppers then move those eggs into a dispenser.
The Hatching Chamber
The dispenser fires eggs into a lower chamber. Some eggs hatch into baby chickens. Not every egg will produce a chick, so patience matters. The more adult chickens you start with, the faster the farm becomes productive.
The Cooking and Collection System
Baby chickens are too short to touch the lava when the farm is built correctly. After about 20 minutes, they grow into adult chickens. Once they are tall enough, they touch the lava, die, and drop cooked chicken and feathers. A hopper below collects the drops and moves them into a chest.
Step-by-Step Guide: How to Build an Auto Chicken Farm in Minecraft
Step 1: Place the Collection Chest
Start by placing a chest where you want to collect your cooked chicken and feathers. This should be at floor level or slightly recessed into the ground, depending on your base design. If you want more storage, use a double chest. You can always expand later, but beginning with a double chest saves you from checking the farm every five minutes like a nervous restaurant manager.
Step 2: Attach a Hopper to the Chest
Crouch and place a hopper feeding into the back or top of the chest. Make sure the hopper’s small nozzle points into the chest. This hopper will collect the drops from the cooking chamber. If it points the wrong way, your farm will not store items properly, and you will spend ten minutes staring at blocks wondering why Minecraft has betrayed you.
Step 3: Build the Lower Chicken Chamber
Above the collection hopper, create a small chamber using glass or solid blocks. Glass is recommended because it lets you see whether the farm is working. Leave enough space for baby chickens to stand on the slab or collection area above the hopper.
Place a non-flammable slab above the collection hopper. The slab helps position the baby chickens low enough that they avoid the lava while they are young. Stone, cobblestone, smooth stone, and similar slabs are safe choices. Do not use wood. Lava and wood have a relationship best described as “short but dramatic.”
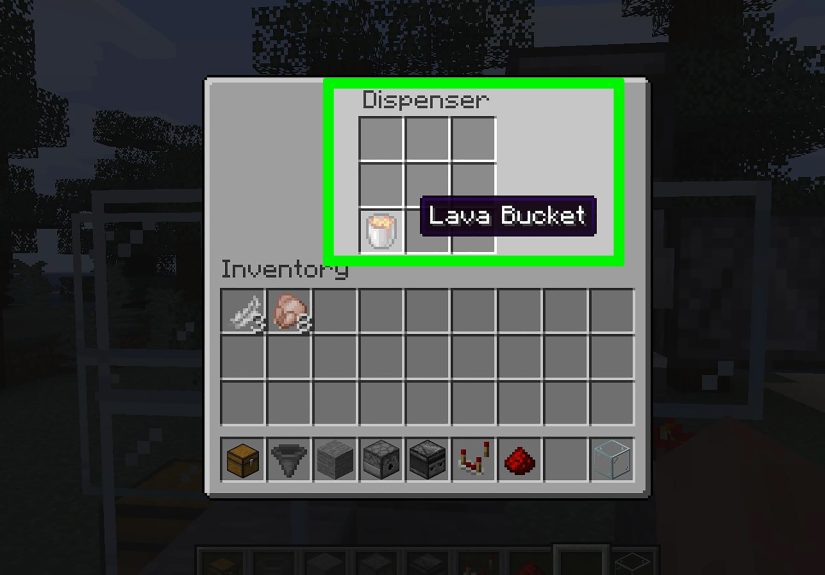
Step 4: Add the Lava
Place lava above the slab so it occupies the space where adult chickens will touch it after growing. The goal is not to flood the chamber. You want the lava positioned so baby chickens stay safe, but adult chickens are cooked when they grow taller. If the lava burns the drops before the hopper collects them, adjust the spacing or test with a small number of chickens before loading the farm fully.
Step 5: Place the Dispenser
Place a dispenser facing into the lower chamber. This dispenser will fire eggs into the area where baby chickens hatch. The dispenser must face the chamber, not upward, sideways into a wall, or directly into your face. Check the front texture carefully before continuing.
Step 6: Add a Hopper Feeding Into the Dispenser
Place a hopper so it feeds into the dispenser. This hopper receives eggs from the chicken chamber above. Again, crouch while placing it so the hopper connects properly. If the hopper nozzle points into the dispenser, you are good. If it points into the void emotionally and physically, break it and place it again.
Step 7: Build the Adult Chicken Chamber
Above the hopper that feeds the dispenser, build a small glass enclosure for adult chickens. The adult chickens should stand directly over the hopper or hoppers so every egg they lay gets collected. A one-block-wide chamber works, but a slightly larger chamber makes it easier to add chickens.
You can lure chickens into the chamber with seeds, push them in with water, or transport them using leads if available. The easiest method is to build a temporary staircase, hold seeds, and guide them in. Once they are inside, close the chamber completely. Chickens are small, nosy, and surprisingly determined to escape at the worst possible time.
Step 8: Build the Redstone Clock
The dispenser needs a redstone signal whenever eggs arrive. A simple comparator clock can handle this. Place a comparator facing away from the dispenser so it reads the dispenser’s inventory. Run redstone dust from the comparator output into a repeater and back toward the dispenser. The idea is to create a pulse that fires the dispenser when eggs enter it.
Different layouts can work, but the basic principle stays the same: comparator detects eggs, redstone activates, dispenser fires eggs, and the cycle repeats. If your dispenser fills up but does not fire, check the direction of the comparator, repeater, and redstone dust. Most farm failures come from one tiny directional mistake, which is Minecraft’s way of teaching humility.
Step 9: Add Chickens and Start the Farm
Add at least two adult chickens to the top chamber. More chickens mean more eggs, and more eggs mean faster production. You can breed chickens with seeds before placing them in the farm, or start with a few and let the machine gradually increase output through egg hatching.
Once the adult chickens begin laying eggs, the hoppers should move eggs into the dispenser. The dispenser should fire them into the lower chamber. Some eggs will hatch. The baby chickens will grow. Eventually, cooked chicken and feathers will appear in the chest.
Testing the Farm
Do not walk away immediately after building the farm. Stay nearby and watch the first few cycles. Make sure eggs move into the dispenser, the dispenser fires, chicks appear in the lower chamber, and drops land in the collection hopper. Testing now prevents disappointment later.
If you are impatient, you can manually place eggs into the dispenser to test whether the redstone fires correctly. You can also throw eggs into the lower chamber by hand to confirm that chicks stand safely below the lava. Just avoid standing too close to the lava while testing unless you want your armor to become part of the experiment.
Common Problems and How to Fix Them
Problem: Eggs Are Not Entering the Dispenser
Check the hopper direction. Hoppers only transfer items toward the direction of their nozzle. If the hopper is not pointing into the dispenser, eggs will sit in the hopper and your farm will do absolutely nothing with great confidence.
Problem: The Dispenser Is Not Firing
Inspect the comparator and redstone circuit. The comparator must read the dispenser, and the redstone must power the dispenser. Also make sure you used a dispenser, not a dropper. Droppers drop eggs as items; dispensers throw eggs. That difference is the whole farm.
Problem: Baby Chickens Are Dying Too Early
The lava may be too low, or the slab position may be wrong. Baby chickens should remain below the danger zone until they grow. Rebuild the lower chamber carefully and test with a small batch of eggs before adding a large population.
Problem: Drops Are Burning
If cooked chicken and feathers burn in lava before reaching the hopper, adjust the lava placement or use a design that keeps the lava just high enough to touch adult chickens without destroying the drops. This is one of the most important details in a Minecraft automatic chicken cooker.
Problem: The Farm Is Slow
Slow output is normal at first. Chickens lay eggs over time, and eggs only have a chance to hatch. Add more adult chickens to the top chamber to increase egg production. You can also keep the chunk loaded by staying near the farm or building it close to your main base.
Java vs. Bedrock: Does This Farm Work in Both?
The general idea works in both Minecraft Java Edition and Bedrock Edition, but small redstone and entity behavior differences can affect specific layouts. If you are playing Bedrock, test the lava height, dispenser timing, and chick position carefully. Some designs that work perfectly in Java may need minor adjustments in Bedrock.
A good rule is to build the farm in Creative mode first if you are unsure. Testing in a creative test world saves iron, lava accidents, and emotional damage. Once you know the design works in your version, rebuild it in Survival with confidence.
Tips to Make Your Auto Chicken Farm Better
Hide It Inside a Barn
Auto farms do not have to look like exposed redstone spaghetti. Build a barn around the farm, add hay bales, lanterns, fences, and a little path. Visitors will think you are a wholesome farmer. Only you will know there is a tiny automated chicken engine humming behind the wall.
Add More Storage
If you play on a long-term world, connect the collection hopper to a row of chests. Cooked chicken stacks quickly once the farm grows. Extra storage keeps the system from backing up.
Use Item Filters Later
Advanced players can add item sorting to separate cooked chicken from feathers. This is not required for a basic farm, but it makes storage cleaner. It also makes you feel like a redstone genius, which is half the reason we build these things anyway.
Keep It Near Your Base
Minecraft farms only work when the area is loaded. If you build the farm far away and never visit, it will not produce much. Place it near your storage room, starter house, villager trading hall, or main base so it runs while you do normal activities.
Is an Auto Chicken Farm Worth It?
Yes, especially in Survival mode. An automatic chicken farm is compact, affordable, and useful for both beginners and experienced players. It does not require villagers, mobs, spawners, rare blocks, or complicated timing systems. Once it is running, it provides food and feathers while taking up very little space.
The farm is also scalable. You can start with a tiny version and upgrade it later. Add more chickens, more storage, better decoration, or a sorting system. Minecraft rewards that kind of gradual improvement. One day you are building a small chicken cooker; the next day you are designing a fully automated industrial food district and wondering whether the chickens need a union.
Best Places to Build an Automatic Chicken Farm
The best location is close to where you spend the most time. If you have a starter house, put the farm behind it or under it. If you have a storage hall, place it nearby so cooked chicken flows naturally into your item system. If you enjoy themed builds, hide the farm inside a barn, market stall, medieval kitchen, butcher shop, or farmhouse.
Underground farms are also popular because they keep noise and visual clutter away from the main base. Just remember that chickens make sound, and a large group can become loud. If you are sensitive to constant clucking, build the farm slightly away from your bedroom. Nobody wants to wake up in Minecraft to 80 chickens discussing politics.
Experience Notes: What I Learned from Building Auto Chicken Farms
The first thing you learn when building an auto chicken farm in Minecraft is that “simple” redstone is still perfectly capable of embarrassing you. The design may only use a chest, a few hoppers, a dispenser, lava, and a small redstone clock, but every block direction matters. My earliest farm failed because one hopper faced the wrong way. The chickens were doing their job, the eggs were dropping, and the dispenser was sitting there like a confused mailbox. Once I fixed the hopper direction, the whole machine came alive.
The second lesson is to test with a small number of chickens before going full poultry empire. It is tempting to cram the top chamber with every chicken you can lure from the plains, but if your lava placement is wrong, you may create a very dramatic disaster box. Start with a few adult chickens, watch the eggs move, and make sure the chicks survive in the lower chamber. After you confirm that cooked chicken and feathers are landing in the chest, then you can expand.
Another useful experience is that decoration makes the farm feel much better. A bare chicken cooker in the middle of your base looks like a machine you built at 2 a.m. because you ran out of steak. But place it inside a barn with hay bales, spruce beams, lanterns, barrels, and a little fenced yard, and suddenly it feels like a planned feature. The redstone can stay hidden behind walls, while the front looks warm and intentional.
Chunk loading is also important. I once built a chicken farm far from my base because I wanted a “farm district.” It looked great, but it barely produced anything because I was almost never there. Automatic farms are only useful when they are loaded often. After moving the design near my storage room, production improved quickly because the farm worked while I sorted items, enchanted tools, repaired gear, and planned builds.
Finally, auto chicken farms are excellent confidence builders. They are not as complex as iron farms or villager breeders, but they introduce the same mindset: understand the mob, control the space, move the items, and automate the trigger. Once you build one successfully, other farms feel less intimidating. You begin to see Minecraft as a game of systems, not just blocks. Also, you never have to panic about food again, which is nice when your next brilliant plan involves sprinting into a cave with three torches and a stone sword.
Conclusion
Learning how to build an auto chicken farm in Minecraft is one of the most useful steps you can take in Survival mode. The farm is compact, affordable, and practical, giving you cooked chicken and feathers with minimal effort once it is running. It teaches core redstone ideas without overwhelming you, and it can be hidden inside almost any base design.
The key is understanding the mechanics: adult chickens lay eggs, hoppers collect those eggs, a dispenser throws them into a hatching chamber, baby chickens grow safely, and lava cooks them once they become adults. Build slowly, test carefully, and do not be afraid to adjust the design for your Minecraft version. Once the system works, you will have a steady food source and a satisfying little machine that proves redstone does not have to be scary.
Note: Farm behavior can vary slightly between Minecraft Java Edition and Bedrock Edition, especially after updates. Always test lava height, hopper direction, and dispenser timing in your current version before filling the farm with a large number of chickens.