Table of Contents >> Show >> Hide
- Before You Start: Prep Hair Like You Mean It
- Way 1: The Classic Blowout Curl
- Way 2: The Twist-and-Glide Method for Soft Waves
- Way 3: The Pin-and-Set Method for Longer-Lasting Curls
- How to Curl Different Hair Lengths with a Hot Air Brush
- How to Curl Different Hair Types
- Common Mistakes to Avoid
- How to Make Hot Air Brush Curls Last Longer
- Real-Life Experiences: What Actually Works When Curling Hair with a Hot Air Brush
- Conclusion
A hot air brush is the beauty tool equivalent of a helpful friend who shows up with coffee and says, “Don’t worry, I brought volume.” It dries, smooths, lifts, bends, flips, and curlsall while saving you from the classic arm workout of holding a blow dryer in one hand and a round brush in the other. If you have ever tried to recreate a salon blowout at home and ended up looking like you fought a ceiling fan, a hot air brush may be your new favorite peace treaty.
Learning how to curl hair using a hot air brush is not difficult, but it does require the right prep, sectioning, tension, and timing. Unlike a curling iron, which clamps hair around a heated barrel, a hot air brush uses airflow, heated bristles, and brush tension to shape the hair as it dries or refreshes. The result is usually softer than a curling wand: think bouncy blowout curls, loose waves, flipped ends, curtain-bang swoops, and that “I casually woke up expensive” finish.
This guide breaks down three easy ways to curl hair with a hot air brush, including a classic blowout curl, a twist-and-glide wave, and a tighter pin-set curl. You will also find practical advice for different hair types, common mistakes to avoid, and real-life styling experiences that can help your curls last longer than your motivation to fold laundry.
Before You Start: Prep Hair Like You Mean It
The secret to great hot air brush curls begins before the brush ever touches your hair. Prep is what separates shiny, bouncy curls from limp pieces that give up before lunch.
Start with dampnot soaking wethair
Most hot air brushes work best on towel-dried or mostly dry hair. If your hair is dripping wet, the tool has to work too hard, which increases styling time and can leave your hair frizzy instead of polished. A good rule is to rough-dry or air-dry your hair until it is about 70% to 80% dry before curling. Fine hair may need to be slightly drier, while thick or coarse hair may benefit from a little more moisture so the shape can set properly.
Always use heat protectant
A heat protectant spray, cream, or leave-in product helps shield the hair from heat exposure and can reduce frizz, dryness, and breakage. Apply it evenly from mid-lengths to ends, then lightly through the top layers. Avoid soaking the roots with too much product, unless “flat helmet chic” is your goal. Spoiler: it probably is not.
Detangle gently
Use a wide-tooth comb or detangling brush before styling. Start at the ends and work upward. This prevents knots from catching in the bristles of the hot air brush. A smooth section wraps better, dries better, and releases better.
Choose the right heat setting
Use low heat for fine, fragile, color-treated, or damaged hair. Medium heat works well for most normal or wavy hair. High heat is better reserved for thick, coarse, or resistant hair, but even then, avoid holding the brush in one spot for too long. The goal is curl, not toast.
Section your hair
Divide your hair into manageable sections. For most people, four to six sections work well: bottom, middle, crown, and front pieces. Smaller sections create more curl and better control. Larger sections create a soft bend but may not hold as long.
Way 1: The Classic Blowout Curl
The classic blowout curl is the most popular way to curl hair with a hot air brush. It creates rounded ends, volume at the roots, and soft salon-style movement. This method works especially well for medium to long hair, layered cuts, curtain bangs, and anyone who wants “fresh blowout” energy without booking an appointment.
Best for:
Loose curls, bouncy ends, face-framing layers, volume, and smooth shine.
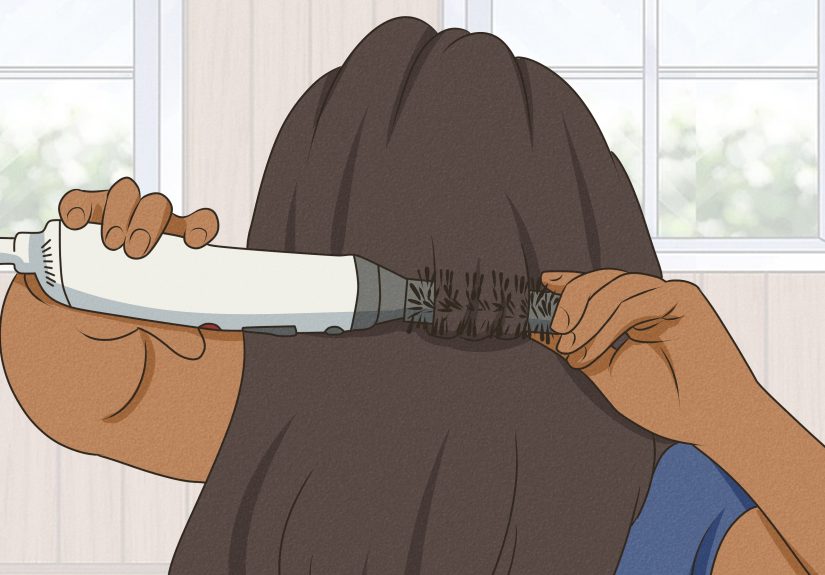
Step 1: Place the brush under the section
Take a section of hair about the same width as the brush barrel. Place the hot air brush underneath the section near the roots. Lift upward and away from your scalp to create volume. Hold for two to three seconds, especially at the crown, where hair often falls flat faster than weekend plans.
Step 2: Glide slowly through the hair
Move the brush down the hair shaft with steady tension. Do not rush. The brush needs time to smooth the cuticle and shape the strand. If you move too quickly, you may get puff instead of polish.
Step 3: Wrap the ends around the barrel
When you reach the ends, roll the brush inward toward your face or outward away from your face, depending on the curl direction you want. For a classic blowout, roll the ends under. For a more glamorous, open look around the face, roll the front pieces away from your face.
Step 4: Hold, cool, and release
Hold the wrapped section for five to ten seconds, then use the cool setting if your tool has one. Cooling the hair helps set the shape. After that, gently unwind the brush instead of yanking it straight down. Your hair is not a lawn mower cord; do not pull it like one.
Step 5: Repeat and alternate directions
Repeat the process around your head. For a more natural finish, alternate curl direction on the side and back sections. Keep the front pieces curled away from your face for the most flattering, lifted look.
Pro tip for more volume
At the crown, place the brush under the hair, lift straight up, and roll backward. Let the section cool before touching it. This gives the roots more height and helps prevent the top from collapsing.
Way 2: The Twist-and-Glide Method for Soft Waves
The twist-and-glide method creates relaxed waves rather than full curls. It is perfect when you want movement without looking overly styled. This technique is also beginner-friendly because you do not need to wrap the entire section tightly around the brush.
Best for:
Beachy waves, soft bends, layered hair, second-day refreshes, and natural-looking movement.
Step 1: Work with smaller sections
Take a narrow section of hair, especially if your hair is thick. Smaller sections help the wave form more clearly. Mist lightly with heat protectant or styling spray if your hair is dry and you are refreshing an old style.
Step 2: Brush through once for smoothness
Run the hot air brush from roots to ends one time to smooth the strand. Keep the brush moving and avoid pressing too hard. You want control, not a wrestling match.
Step 3: Twist as you glide
Place the brush under the section, then slowly rotate your wrist as you glide downward. Think of making a loose ribbon shape. The brush should turn gradually, not spin wildly. If your tool has a rotating barrel, use the rotation gently and guide the hair with your hand.
Step 4: Flick the ends
At the ends, twist the brush away from your face for a modern, airy wave. For a softer vintage bend, twist the ends inward. Hold for a few seconds, use cool air if available, then release.
Step 5: Let the waves cool before brushing
Do not immediately rake your fingers through the curls. Let them cool first. Once your whole head is styled, gently shake out the waves with your fingers. If you want a more undone finish, flip your head over, mist lightly with flexible hairspray, and return dramatically like you are in a shampoo commercial.
Pro tip for fine hair
Fine hair often loses wave quickly, so use a lightweight mousse before drying and finish with a flexible hold spray. Avoid heavy oils before styling because they can weigh the curl down.
Way 3: The Pin-and-Set Method for Longer-Lasting Curls
If your hair refuses to hold curl, the pin-and-set method can help. This technique uses the hot air brush to form the curl, then lets each curl cool in its coiled shape. It takes a little longer, but the payoff is better staying power.
Best for:
Long-lasting curls, special events, stubborn straight hair, thick hair, and styles that need extra bounce.
Step 1: Prep with a product that has hold
Apply a volumizing mousse, blowout cream, or light styling spray before drying. The product should add memory without making the hair crunchy. If your hair is very silky, a light texture spray can help give it grip.
Step 2: Curl with the hot air brush
Take a small section and use the classic wrap method. Roll the hair around the barrel, hold until the section feels dry and warm, then hit it with cool air if your brush has that option.
Step 3: Release into your palm
Instead of letting the curl drop, gently slide it off the brush into your palm while keeping the curl shape intact. This step is important because hot hair is still moldable. If it drops while warm, gravity may stretch it out.
Step 4: Pin the curl
Use a duckbill clip or small hair clip to pin the curl against your head. Continue curling and pinning each section. You may look slightly like you are preparing for a 1950s yearbook photo, but stay with it.
Step 5: Let everything cool completely
Wait at least 10 to 15 minutes, or longer if you can. Once the curls are fully cool, remove the clips and gently separate them with your fingers. Finish with a light hairspray.
Pro tip for special occasions
Style your hair earlier than you think you need to. Let the curls sit slightly tighter at first. They will relax naturally over time into a soft, expensive-looking blowout.
How to Curl Different Hair Lengths with a Hot Air Brush
Short hair
Use a smaller barrel if possible. Focus on root lift, curved ends, and face-framing shape. For short bobs or lobs, place the brush under the ends and roll inward for a polished look. For a playful finish, flick the ends outward.
Medium-length hair
Medium hair is ideal for hot air brush curls because it has enough length to wrap but not so much weight that curls fall instantly. Use the classic blowout method for everyday styling and the pin-and-set method when you want extra hold.
Long hair
Long hair needs smaller sections and more patience. Start curling from the mid-lengths rather than trying to wrap the entire strand from root to tip. Use clips to set the front and crown sections, since those areas define the finished style.
How to Curl Different Hair Types
Fine hair
Use low to medium heat, lightweight mousse, and smaller sections. Avoid heavy serums before styling. Fine hair usually benefits from cooling each curl before release.
Thick hair
Rough-dry first, then work in thin sections. Use medium to high heat if your hair can handle it, but keep the brush moving. Thick hair may need more tension and a longer cooling period to hold the shape.
Curly or coily hair
Start with detangled, moisturized hair and use a heat protectant designed for textured hair. Depending on your desired result, you may stretch the hair first with a blow-dry brush attachment, then use the round brush to shape the ends. Avoid excessive passes, and keep the hair hydrated before and after styling.
Color-treated or damaged hair
Use the lowest effective heat setting and avoid styling the same section repeatedly. Add a nourishing leave-in conditioner and heat protectant. If your ends are very fragile, focus on soft bends instead of tight curls.
Common Mistakes to Avoid
Using the brush on soaking wet hair
This is one of the biggest mistakes. Hot air brushes are styling tools, not miracle workers. Starting with soaking wet hair makes the process longer and can create frizz. Towel-dry, air-dry, or rough-dry first.
Taking sections that are too large
Large sections may look faster, but they often dry unevenly and refuse to curl. Smaller sections produce better shape, shine, and hold.
Skipping the cool shot
Heat shapes the hair, but cool air helps set it. If your brush has a cool setting, use it before releasing each curl. If it does not, hold the curl in your hand for a few seconds after release.
Overloading hair with product
Too much cream, oil, or spray can make curls heavy and flat. Start with a small amount. You can always add more, but removing product usually requires a shampoo situation, and nobody invited that.
Brushing curls too soon
Let curls cool completely before touching them. Brushing warm curls is like canceling your own hard work.
How to Make Hot Air Brush Curls Last Longer
To help curls last, begin with slightly damp hair and a light hold product. Use enough tension while styling, dry each section fully, and cool the curl before releasing. For stubborn hair, clip each curl until it cools. Finish with flexible hairspray rather than a stiff formula. If you live in a humid climate, use an anti-humidity spray or lightweight finishing cream on the ends.
At night, protect your style by loosely twisting hair into a soft bun or using a silk scrunchie. A satin or silk pillowcase can reduce friction and help curls survive until morning. The next day, refresh flat pieces with the hot air brush on low heat, focusing only on the sections that need help.
Real-Life Experiences: What Actually Works When Curling Hair with a Hot Air Brush
After testing different hot air brush techniques, one thing becomes very clear: the tool is easy, but the results depend heavily on patience. The first time many people use a hot air brush, they treat it like a regular brush and simply drag it through the hair. That creates smoothness, yes, but not much curl. The magic happens when you slow down, add tension, roll the ends, and let the hair cool before releasing.
For fine hair, the biggest lesson is that less product is better. A golf-ball-sized amount of mousse may look harmless in your palm, but on fine hair it can quickly turn into a flat, sticky situation. A small amount of volumizing spray at the roots and a light heat protectant through the ends usually works better. Fine hair also benefits from curling smaller sections and clipping the front pieces while they cool. The difference can be dramatic: without clipping, the curl may fall in 20 minutes; with clipping, it can last through a workday, a dinner, and possibly one emotional weather forecast.
For thick hair, the biggest challenge is drying time. Trying to curl thick hair from very damp can feel endless. The better approach is to rough-dry first until the hair is mostly dry, then use the hot air brush as a finishing and shaping tool. Thick hair usually needs stronger sectioning, too. Instead of two giant side sections, divide the hair into bottom, middle, top, and face-framing layers. It looks more fussy at first, but it saves time because each section actually curls properly.
For layered hair, hot air brushes can be especially flattering. Layers naturally want movement, and the brush helps exaggerate that shape. The best trick is to curl the shortest front layers away from the face and the lower layers inward or alternating. This creates a full, soft finish without making the hair look too uniform. Uniform curls can sometimes look a little “pageant at 9, grocery store at 10.” Alternating the direction keeps things modern.
For curtain bangs, the hot air brush is practically royalty. Place the brush under the bangs, lift at the root, roll backward, and then sweep each side away from the face. Let the bangs cool before touching them. If they fall too perfectly, pinch the middle part and shake the roots lightly with your fingers. The result is soft, lifted, and much easier than trying to use a curling iron near your forehead while silently negotiating with danger.
Another useful experience: the cool shot matters more than people think. Many beginners skip it because they are rushing. But cooling the curl helps lock in the shape, especially on silky or straight hair. If your tool does not have a strong cool setting, release the curl carefully and hold it in your palm for a few seconds. This small pause can make the style look smoother and last longer.
Finally, hot air brush curls look best when they are not overworked. Once your curls are finished, do not keep going back over them again and again. Too many passes can flatten volume, create frizz, and dry out the ends. Style, cool, separate, and stop. Sometimes the most professional move is knowing when to put the tool down and walk away like you meant to look that good.
Conclusion
Curling hair with a hot air brush is one of the easiest ways to create soft, polished, everyday curls without juggling multiple tools. The classic blowout curl gives you bounce and volume, the twist-and-glide method creates relaxed waves, and the pin-and-set method helps stubborn hair hold its shape longer. The keys are simple: start with damp hair, use heat protectant, work in small sections, maintain steady tension, and let each curl cool before touching it.
A hot air brush may not replace every curling iron or wand, especially if you want tight ringlets, but it is excellent for smooth body, airy movement, curled ends, and salon-style volume at home. With a little practice, you can turn your morning styling routine from “mild panic with frizz” into “casual blowout confidence.” And honestly, your hair deserves that kind of character development.
Note: This article is written for general beauty and hair-care education. Always follow the instructions for your specific hot air brush and adjust heat settings based on your hair type and condition.