Table of Contents >> Show >> Hide
- Why a Water Bottle Works So Well as a Pencil Holder
- Before You Start: Materials, Prep, and Safety
- Way 1: Make a Classic Painted Bottle Pencil Cup
- Way 2: Make a Wrapped Water Bottle Pencil Holder
- Way 3: Make a Zippered Water Bottle Pencil Holder
- How to Make Your Pencil Holder Look Better, Not Just Exist
- Which Water Bottle Pencil Holder Should You Choose?
- What I Learned From Making Water Bottle Pencil Holders
- Conclusion
- SEO Tags
If you have an empty water bottle rolling around in your kitchen, congratulations: you are already halfway to a desk upgrade. A plastic bottle might not look glamorous at first glance, but neither did sweatpants before work-from-home culture made them boardroom-adjacent. With a few simple tools, a little creativity, and a healthy respect for scissors, you can turn that bottle into a pencil holder that is practical, cute, and surprisingly satisfying to make.
This project is one of those rare DIY wins that checks every box. It is affordable. It is beginner-friendly. It helps you reuse something you already have. And it solves a real problem: where all your pens, markers, scissors, and mystery highlighters keep disappearing to. Whether you want a quick craft for kids, a low-budget organizer for your desk, or a fun upcycling idea that does not involve twenty-seven power tools and a spiritual awakening, these three water bottle pencil holder ideas deliver.
Below, you will learn 3 ways to make a pencil holder from a water bottle, from the fastest no-fuss version to a prettier wrapped design and a zippered organizer that feels like it came from a crafty alternate universe. Each method uses simple materials, gives you room to personalize the look, and proves that “trash” is sometimes just “future office decor” in disguise.
Why a Water Bottle Works So Well as a Pencil Holder
A water bottle is practically begging for a second career. It is lightweight, easy to cut, easy to decorate, and tall enough to hold pencils without turning them into a weird leaning tower. The curved shape also helps the holder feel finished even before you decorate it, which is great news for anyone who wants a craft that looks intentional instead of “I made this during a cereal commercial.”
Another bonus is flexibility. You can cut the bottle low to make a short cup for pens and paper clips, or keep it taller for paintbrushes, markers, and colored pencils. You can leave the plastic clear for a modern look, paint it, wrap it in fabric, add labels, or go full glitter if your desk needs a tiny disco moment. In other words, this is not just one craft. It is a whole family of water bottle crafts hiding inside one humble container.
Before You Start: Materials, Prep, and Safety
Before making any DIY pencil holder, wash the bottle well and let it dry completely. Remove labels if possible so you have a clean surface to work with. If the bottle feels sticky afterward, warm soapy water usually helps. A little patience helps too, although patience is admittedly the least fun craft supply.
You will also want a few basic tools on hand:
- 1 empty water bottle
- Scissors
- Craft knife or box cutter for tougher spots
- Sandpaper or an emery board
- Ruler
- Marker
- Glue, paint, or decorative supplies depending on the design
If children are involved, an adult should handle the cutting portion, especially the first slice into the bottle. Once the shape is cut, smoothing the edge matters. A quick pass with fine sandpaper can make the top feel much cleaner and safer to use. It also makes the finished project look more polished, which is always nice when you want your recycled bottle organizer to look like decor instead of an accident.
Way 1: Make a Classic Painted Bottle Pencil Cup
This is the easiest method and the best one for beginners. If you want a fast result with lots of room for customization, start here. It is simple, useful, and impossible to mess up unless you somehow glue the scissors to the bottle, in which case you have created a modern sculpture.
What You’ll Need
- 1 water bottle
- Acrylic paint or paint markers
- Painter’s tape, washi tape, or stickers
- Sandpaper
- Optional: clear sealer
How to Make It
- Use a marker to draw a line around the bottle where you want to cut it. For a standard pencil holder, cutting the bottle about 4 to 5 inches from the bottom works well.
- Cut the bottle carefully, then smooth the top edge with sandpaper.
- Wipe away any plastic dust.
- Paint the outside of the bottle in one solid color or make simple designs like stripes, polka dots, checkerboard patterns, or smiley faces.
- Let the paint dry fully before adding a second coat.
- Finish with tape, stickers, or a name label if you want a school-supply look.
Why This Version Works
This pencil cup is quick, functional, and easy to match to your room or workspace. A matte black version looks surprisingly sleek on an office desk. Bright colors work great in a kid’s room. Pastels feel cute and crafty. Metallic paint makes the bottle look fancier than its former life would suggest.
You can also make a full set. One holder for pencils, one for pens, one for scissors, and one for “things I refuse to identify but might need later.” Suddenly your desk is organized, and you did it with old plastic. That is what we call character development.
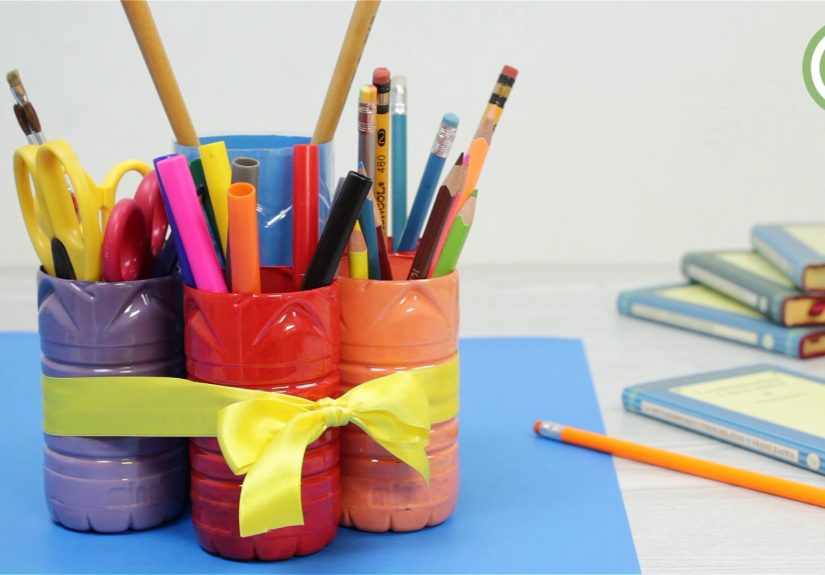
Way 2: Make a Wrapped Water Bottle Pencil Holder
If the painted version is the sporty sedan of the group, this one is the dressed-up cousin who shows up with a cute coat and a better playlist. Wrapping the bottle in fabric, felt, burlap, yarn, or twine gives it warmth and texture. It also hides the plastic completely, which is perfect if you want your plastic bottle craft to look more like home decor.
What You’ll Need
- 1 cut water bottle bottom
- Fabric, felt, twine, or thick yarn
- Craft glue or hot glue
- Scissors
- Ribbon, buttons, faux flowers, or labels for decoration
How to Make It
- Cut the bottle to your desired height and sand the edge smooth.
- If using fabric or felt, cut a piece large enough to wrap around the bottle with a little overlap.
- Apply glue in small sections and wrap the material tightly around the bottle.
- Fold the top edge inward if your material is soft enough, or trim it close for a cleaner finish.
- If using twine or yarn, start at the bottom and glue as you wrap upward in neat rows.
- Add finishing touches like a bow, a tag, a monogram, or a strip of contrasting ribbon.
Best Style Ideas for This Holder
This design is incredibly versatile. Burlap and twine give it a rustic farmhouse vibe. Bright felt makes it playful and great for kids. Denim scraps create a casual, cool look. Floral cotton fabric turns it into a cheerful desk accessory that would not look out of place next to a vase of daisies and a to-do list you are pretending not to see.
This is also a smart choice if you are making a gift. A handmade desk organizer DIY project feels personal without being overly complicated. Pair it with pencils, gel pens, or paintbrushes, and suddenly your upcycled bottle looks suspiciously thoughtful.
Way 3: Make a Zippered Water Bottle Pencil Holder
This version is the show-off of the bunch, but in a good way. It uses two bottle bottoms and a zipper to create a case that can hold supplies while traveling and then stand open on a desk like a mini caddy. It is clever, compact, and the kind of project that makes people say, “Wait, that used to be a water bottle?” which is the highest compliment in the land of upcycling.
What You’ll Need
- 2 water bottles of the same size
- 1 zipper long enough to go around the bottle
- Hot glue gun or strong craft glue
- Scissors or craft knife
- Marker and sandpaper
How to Make It
- Cut the bottoms off two matching water bottles. One side can be slightly taller if you want a deeper holder.
- Sand the edges so they are smooth and even.
- Open the zipper fully.
- Glue one side of the zipper around the edge of the first bottle bottom.
- Glue the other side of the zipper to the second bottle bottom.
- Let the glue set completely, then zip the two pieces together.
- Decorate the outside with paint, stickers, or puffy letters if desired.
Why People Love This One
This project solves two problems at once. It stores supplies neatly, and it keeps them from rolling all over your backpack or desk drawer. Unzip it, set one half on the table, and you have a compact little holder for pens, clips, or crayons. Zip it up, and it becomes a portable pencil case. Not bad for something that started life next to the bottled tea at the grocery store.
This is an especially fun version for older kids, tweens, and anyone who enjoys a craft with a slightly more engineered feel. It is also one of the coolest upcycled school supplies ideas because it feels inventive without needing expensive materials.
How to Make Your Pencil Holder Look Better, Not Just Exist
The difference between a decent craft and one you proudly keep on your desk usually comes down to details. First, cut as evenly as you can. Second, smooth the edge. Third, do not rush the drying time if you are painting or gluing fabric. That impatient “it’s probably dry” energy has ruined many a beautiful project.
You can also improve the finished look with simple upgrades:
- Add a cardboard circle inside the bottom for extra stability.
- Use matching colors if you are making a set of organizers.
- Label each holder for pens, markers, scissors, or brushes.
- Glue on pom-poms, beads, or faux flowers for a playful style.
- Use clear bottles strategically if you like seeing your supplies at a glance.
If your desk tends to collect clutter like it is training for a championship, making two or three holders at once is worth it. One lonely pencil holder is helpful. A coordinated set is a whole system. And “system” is just a classy word for “I finally know where my pens are.”
Which Water Bottle Pencil Holder Should You Choose?
If you want the fastest result, go with the classic painted cup. If you care most about style, choose the wrapped version. If you want something clever and portable, the zippered holder wins. There is no wrong option here. The best one is the version you will actually make instead of pinning to a board and forgetting about until 2029.
That is the beauty of this project. It is approachable. It is useful. And it gives an empty bottle a second life as something you will see and use every day. In a world full of complicated craft tutorials that require twelve specialty tools and the confidence of a reality show contestant, this one is refreshingly doable.
What I Learned From Making Water Bottle Pencil Holders
After making different versions of a pencil holder from a water bottle, the biggest surprise was how quickly the project stopped feeling like a “kids’ craft” and started feeling like a genuinely smart organizing solution. At first, I expected something cute but slightly flimsy, the kind of thing you make once, smile politely at, and then quietly relocate to a drawer. Instead, the finished holders turned out useful enough to stay on a real desk, holding real pens, through real weeks of work. That alone felt like a minor crafting miracle.
The first lesson was that prep matters more than people think. The bottle that was washed well, dried fully, and cut neatly always looked better in the end. The one that was rushed looked rushed. Crafting has a rude but reliable way of exposing laziness. If the edge was uneven, the whole holder looked sloppy. If I sanded it properly, suddenly it looked intentional. Not luxury-designer intentional, of course, but definitely “I know what I’m doing” intentional, which is close enough for a Tuesday afternoon.
I also learned that decoration changes everything. A plain cut bottle can look like recycling-bin leftovers. Add paint, twine, or patterned fabric, and it starts to look like something you chose on purpose. The wrapped version especially felt more elevated than expected. It blended into shelves and desks better, and it made the whole project feel less like a bottle in costume and more like actual decor. That is a useful reminder for any upcycling project: the structure can be humble as long as the finish feels thoughtful.
The zippered version taught me something else: people love projects that have a little twist. A basic cup is helpful, but a holder that opens and closes gets attention. It invites curiosity. It is practical, yes, but it is also fun, which is often the difference between a project people admire for three seconds and one they remember. There is a reason clever storage hacks spread so quickly. We all want ordinary objects to secretly have a second personality.
Another experience worth mentioning is how satisfying it feels to make organization with what you already have. Buying desk organizers is easy, but making one from a water bottle feels oddly empowering. It is inexpensive, creative, and just useful enough to make you look around the house wondering what else could be repurposed. Suddenly old jars look promising. Cardboard boxes seem full of potential. You begin to develop the slightly unhinged but admirable habit of seeing packaging as raw material.
Most of all, these projects reminded me that a good craft does not have to be complicated to be worthwhile. It just has to solve a problem, look decent, and be enjoyable to make. A water bottle pencil holder does all three. It keeps supplies in one place, gives you room to personalize your space, and turns something disposable into something lasting a little longer. That is a small win, sure, but small wins are the backbone of a tidy desk and a happy crafter. Also, they are much cheaper than buying another organizer you absolutely do not need but somehow still add to cart.
Conclusion
If you were wondering whether an empty water bottle can become something useful, the answer is a loud, cheerful yes. These three pencil holder ideas prove that upcycling can be simple, stylish, and genuinely practical. Whether you paint it, wrap it, or zip it into a portable case, you end up with a project that saves money, reduces waste, and gives your desk a little more personality.
So the next time you finish a bottle of water, do not toss it without a second thought. Give it a promotion. Your pens need a home, your desk needs less chaos, and that bottle deserves a better ending than the recycling bin waiting game.