Table of Contents >> Show >> Hide
- Before You Start: Choose the Right Unicorn Horn Method
- Safety Notes for Unicorn Horn Crafts
- Method 1: How to Make a Unicorn Horn from Cardstock
- Method 2: How to Make a Soft Felt Unicorn Horn Headband
- Method 3: How to Make an Edible Fondant Unicorn Horn
- Design Ideas for Your Unicorn Horn
- Common Mistakes to Avoid
- Which Unicorn Horn Method Is Best?
- Real-Life Experience: What I Learned Making Unicorn Horns
- Conclusion
A unicorn horn is one of those magical craft projects that looks impressive but does not require a wizard, a royal workshop, or a questionable bargain with a forest fairy. Whether you are preparing a birthday party, building a Halloween costume, decorating a cake, or trying to rescue a rainy afternoon from boredom, learning how to make a unicorn horn gives you a surprisingly useful creative superpower.
The classic unicorn horn is tall, tapered, and usually spiraled. That spiral detail is the secret sauce. Without it, you have a cone. With it, you have instant mythical creature energy. The good news is that you can make a unicorn horn from simple materials such as cardstock, felt, craft foam, paper mache cones, or fondant. The best method depends on where the horn will live: on a headband, on a costume, on a party table, or proudly on top of a cake.
This guide covers three practical ways to make a unicorn horn: a quick cardstock horn, a soft felt unicorn horn headband, and an edible fondant unicorn horn for cakes or cupcakes. Each method includes materials, step-by-step instructions, design tips, safety notes, and troubleshooting advice. No glitter-related panic requiredalthough glitter will absolutely try to move into your house permanently.
Before You Start: Choose the Right Unicorn Horn Method
Before cutting, gluing, rolling, or dusting everything in shimmer, decide what your unicorn horn needs to do. A party favor for ten kids should be quick and inexpensive. A costume horn should be comfortable and sturdy. A cake topper should be food-safe and firm enough to stand upright without slowly leaning like it just heard bad news.
Use cardstock for fast party horns
Cardstock is best when you need a simple unicorn horn for a birthday activity, classroom craft, photo booth prop, or last-minute costume. It is affordable, easy to decorate, and beginner-friendly. Kids can color, sticker, paint, and personalize it, while adults can handle hot glue or tricky cutting if needed.
Use felt or fleece for a soft wearable horn
Felt and fleece make excellent unicorn horn headbands because they are lightweight, flexible, and comfortable. Add stuffing to give the horn shape, then wrap thread, yarn, or metallic cord around it to create the spiral. This method looks polished enough for costumes but is still manageable for a home craft table.
Use fondant for edible cake magic
Fondant or gum paste is the best choice when you want a unicorn horn cake topper. The horn can be shaped, twisted, painted gold, and placed on cakes or cupcakes. It looks fancy, but the technique is simple: roll two tapered ropes, twist them together, shape the point, and let the horn firm up before decorating.
Safety Notes for Unicorn Horn Crafts
Unicorn crafts are joyful, but glue guns, scissors, small gems, and wire-backed flowers still deserve respect. If children are helping, match the task to their age and skill level. Let young kids decorate pre-cut shapes with crayons, stickers, washable markers, or glue sticks. Adults should handle hot glue, sharp scissors, craft knives, and wire trimming.
For hot glue projects, work on a clean, dry, protected surface. Keep the glue gun upright on its stand, never leave it plugged in unattended, and do not touch the heated nozzle or fresh glue. If you want a kid-friendlier version, use tacky glue, glue dots, double-sided tape, or a low-temperature glue gun handled by an adult.
For edible unicorn horns, use food-safe materials only. Toothpicks, skewers, or wires may be used by some decorators for support, but they must be inserted carefully, kept away from children, and removed before serving unless you clearly warn guests. For small cupcakes, make mini horns that do not need internal support.
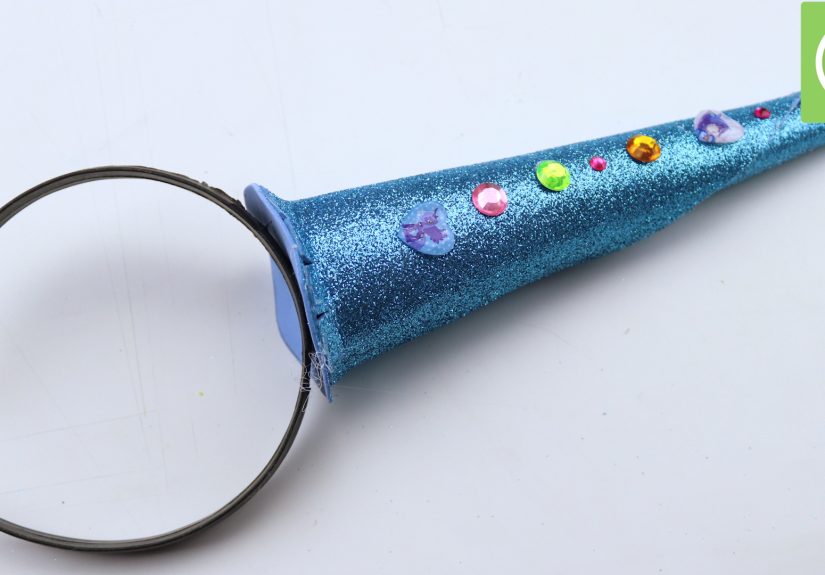
Method 1: How to Make a Unicorn Horn from Cardstock
This is the easiest and fastest way to make a unicorn horn. It is ideal for unicorn party favors, school crafts, costume accessories, or “we need magic in 20 minutes” emergencies. The finished horn can be attached to a headband, elastic string, party hat base, or even a paper mask.
Materials
- Gold, white, pastel, or glitter cardstock
- Pencil
- Scissors
- Glue stick, tacky glue, double-sided tape, or hot glue
- Thin elastic, ribbon, or a plain headband
- Optional: stickers, gems, markers, glitter glue, metallic cord, faux flowers
Step-by-step instructions
- Draw a curved triangle. On the back of your cardstock, draw a tall triangle with a slightly curved bottom edge. A good beginner size is about 7 inches tall and 5 inches wide at the base.
- Cut out the shape. Cut slowly so the edges stay neat. If young children are crafting, adults can pre-cut the horn pieces.
- Roll the cardstock into a cone. Start at one side and curl the cardstock toward the opposite edge. Adjust the shape until the point is narrow and the base is round.
- Secure the seam. Use double-sided tape for a clean finish or hot glue for a stronger hold. Press the seam until it stays closed.
- Add the spiral. Wrap metallic cord, yarn, ribbon, or glitter glue around the cone from base to tip. Space the lines evenly for that classic unicorn look.
- Attach the horn. Hot glue it to a headband, punch two small holes near the base and tie elastic through them, or glue it to a paper crown.
- Decorate the base. Add faux flowers, paper ears, rhinestones, or colorful paper fringe to hide the attachment point.
Cardstock unicorn horn tips
If the horn collapses, your cardstock may be too thin. Use heavier cardstock or glue a second cone inside the first. If the point looks blunt, roll the cone tighter at the top before securing the seam. If the horn leans on the headband, flatten the base slightly and glue a small felt or cardstock circle underneath to “sandwich” the headband between two layers.
For a party activity, prepare the cones in advance and let guests decorate them. Put out sticker sheets, washable markers, adhesive gems, and pre-cut ears. This keeps the craft moving and prevents a line of impatient mini-unicorns waiting for one glue gun like it is a theme park ride.
Method 2: How to Make a Soft Felt Unicorn Horn Headband
A felt unicorn horn is the best choice for a comfortable, reusable costume. It is soft, lightweight, and cute enough for birthday parties, pretend play, Halloween, school spirit days, and family photos where at least one adult will pretend they are “only wearing it for the kids.” Sure. We believe you.
Materials
- White, gold, or pastel felt or fleece
- Poly-fill stuffing or cotton balls
- Plain plastic or fabric-covered headband
- Needle and strong thread, embroidery floss, yarn, or metallic cord
- Hot glue gun or fabric glue
- Scissors
- Optional: felt flowers, faux flowers, leaves, rhinestones, glitter felt
Step-by-step instructions
- Cut the horn shape. Cut a long triangle from felt. A 6-inch-tall horn works well for most headbands. For a taller dramatic horn, use a longer triangle and add firmer stuffing.
- Form the cone. Fold the triangle lengthwise with the good side facing inward. Glue or sew the long edge, leaving the bottom open.
- Turn and stuff. Turn the cone right side out. Push stuffing into the tip first, then fill the rest of the horn until it is plump but not lumpy.
- Close the bottom. Glue or stitch a felt circle over the open base. Trim away extra felt so the horn sits flat.
- Create the spiral. Anchor thread, yarn, or cord near the tip. Wrap it diagonally around the horn toward the base. Pull gently to create grooves, but not so tightly that the horn bends.
- Attach to the headband. Place the horn in the center of the headband. Glue it down, then glue another felt circle underneath so the headband is trapped securely between the horn and the backing piece.
- Add ears. Cut two large ear shapes from white felt and two smaller inner-ear shapes from pink or pastel felt. Glue the smaller pieces to the larger ones, then attach the ears on both sides of the horn.
- Decorate the base. Cover the glue area with felt flowers, faux flowers, leaves, ribbon, or gems.
How to make the felt horn look professional
The difference between “cute craft” and “where did you buy that?” is usually the spiral. Use strong thread for subtle grooves, gold cord for a classic royal look, or pastel yarn for a soft storybook style. Start the spiral at the back of the horn so the knots and glue dots are less visible.
Another professional trick is symmetry. Place the horn in the center first, then position the ears equally on both sides. If the headband is narrow, use small flowers to cover the base without making it bulky. If the headband is for a child, keep decorations lightweight so it does not slide forward.
Troubleshooting a felt unicorn horn
If your horn is floppy, add more stuffing or insert a small rolled piece of cardstock inside before closing the base. If the horn keeps peeling off the headband, rough up the plastic headband slightly with sandpaper before gluing, or wrap the headband with felt first. If glue strings are everywhere, wait until the glue cools and pull them away gently. Do not fight hot glue strings while they are warm. They are tiny craft noodles with attitude.
Method 3: How to Make an Edible Fondant Unicorn Horn
A fondant unicorn horn is perfect for unicorn cakes, cupcakes, cookies, and dessert tables. It creates a polished bakery-style look without needing special molds. You can make one large cake topper or several mini horns for cupcakes. The key is giving the horn enough time to firm up before placing it on the dessert.
Materials
- White fondant or gum paste
- Cornstarch or powdered sugar for dusting
- Small rolling surface
- Edible gold paint, luster dust, or food-safe shimmer
- Small food-safe paintbrush
- Water or edible glue
- Optional: toothpick or skewer for support on larger cake toppers
Step-by-step instructions
- Knead the fondant. Work the fondant until it is smooth and flexible. If it feels sticky, dust your hands lightly with cornstarch or powdered sugar.
- Roll two tapered ropes. Divide the fondant into two equal pieces. Roll each piece into a rope that is thicker at one end and thinner at the other.
- Join the tips. Press the two thin ends together to form the horn point.
- Twist the ropes. Carefully twist the two ropes around each other, keeping the taper even. The thicker ends become the base of the horn.
- Shape the horn. Roll it gently between your palms to smooth the twist while keeping the spiral visible. Flatten the base slightly so it can stand.
- Let it dry. Place the horn on parchment paper and let it firm up. Mini horns may need several hours; larger horns are best made a day ahead.
- Paint it. Brush with edible gold paint or apply food-safe luster dust mixed with a small amount of clear extract, depending on the product instructions.
- Place on the cake. Insert the horn into frosting or attach it with a small amount of buttercream. If using a support stick, make sure guests know it is there and remove it before serving.
Fondant unicorn horn tips
For cupcakes, keep the horns short and light. For a tall cake, make the horn thicker at the base so it does not topple. Gum paste dries firmer than fondant, so it is helpful for larger toppers. If you only have fondant, knead in a little tylose powder if available, or simply make the horn ahead of time and let it dry longer.
To create a clean gold finish, apply thin layers rather than one heavy coat. Heavy edible paint can pool in the spiral grooves and look blotchy. Let the first coat dry, then add another if needed. For a pastel unicorn cake, try pearl shimmer, rose gold, lavender, or rainbow dust instead of classic gold.
Design Ideas for Your Unicorn Horn
Once you understand the basic cone-and-spiral structure, you can customize your unicorn horn for almost any theme. A white horn with gold cord feels classic. A rainbow cardstock horn feels playful. A blush pink felt horn with roses looks dreamy for a birthday crown. A black glitter horn with silver flowers can turn the same project into a mystical Halloween costume.
Color combinations that work beautifully
- Classic unicorn: white horn, gold spiral, pink ears, pastel flowers
- Rainbow party: rainbow cardstock, silver glitter, colorful gems
- Elegant cake topper: white fondant, edible gold paint, pearl accents
- Halloween unicorn: black felt, purple cord, dark roses, silver stars
- Princess style: blush horn, rose gold spiral, soft pink flowers
How to size a unicorn horn
For toddlers and young children, keep wearable horns small, soft, and lightweight. A horn between 4 and 5 inches tall is usually enough. For older kids or adults, 6 to 8 inches creates a stronger costume effect. For cake toppers, match the horn to the cake height. A 6-inch cake usually looks balanced with a horn around 3 to 5 inches tall.
Common Mistakes to Avoid
Making the base too narrow
A narrow base may look elegant at first, but it makes the horn unstable. Whether you are using cardstock, felt, foam, or fondant, the base needs enough width to support the height. If the horn wobbles, widen the base or add a backing circle.
Using too much glue
More glue does not always mean stronger. Big blobs of hot glue can create bumps, show through felt, or make cardstock wrinkle. Use thin lines of glue and press firmly until the bond sets.
Skipping drying time
Paint, glitter glue, and fondant all need time to dry. If you rush, the horn can smear, sag, or stick to everything nearby. Give each layer a chance to set before handling it.
Forgetting comfort
A beautiful headband is not useful if it pinches, slides, or feels heavy. Wrap plastic headbands with felt or ribbon for comfort, keep decorations balanced, and avoid sharp wire ends or scratchy materials near the wearer’s head.
Which Unicorn Horn Method Is Best?
The best method depends on your project. Choose cardstock if you want speed, low cost, and easy decorating. Choose felt if you want a comfortable costume accessory that can survive more than one afternoon of galloping through the living room. Choose fondant if your unicorn horn is headed for a dessert table and needs to be edible, photogenic, and worthy of dramatic cake-cutting applause.
If you are crafting with a group, the cardstock method is easiest to scale. If you are making one special costume, the felt method gives the best result. If you are decorating a unicorn birthday cake, the fondant method is the clear winner. And if you are making all three, congratulationsyou may now be the official unicorn department of your household.
Real-Life Experience: What I Learned Making Unicorn Horns
The first thing you learn when making a unicorn horn is that cones are sneakier than they look. On paper, the project sounds simple: roll a triangle, glue it, add sparkle, become magical. In real life, the cone may roll too wide, too narrow, or into a shape that looks less like a unicorn horn and more like a confused party hat. The trick is to adjust before gluing. Dry-fit the shape, look at it from the front, and only commit when the point and base look balanced.
With cardstock horns, I found that double-sided tape is cleaner than liquid glue, especially when making several horns at once. Glue sticks are fine for decorating, but the seam of the cone needs something stronger. Hot glue works quickly, but it can create lumps if you use too much. A thin line is enough. I also learned that glitter cardstock is gorgeous but stubborn. It does not always want to stay curled, so it helps to gently curve it around a pencil or marker before forming the cone.
Felt horns are more forgiving. If the shape is slightly uneven, stuffing and spiral thread can hide a lot of sins. That is one reason this method is my favorite for costumes. The moment you wrap gold cord around the stuffed cone, it suddenly looks intentional. Before the cord, it may resemble a tiny fabric carrot. After the cord, it becomes a unicorn horn with confidence. The biggest lesson is not to overstuff the horn. Too much filling can make the sides bulge; too little makes it floppy. Aim for firm but squeezable.
Attaching the horn to the headband is where patience pays off. I have had horns lean forward, slide sideways, and once attempt a full escape from the headband five minutes before a party. The strongest solution is the sandwich method: glue the horn on top, then glue a felt circle underneath the headband so the headband is trapped between layers. Cover the top base with flowers, leaves, or ribbon, and nobody will know there is practical engineering under all that cuteness.
Fondant horns taught me a different lesson: make them earlier than you think. A fondant horn may look ready after an hour, but if it is large, the inside can still be soft. When placed on a cake too soon, it may tilt. A leaning unicorn horn is funny, but not always the vibe you want after spending hours smoothing buttercream. Making the horn a day ahead gives it time to firm up. Painting it gold after it dries also creates a cleaner finish.
The best part of making unicorn horns is how personal they become. Kids rarely follow the “perfect” sample, and that is the fun of it. One child will add twenty stickers. Another will insist on a rainbow lightning horn. Someone will put flowers on the back, gems on the ears, and announce that their unicorn is from space. Let them. A unicorn horn is not supposed to be serious. It is supposed to invite imagination, dramatic posing, and possibly a few majestic hallway trots.
After trying different materials, my honest recommendation is simple: use cardstock for groups, felt for costumes, and fondant for cakes. Keep the spiral visible, keep the base secure, and do not underestimate the power of flowers to hide messy glue. Most importantly, enjoy the process. A handmade unicorn horn does not need to be flawless to be magical. In fact, the tiny imperfections often make it more charminglike proof that real human hands made something whimsical, sparkly, and slightly ridiculous in the very best way.
Conclusion
Making a unicorn horn is a simple craft with a big visual reward. With cardstock, you can create a quick party-ready horn in minutes. With felt, stuffing, and cord, you can make a soft unicorn horn headband that looks polished and feels comfortable. With fondant, you can build an edible horn that turns an ordinary cake into the star of a magical celebration.
The secret to every method is the same: start with a strong cone shape, add a clean spiral, secure the base, and decorate with personality. Whether your unicorn horn is gold, rainbow, glittery, floral, edible, or proudly over-the-top, it should feel fun to make and even more fun to wear, display, or eat. After all, unicorns are mythical creatures. They are not here to judge your glue lines.