Table of Contents >> Show >> Hide
- What You Need Before You Start
- Wood Filler, Spackle, Putty, or Caulk: Which One Should You Use?
- How to Fill Nail Holes in Trim: 13 Steps
- Step 1: Inspect the Trim in Good Light
- Step 2: Set Any Proud Nails Below the Surface
- Step 3: Clean Dust, Grease, and Loose Paint
- Step 4: Choose the Correct Filler for the Finish
- Step 5: Apply a Small Amount of Filler
- Step 6: Overfill Slightly
- Step 7: Remove Excess From the Surrounding Trim
- Step 8: Let the Filler Dry Fully
- Step 9: Sand Smooth With Fine-Grit Sandpaper
- Step 10: Check for Dips and Refill if Needed
- Step 11: Caulk Gaps Around the Trim
- Step 12: Prime the Repaired Spots
- Step 13: Paint the Trim for a Seamless Finish
- Common Mistakes to Avoid
- Best Tips for Painted Trim
- Best Tips for Stained Trim
- How Long Does It Take to Fill Nail Holes in Trim?
- Experience Section: What I’ve Learned From Filling Nail Holes in Trim
- Conclusion
Fresh trim can make a room look crisp, expensive, and “yes, I absolutely know where my tape measure is.” But tiny nail holes? Those little dots can ruin the illusion fast. Whether you just installed baseboards, door casing, crown molding, shoe molding, or window trim, learning how to fill nail holes in trim is the final detail that separates a weekend DIY job from a professional-looking finish.
The good news is that nail-hole repair is not complicated. The bad news is that rushing it can leave bumps, craters, shiny patches, or sad little shadows that appear the moment sunlight hits the wall. The secret is choosing the right filler, pressing it in properly, sanding carefully, and finishing with primer and paint. Think of it as cosmetic surgery for your trim, but cheaper and with fewer awkward waiting-room magazines.
This guide walks you through 13 clear steps for filling nail holes in trim, including what materials to use, when to choose wood filler versus spackle or caulk, how to sand without damaging the surrounding paint, and how to make the repair disappear.
Note: If your home was built before 1978, be careful before sanding old painted trim. Older paint may contain lead. Use lead-safe work practices or hire a certified professional if you are unsure.
What You Need Before You Start
Gathering everything first saves you from doing the classic DIY shuffle: one hand covered in filler, the other hand opening drawers like a raccoon searching for snacks.
Tools and Materials
- Wood filler, lightweight spackle, or color-matched wood putty
- Flexible putty knife or plastic scraper
- Fine-grit sandpaper, usually 180 to 220 grit
- Tack cloth or damp microfiber cloth
- Painter’s tape, if needed
- Primer or stain-blocking primer
- Matching trim paint or touch-up paint
- Small angled brush
- Nail set and hammer
- Paintable acrylic latex caulk for gaps, not holes
- Safety glasses and dust mask
Wood Filler, Spackle, Putty, or Caulk: Which One Should You Use?
Before you start filling nail holes in trim, choose the right material. This is where many DIY repairs go sideways. The products look similar on the shelf, but they do different jobs.
Wood filler is usually the best choice for painted wood trim, especially on baseboards, casing, and molding. It dries hard, can be sanded smooth, and accepts primer and paint well. Use it for raw wood, primed trim, or painted trim that will be repainted.
Lightweight spackle can work for very small nail holes in painted trim, especially if the trim is MDF or already painted white. It sands easily, but it may not be as durable as wood filler on edges or high-contact areas.
Wood putty is best for finished or stained trim when you do not plan to sand or repaint the entire piece. It stays slightly flexible and often comes in wood-tone colors. Use it after staining or finishing, then wipe away the excess.
Caulk is for gaps between trim and walls, corners, or joints where materials meet. It is not the best product for nail holes because it cannot be sanded flat. Save caulk for seams and cracks, not tiny round divots.
How to Fill Nail Holes in Trim: 13 Steps
Step 1: Inspect the Trim in Good Light
Start by looking closely at the trim from different angles. Natural side light from a window is brutally honest, which is helpful here. Mark each nail hole with a small piece of painter’s tape if there are many. Also check for dents, scratches, open miter joints, and gaps along the wall.
This inspection helps you avoid painting the trim and then discovering a missed hole later. Few things are more annoying than finishing a project and seeing one tiny crater staring back at you like it pays rent.
Step 2: Set Any Proud Nails Below the Surface
If a nail head is sticking up, do not simply smear filler over it. Use a nail set and hammer to tap the nail slightly below the surface of the trim. A small recess gives the filler something to grip and prevents a metal bump from showing through the finish.
Be gentle. You are not driving railroad spikes. One or two light taps should be enough. If the trim is MDF, soft pine, or delicate molding, use extra care because the surface can dent easily.
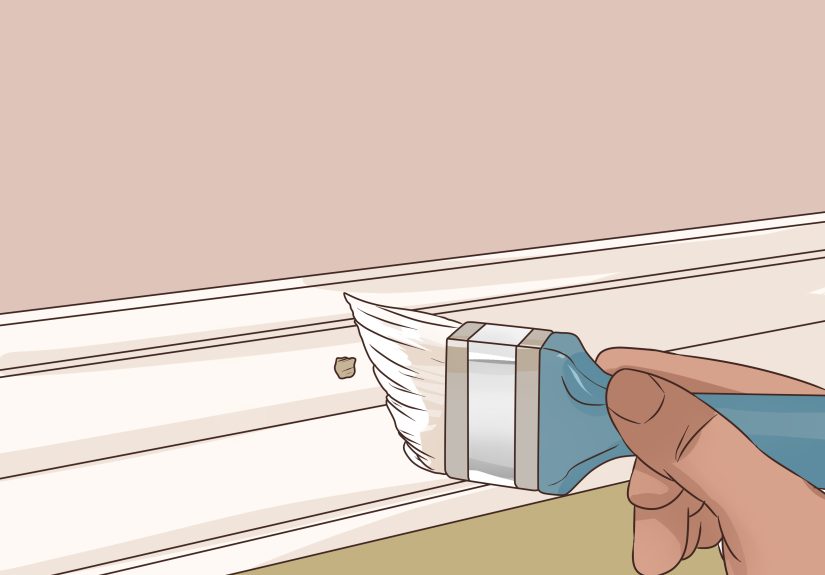
Step 3: Clean Dust, Grease, and Loose Paint
Filler sticks best to a clean, dry surface. Wipe the trim with a damp microfiber cloth to remove dust. If the trim is in a kitchen, bathroom, or near a handrail, it may have oils or grime on it. Use a mild cleaner, rinse with a damp cloth, and let the area dry completely.
Loose paint or crumbly material around the nail hole should be removed before filling. A smooth repair begins with a stable surface.
Step 4: Choose the Correct Filler for the Finish
For painted trim, use a sandable wood filler or high-quality lightweight spackle. For stained trim, test a stainable filler or use color-matched putty after the final finish. Stain can behave differently on filler than it does on real wood, so always test first on scrap wood or an inconspicuous area.
If you are repairing exterior trim, choose a product rated for exterior use. Outdoor trim expands, contracts, and deals with moisture, sun, and temperature swings. Interior-only filler may fail outside faster than a cheap umbrella in a thunderstorm.
Step 5: Apply a Small Amount of Filler
Scoop a small amount of filler onto a putty knife. Press it firmly into the nail hole rather than just wiping it over the surface. The goal is to pack the hole completely so it does not shrink into a dimple later.
For tiny brad-nail holes, you can also use your fingertip, especially with soft filler. Push the product in, then wipe across the hole from two directions. This helps fill the entire recess instead of leaving an air pocket.
Step 6: Overfill Slightly
Leave the filler just a little higher than the trim surface. This tiny mound gives you material to sand flush after it dries. Do not leave a mountain. A small bump is good; a frosting swirl is not.
Overfilling is especially important because many fillers settle slightly as they dry. If you scrape the filler perfectly flat while wet, you may return later to find a shallow dimple. That means another coat, more drying time, and more muttering under your breath.
Step 7: Remove Excess From the Surrounding Trim
Use the edge of the putty knife to remove extra filler around the hole. Keep the blade almost flat and scrape gently. The cleaner your application, the less sanding you will need later.
This matters most on detailed trim with grooves, curves, or decorative profiles. Filler trapped in trim details can dry into little ridges that are hard to sand without flattening the profile. Work neatly now and future-you will send a thank-you card.
Step 8: Let the Filler Dry Fully
Drying time depends on the product, hole depth, temperature, humidity, and how much filler you used. Shallow repairs may dry within a few hours, while deeper holes or layered repairs may need much longer. Follow the product label rather than guessing.
Do not sand too early. If the surface skins over but the inside is still soft, sanding can tear the filler out of the hole. Touch it lightly. If it feels cool, rubbery, or soft, give it more time.
Step 9: Sand Smooth With Fine-Grit Sandpaper
Once the filler is fully dry, sand it smooth with 180- to 220-grit sandpaper. Sand lightly and stay focused on the filled spot. The goal is to level the patch, not remove half the trim’s personality.
For flat baseboards and casing, wrap sandpaper around a small sanding block for even pressure. For curved molding, fold the sandpaper and use your fingers carefully so you do not flatten decorative edges.
Step 10: Check for Dips and Refill if Needed
After sanding, inspect the repair again under good light. Run your fingertip over the area. If you feel a dip or see a tiny crater, apply a second thin coat of filler. Let it dry and sand again.
Professional-looking trim often comes from two light fills rather than one heavy blob. Patience here pays off. Paint magnifies flaws, especially glossy trim paint, so fix the surface before opening the paint can.
Step 11: Caulk Gaps Around the Trim
Now handle gaps between the trim and wall, corners, or seams. Use paintable acrylic latex caulk for these areas. Cut a small opening in the caulk tube, apply a thin bead, and smooth it with a damp finger or caulk tool.
Remember: filler is for holes in the trim; caulk is for gaps around the trim. Using the right product in the right place gives you a cleaner, more durable result.
Step 12: Prime the Repaired Spots
Primer helps prevent flashing, which is when repaired areas show through paint as dull, shiny, or differently textured patches. Spot-prime each filled nail hole and any sanded areas. If the trim has many repairs, priming the entire piece may produce a more even finish.
For raw wood, knots, stains, or heavy repairs, use a suitable bonding or stain-blocking primer. Let the primer dry according to the label before painting.
Step 13: Paint the Trim for a Seamless Finish
Finish with matching trim paint. Use a small angled brush and apply thin, even coats. If you are touching up only a few holes, feather the paint outward so the edge blends into the existing finish. For newly installed trim, paint the entire length for the most consistent sheen.
Semi-gloss and satin paints are popular for trim because they are easier to clean, but they also reveal surface flaws more than flat paint. That is why smooth filling, careful sanding, and primer matter so much.
Common Mistakes to Avoid
Using Caulk in Nail Holes
Caulk may look fine while wet, but it usually leaves a soft, unsandable spot. Paint can highlight it later. Use sandable filler for nail holes and save caulk for seams.
Sanding Too Aggressively
Heavy sanding can remove surrounding paint, flatten trim details, or create shiny burnished areas. Use fine-grit sandpaper and light pressure.
Skipping Primer
Paint alone does not always hide filler. Primer seals the repair and helps the final coat look even.
Not Testing Stainable Filler
Stained trim is less forgiving than painted trim. Some fillers absorb stain differently, leaving a patch that looks too light, too dark, or oddly cloudy. Always test first.
Best Tips for Painted Trim
For painted trim, the simplest formula is: fill, dry, sand, prime, paint. Use a high-quality wood filler for durable repairs. On MDF trim, lightweight spackle can work well for tiny nail holes, but wood filler is often better for edges or deeper dents.
If your trim is already painted and you only need to touch up a few holes, use the exact same paint if possible. Even “white” trim paints can vary wildly. One white may look creamy, another gray, and another like it was mixed during a snowstorm.
Best Tips for Stained Trim
Stained trim requires more planning. If the trim is unfinished, you may be able to use stainable wood filler before staining, but test it first. If the trim is already stained and sealed, color-matched putty or wax filler is often the better option. Press it into the hole after finishing, wipe away excess, and blend the color carefully.
When choosing a putty color, match the darker grain lines rather than the lightest background tone. A slightly darker dot often blends better than a pale spot, which can look like a tiny speck of drywall dust trapped forever in your beautiful woodwork.
How Long Does It Take to Fill Nail Holes in Trim?
For one room of baseboards, the hands-on work may take less than an hour. Drying time is the real schedule-maker. A quick-drying filler may be ready to sand the same day, while deeper repairs may need overnight drying. Add time for sanding, priming, and painting.
If you are installing new trim throughout a house, fill nail holes in batches. Do all the filling first, then move on to sanding, then priming, then painting. This assembly-line method is faster and helps maintain a consistent finish from room to room.
Experience Section: What I’ve Learned From Filling Nail Holes in Trim
The first thing experience teaches you is that nail holes are sneaky. When the trim is raw or freshly installed, they look small and harmless. After paint goes on, they suddenly become tiny craters with dramatic lighting. That is why I always inspect trim from the side, not just straight on. A flashlight held at a low angle will reveal dips, proud filler, scratches, and missed holes before paint makes them famous.
Another lesson is that less filler is usually better, but too little filler is worse. The sweet spot is a slight overfill. A thin smear over the top of a hole rarely works because it does not pack the recess. Pressing filler into the hole matters. I like using a flexible putty knife for flat trim and a fingertip for tiny brad-nail holes, especially on painted baseboards. The fingertip method is not glamorous, but neither is staring at 90 unfilled nail holes while questioning your life choices.
Drying time also deserves respect. Many beginners sand as soon as the surface looks dry. That can pull filler out of the hole or leave a gummy patch. If a repair feels cool or soft, it is not ready. On humid days, filler can take longer than expected. I have had better results by filling nail holes near the end of the day, letting everything dry overnight, and sanding the next morning.
For sanding, I have learned to use the lightest touch possible. Aggressive sanding creates a larger repair area, which then needs more primer and paint. On simple flat trim, a small sanding block keeps the surface even. On decorative trim, I fold the sandpaper and work slowly along the profile. The goal is to remove the bump, not redesign the molding.
Primer is the step people love to skip, and it is also the step that prevents many ugly surprises. Filled spots can absorb paint differently than the surrounding trim. Even if the wall color looks perfect, the sheen may flash. Spot-prime small repairs, and if the trim has lots of patches, prime the whole board. It takes extra time, but it is faster than repainting after the flaws show.
Finally, I have learned that caulk and filler should not trade jobs. Caulk is wonderful along the top edge of baseboards, inside corners, and small gaps where trim meets the wall. But in nail holes, it tends to stay flexible and resist sanding. Wood filler belongs in the holes. Caulk belongs in the gaps. When each product does its own job, the final trim looks sharper, cleaner, and much closer to professional work.
Conclusion
Filling nail holes in trim is a small job with a big visual payoff. The process is simple: inspect the trim, set the nails, clean the surface, choose the right filler, overfill slightly, let it dry, sand smooth, prime, and paint. The difference between an average repair and a beautiful one usually comes down to patience. Let the filler dry fully. Sand gently. Do not skip primer. Use caulk only where it belongs.
Once you master these 13 steps, baseboards, door casing, crown molding, and window trim all become easier to finish. Your trim will look cleaner, your paint job will look more expensive, and your nail holes will quietly disappear like they were never invited to the project in the first place.