Table of Contents >> Show >> Hide
- What Is TheC64 USB Joystick?
- Why Add an Atari Joystick Port?
- Understanding the DB9 Atari-Style Joystick Pinout
- How the Modification Works
- Planning the Mod Before Cutting Anything
- Safety and Reliability Considerations
- What Games Benefit Most?
- Advantages of Adding the Port
- Limitations You Should Know
- Step-by-Step Overview
- Practical Experience: What It Feels Like After the Mod
- Conclusion
Retro gaming is full of wonderful contradictions. We want the convenience of HDMI, USB storage, save states, and modern displays, but the moment a joystick feels slightly too modern, our brains start shouting, “This is not how I crashed into the first barrel in 1984.” That is exactly why the idea of adding an Atari joystick port to TheC64 USB joystick is so appealing. It blends modern plug-and-play convenience with the satisfying feel of old-school DB9 controllers, arcade sticks, and beloved Atari-style joysticks.
TheC64 and TheC64 Mini ship with USB joysticks that look retro, but internally they are modern USB devices. They are designed to work with TheC64’s software environment, menus, and built-in games. However, many retro fans already own classic Commodore 64, Atari 2600, Atari 8-bit, Amiga, Sega-compatible, or third-party DB9 joysticks. Some players prefer the click, throw, spring tension, or fire-button feel of those original controllers. Adding a 9-pin Atari-style joystick port to TheC64 USB joystick can turn that USB stick into a practical pass-through adapter, letting a classic joystick communicate through the USB controller hardware.
This article explains the idea, why the mod works, what makes the Atari joystick port so important, what to consider before opening the joystick shell, and what real-world experience feels like after the modification. It is not a magic spell, although if you grew up with a Competition Pro or QuickShot in your hand, it might feel close.
What Is TheC64 USB Joystick?
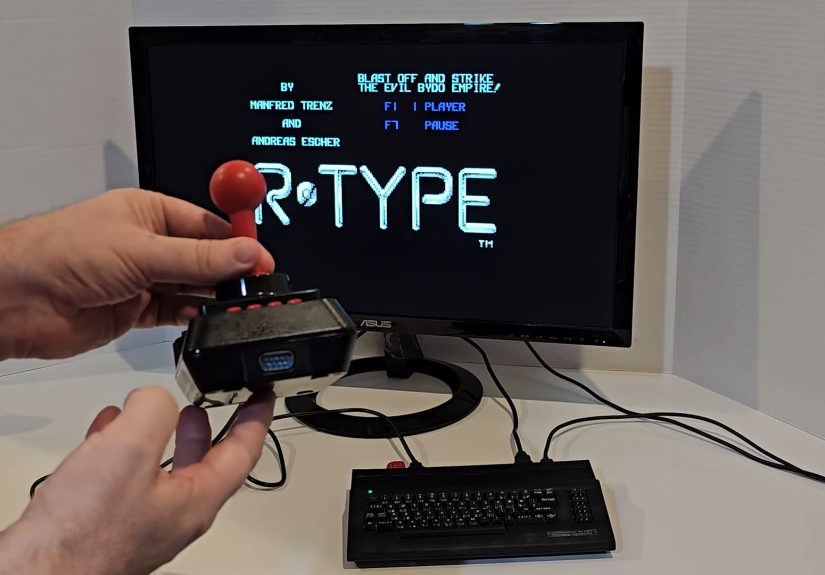
TheC64 is a modern recreation of the Commodore 64 experience. It uses HDMI for video output, includes built-in games, supports USB peripherals, and provides a familiar case design for people who want the C64 feeling without coaxial cables, aging power bricks, or waiting for a cassette deck that sounds like a robot arguing with a fax machine.
The included joystick is styled after classic controllers, but it connects over USB. That means the stick does not plug into a native Commodore 64 control port. Instead, the joystick’s internal circuit board reads the stick directions and buttons, converts those signals into USB input data, and sends them to TheC64. This is convenient, but it also means traditional DB9 joysticks cannot be plugged directly into the console unless you use an adapter or modification.
Why Add an Atari Joystick Port?
The classic Atari joystick port, commonly associated with the 9-pin D-sub connector, became one of the most widely used control standards in home gaming. Atari popularized it, Commodore adopted it, and many other systems and peripherals followed. On a typical one-button digital joystick, the wiring is beautifully simple: directions and fire are basically switches that connect signal lines to ground.
That simplicity is the secret sauce. Since the TheC64 USB joystick already has a circuit board reading up, down, left, right, fire, and other button inputs, a DB9 connector can be wired to the appropriate points on the board. When an external Atari-style joystick is plugged into that new port, it can trigger the same inputs the USB joystick would normally trigger. In practical terms, the modified joystick becomes a USB bridge for classic controllers.
The Big Benefit: Real Retro Feel
The biggest reason to do this mod is feel. Emulation can reproduce graphics, sound, timing, and game logic, but a joystick is physical. It has resistance, travel, click, grip shape, and button position. Playing Impossible Mission, Jumpman, California Games, or Uridium with a controller that feels “right” can change the whole experience.
Some players like stiff microswitch sticks. Others prefer the softer throw of older Atari-style controllers. Some want a large arcade-button build. Others just want to use the joystick they already own. Adding an Atari joystick port makes TheC64 setup more flexible without replacing the whole system.
Understanding the DB9 Atari-Style Joystick Pinout
A standard Atari-style joystick connector uses a 9-pin layout. For basic digital joystick use, the important lines are usually:
- Pin 1: Up
- Pin 2: Down
- Pin 3: Left
- Pin 4: Right
- Pin 6: Fire
- Pin 8: Ground
Pins 5, 7, and 9 may be used for paddles, analog functions, or power depending on the system and accessory. On many simple joystick mods, only the direction, fire, and ground lines are required. However, some advanced adapters or wireless DB9 solutions may need 5V power on pin 7. That is where the mod becomes more interesting, and also where careful planning matters.
The original Commodore 64 control ports were more than “just joystick holes.” They also supported paddles, mice, and light pens through additional lines and chips inside the C64. TheC64 USB joystick, however, is not a full original C64 control-port replica. A DB9 port added to the joystick generally works as a way to pass simple digital joystick inputs into the existing USB joystick board. Expecting full paddle or mouse behavior from a basic wiring mod would be optimisticlike expecting a floppy disk to load faster because you asked politely.
How the Modification Works
The basic concept is straightforward. Inside TheC64 USB joystick, the stick and buttons connect to a PCB. When you move the joystick up, a switch closes. When you press fire, another switch closes. The USB board detects those switch closures and sends input to TheC64.
The mod adds a female DB9 connector to the joystick shell or a replacement 3D-printed base. Wires are then connected from the DB9 pins to the correct switch points on the joystick PCB. When an external classic joystick is plugged into the DB9 port, its internal switches close the same circuits as the built-in joystick switches. The USB board does not necessarily know or care whether the signal came from the original stick or an attached DB9 controller. It simply sees input.
Typical Parts Used
A clean Atari joystick port mod may use:
- A panel-mount female DB9 connector
- Thin insulated hookup wire or ribbon cable
- Soldering iron and solder
- Heat-shrink tubing or insulation tape
- Multimeter for continuity testing
- Small screwdrivers
- Drill, rotary tool, or 3D-printed replacement base
- Optional resistors or protective components, depending on design
The neatest builds avoid simply hacking a rough hole into the joystick housing. A replacement 3D-printed base can provide a proper mounting location for the DB9 connector, making the mod look intentional rather than like the joystick lost a fight with a kitchen drawer.
Planning the Mod Before Cutting Anything
Before touching the soldering iron, map the job. TheC64 joystick may have different PCB revisions, so do not assume every online photo matches your unit exactly. Open the joystick carefully, inspect the board, and trace the switch contacts. A multimeter in continuity mode is your best friend here. It can tell you which pad connects to ground and which pad is activated by each direction or button.
Label every planned connection before soldering. A simple table can prevent comedy and tragedy:
| DB9 Pin | Function | Connects To |
|---|---|---|
| 1 | Up | Up switch signal on PCB |
| 2 | Down | Down switch signal on PCB |
| 3 | Left | Left switch signal on PCB |
| 4 | Right | Right switch signal on PCB |
| 6 | Fire | Main fire switch signal on PCB |
| 8 | Ground | Common ground on PCB |
For a basic digital joystick, that may be enough. If you want to support powered adapters, wireless DB9 receivers, or special controllers, you need to think carefully about pin 7 and 5V. Adding power can expand compatibility, but it also increases the risk if something is wired incorrectly. Measure twice, solder once, and do not let “probably fine” become your electronics philosophy.
Safety and Reliability Considerations
Hardware mods are rewarding, but they can damage equipment if rushed. Unplug everything before opening the joystick. Do not solder while the joystick is connected to TheC64 or a computer. Keep solder joints small and clean. Avoid blobs that can bridge nearby pads. Strain-relieve wires so they do not snap when the joystick is moved or when a DB9 plug is inserted.
The DB9 connector should be mounted securely. If the connector flexes every time a joystick is plugged in, the solder joints will eventually take the stress. Use screws, a proper panel mount, or a printed bracket. Also make sure the connector does not touch components inside the shell when closed.
Testing should be gradual. First test the original USB joystick after reassembly. Then test continuity at the DB9 port with no controller attached. Then plug in a simple known-good one-button joystick. Try directions in a menu or a game where input is obvious. If up acts like fire or left behaves like down, stop and recheck the wiring. The joystick is not haunted; it is just wired incorrectly.
What Games Benefit Most?
This modification is most noticeable in games where timing, diagonals, and button response matter. Platformers, shooters, maze games, sports games, and arcade conversions often benefit from a joystick that feels comfortable and predictable. Games like Jumpman, Paradroid, Uridium, Impossible Mission, California Games, and Boulder Dash can feel more authentic with a classic-style stick.
TheC64 also supports loading additional games from USB, depending on file setup and firmware features. That makes controller flexibility even more useful. Some C64 games expect joystick port 2, while others use port 1. Modern firmware and settings can help, but the right physical controller still matters. Retro gaming often lives in small details: a half-second jump, a diagonal press, a fire button that lands exactly under your thumb.
Advantages of Adding the Port
1. More Controller Choice
The obvious win is that you can use different Atari-style DB9 joysticks. That includes original controllers, modern reproductions, arcade builds, and specialty sticks. Instead of being limited to one USB joystick design, you can choose the controller that fits the game.
2. Cleaner Setup Than a Separate Adapter
Dedicated DB9-to-USB adapters exist, but building the port into TheC64 joystick creates an all-in-one solution. You plug the modified USB joystick into TheC64, then plug your classic controller into the joystick. Fewer boxes, fewer cables, fewer mystery dongles hiding behind the TV.
3. Preserves the Original Console
This mod is performed on the joystick, not on TheC64 console itself. That is a big psychological advantage. Modifying a controller feels less intimidating than cutting into the main unit. If you keep the work tidy, the joystick becomes a useful accessory rather than a risky console surgery.
4. Great for Experimenters
Retro tinkerers love projects that are simple enough to finish in an afternoon but useful enough to keep using. This mod hits that sweet spot. It involves basic wiring, practical problem solving, and a visible result every time you play.
Limitations You Should Know
This is not a universal solution for every classic controller ever made. A simple Atari-style digital joystick is the ideal target. More complicated controllers may use extra buttons, special electronics, analog lines, or power in ways the basic mod does not support.
Sega Genesis or Mega Drive controllers, for example, physically use a similar 9-pin connector, but their internal behavior is not always identical to a simple Atari joystick. Some may work partially, some may require special handling, and some should not be connected casually without understanding the wiring. When in doubt, research the exact controller and test carefully.
Another limitation is menu control. TheC64 joystick has multiple buttons for menu access and system functions. A one-button DB9 joystick will not magically gain all those buttons. You may still need the original joystick buttons, a keyboard, or TheC64 menu controls for certain functions. The DB9 joystick is best thought of as a gameplay controller, not a complete replacement for every USB joystick feature.
Step-by-Step Overview
The following is a general overview, not a one-size-fits-all wiring diagram. PCB layouts can vary, and your joystick may not match someone else’s photos.
Step 1: Open the Joystick
Remove the screws and carefully separate the shell. Watch for small parts, wires, and buttons that may shift when opened. Take photos before moving anything. Future you will appreciate this. Future you is forgetful.
Step 2: Identify Switch Contacts
Use a multimeter to identify the contacts for up, down, left, right, fire, and ground. Press each joystick direction and button while testing continuity. Write down the correct pads.
Step 3: Choose the DB9 Location
Decide where the DB9 connector will mount. A flat area on the base is usually best. A 3D-printed replacement base can make the installation cleaner and stronger.
Step 4: Solder the Wires
Connect DB9 pins 1, 2, 3, 4, 6, and 8 to the matching PCB points. Keep wires short but not tight. Use heat-shrink tubing or insulation where needed.
Step 5: Test Before Final Assembly
Before closing the shell, test continuity and inspect every solder joint. Look for accidental bridges, loose strands, or wires that may be pinched.
Step 6: Reassemble and Play
Close the joystick, connect it to TheC64, and test with a simple game. Start with basic movement and fire. Once everything behaves correctly, celebrate responsibly by losing three lives in the first minute of your favorite classic.
Practical Experience: What It Feels Like After the Mod
The first thing you notice after adding an Atari joystick port to TheC64 USB joystick is not technical. It is emotional. Plugging a DB9 joystick into a modern USB controller feels like connecting two eras with a very small time machine. One side says “modern convenience,” the other says “brown plastic, CRT glow, and why is this level so hard?”
In actual use, the mod makes TheC64 feel more open. Instead of treating the included joystick as the only practical controller, you start thinking of it as a hub. Want a firmer stick for shooters? Plug one in. Want a looser vintage joystick for slower arcade games? Try that. Want a handmade arcade controller with a large fire button? Go for it. TheC64 suddenly becomes less like a sealed mini-console and more like a flexible retro station.
The biggest improvement is comfort. The included joystick is serviceable, but controller preference is deeply personal. Some players like short-throw microswitch controls. Others want something softer and less clicky. During longer sessions, especially with twitchy games, the right joystick can reduce hand fatigue and improve confidence. You stop thinking about the controller and start thinking about the game, which is exactly how it should be.
Another benefit is testing old hardware. Many retro fans have a box of joysticks collected from thrift stores, online auctions, family closets, or mysterious garage-sale bins labeled “computer stuff.” A modified TheC64 joystick gives you a convenient way to try them. Some will work beautifully. Some will reveal sticky directions or weak fire buttons. Some will make you question whether anyone in the 1980s had normal hands. Still, it is fun.
There are small annoyances. A one-button joystick does not handle TheC64 menu functions by itself, so you may still reach for the built-in buttons or a keyboard. Also, not every DB9 controller should be treated as identical. Simple Atari-compatible joysticks are the safest and most predictable. More complex controllers require research. The mod rewards patience, not guessing.
From a build perspective, the most satisfying version is the clean one: a properly mounted connector, tidy internal wiring, no loose cable spaghetti, and a shell that closes without force. A 3D-printed base is especially nice because it avoids the “I attacked this with a hot screwdriver” look. Good cable management also matters. When you plug and unplug DB9 controllers, the connector takes physical stress. A secure mount makes the mod feel like a real product rather than a temporary experiment.
In gameplay, the difference depends on the joystick you use. With a solid arcade-style DB9 stick, movement can feel sharper. With an older Atari-style controller, the experience may feel more historically authentic, even if it is not always more precise. That is part of the charm. Retro gaming is not only about perfect performance. Sometimes it is about recreating the slightly stubborn feel of the hardware you remember.
The mod also encourages a deeper understanding of how simple classic controllers really were. A modern USB gamepad can feel like a tiny computer. A classic digital joystick is mostly switches and wires. Up closes a circuit. Fire closes a circuit. Ground ties it together. That simplicity is why the Atari-style port spread so widely and why this modification is possible in the first place.
Overall, adding an Atari joystick port to TheC64 USB joystick is one of those upgrades that feels bigger than its parts list. It does not turn TheC64 into an original breadbin C64, and it does not replace every adapter on earth. But it makes the system more enjoyable, more personal, and more connected to the hardware culture that made the Commodore 64 era so memorable. It is practical nostalgia with a soldering iron.
Conclusion
Adding an Atari joystick port to TheC64 USB joystick is a clever, useful, and very retro-friendly modification. It takes advantage of the simple switch-based design of classic DB9 joysticks and routes those inputs through the existing USB joystick electronics. The result is a controller that can act as a bridge between old-school joysticks and modern TheC64 hardware.
The project is best suited for people comfortable with basic soldering, continuity testing, and careful case work. It is not difficult in concept, but it does require attention to pinout, grounding, mechanical mounting, and controller compatibility. Done well, it gives TheC64 owners more control options, a more authentic playing feel, and a neat little hardware story to tell every time someone asks, “Wait, how is that old joystick plugged into that?”
For retro gamers, that is the fun part. The mod is not only about wires and connectors. It is about making a modern recreation feel a little more like the machine that inspired it. And if it helps you jump a fraction sooner, dodge a pixel faster, or finally survive that one level that has been mocking you since childhood, all the better.