Table of Contents >> Show >> Hide
- What “Hasselback” Means (And Why Squash Loves It)
- The “Best” Hasselback Butternut Squash Formula
- Best Hasselback Butternut Squash Recipe
- Step-by-Step: How To Make Hasselback Butternut Squash
- Why This Recipe Works (Quick Food Science, No Lab Coat Needed)
- Flavor Variations (Same Method, Different Vibes)
- Serving Ideas (So It Doesn’t Just Sit There Looking Pretty)
- Make-Ahead Tips (Because Life Is Busy)
- Storage & Reheating (Food Safety + Texture)
- FAQ: Hasselback Butternut Squash Troubleshooting
- Kitchen Notes & Real-Life Experiences (Extra )
- Conclusion
Some side dishes show up to dinner quietly, do their job, and leave without making eye contact. Hasselback butternut squash is not that dish.
This one arrives wearing a fancy coat, smelling like brown butter and herbs, and politely demanding the center of the table.
The best part? It’s easier than it lookslike eyeliner on a good day.
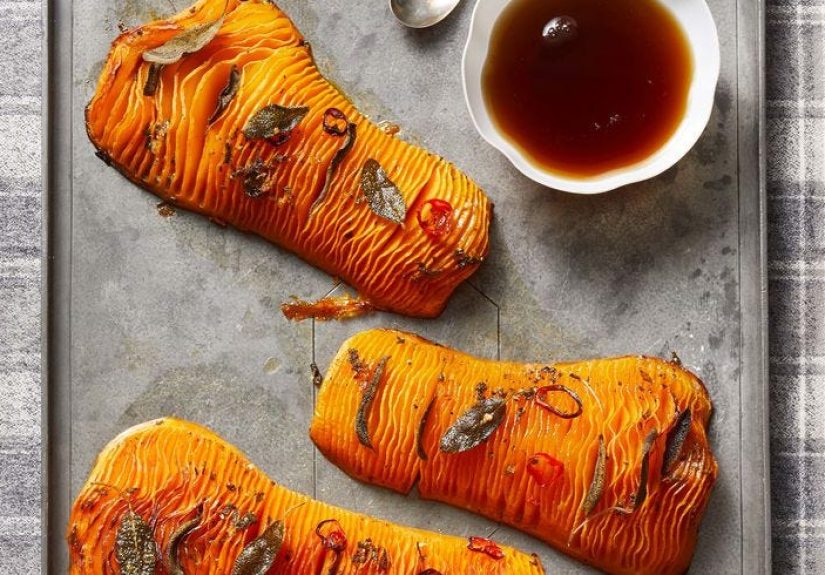
In this guide, you’ll learn exactly how to make Hasselback butternut squash that’s tender in the middle, crisp at the edges,
and soaked with a sweet-tangy glaze that slides into every slice. We’ll cover the foolproof cutting method, the roast-and-baste rhythm,
and a few “choose-your-own-adventure” variations (maple-brown butter, honey-garlic, chile glaze, and more).
What “Hasselback” Means (And Why Squash Loves It)
“Hasselback” is a technique where you slice an ingredient into thin, even cuts without cutting all the way through.
Those little accordion pockets create more surface area for caramelization and more space for flavorthink herbs, glaze, and buttery goodness.
Butternut squash is basically built for this: it’s naturally sweet, roasts into a silky texture, and gets even better when edges brown
and the glaze reduces into a shiny, sticky coat. The slices help heat travel faster, so you get tender squash without waiting until next Tuesday.
The “Best” Hasselback Butternut Squash Formula
After reviewing a range of approaches (brown butter + maple, honey glazes, cider vinegar tang, herb stuffing, and crunchy toppings),
this recipe is the best all-around option because it balances:
- Sweet (maple syrup)
- Nutty-rich (brown butter)
- Bright (apple cider vinegar)
- Savory (garlic + herbs)
- Gentle heat (optional chile flakes)
It’s also flexible: keep it vegetarian, make it holiday-fancy with crunchy breadcrumbs, or go full “weeknight deluxe” with just glaze and herbs.
Best Hasselback Butternut Squash Recipe
Ingredients (Serves 6–8)
- 2 medium butternut squash (about 2 lb each), peeled, halved lengthwise, seeds removed
- 2–3 Tbsp extra-virgin olive oil (for brushing)
- Kosher salt and freshly ground black pepper
Maple Brown-Butter Glaze
- 5 Tbsp unsalted butter
- 1/4 cup pure maple syrup
- 2 Tbsp apple cider vinegar
- 2–3 cloves garlic, finely grated (or 1 roasted garlic head, optional)
- 1–2 tsp chopped fresh sage (plus extra whole leaves for stuffing slices)
- 1 tsp fresh thyme leaves (or 2–3 thyme sprigs)
- Pinch of red chile flakes (optional)
- Pinch of cinnamon or smoked paprika (optional, for warmth)
Optional Crunchy Topping (Holiday Mode)
- 1 cup panko breadcrumbs
- 1/2 cup finely grated Parmesan
- 2 Tbsp butter or olive oil
- 2–3 Tbsp chopped pistachios or pecans
- 2–3 Tbsp dried cranberries (optional, for sweet-tart sparkle)
Equipment
- Rimmed baking sheet
- Parchment paper (recommended)
- Sharp chef’s knife
- Two wooden spoons or chopsticks (your “don’t cut through” safety rails)
- Small saucepan
- Pastry brush or spoon (for basting)
Step-by-Step: How To Make Hasselback Butternut Squash
1) Prep the squash safely
Peel the squash, cut each one in half lengthwise, and scoop out the seeds. If peeling feels like arm day at the gym,
you can soften the skin first by microwaving the whole squash for a few minutes, then cooling slightly before peeling. (This makes it less slippery and more cooperative.)
Place squash halves cut-side down on a parchment-lined baking sheet. Brush the outside with olive oil and season with salt and pepper.
2) Par-roast first (the secret to easier slicing)
Roast at 425°F for 15–20 minutes, just until the squash is slightly tendernot fully cooked.
This step makes Hasselback slicing dramatically easier and helps the squash stay stable while you cut.
3) Make the maple brown-butter glaze
While the squash par-roasts, melt butter in a small saucepan over medium heat. Keep swirling until it turns golden brown and smells nutty.
Add garlic, chopped sage, thyme, maple syrup, vinegar, and (if using) chile flakes. Simmer for 1–2 minutes until glossy and lightly thickened.
Taste and adjust: more vinegar for brightness, more maple for sweetness, more salt if it tastes “flat.”
4) Hasselback slice (without cutting all the way through)
Remove squash from oven and cool 5 minutes so it’s safe to handle. Flip cut-side down (rounded side up).
Place a wooden spoon on each side of a squash half. These act like bumpers so your knife stops before slicing through.
Cut thin slits 1/8 to 1/4 inch apart across the squash, stopping before the bottom.
If you’re a perfectionist, breathe. The squash will still taste amazing if a few slices are wider. We’re cooking, not drafting architectural plans.
5) Stuff + glaze
Gently tuck a few small sage leaves (or thyme) into some of the slits. Brush or spoon glaze generously over the top,
letting it drip into the slices. Don’t be shythis is the whole point of Hasselback.
6) Roast, baste, repeat
Return to the oven (still at 425°F) and roast for 25–35 minutes, basting every 10 minutes with pan juices.
The squash is done when a knife slides in easily and the edges look browned and slightly crisp.
7) Add crunchy topping (optional but highly encouraged)
If using breadcrumbs: toss panko with Parmesan and butter/olive oil. During the last 10 minutes of roasting,
sprinkle over the squash so it turns golden and crunchy.
8) Finish like a pro
Once out of the oven, brush on any remaining glaze. Sprinkle with flaky salt, nuts, and cranberries if you want that festive “I totally planned this” look.
Rest 5 minutes before serving so the glaze thickens slightly and the slices fan out beautifully.
Why This Recipe Works (Quick Food Science, No Lab Coat Needed)
- Par-roasting softens the squash so slicing is safer and cleaner, while helping it cook evenly.
- Hasselback cuts increase surface area, so you get more browning and more places for glaze to seep in.
- Brown butter adds nutty depth that makes squash taste less “sweet vegetable” and more “holiday main character.”
- Cider vinegar balances sweetness so every bite tastes bright, not sugary.
- Basting builds layers of flavor like edible lacquer.
Flavor Variations (Same Method, Different Vibes)
1) Honey-Garlic + Orange Zest
Swap maple for honey, add orange zest, and finish with toasted pepitas.
This version feels like fall sunshine with good manners.
2) Chile-Maple with Bay Leaves (Aromatic + Fancy)
Slip a few bay leaves between slices and add extra chile flakes to the glaze.
The bay leaf aroma gives a subtle, holiday-worthy backdrop that reads “chef-y” without being loud about it.
3) Savory Herb Butter (Less Sweet)
Skip maple entirely. Use browned butter with garlic, thyme, rosemary, and a squeeze of lemon.
Finish with Parmesan breadcrumbs for a savory, roast-chicken-sidekick energy.
4) “Yes, Bacon” (Crowd-Pleaser Mode)
Tuck thin bacon pieces into some slices before the final roast, then finish with a little cheese.
It’s not subtle, but neither is your uncle’s opinion at Thanksgivingso it fits right in.
Serving Ideas (So It Doesn’t Just Sit There Looking Pretty)
- Holiday table: Serve alongside turkey, roasted chicken, or a mushroom-walnut loaf.
- Vegetarian main: Pair with a hearty lentil salad or farro with roasted mushrooms.
- Sauce buddy: A dollop of Greek yogurt with lemon and salt is an excellent contrast to the glaze.
- Leftover upgrade: Chop and toss into grain bowls with kale, chickpeas, feta, and a splash of vinaigrette.
Make-Ahead Tips (Because Life Is Busy)
- Prep the squash: Peel, halve, and seed up to 24 hours ahead. Store covered in the fridge.
- Make the glaze: Cook it ahead and rewarm gently before basting.
- Roast timing: Roast fully, then rewarm at 350°F until heated through, brushing with glaze to refresh shine.
Storage & Reheating (Food Safety + Texture)
Cool leftovers quickly, store in an airtight container, and refrigerate. For best safety, aim to eat refrigerated leftovers within 3–4 days.
Reheat until steaming hot; if you’re using a food thermometer, 165°F is the safe benchmark.
To keep edges from turning sad and soggy, reheat in the oven (350°F) or an air fryer rather than the microwave when possible.
The microwave works fine for speed, but the oven brings back the crisp.
FAQ: Hasselback Butternut Squash Troubleshooting
How do I keep from slicing all the way through?
Use the wooden spoon (or chopstick) method. Place one on each side of the squash half so your knife hits the spoon before it hits “oops.”
My squash isn’t fanning out. What happened?
Usually the cuts are a bit thick or the squash needs more time. Once it’s tender, gently press the top to encourage slices to separate.
Basting also helps the slices loosen as the squash cooks.
Do I really have to peel it?
For Hasselback, peeling gives the smoothest texture and helps the glaze cling. If peeling is a struggle, soften the skin first with a short microwave stint,
then peel carefully once it cools a bit.
What if my glaze is too thin?
Simmer it 1–2 minutes longer. A glaze should lightly coat the back of a spoon. It will thicken more as it cools.
Kitchen Notes & Real-Life Experiences (Extra )
Here’s what “best Hasselback butternut squash” looks like in real kitchenswhere timers go off at inconvenient moments and someone always asks,
“Is this done yet?” while standing directly in front of the oven.
First, the slicing fear is real. Butternut squash is famously stubbornhard skin, awkward shape, and a personality that screams, “Are you sure you want to cook today?”
The par-roast step is the difference between feeling like a confident home cook and feeling like you’re auditioning for a medieval sword-fighting show.
Once the squash has had 15–20 minutes in the oven, the knife glides more easily, the squash stays put, and the slices look cleaner.
Several home cooks swear the “partial cook, then slice” approach is the stress reliever that makes Hasselback squash doable on a weeknight.
Second, basting is not busyworkit’s the moment the dish turns from “roasted vegetable” into “people asking for the recipe before they’ve finished chewing.”
In practice, you’ll baste, walk away, get distracted, and come back to baste again. That’s okay. Even two good bastes will make a difference.
When you do it every 10 minutes, though, the glaze builds into glossy layers, and the edges brown like they’re getting paid for it.
Third, don’t underestimate salt. Butternut squash is sweet, and sweet foods can taste a little one-note without enough salt.
In real kitchens, the most common “something’s missing” moment is fixed by a pinch of kosher salt and a tiny splash more vinegar.
Sweet + salty + tangy is the trio that keeps people going back for “just one more slice” (which is a liethey want three).
Fourth, the toppings are where you can read the room. If you’re feeding a holiday crowd, crunchy breadcrumbs and nuts make it feel special and finished.
If you’re feeding picky eaters, you might skip the cranberries (too “mysterious”) and keep it simple with just glaze and herbs.
If you’re feeding a group that loves bold flavors, add chile flakes or slip bay leaves into the cuts for that subtle aromatic vibe that makes the whole dish smell expensive.
Finally, leftovers are secretly the best part. The next day, Hasselback butternut squash becomes a meal prep superhero:
chop it into chunks and toss with quinoa, arugula, and feta; mash it into a quick soup base with broth; or warm it and top with a fried egg for a brunch moment.
People often assume “fancy holiday side” won’t translate into weekday food, but this one doesbecause the glaze and caramelized edges hold up beautifully.
The only real downside is discovering that you made not nearly enough.
Conclusion
Hasselback butternut squash is the rare recipe that checks every box: gorgeous presentation, legit flavor, and a method you can repeat without sweating.
Par-roast to make slicing easy, cut thin slits with your wooden-spoon safety rails, and roast with a glaze that balances sweet, nutty, and tangy.
Whether you dress it up with crunchy topping or keep it simple and glossy, you’ll get a side dish that tastes like you tried really hard
even if you were just following steps and occasionally whispering, “Please don’t burn.”