
Table of Contents >> Show >> Hide
- What “Retro Remodel” Really Means (and Why Blue Belongs in It)
- Step 1: Choose the Right Blue (Because Lighting Has Opinions)
- Step 2: Demo and Prep (a.k.a. The Part Nobody Posts First)
- Step 3: Paint Order Matters (and It’s Not Just a Preference)
- Step 4: Add the Retro (Without Turning It Into a Costume)
- Step 5: Upgrade Function (Quietly, Like a Design Ninja)
- The “Blue Room” Checklist: A Practical Finish Line
- Common Mistakes (So You Don’t Have to Learn Them the Hard Way)
- Conclusion: A Blue Room That Feels Fresh, Not Frozen in Time
- of Real-World “Blue Room” Experience (What People Usually Don’t Tell You)
There are two kinds of “blue rooms.” The first is the kind in a paint commercial where someone gently leans on a perfectly staged wall and whispers,
“Ahhh.” The second is the kind you inherit from a previous owner who loved wallpaper the way some people love conspiracy theories: in layers.
This article is for the second kindthe real-world Blue Room; Retro Remodel: part renovation, part design reboot, and part “how is there
fabric tacked to the wall?”
A blue room is a classic because it can be calm, cozy, dramatic, fresh, or all four if you pick the right shade and give it the right supporting cast.
A retro remodel is the same vibe: you’re not building a museum diorama of 1958you’re borrowing the best bits (warm wood, playful patterns, iconic silhouettes)
and letting modern life do its thing (better lighting, smarter storage, less mystery glue).
What “Retro Remodel” Really Means (and Why Blue Belongs in It)
“Retro” works when it’s a blend: old bones + updated function + a few deliberate throwbacks. The Remodelaholic Blue Room; Retro Remodel is a perfect
blueprint for this approach. The space started as an upstairs bedroom in rough shape, with multiple layers of wall covering, a lot of patching, and a whole lot
of cleaning before paint ever hit the walls. The punchline is timeless: crisp blue walls plus bright white trim can make an awkward, tired room feel intentional,
cheerful, and (most importantly) clean.
Blue is also one of the easiest colors to steer toward “retro” without turning your home into a theme restaurant. Mid-century and vintage-inspired rooms often
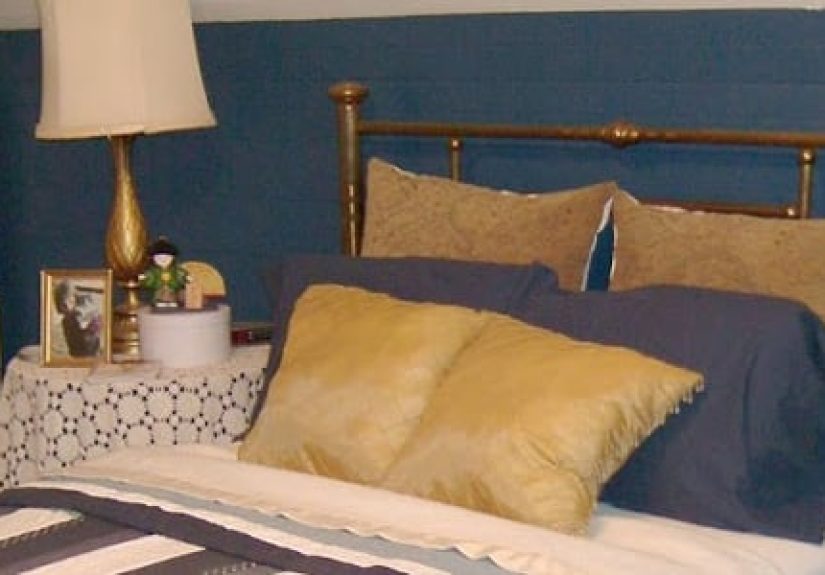
lean on bluesnavy, teal, denim, robin’s egg, ceruleanpaired with warm woods, brass, and a pop color (mustard, orange, coral, avocado). That contrast is the
secret sauce: blue cools the palette, wood warms it up, and the accent color keeps it from feeling like a dentist’s waiting room.
Step 1: Choose the Right Blue (Because Lighting Has Opinions)
Blue’s personality changes with undertones
“Blue” isn’t one colorit’s a family reunion. Some blues have green undertones (often reading a bit warmer and more welcoming), while others lean gray or violet
(which can feel sophisticated… or accidentally gloomy). Paint brands call this out for a reason: undertones determine whether your “calm coastal blue” becomes
“sad aquarium at 6 p.m.”
Pick your blue based on the room’s job
If your blue room is a bedroom, you can lean into softer, quieter shades for a restful vibeor go deep and moody for a cocoon effect.
If it’s a living room, you can push saturation a bit more, especially if you balance it with texture and warm finishes.
- Soft blues (powder, pale denim, mist): airy, friendly, great for smaller rooms.
- Mid-tone blues (classic “blue room” territory): lively without shouting.
- Deep blues (navy, ink, midnight): dramatic, retro-chic, best with warm lighting and warm accents.
Do the sample test like you actually mean it
Paint samples aren’t optional with blueespecially if the room gets cool light. Test swatches on multiple walls and look at them morning, afternoon, and night.
Then look at them again after you’ve turned on the lamps you actually use. (Yes, your room has a “day” personality and a “night” personality. No, they do not
always get along.)
Step 2: Demo and Prep (a.k.a. The Part Nobody Posts First)
Retro remodels often start with archaeology: you don’t just remove wallpaper, you discover what decade it was installed in… and what decade the next layer was
installed in… and why there is a third layer that appears to be held on by vibes and regret. The Remodelaholic project described pulling multiple layers of wall
covering (including fabric) and doing extensive wall cleaning and crack-filling before paintingbecause paint is not a magic eraser; it’s more like makeup: it
highlights texture and tells on you in daylight.
Wallpaper removal: pick your method, protect your sanity
Most reputable DIY guidance boils wallpaper removal down to a few fundamentals: score the surface so moisture can penetrate, use a stripping solution or steam to
soften adhesive, and work in manageable sections. Protect floors, cover outlets, and keep a scraper handybut don’t go full “medieval chisel” on your drywall or
plaster.
- Score gently: enough perforations for solution to penetrate, not enough to crater the wall.
- Use hot water/stripper: spray, wait a few minutes, then peel/scrape.
- Steam for stubborn layers: especially older adhesive or multiple layers.
Old-house reality check: assume lead risk until proven otherwise
If your home was built before 1978, lead-based paint is a real possibility. Renovation work that disturbs painted surfaces can create lead-contaminated dust.
Federal guidance emphasizes lead-safe work practices and careful containment when disturbing old paint. Even if you’re DIYing, it’s smart to treat unknown paint
like it may contain lead: keep dust down, avoid aggressive sanding without proper controls, use appropriate cleanup methods, and protect kids and pets from the work
zone.
Patch like a grown-up: plaster, spackle, and “why is this wall crunchy?”
Many older homes have plaster walls, and patching them is a different game than drywall. Repair guidance often recommends plaster (or plaster-based products) for
larger repairs because it’s more durable and better matched to existing plaster surfaces, while spackle is typically best for small dings and nail holes.
If your room looks like it’s been through a furniture-moving Olympics, plan for patching timeand then plan for patching the patching.
Caulk is the difference between “updated” and “unfinished”
Hairline gaps around trim and corners can make even expensive paint look sloppy. Pro trim-painting advice commonly recommends filling small cracks before painting
and keeping a controlled beadbecause messy caulk lines are basically the home-improvement equivalent of spinach in your teeth.
Step 3: Paint Order Matters (and It’s Not Just a Preference)
In the Remodelaholic blue room remodel, the paint sequence was straightforward: paint trim/doors/ceilings first, then paint the walls. That order is popular
because it’s easier to cut wall paint neatly against finished trim than it is to protect a freshly painted wall while you wrestle with door casings.
Get the finish right
- Ceiling: flat/matte (hides imperfections).
- Walls: eggshell or satin (wipeable, not too shiny).
- Trim/doors: satin or semi-gloss (durable, crisp contrast).
Make blue feel intentional with contrast
Blue walls with white trim is a classic for a reason: it sharpens architectural lines and makes the room feel fresher.
It also reads “retro” when you lean into clean geometrythink bold baseboards, simple curtains, and a few sculptural pieces instead of lots of tiny décor.
Step 4: Add the Retro (Without Turning It Into a Costume)
Mid-century and vintage-inspired design is still popular because it’s practical: furniture is often scaled well for real homes, silhouettes are clean, and the
look plays nicely with modern pieces. The trick is balanceretro vibes, modern function.
Retro shapes that work in a blue room
- Tapered legs: dressers, nightstands, chairsinstant mid-century signal.
- Warm wood tones: walnut, oak, teakthese keep blue from feeling cold.
- Simple, graphic patterns: stripes, small geometrics, color-blocked textiles.
- Iconic materials: brass accents, matte black hardware, glass globes, cane/rattan details.
Color palette ideas that “read retro”
If you want a safe retro palette, start with blue + white + warm wood, then add one accent color.
If you want a bolder retro palette, add two accentsbut keep them in the same “temperature family” so the room doesn’t look like a crayon argument.
- Classic: mid-tone blue + crisp white + walnut + mustard accents.
- Playful: teal-leaning blue + cream + light oak + coral or tangerine pops.
- Moody: navy + warm white + dark wood + brass + rust/terracotta textiles.
Step 5: Upgrade Function (Quietly, Like a Design Ninja)
Lighting: the fastest way to make blue feel cozy
Blue can feel tranquil, but it can also feel chilly if your bulbs are too cool. Warm, layered lighting helps a blue room feel inviting:
overhead for general light, a table lamp for warmth, and a reading light where you actually read (not where your floor lamp “looks balanced”).
Aim for warm-white bulbs for most bedrooms and cozy living spaces.
Closet doors and storage: learn from the “I’d do it differently” moment
One honest and helpful detail from the Remodelaholic story: they installed a bifold closet door and later said they’d do it differentlychoosing doors that match
the existing door and hanging them properly. That’s the essence of a good remodel lesson: don’t just pick what’s easiest today; pick what will look and work best
a few years from now.
Small upgrades that matter more than they cost
- Hardware swap: retro knobs or simple pulls (brass or matte black).
- Outlet/switch plates: clean new plates instantly make walls feel finished.
- Window treatments: simple curtains or woven shades for texture and warmth.
- Rug layering: adds softness, absorbs sound, and makes blue feel lived-in.
The “Blue Room” Checklist: A Practical Finish Line
- Blue selected based on undertone and lighting tests
- Walls cleaned, patched, sanded (with dust control), and primed where needed
- Trim cracks caulked; edges smoothed for crisp paint lines
- Trim/ceiling painted first; walls last
- Warm lighting added (lamps count!)
- Retro elements chosen intentionally: silhouette + wood + one accent color
- Storage improved without cluttering the room
Common Mistakes (So You Don’t Have to Learn Them the Hard Way)
1) Picking a blue from your phone screen
Screens lie. Lighting changes. Undertones surprise you. Sample first.
2) Skipping prep because “paint will cover it”
Paint is a spotlight, not a blanket. If the wall is bumpy now, it will be bumpy in HD after paint.
3) Using cool bulbs and wondering why the room feels cold
Blue + cool lighting can feel clinical. Warm bulbs are the design equivalent of adding a cozy soundtrack.
4) Going “retro” with too many small props
A few strong pieces beat a hundred tiny ones. Let shape and material do the talking.
Conclusion: A Blue Room That Feels Fresh, Not Frozen in Time
A successful Blue Room; Retro Remodel is equal parts discipline and fun: disciplined prep, deliberate color choice, and a clean paint jobthen the fun
of layering in vintage-inspired pieces that make the room feel like you. Whether your starting point is a charming old bedroom or a space that
currently resembles “wallpaper lasagna,” the path is the same: clean it, repair it, paint it thoughtfully, and style it with warmth and intention.
of Real-World “Blue Room” Experience (What People Usually Don’t Tell You)
If you’ve never done a retro remodel in a blue room before, here’s the part that’s hard to capture in glossy after photos: the emotional arc.
It often starts with confidence“It’s just one room”followed by the first surprise layer“Okay, it’s just two wallpapers”followed by the third
surprise layer“Why is there fabric stapled to the wall like it owes someone money?” That’s when most people learn the first lesson of old-room makeovers:
you’re not just remodeling; you’re negotiating with history.
Then comes the cleaning and patching phase, which is where optimism goes to take a long nap. Scrubbing walls is strangely exhausting because it’s repetitive and
unglamorous, but it’s also the moment you start feeling in control again. The room stops being “someone else’s mess” and becomes “my project.”
Patching is similar: at first, every hole feels like a personal insult, but eventually you realize the wall is just telling you where it needs help.
The rhythm becomes: patch, dry, sand, check, repeatuntil the surface finally behaves.
Paint day is when the room’s personality changes fastand this is where blue can be dramatic. People often describe a moment of panic when the first coat goes on:
the color looks too bright, too dark, too something. This is normal. Fresh paint is wet, lighting shifts, and your brain needs time to recalibrate.
By the second coat, the blue starts to settle into itself and the trim contrast begins to look crisp instead of harsh.
The funniest part is how quickly you become a lighting snob: one “daylight” bulb can make your beautiful blue look icy, and suddenly you’re swapping bulbs like
you’re auditioning them for a role in a movie.
Styling is the reward phase, but it’s also where restraint matters. A retro remodel looks best when the big choices carry the weight:
a warm wood dresser with tapered legs, a vintage-inspired lamp with a soft shade, a patterned pillow that echoes the era without screaming “I BOUGHT THIS
SPECIFICALLY BECAUSE IT SAID MID-CENTURY ONLINE.” Many people find the best retro pieces accidentallyat thrift stores, estate sales, or by shopping their own
housebecause older items often have the right scale and character. And the final, sneaky truth? The room feels most “retro” when it feels lived-in:
a book on the nightstand, a throw on the chair, a rug that softens footsteps. That’s when the blue room stops being a project and becomes a place you want to be.


