
Table of Contents >> Show >> Hide
- Why an Indoor Tree House Is the Ultimate Kid Zone
- Planning Your Indoor Tree House
- Materials and Tools You’ll Need
- Step-by-Step: Building the Indoor Tree House Frame
- How to Add the Slide
- Building the Rock Climbing Wall
- Styling Your Tree House: Make It Feel Magical
- Ongoing Safety and Maintenance
- Real-Life Lessons From Building an Indoor Tree House
If your kids are bouncing off the walls, you might as well give them a wall that is
meant to be climbed. An indoor tree house with a slide and rock climbing wall
turns an ordinary playroom or basement corner into a mini adventure park. Think of it
as a cozy loft, indoor playground, and imagination station all rolled into one awesome
structure. This guide walks you through planning, building, and styling a safe indoor
tree house inspired by the playful, DIY-friendly spirit of Remodelaholic-style projects.
Why an Indoor Tree House Is the Ultimate Kid Zone
Benefits for Kids
An indoor tree house is so much more than a cute Instagram backdrop. It encourages
kids to climb, slide, crawl, and pretend, all in a space you can easily supervise.
Climbing and sliding build strength, balance, and coordination. The “tree house”
concept invites storytelling: today it’s a pirate ship, tomorrow it’s a reading nook
in the forest, and by the weekend it might be the headquarters for a superhero squad.
Because the play structure is indoors, kids can burn off energy on rainy afternoons,
snowy days, or during those long evenings when you really, really need bedtime to go
smoothly. When children have a physical outlet during the day, they’re more likely to
wind down calmly later.
Benefits for Parents and the Home
For parents, an indoor tree house is a smart way to contain chaos. Instead of a trail
of toys all over the house, you’re designating one area as the “fun zone.” A lofted
platform also makes smart use of vertical space. Under the tree house, you can carve
out storage for bins, a kids’ reading corner, or even a pretend shop or kitchen.
And let’s be honest: a well-built indoor tree house is also a big design flex. It
adds personality to a playroom or basement and can even increase your home’s appeal
to future buyers with young families. Done right, it feels custom, playful, and
surprisingly polished.
Planning Your Indoor Tree House
Choose the Right Location
Before you buy a single 2×4, choose the best spot. Look for:
- A solid wall with studs to anchor the frame safely.
- Sufficient ceiling height so kids can sit or kneel on the
platform without bumping their heads. - Clear floor space for a safe slide landing and climbing wall
fall zone. - Distance from windows and doors so there are no collisions or
falls into glass.
Basements, bonus rooms, and large bedrooms are common choices. Avoid areas with low
ceiling fans or where doors swing into the play zone.
Measure and Sketch Your Design
Next, grab a tape measure, notepad, and maybe a cup of coffee. Measure the length and
depth of your available wall, the ceiling height, and any obstructions such as vents
or outlets. Decide:
- The size of the platform (for example, 4×6 feet or 5×8 feet).
- The height of the deck (often around 4–5 feet off the floor for young children).
- Where the slide will exit and which side the rock climbing wall will be on.
- How kids will access the tree house: ladder, small stairs, or a combination.
Create a simple top view and side view sketch. Even a rough drawing helps you visualize
how the slide and climbing wall fit, and ensures there’s enough room for mats and
circulation around the structure.
Think Safety from Day One
Safety is the backbone of this project. A few key planning guidelines:
- Limit the height. For younger kids, a deck height around
4–5 feet keeps falls more manageable. - Use guardrails. Install sturdy guardrails at least 36 inches
high around open sides of the platform, with baluster spacing that a child’s head
cannot fit through. - Plan for soft landings. Use thick foam or gym-style mats under
the slide and the climbing wall, extending beyond the landing area. - Set clear rules. From the start, teach kids how to use the
slide and climbing wall properlyno pushing, no jumping from the top, and only one
slider at a time.
Materials and Tools You’ll Need
Your exact shopping list will depend on your design, but most indoor tree houses with
a slide and climbing wall use similar building blocks:
Common Materials
- Framing lumber: 2×4s for the frame; optional 4×4 posts for vertical supports.
- Decking: 3/4-inch plywood or similar sheet goods rated for flooring.
- Fasteners: 3–4 inch wood screws, lag screws for wall attachment, and construction
adhesive where needed. - Slide: a prefabricated indoor/outdoor slide or a custom-built, smooth wooden slide.
- Climbing wall panels: 3/4-inch plywood cut to size.
- Rock climbing holds and T-nuts, plus bolts specific to your hold kit.
- Safety mats: foam play mats, crash pads, or gymnastics-style mats for the floor.
- Paint, stain, primer, and clear coat for the tree house “trunk,” walls, and trim.
- Decor: faux leaves, vinyl decals, string lights, curtains, cushions, and storage bins.
Basic Tools
- Stud finder, level, and tape measure.
- Circular saw or miter saw, plus a jigsaw for curves.
- Drill/driver with bits and countersink.
- Orbital sander and sandpaper.
- Paint rollers, brushes, and painter’s tape.
- Safety gear: eye protection, hearing protection, and a dust mask.
Step-by-Step: Building the Indoor Tree House Frame
1. Locate Studs and Install the Wall Ledger
Start by finding the wall studs where your platform will attach. Mark them with a
pencil. Cut a 2×4 to match the length of your planned platform and hold it level
against the wall at your desired deck height. This piece is your ledger board.
Pre-drill holes through the ledger at each stud location and secure it using long
wood screws or lag screws. This creates a solid anchor point for your frame.
2. Build the Platform Frame
On the floor, assemble a rectangular frame using 2×4 lumber. Add joists inside the
frame, spaced roughly 16 inches apart for strength and stability. Use 3–4 inch screws
at each connection, checking that everything stays square.
Once the frame is assembled, lift it into position so that one side rests on the
ledger and the far side is supported by temporary legs or blocks. Attach the frame to
the ledger with screws driven through the frame into the ledger.
3. Add Vertical Supports
For free-standing corners or longer spans, add 4×4 or doubled 2×4 posts under the
outer edges of the frame. Anchor these posts securely to the subfloor using
appropriate post bases or angled screws. If your design allows, you can also tie
supports into ceiling joists for extra stability.
4. Install the Deck
Cut your plywood decking to fit the frame. Pre-sand the edges so there are no sharp
corners. Lay the plywood on top of the frame and secure it with screws, sinking the
screw heads just below the surface so they won’t catch little toes or socks.
At this stage, stand on the platform and gently bounce to test for movement. A solid
platform should feel sturdy, not springy. If there is flex, add additional bracing or
joists before moving forward.
5. Add Guardrails and Access Ladder or Stairs
Frame guardrails along open edges using 2×2 or 2×4 posts and slats. Keep openings
small enough that a child cannot slip through or get stuck. The top of the rail
should hit around mid-chest on your child when they are standing on the platform.
For access, you can build a simple ladder with 2×4 sides and 2×2 rungs or construct
low-profile stairs with handrails. Stairs are especially helpful for toddlers or
younger children who aren’t confident climbers yet.
How to Add the Slide
Choose the Right Slide
The easiest option is a pre-made plastic slide designed for playsets. These are
molded for comfort, have high sides, and can often be bolted directly to the platform
edge. Measure the slide length and match it to your deck height and floor space.
If you love a full DIY moment, you can build a boxed-in wooden slide using smooth
plywood and side rails. Just be sure to round over edges and sand everything
thoroughly, then paint or clear-coat the surface so it’s slick but not splintery.
Secure and Cushion the Slide
Once you’ve chosen your slide, cut an opening in the guardrail or deck where it will
attach. Anchor the top of the slide to the platform using the manufacturer’s
hardware or heavy-duty brackets for a DIY slide. At the bottom, use foam mats that
extend past the slide’s end to soften landings.
Test the slide yourself firstyes, that may mean scooting down in an extremely
dignified wayto check stability and smoothness. If it feels wobbly for an adult, it
needs more bracing before kids use it.
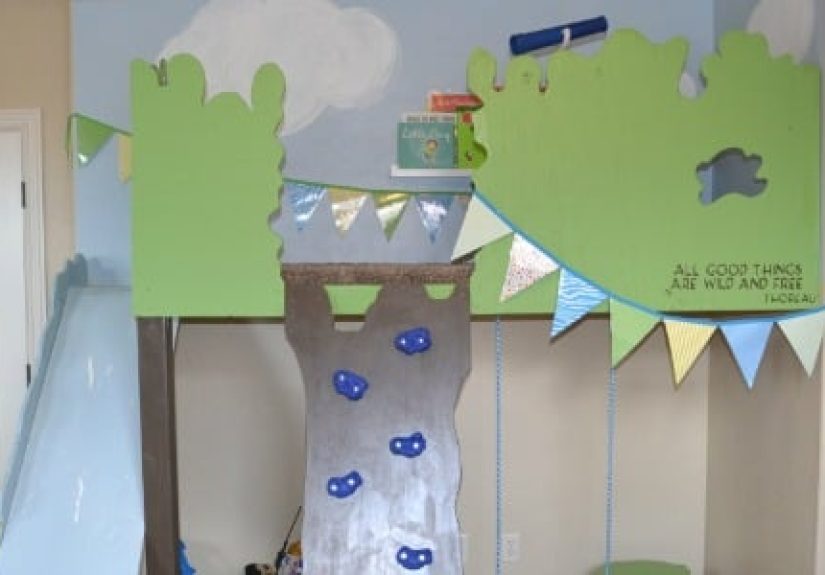
Building the Rock Climbing Wall
Design the Wall Panel
A climbing wall can be vertical or slightly slanted. For most playrooms, a vertical
wall that tops out at or just above platform height is plenty. Cut 3/4-inch plywood
to your desired height and width, then sand the edges thoroughly.
Before installing, mark a grid on the back of the panel for T-nut placement
(for example, every 6–8 inches). Drill holes at each mark, then hammer in T-nuts.
This lets you move holds around easily, creating new routes as your kids grow more
confident.
Attach the Wall and Install Holds
Secure the panel to wall studs or your tree house frame using long structural
screws. Climbing panels must be solidno flexing or rattling. Once the panel is in
place, bolt climbing holds into the T-nuts, mixing easy “jug” holds with smaller,
more challenging shapes.
Keep routes simple for younger kids, with plenty of big handholds and feet-friendly
options. As they get older, you can remove easier holds and introduce trickier
combinations to keep the wall interesting.
Don’t Forget Mats and Rules
Place thick mats under the entire climbing zone and keep them in place every time the
wall is used. Establish family rules such as one climber at a time, no climbing
above a certain height without an adult nearby, and no roughhousing near the wall.
Styling Your Tree House: Make It Feel Magical
Create a Tree-Inspired Look
You don’t need an actual tree to get that tree house vibe. Paint a trunk and branches
on the wall behind the structure using earthy browns and leafy greens. Add removable
leaf decals or cut out leaf shapes from cardstock and string them as garlands.
You can also wrap the support posts in textured fabric or faux bark wrap, and use
soft green rugs to mimic grass. Hanging paper lanterns or string lights underneath
the platform gives the “forest floor” a cozy glow.
Turn the Under-Loft into a Bonus Zone
The space under the platform is prime real estate:
- Reading nook: Add a beanbag chair, bookshelf, and a clip-on lamp.
- Pretend shop or kitchen: Use a play kitchen, toy cash register, or
a simple counter and curtain for a “storefront.” - Art corner: Hang a roll of craft paper and set up a small table
with markers and crayons.
Let your child’s interests guide the theme. The more they “own” the space, the more
they’ll use it.
Ongoing Safety and Maintenance
Even the best-built indoor tree house needs occasional checkups. Set a reminder to:
- Inspect screws, bolts, and brackets monthly and tighten anything that feels loose.
- Check the climbing holds; re-tighten any that spin or wiggle.
- Vacuum dust from the slide and mats to keep surfaces clean and grippy.
- Look for chipped paint or splintered wood and sand/repaint when needed.
- Revisit family rules with kids, especially after playdates or long breaks.
A little maintenance goes a long way. When you treat the tree house like a permanent
fixture, not just a toy, it stays safe, sturdy, and fun for years.
Real-Life Lessons From Building an Indoor Tree House
On paper, building an indoor tree house with a slide and rock climbing wall looks
like a weekend project. In real life, it’s an adventure with a few plot twistsbut
the payoff is huge. Here are some lessons and experiences people often share once the
sawdust settles.
First, nearly everyone underestimates size. The frame that seemed “pretty small” in
your sketch will look enormous once it’s mocked up in the room. Many DIYers do a dry
layout on the floor with painter’s tape or scrap boards and then shrink the design
by a foot or two after seeing it in context. It’s much easier to adjust the plan
before the lumber is cut.
Second, pre-finishing pays off. Builders quickly learn that it’s much easier to paint
or stain panels and guardrails before assembling them overhead. Painting a ladder or
guardrail on sawhorses in the garage is a lot more comfortable than crouching in a
corner while trying not to drip on the carpet. If you can, prime and paint the
climbing panels, rails, and trim in advance, then just touch up after installation.
Another common experience: kids will use the space in ways you didn’t expect. You
might imagine constant climbing and sliding, but you’ll also find stuffed animals
tucked into a “tree house hospital,” stacks of books arranged just so, or quiet
sibling meetings happening under the platform. The rock wall becomes a storytelling
backdrop; the slide doubles as a racetrack for toy cars or a runway for dolls.
Parents also notice how the tree house changes the rhythm of the day. When the
playroom has a clear focal point, clean-up becomes easier: “Everything goes under the
tree house or on the shelf” is simpler than “Just pick up!” Having a dedicated
climbing and sliding area also helps redirect wild energy“Take it to the tree house”
quickly becomes a household catchphrase.
Budget-wise, many families get creative. Some reuse a slide from an old outdoor
playset, pick up foam mats secondhand, or source climbing holds during sales. Others
build the project in stages: first the loft platform and rails, then the slide a
month later, and finally the climbing wall when time and budget allow. This phased
approach spreads out the cost and makes the project feel manageable instead of
overwhelming.
One subtle but important lesson is to think about the future. A well-designed indoor
tree house can grow with your kids. As they get older, you can swap out the bright
primary colors for more neutral tones, remove some of the playful decor, and let the
loft function as a reading hideaway, homework nook, or even a teen lounge space.
Designing with this flexibility in mindusing clean lines, simple framing, and
removable accessorieshelps your investment last beyond the little-kid years.
Finally, there’s the emotional payoff. The first time your child races up the ladder,
peeks over the rail, and shouts, “This is my tree house!” you’ll forget how many
screws you drove or boards you re-cut. Every scuff on the slide and chalk mark on
the climbing wall becomes evidence of memories in the making. It’s not just a DIY
project; it’s a permanent chapter in your family story.
So if you’ve been on the fence about starting, consider this your friendly nudge.
With a solid plan, a focus on safety, and a little imagination, you can build an
indoor tree house with a slide and rock climbing wall that your kids will talk about
long after they’ve outgrown the need for a bedtime story.


