Table of Contents >> Show >> Hide
- Why Build an A-Frame Toolbox Instead of Buying One?
- Recommended Size for a Starter A-Frame Toolbox
- Materials You Will Need
- Designing the A-Frame Shape
- Step-by-Step: How to Build the Toolbox
- Customization Ideas That Actually Help
- Safety Tips Before You Start
- Common Mistakes to Avoid
- Best Uses for a Customizable A-Frame Toolbox
- Finishing Touches for a Professional Look
- Real-World Experience: What You Learn When Building an A-Frame Toolbox
- Conclusion
A good toolbox should do three things: carry your tools, survive being tossed around the garage, and make you feel just a little more capable every time you grab the handle. A customizable A-frame toolbox does all three with style. It is sturdy enough for everyday repairs, open enough that you can see what you packed, and flexible enough to adapt to woodworking tools, gardening gear, craft supplies, electrical testers, or the mysterious collection of screws that every home seems to grow in a drawer.
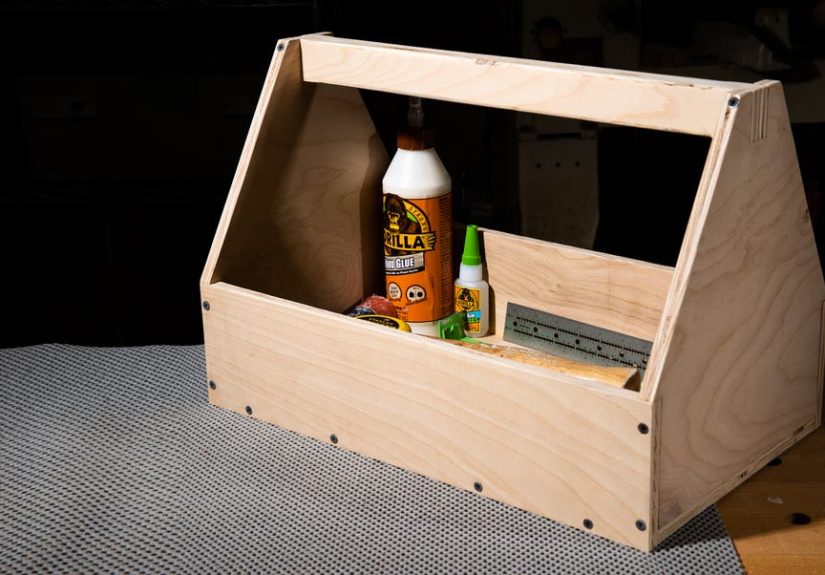
The classic A-frame toolbox is basically a wooden tool tote with angled sides, a strong center handle, and a wide base that keeps it from tipping over when loaded. Think of it as the pickup truck of small workshop storage: simple, useful, and ready to haul more than it probably should. Unlike a plastic box with fixed compartments, this DIY toolbox can be sized, divided, painted, stained, labeled, and upgraded to match the way you actually work.
This guide walks through how to build a customizable A-frame toolbox using common materials, beginner-friendly joinery, and practical design choices. You do not need a cabinetmaker’s shop to build it. You need a plan, patience, accurate measuring, and a healthy respect for safety. If you are younger or new to woodworking, work with an experienced adult, especially when cutting, drilling, sanding, or handling sharp tools.
Why Build an A-Frame Toolbox Instead of Buying One?
Buying a toolbox is easy. Building one is better, especially when you want something that fits your tools instead of forcing your tools to fit a box designed by someone who has apparently never owned an oddly shaped clamp.
An A-frame toolbox gives you open access from both sides. That makes it ideal for tools you grab frequently: screwdrivers, pliers, tape measures, utility knives, pencils, small levels, hex keys, brushes, glue bottles, and fasteners. The angled side profile creates strength without adding unnecessary bulk, while the center handle acts as both a carry point and a structural spine.
Another advantage is customization. You can build the toolbox short and compact for household repairs, long and narrow for chisels and layout tools, or wider with dividers for painting supplies. Add removable bins for screws. Add a drill holster. Add a rack for screwdrivers. Add a magnetic strip for bits. This project rewards practical thinking, not perfectionism.
Recommended Size for a Starter A-Frame Toolbox
For a balanced everyday toolbox, start with these approximate dimensions:
- Length: 18 to 22 inches
- Width: 8 to 10 inches
- Height: 11 to 14 inches including the handle
- Side thickness: 1/2-inch or 3/4-inch plywood, pine, poplar, or similar wood
- Handle: 3/4-inch to 1-inch wood dowel, hardwood strip, or shaped solid-wood grip
These dimensions create enough room for basic hand tools without making the box awkward to carry. The best rule is simple: measure your longest must-carry tool first. If your handsaw, level, pry bar, or long screwdriver is 19 inches, do not build an 18-inch toolbox and then act surprised when your tools stick out like a bad haircut.
Materials You Will Need
One of the joys of this project is that you can build it from fresh lumber, plywood offcuts, reclaimed boards, or leftover shop materials. For a clean, durable build, cabinet-grade plywood or smooth pine boards are excellent choices. Plywood is stable and resists warping, while solid wood gives the toolbox a warmer, traditional look.
Basic Materials List
- 1/2-inch or 3/4-inch plywood or boards for the sides, ends, and bottom
- Wood dowel or hardwood strip for the handle
- Wood glue
- Wood screws or brad nails
- Sandpaper in medium and fine grits
- Paint, stain, polyurethane, Danish oil, or another finish
- Optional: dividers, hooks, magnetic strip, rubber feet, labels, small bins, or leather handle wrap
Tool List
- Tape measure or ruler
- Combination square
- Pencil
- Clamps
- Saw suitable for straight cuts
- Drill and drill bits
- Screwdriver or driver bit
- Sanding block or random-orbit sander
- Safety glasses, hearing protection, and dust protection
Keep the build approachable. If you do not have a table saw, many home centers can cut plywood into manageable panels, or you can use a circular saw with a straightedge. Accuracy matters more than owning every tool in the catalog.
Designing the A-Frame Shape
The defining feature of this toolbox is the A-frame end panel. Instead of square vertical ends, each end rises to a peak or flattened peak where the handle passes through. This creates the familiar triangular silhouette and gives the box its strong, balanced shape.
To design the end panels, draw a rectangle equal to the width and height of the toolbox. Mark the centerline at the top. Then draw angled shoulders from the lower corners up toward the handle area. You can use a sharp peak, but a flat top around the handle hole is easier to drill and stronger in daily use.
A good end panel might be 9 inches wide and 12 inches tall, with the handle hole centered about 1 1/2 to 2 inches below the top. Leave enough wood around the handle opening so the end panel does not crack under load. The bottom should be wide enough to keep the box stable when full.
Step-by-Step: How to Build the Toolbox
Step 1: Lay Out Your Tools First
Before cutting wood, place the tools you want to carry on a bench or table. Group them by size and frequency of use. The items you grab constantly should be easy to see and reach. Heavy items should sit low in the box. Small items should have a dedicated compartment or removable container so they do not become a tiny metal soup at the bottom.
This step prevents the most common DIY storage mistake: building a beautiful box that is almost useful. Almost useful is the most frustrating kind of useful.
Step 2: Cut the Bottom, Side Rails, and End Panels
Cut the bottom panel first. For a starter size, an 18-inch by 8-inch bottom works well. Then cut two long side rails, typically 18 inches long and 4 to 6 inches tall. The side rails hold tools in place while keeping the tote open and visible.
Next, cut two matching A-frame end panels. Stack the pieces together and sand or trim them as a pair so they match closely. Matching end panels help the toolbox sit flat and keep the handle aligned.
Step 3: Drill the Handle Holes
Mark the handle location on both end panels. Use a drill bit or hole saw sized to match your dowel or handle. Drill slowly and support the wood to reduce tear-out. If the hole is slightly tight, sand it carefully until the handle fits snugly.
A dowel handle is simple and comfortable, but you can upgrade it. Try a rounded hardwood handle, a rectangular grip with eased edges, or a leather-wrapped dowel for a more finished look.
Step 4: Dry Fit Everything
Before using glue, assemble the toolbox without fastening it. Check that the bottom fits between or under the side rails, depending on your design. Make sure the end panels stand square and the handle slides through evenly.
Dry fitting may feel like an annoying extra step, but it is cheaper than discovering a mistake after the glue bottle has entered the chat.
Step 5: Glue and Fasten the Main Box
Apply wood glue along the contact edges. Clamp the pieces together and fasten them with screws or brad nails. Screws are strong and repairable, while brad nails are fast and clean when paired with glue. If using screws near plywood edges, predrill holes to reduce splitting.
Check for square as you assemble. A toolbox does not need museum-level precision, but it should sit flat and carry comfortably. Wipe away glue squeeze-out with a damp rag before it hardens.
Step 6: Install the Handle
Slide the handle through both end panels. You can glue it in place, pin it with screws from the outside, or leave it removable if the fit is secure. For heavy-duty use, glue and a small screw at each end provide extra insurance.
Test the grip before finishing. If the handle feels sharp, sand the edges until it is comfortable. A toolbox handle should not punish your hand for having the audacity to carry tools.
Step 7: Add Dividers and Custom Features
This is where the project becomes yours. Add a center divider to separate hand tools from hardware. Add narrow vertical dividers for screwdrivers, chisels, or files. Add a small tray for pencils, bits, and fasteners. Attach hooks inside the side rail for tape, string, or small cords.
For a household repair toolbox, include dedicated spaces for a tape measure, hammer, multi-bit screwdriver, pliers, flashlight, painter’s tape, utility knife, and small box of screws. For a woodworking toolbox, create slots for marking tools, layout squares, chisels, a small mallet, glue, clamps, and a block plane. For a gardening tote, make the side rails taller and include compartments for gloves, pruners, twine, seed packets, and plant labels.
Customization Ideas That Actually Help
1. Removable Hardware Cups
Instead of permanently dividing every inch, use small removable cups or bins. This makes it easy to carry screws to a project area without dragging the whole toolbox across the room.
2. Magnetic Bit Strip
A magnetic strip inside the box can hold driver bits, small drill bits, or loose fasteners. Place it where it will not interfere with your hand when carrying the box.
3. Screwdriver Rack
Drill a row of holes in a narrow strip of wood and mount it inside one side. This creates a simple screwdriver rack that keeps handles visible and tips protected.
4. Label Zones
Paint a small chalkboard label area or attach metal label holders. Labels are helpful if you build multiple A-frame toolboxes for electrical, plumbing, painting, or craft supplies.
5. Rubber Feet
Small rubber feet protect finished floors and help the toolbox grip smooth surfaces. They also keep the wooden bottom away from damp garage floors.
6. Finish by Function
Use clear polyurethane for durability, paint for personality, oil for a natural workshop look, or exterior finish if the toolbox will live in a garden shed. A bright color makes it easier to spot. A natural finish says, “I own clamps and have opinions about grain direction.” Both are valid lifestyles.
Safety Tips Before You Start
Woodworking is fun, but it deserves attention. Wear safety glasses when cutting, drilling, or sanding. Use hearing protection around loud tools. Wear appropriate dust protection when sanding or cutting wood, especially plywood or treated materials. Keep your workpiece clamped whenever possible, and never rush a cut just because you are excited to see the finished toolbox.
If you are new to woodworking, begin with hand tools or ask an experienced adult to help with powered cuts. Keep fingers away from blades and bits, unplug tools before adjustments, and read the instructions for every tool you use. The best project is the one you finish safely and proudly.
Common Mistakes to Avoid
Making the Toolbox Too Big
A giant tote sounds useful until you fill it and realize you have built a portable backache. Keep the box sized for one hand and one purpose.
Skipping the Dry Fit
Dry fitting helps catch crooked cuts, tight handle holes, and layout errors before glue makes everything dramatic.
Using Weak Handle Joinery
The handle carries the whole load. Give it enough support, use strong wood, and reinforce it if you plan to carry heavy tools.
Forgetting Sanding
A toolbox gets handled constantly. Round over sharp corners and sand the handle smooth. Your knuckles will appreciate the kindness.
Overcomplicating the Interior
Customization is great, but too many fixed compartments can limit future use. Use a mix of permanent dividers and removable storage.
Best Uses for a Customizable A-Frame Toolbox
This project is more versatile than it first appears. In the workshop, it can hold layout tools, glue, fasteners, and small clamps. Around the house, it becomes a grab-and-go repair kit. In the garden, it works as a seed and hand-tool tote. In a craft room, it can organize scissors, brushes, rulers, and glue guns. For painters, it can hold tape, brushes, stir sticks, rags, and small patching tools.
The A-frame design also makes a great gift. Build one for a new homeowner, a parent who constantly loses the tape measure, or a friend who loves DIY but stores tools in a kitchen drawer next to birthday candles. Add a name, painted stripe, or custom label to make it personal.
Finishing Touches for a Professional Look
Small details make the toolbox feel intentional. Round the edges with sandpaper or a router. Fill visible nail holes if you want a polished finish. Use contrasting wood for the handle. Paint the inside a lighter color so small parts are easier to see. Add a ruler strip along the top edge. Attach a bottle opener only if your workshop also has a strict “finish first, celebrate later” policy.
For a rustic look, use reclaimed wood and keep the finish simple. For a modern look, use birch plywood, clean lines, and matte paint. For a traditional look, stain the wood and add brass screws or a dark handle wrap. The structure may be simple, but the personality is wide open.
Real-World Experience: What You Learn When Building an A-Frame Toolbox
The first thing you learn while building a customizable A-frame toolbox is that storage is personal. Two people can own the same hammer, the same tape measure, and the same screwdriver set, yet want completely different layouts. One person wants everything divided and labeled. Another wants one open bay where tools can be dropped quickly. Neither is wrong. The best toolbox is the one that matches your habits instead of trying to turn you into a more organized version of yourself overnight.
When I think about this project from a practical builder’s point of view, the handle is the detail that matters most. A toolbox can look beautiful on a bench, but once you load it with a hammer, pliers, drill bits, a wrench, a tape measure, and a fistful of fasteners, the handle becomes the truth-teller. If it is too thin, it digs into your hand. If it is too high, the box swings awkwardly. If it is not secured well, every step feels like a suspense movie. Taking extra time to shape and reinforce the handle is worth it.
The second lesson is that open storage beats hidden storage for frequently used tools. Drawers are wonderful for precision tools, but for everyday repairs, visibility wins. When the sink cabinet is leaking or a hinge screw is loose, you do not want to conduct an archaeological dig through three trays and a mysterious bag of wall anchors. An A-frame toolbox lets you glance down and grab what you need. That saves time and reduces the classic DIY phrase: “I just had it a second ago.”
Another useful experience is learning how much weight is enough. A small toolbox encourages smart packing. Instead of carrying every tool you own, you start asking better questions: What does this job actually require? Which tools do I use constantly? Which items are just emotional support hardware? That thinking makes future projects faster because your kit becomes more intentional.
Customization also teaches restraint. It is tempting to add every clever feature at once: bit holders, hidden compartments, racks, hooks, trays, labels, magnets, and maybe a tiny drawer for dramatic effect. But a toolbox should stay easy to clean, easy to repair, and easy to change. The smartest design often includes a few fixed features and several removable containers. That way, the toolbox can evolve with your projects.
Finally, this project builds confidence. It includes measuring, layout, cutting, drilling, sanding, assembly, and finishing without requiring advanced joinery. You get a real object at the end, not just practice cuts. Better yet, the finished toolbox immediately becomes part of your next project. It carries the tools that build the shelf, fix the fence, hang the picture frame, repair the chair, or assemble the workbench. That is the quiet satisfaction of shop-made storage: you are not only organizing your tools, you are building momentum.
Conclusion
Building a customizable A-frame toolbox is one of those satisfying DIY projects that proves simple design can still be extremely useful. With a sturdy base, angled end panels, a comfortable handle, and a layout tailored to your tools, you get a portable organizer that works in the garage, workshop, garden shed, craft room, or around the house.
Start with a practical size, build safely, customize only what improves your workflow, and finish it in a way that makes you want to use it. The result is more than a wooden box. It is a small, hardworking command center for your next repair, build, or weekend project. And unlike that plastic toolbox with the broken latch, this one comes with bragging rights.