Table of Contents >> Show >> Hide
- What “Mil-Spec Style” Really Means
- Starting With the Design
- Choosing the Right 3D Printing Material
- Mechanical Design Details That Matter
- Electronics: Making the Handset Actually Work
- Printing Strategy
- Assembly Process
- Finishing for That Rugged Look
- Testing and Troubleshooting
- Common Build Mistakes
- Experience Notes: What Building One Teaches You
- Conclusion
Note: This guide is for building a rugged, mil-spec-inspired phone handset for hobby, maker, desk-phone, radio-style, or smartphone accessory projects. It is not a certified military communication device, and that is perfectly fine. Your phone probably does not need to survive a mud bath, a parachute jump, or a sergeant yelling at it.
A 3D printed phone handset sounds like the kind of project that starts with “I had a perfectly normal weekend planned” and ends with a workbench covered in screws, heat-set inserts, and a cable that somehow has five conductors despite promising to be simple. But that is exactly the charm. A handset is one of those objects that feels instantly familiar: speaker at one end, microphone at the other, a comfortable grip in the middle, and enough attitude to make a modern smartphone look underdressed.
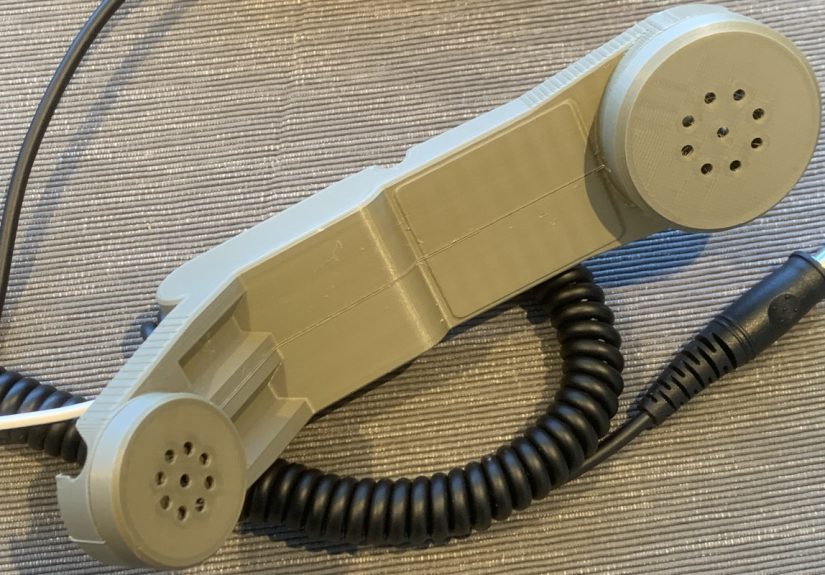
The inspiration behind many rugged handset builds is the military H-250 style: tough, chunky, purposeful, and slightly techno-punk. The original H-250 was designed for field communication equipment, not for taking calls while pacing around a kitchen, but its silhouette is so good that makers keep coming back to it. A 3D printed version lets you borrow the style without wrestling with surplus parts, unusual impedance values, old connectors, or mystery components that smell faintly like an army depot.
In this article, we will walk through the design logic, material choices, electronics, printing strategy, assembly process, and real-world lessons behind building a 3D printed phone handset with mil-spec style. The goal is not to clone a military device exactly. The goal is to create a functional, repairable, customizable handset that looks like it belongs in a field radio kit, works with modern audio hardware, and makes every phone call feel 23% more dramatic.
What “Mil-Spec Style” Really Means
Before touching CAD software, it is worth clearing up one thing: mil-spec style is not the same as actual mil-spec certification. A true military handset is built to formal requirements for durability, environmental resistance, electrical behavior, and compatibility with specific radios. Your 3D printed handset, unless tested and certified in the same way, is a maker project with military-inspired design language.
That distinction matters. Saying “mil-spec style” gives you freedom. You can adopt the rugged shape, thick walls, guarded switches, textured grip, strain relief, matte black finish, and practical modularity without pretending the thing is ready for a battlefield. Think of it as the difference between wearing a field jacket and claiming you are now a logistics battalion.
For a phone handset, the best features to borrow are the human-centered ones. The H-250-style layout places the speaker and microphone far apart, which helps the device feel natural against the face. The broad handle gives the user something substantial to hold. The large push-to-talk style button can be repurposed as a mute button, call-control button, intercom trigger, or purely decorative “important red button” if you enjoy drama.
Starting With the Design
A good 3D printed phone handset begins with the enclosure. The body should look rugged, but it also needs to be printable, serviceable, and comfortable. The easiest approach is to design the handset as two clamshell halves that screw together. This gives you access to the speaker, microphone, wiring, button, and strain relief after printing. It also means you can fix mistakes without performing plastic archaeology with a rotary tool.
Use Parametric CAD When Possible
Parametric design is especially useful for this project. If the speaker diameter changes, you can update one value instead of redrawing the entire receiver cup. If your cable is thicker than expected, you can adjust the cable channel. If your microphone capsule is slightly taller, you can deepen the pocket. OpenSCAD is a popular choice for this kind of mechanical, dimension-driven design because it treats the model like code: define the important numbers, generate the object, revise, repeat, and occasionally mutter at a missing semicolon.
Key parameters should include speaker diameter, microphone diameter, wall thickness, screw boss diameter, cable diameter, button opening size, handset length, and grip thickness. Even if you design in Fusion 360, FreeCAD, Onshape, or another CAD tool, the principle is the same: make the design adjustable instead of frozen.
Design for Real Components
Do not design the perfect shell first and then try to shove electronics into it. That path leads to sadness, hot glue, and suspicious bulges. Choose the basic hardware early:
- A small speaker or headphone driver for the receiver end
- An electret microphone capsule, dynamic microphone, or headset mic module
- A momentary switch for push-to-talk, mute, or call control
- A TRRS cable, USB audio module, Bluetooth audio board, or custom cable
- Small machine screws and heat-set brass inserts
- Optional foam, mesh, rubber pads, or TPU gaskets
Measure every component with calipers. Then measure again, because tiny electronics love lying by half a millimeter. Leave clearance for wires, solder joints, heat-shrink tubing, and the awkward angle at which cables actually bend once installed.
Choosing the Right 3D Printing Material
For a rugged handset, PLA is excellent for prototypes but not always ideal for the final version. It prints easily, holds detail well, and lets you test shape and ergonomics quickly. However, PLA can soften in hot cars or warm environments, and a handset is the kind of object that may end up on a dashboard, beside a window, or in the hands of someone who treats gadgets like stress balls.
PETG is a strong everyday choice for the final shell. It offers better toughness and impact resistance than basic PLA, handles moisture better, and has enough flexibility to survive normal handling. It can be stringy, so retraction tuning matters, but it rewards patience. ASA or ABS can also work well if you have proper ventilation and an enclosure; ASA is especially attractive for parts that may see sunlight. Nylon or carbon-fiber-filled nylon can create a more professional functional part, although it raises the difficulty level and may require a hardened nozzle and dry filament.
For the most practical build, print prototypes in PLA and the final handset in PETG or ASA. Use TPU only for flexible details such as button covers, soft bumpers, or gasket-like trim. Printing the entire handset in TPU would make it feel like a tactical banana, which is memorable but not necessarily useful.
Mechanical Design Details That Matter
The outside shape gets the compliments, but the inside geometry decides whether the handset survives assembly. Start with generous wall thickness. For a handheld accessory, thin decorative walls are not your friend. Around the grip and screw bosses, use enough material to resist cracking. Add fillets where the handle meets the speaker and microphone housings, because sharp internal corners concentrate stress.
Screw Bosses and Heat-Set Inserts
Heat-set inserts are one of the easiest upgrades that make a 3D printed project feel serious. Instead of driving screws directly into plastic, you melt brass threaded inserts into prepared holes. The plastic flows around the knurled surface, and the screw threads into metal. This improves repeat assembly, reduces stripping, and makes the device easier to repair.
For a phone handset, M2.5 or M3 screws are usually enough. Place screw bosses along the perimeter and near the ends, but do not crowd them too close to the edge. Add extra wall loops around bosses in the slicer, and consider higher infill around fastening areas. If your slicer supports modifiers, you can increase infill only near insert zones rather than turning the entire handset into a plastic brick.
Cable Strain Relief
The cable exit is a classic failure point. A nice handset with a bad strain relief is like a helmet made of frosting: bold, but doomed. Design a channel that clamps the cable gently when the shell closes. Add a zigzag path, printed clamp, rubber grommet, or knot cavity depending on the cable type. The goal is to keep pulling force away from solder joints.
If the handset uses a coiled cable, leave room for the cable to flex without rubbing against sharp plastic. Round the cable exit. A chamfer looks clean, but a generous radius is kinder to wires.
Electronics: Making the Handset Actually Work
The simplest version of this project is a passive wired handset. It contains a speaker, a microphone, and maybe a button, all connected to a phone-compatible audio interface. The complexity depends on the device you want to plug into.
TRRS Analog Wiring
Many older smartphones, tablets, laptops, and adapters use a 3.5 mm TRRS headset connection. In the common CTIA layout, the tip carries left audio, the first ring carries right audio, the second ring is ground, and the sleeve is microphone and control. If you only need mono audio to one speaker, you can route one audio channel through the receiver driver, or mix left and right through resistors rather than shorting channels together.
The microphone side must match the expected input. Many phones expect an electret-style microphone with bias voltage through the headset jack. A random dynamic microphone may produce a weak signal unless you add a preamp. That is one reason a maker-friendly build often uses a small electret capsule or salvaged headset microphone module.
USB-C and Digital Audio
Modern USB-C phones can be trickier. Some adapters are simple analog pass-through devices; others contain a digital audio converter. Many current Android devices expect a proper USB audio accessory rather than a purely mechanical USB-C-to-analog adapter. The safe route is to use a known working USB-C audio dongle with microphone support, then wire the handset internals to the dongle’s headset side.
This approach keeps the handset build simple. Instead of designing your own USB audio interface from scratch, you let a tested dongle handle device compatibility. Your 3D printed shell becomes the rugged human interface: comfortable grip, speaker, microphone, button, and cable management.
Push-to-Talk, Mute, or Call Button?
A mil-spec-style handset looks incomplete without a big side button. For radio projects, that button can serve as push-to-talk. For phone or computer use, it can become a mute switch, call answer button, recording trigger, or decorative control wired to a small microcontroller. If using a TRRS headset interface, inline button functions depend on resistance values and device support, so test before making the shell permanent.
A practical compromise is to install a tactile or momentary switch now and leave extra internal space for future electronics. Today it may do nothing. Tomorrow it may mute a USB audio board. Next week it may launch a home intercom. Maker projects age like software: somehow, they always want one more feature.
Printing Strategy
Print orientation is important because FDM parts are strongest along the layer lines and weaker between layers. A handset is handled, squeezed, and sometimes dropped, so orient the halves to balance surface quality and strength. Printing each clamshell half with its exterior facing upward often gives a cleaner outside finish, while the interior can tolerate support marks.
Use at least three or four perimeters for the shell. A layer height around 0.2 mm is a good balance between strength, appearance, and print time. For a final PETG build, slow down outer walls and tune cooling to reduce stringing. If the model includes long narrow sections, add brims or mouse ears to prevent warping and corner lift.
Test-print small sections first: the speaker cup, microphone pocket, button opening, and screw boss. This saves filament and prevents the tragic discovery that your speaker is 0.8 mm too large after a nine-hour print.
Assembly Process
Once the parts are printed, clean the edges and test-fit the halves. Install heat-set inserts before wiring so you are not waving a soldering iron near delicate components. Use a flat press or steady hand to keep inserts straight. Crooked inserts are the mechanical equivalent of a bad haircut: technically functional, but impossible not to notice.
Next, install the speaker and microphone. Use small printed retainers, screws, foam rings, or a careful bead of removable adhesive. Avoid fully entombing parts in glue unless you enjoy future regret. Add mesh or acoustic cloth over openings to reduce dust and improve the finished look. For the microphone, leave an acoustic path to the outside, but protect the capsule from breath blasts and debris.
Solder wires neatly, add heat-shrink tubing, and route the cable through the strain relief. Before closing the shell, test audio playback and microphone input. Record a sample. Make a call. Tap the shell gently to listen for rattles. If everything works, close the handset and tighten the screws evenly.
Finishing for That Rugged Look
The mil-spec style depends heavily on finish. Matte black PETG or ASA looks excellent right off the printer if the settings are clean. For extra realism, use subtle texture: a lightly pebbled print surface, fine sanding, or textured spray coating. Olive drab, desert tan, charcoal gray, and safety orange also work, depending on whether you want “field radio,” “industrial prototype,” or “prop from a movie where the computers beep too much.”
Labels add personality. Emboss “MIC,” “SPKR,” “PTT,” or a fake model number into the shell. Add a small printed serial plate. Use recessed lettering if you plan to paint-fill details. A few visible screws can also enhance the rugged look, provided they actually hold something together. Decorative screws are allowed, but they should at least pretend to have a job.
Testing and Troubleshooting
After assembly, test the handset in the environment where it will actually be used. A desk call is different from a workshop call. A quiet room is different from a garage with a fan, printer, and mysterious compressor noise. Listen for low microphone volume, hum, scratchy cable movement, echo, or distortion.
If the microphone is too quiet, confirm that the mic type matches the input. If audio plays but the microphone does not work, check TRRS wiring and adapter compatibility. If the handset sounds hollow, add foam behind the speaker or reduce internal resonance with small ribs or damping material. If the cable crackles when moved, improve the strain relief and inspect solder joints.
Mechanical testing is just as important. Hold it tightly. Set it down repeatedly. Tug the cable gently. Press the button a few dozen times. Do not start with a dramatic drop test from shoulder height unless you printed spare parts and enjoy learning through shattering.
Common Build Mistakes
Designing Too Thin
A handset should feel substantial. Thin walls save filament but create a toy-like feel and may crack around screws. Add thickness where hands apply pressure.
Ignoring Serviceability
If the shell cannot reopen, every wiring issue becomes a funeral. Use screws, inserts, and removable retainers whenever possible.
Trusting Adapters Blindly
Not every USB-C or Lightning audio adapter supports microphone input. Test the adapter with a normal headset before blaming your beautiful printed masterpiece.
Forgetting Ergonomics
Mil-spec style looks cool, but the handset still needs to fit a human face. Print a low-infill prototype and hold it before finalizing the model.
Experience Notes: What Building One Teaches You
The most surprising part of building a 3D printed phone handset with mil-spec style is how quickly it stops feeling like a novelty and starts feeling like a real product. On paper, it is just a plastic shell with a speaker, microphone, and cable. In the hand, it becomes an object with weight, grip, balance, and personality. That is when the small design decisions begin to matter.
One practical lesson is that comfort beats perfect visual accuracy. A true military-inspired profile may look fantastic on the screen, but if the grip is too square, it feels awkward after five minutes. Rounding the back of the handle, softening the edges near the mouthpiece, and slightly angling the speaker end can make the handset feel much more natural. The best version is not always the most accurate-looking version; it is the one people actually want to pick up.
Another lesson is that sound quality is partly mechanical. The same tiny speaker can sound thin in one shell and surprisingly decent in another. A loose speaker rattles. A large empty cavity can make voices sound boxy. A bit of foam, a tighter retainer, or a smaller rear chamber can improve clarity. Microphones are even fussier. Place the mic too deep and the voice sounds muffled. Leave it too exposed and every breath becomes a weather event. A thin layer of acoustic cloth or foam can make the handset more pleasant without hurting usability.
Wiring also teaches humility. A TRRS plug looks simple until you discover that left audio, right audio, ground, microphone, and button control all have opinions. USB-C adds another layer of “please read the documentation before celebrating.” The best workflow is to test the electronics outside the shell first. Breadboard the audio path, record a voice memo, try a call, and wiggle the cable. Only when it works should you lock it inside the printed body.
Heat-set inserts are a small luxury that become addictive. Once you use them, plain self-tapping screws in plastic feel rude. Inserts let you open the handset repeatedly, which is helpful because the first build is rarely the last build. Maybe you will swap the microphone. Maybe you will add a mute circuit. Maybe you will decide the button needs a better click. A repairable design invites improvement.
The final experience is aesthetic. A finished mil-spec-style handset has a theatrical quality. It turns an ordinary call into something that feels intentional. It looks great on a desk beside a laptop, radio project, VoIP box, Raspberry Pi intercom, or retro-futuristic control panel. It is useful, yes, but it is also a tiny rebellion against featureless black rectangles. Sometimes the best maker projects are not the ones that solve the biggest problem. They are the ones that make everyday technology feel fun again.
Conclusion
Building a 3D printed phone handset with mil-spec style is a satisfying blend of industrial design, practical electronics, and maker stubbornness. It lets you borrow the rugged charm of military communication gear while adapting the internals for modern phones, computers, USB audio adapters, or custom radio-style projects. The best builds use smart materials such as PETG or ASA, serviceable hardware like heat-set inserts, proper strain relief, and electronics chosen for the device they will actually connect to.
The project is also a reminder that 3D printing is not just for brackets, toys, and emergency drawer organizers. It can create objects with character. A handset is tactile. It has a job. It invites interaction. With careful design, clean wiring, and a little patience, your printed handset can look tough, feel good, sound clear, and make every call feel like you are receiving instructions from mission control.