
Table of Contents >> Show >> Hide
- What Are Chocolate Revel Bars?
- Why Chocolate Revel Bars Are So Popular
- The Anatomy of Great Chocolate Revel Bars
- Chocolate Revel Bars Recipe (Classic Style)
- Pro Tips for the Best Chocolate Revel Bars
- Common Chocolate Revel Bar Mistakes (and How to Fix Them)
- Flavor Variations to Try
- How to Serve, Store, and Freeze Chocolate Revel Bars
- Are Chocolate Revel Bars the Same as Magic Bars?
- Conclusion
- Extra: Real-World Baking Experiences With Chocolate Revel Bars (About )
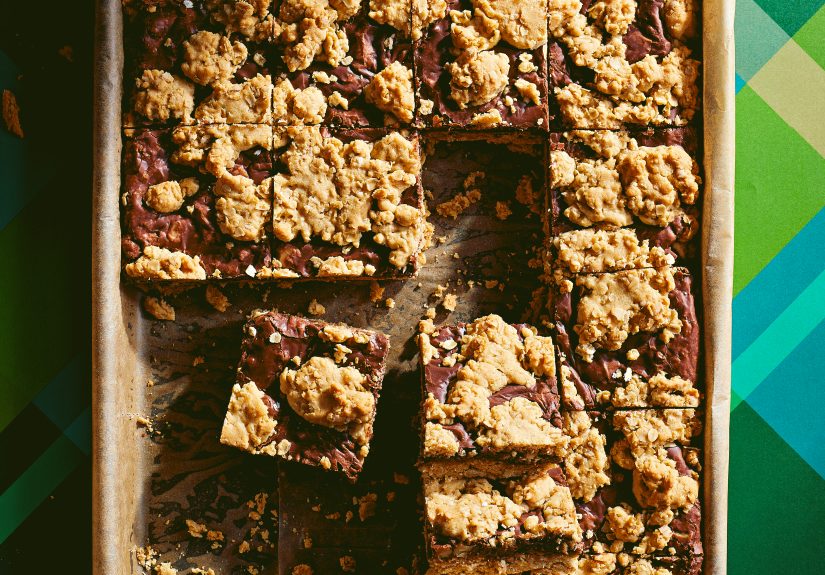
If brownies and oatmeal cookies had a very cozy, very chocolatey family reunion, Chocolate Revel Bars would be the star cousin who arrives with a foil pan and leaves with zero leftovers. These retro dessert bars are beloved for a reason: a chewy oat cookie base, a rich fudgy middle, and a crumbled oat topping that bakes into a golden, irresistible finish.
They’re nostalgic, crowd-friendly, and surprisingly simple once you understand the formula. In this guide, you’ll get an in-depth look at what makes revel bars work, how to make them taste amazing, and how to avoid the usual “why are my bars falling apart / too sweet / glued to the pan?” moments. (We’ve all been there. Some of us more than once. On holidays.)
What Are Chocolate Revel Bars?
Chocolate revel bars are classic oatmeal cookie bars with a sweet chocolate fudge filling sandwiched between two layers of oat-based dough. The dough is usually made with butter, brown sugar, eggs, flour, baking soda, vanilla, and oats. The filling is typically made with sweetened condensed milk, semisweet chocolate chips, butter, and vanilla, with chopped walnuts or pecans often added for texture.
In other words, they’re a layered bar cookie that delivers three textures in one bite:
- Chewy from the oats
- Fudgy from the condensed milk chocolate center
- Lightly crisp around the golden edges
They’re especially popular for potlucks, bake sales, holidays, church suppers, and any event where someone says, “Just bring a little something.” (This is not a little something. This is a tray of victory.)
Why Chocolate Revel Bars Are So Popular
1) They feed a crowd
A standard 9×13-inch pan can yield a generous batch, and if you cut them into smaller squares, you can stretch them for parties and dessert tables.
2) They use pantry staples
Most versions rely on ingredients many home bakers already keep around: oats, flour, brown sugar, butter, eggs, chocolate chips, and a can of sweetened condensed milk.
3) They freeze well
Chocolate revel bars are one of those magical desserts that can be made ahead, frozen, and brought back to life when guests appear or cravings strike at 9:47 p.m.
4) They’re flexible
You can make them nutty, nut-free, darker chocolate, slightly salty, or even add espresso powder for a deeper chocolate flavor.
The Anatomy of Great Chocolate Revel Bars
The Oat Layer
The top and bottom layers are not exactly cookie dough and not exactly crumblethey live in a delicious middle ground. Brown sugar gives the bars their warm, caramel-like sweetness, while oats add chew and structure.
Quick-cooking oats vs. old-fashioned oats:
Many classic recipes use quick-cooking oats for a slightly tighter, softer texture. Old-fashioned rolled oats also work and create a heartier chew. If you use old-fashioned oats, expect a more textured bite. If you use quick oats, the bars may feel a little more uniform and tender.
The Fudge Filling
This is the “revel” partthe part that makes people close their eyes and nod. Sweetened condensed milk melts with chocolate chips into a thick, glossy filling that bakes into a soft fudge layer. Butter and vanilla round out the flavor, and nuts help balance the sweetness.
Important note: Don’t confuse sweetened condensed milk with evaporated milk. They are not interchangeable here. The sugar in condensed milk is what helps create that signature fudgy texture and sweetness.
The Bake-and-Cool Stage
If you cut revel bars too early, the filling can ooze and the bars may crumble. Delicious? Yes. Photogenic? Not really. Letting them cool completely gives the layers time to set for cleaner slices.
Chocolate Revel Bars Recipe (Classic Style)
This is a classic-style version inspired by the most common and trusted approaches across vintage and modern revel bar recipes.
Ingredients
For the oat layers:
- 1 cup (2 sticks) unsalted butter, softened
- 2 cups packed light brown sugar
- 2 large eggs
- 2 teaspoons vanilla extract
- 2 1/2 cups all-purpose flour
- 1 teaspoon baking soda
- 1/2 teaspoon salt (optional but recommended for balance)
- 3 cups quick-cooking oats (or old-fashioned oats for a chewier texture)
For the chocolate fudge filling:
- 1 (14-ounce) can sweetened condensed milk
- 2 cups semisweet chocolate chips
- 2 tablespoons butter
- 1 teaspoon vanilla extract
- 1/2 to 1 cup chopped walnuts or pecans (optional)
- Pinch of salt (optional, but excellent)
Instructions
- Preheat and prep the pan. Preheat oven to 350°F. Line a 9×13-inch pan with parchment paper (leave overhang for easy lifting) and lightly grease exposed sides.
- Make the oat dough. In a large bowl, cream butter and brown sugar until combined and fluffy. Add eggs and vanilla, mixing until smooth.
- Add dry ingredients. Stir in flour, baking soda, and salt. Fold in oats until everything is evenly mixed. The dough will be thick.
- Reserve topping. Set aside about 1 1/2 to 2 cups of the oat mixture for the top.
- Press the base. Press the remaining oat mixture evenly into the prepared pan. A lightly greased spatula or damp fingertips make this easier.
- Make the fudge filling. In a saucepan over low heat, combine sweetened condensed milk, chocolate chips, and butter. Stir frequently until melted and smooth. Remove from heat, then stir in vanilla, optional salt, and nuts.
- Layer it up. Spread the chocolate filling evenly over the oat base. Crumble the reserved oat mixture over the top in small pieces (don’t press it flat).
- Bake. Bake 25–35 minutes, or until the top is lightly golden and the filling is set around the edges. The center may still look a little softthat’s okay.
- Cool completely. Let the bars cool in the pan, then lift out using parchment and slice. For the cleanest cuts, chill briefly before slicing.
Pro Tips for the Best Chocolate Revel Bars
Use parchment paper like a sling
Lining the pan with parchment and leaving overhang on two sides makes removal much easier. This helps protect the bars from sticking and gives you cleaner cuts after cooling.
Melt the filling gently
Low heat is your friend. Chocolate can scorch if rushed, and scorched chocolate tastes bitter. Stir frequently and remove the pan as soon as the mixture is smooth and glossy.
Don’t drastically reduce the sugar
It’s tempting, but heavy sugar cuts can change texture, spread, and overall structure in cookie bars. If you want to reduce sweetness, try these instead:
- Use semisweet or bittersweet chocolate instead of milk chocolate
- Add nuts for balance
- Sprinkle flaky salt on top after baking
- Cut smaller bars (your future self will thank you)
Cool fully before slicing
This is the difference between neat bakery-style bars and a delicious chocolate avalanche. Both are enjoyable, but only one stacks nicely for a bake sale.
Common Chocolate Revel Bar Mistakes (and How to Fix Them)
Problem: Bars are too crumbly
Possible causes: Too much flour, overbaking, or cutting while warm.
Fix: Measure flour carefully (spoon and level if possible), bake just until golden, and cool completely before slicing.
Problem: Filling is grainy or stiff
Possible causes: Chocolate overheated or not fully melted together with condensed milk.
Fix: Use low heat and stir until fully smooth before spreading.
Problem: Bars are too sweet
Possible causes: Milk chocolate chips, no salt, no nuts.
Fix: Use semisweet or bittersweet chocolate, add a pinch of salt, and consider walnuts/pecans.
Problem: Bars stick to the pan
Possible causes: No liner, insufficient greasing, or trying to remove while warm.
Fix: Use parchment with overhang, grease lightly, and let cool before lifting.
Flavor Variations to Try
1) Dark Chocolate Revel Bars
Swap semisweet chips for a mix of semisweet and dark chocolate chips for a richer, less sweet flavor profile.
2) Espresso Chocolate Revel Bars
Add 1/2 to 1 teaspoon espresso powder to the fudge filling. It won’t make the bars taste like coffee; it just makes the chocolate taste more chocolatey.
3) Peanut Butter Chocolate Revel Bars
Stir a few tablespoons of creamy peanut butter into the filling, or drizzle melted peanut butter over the cooled bars. Very lunchbox nostalgia. Very hard to stop eating.
4) Nut-Free Revel Bars
Skip the walnuts/pecans and add a pinch of extra salt for balance. You can also add toasted coconut if your crowd likes it.
5) Holiday Revel Bars
Add a small pinch of cinnamon to the oat layer or top the cooled bars with flaky sea salt for a festive cookie tray upgrade.
How to Serve, Store, and Freeze Chocolate Revel Bars
Serving Ideas
- Cut into small squares for parties and cookie platters
- Serve slightly warm with vanilla ice cream for a plated dessert
- Pack in lunchboxes (if they make it that far)
- Bring to potlucks in the pan and watch people hover nearby “just to help”
Storage
Store bars in an airtight container at room temperature for 2–4 days for best texture. If your kitchen is warm or humid, refrigerate them to keep the filling firm. Let chilled bars sit at room temperature a bit before serving if you prefer a softer bite.
Freezing
Freeze fully cooled bars in layers separated by parchment or wax paper in an airtight container. They usually keep well for up to 2–3 months. Thaw in the refrigerator or at room temperature.
Are Chocolate Revel Bars the Same as Magic Bars?
Not exactly. Both are retro bar desserts and often use sweetened condensed milk, but magic bars (or seven-layer bars) are usually built with a crumb crust and layered toppings like coconut and nuts. Chocolate revel bars are more like a layered oatmeal cookie bar with a fudge center.
Think of magic bars as the “dump-and-layer” cousin and revel bars as the “cookie-fudge sandwich” cousin. Same family reunion. Different dance moves.
Conclusion
Chocolate revel bars earn their reputation because they combine the best parts of several desserts into one pan: cookie, fudge, and bar cookie convenience. They’re rich but not fussy, nostalgic but still crowd-pleasing in modern kitchens, and endlessly adaptable for holidays, bake sales, or everyday cravings.
If you want a reliable dessert that looks homemade in the best possible way and tastes even better the next day, this is it. Make a batch, cool them completely, cut them neatly (or not), and enjoy the moment when someone asks, “Wait… can I get the recipe?”
Extra: Real-World Baking Experiences With Chocolate Revel Bars (About )
One of the most interesting things about Chocolate Revel Bars is how often they become a “memory recipe.” Even when people discover them for the first time, they tend to react like they’ve known them forever. That’s because the flavors feel familiar: oats like a homey cookie, chocolate like fudge, brown sugar like a warm bakery smell that somehow fills the whole kitchen before the bars are even done baking.
A common experience is making revel bars for a party and underestimating how much people will like them. You might arrange them on a tray next to brownies, cookies, and maybe a fancy tart you spent too much time decorating. Then, somehow, the revel bars disappear first. Not because they’re flashy. Because they’re the kind of dessert people take “just one” of, and then circle back for a second piece while pretending they’re checking on the drinks.
Another very real experience: the first time you try to cut them too soon. The top looks golden, the pan smells incredible, and patience suddenly seems like an outdated concept. You cut in, and the fudgy center slides a little, the edges crumble, and now you have something closer to a dessert excavation site than perfect squares. The good news? Warm, messy revel bars are still fantastic with a spoon. The better news? The next batch teaches you the power of cooling time, and your slices come out clean enough to make you feel like a professional baker for a full ten minutes.
Texture experiments are also part of the revel bar journey. Some bakers use quick oats for a softer, more compact bar. Others prefer old-fashioned oats for a chunkier chew. Some add walnuts because the slight bitterness and crunch help balance the sweetness. Others skip nuts entirely because they want pure chocolate-oat comfort. There’s no single “correct” version in everyday kitchens; there’s just the version your people ask you to make again.
Chocolate revel bars also tend to become a practical favorite. They travel well, stack neatly once cooled, and can be made ahead. That means they show up in real-life situations: school events, office potlucks, holiday tins, neighbor drop-offs, and those last-minute “Can you bring dessert?” texts. They’re impressive without being fragile, which is exactly what most home bakers need.
And then there’s the freezer discovery. Plenty of bakers swear revel bars are even better after a little time in the freezer or fridge because the layers firm up and the flavors settle in. You pull one out, let it soften just a bit, and suddenly the bar has this chewy-fudgy texture that feels almost candy-like. It’s the sort of thing that turns a casual snack into a “why am I standing in the kitchen eating this in complete silence?” moment.
In short, Chocolate Revel Bars aren’t just a recipethey’re an experience recipe. They teach timing, reward patience, adapt to preferences, and somehow manage to feel both nostalgic and new at the same time. That’s a pretty great return for one 9×13 pan.


