
Table of Contents >> Show >> Hide
- What Makes These “Chocolaty” Melted Snowmen (and Not Just Cute)?
- Quick Recipe Snapshot
- Ingredients
- Tools You’ll Want (No, You Don’t Need a Culinary Degree)
- Step-by-Step Instructions
- Pro Tips for Better Cookies (Because Snowmen Deserve Dignity)
- Flavor Variations (Choose Your Winter Personality)
- Make-Ahead, Storage, and Party Logistics
- Troubleshooting
- FAQ
- Kitchen Experiences: The Real Joy of Chocolaty Melted Snowmen Cookies (Extra Story Time)
If you’ve ever looked at a winter cookie tray and thought, “Needs more adorable chaos,” these Chocolaty Melted Snowmen Cookies
are your new best friends. They’re fudgy, cocoa-forward cookies topped with glossy “melted snow” icing and a marshmallow snowman who clearly forgot
to pack sunscreen. The best part? You don’t need fancy pastry skillsjust a microwave, a sense of humor, and the willingness to give a marshmallow
a dramatic makeover.
This recipe pulls together the most reliable, real-world tricks that American home bakers use: a sturdy chocolate cookie base that holds up under
icing, an easy white drizzle that actually sets, and a marshmallow “head” you can melt just enough to look hilariously doomed (but still delicious).
Whether you’re making easy Christmas cookies for a party, a cookie exchange, or a living-room “bake-off” with kids, these are built to impress
without turning your kitchen into a powdered-sugar crime scene.
What Makes These “Chocolaty” Melted Snowmen (and Not Just Cute)?
Traditional melted snowman cookies often start with plain sugar cookies. Great! Classic! Also… sometimes a little too sweet once you add icing and candy.
Here, we balance the whole situation with a soft chocolate cookie flavored with both cocoa powder and a scoop of
hot chocolate mix. That hot cocoa mix isn’t just sugarmost blends include cocoa and milk solids that give the cookie a cozy, “hot cocoa cookie”
vibe without tasting like you baked a mug.
Quick Recipe Snapshot
- Yield: About 20–24 cookies
- Total time: ~60–90 minutes (including cooling and decorating)
- Skill level: Beginner-friendly, kid-approved, perfectionist-optional
- Main keyword to remember: chocolaty melted snowmen cookies
Ingredients
For the Chocolate Cookie Base
- 1/2 cup (1 stick) unsalted butter, softened
- 1/2 cup granulated sugar
- 1/3 cup packed light brown sugar
- 1 large egg, room temperature
- 2 teaspoons vanilla extract
- 1 1/4 cups all-purpose flour
- 1/3 cup unsweetened cocoa powder (natural or Dutch-process both work)
- 1/4 cup hot chocolate mix (regular, not sugar-free)
- 1 tablespoon cornstarch (optional but highly recommended for softness)
- 1/2 teaspoon baking soda
- 1/4 teaspoon baking powder
- 1/2 teaspoon kosher salt (or 1/4 teaspoon table salt)
- 1/2 cup mini chocolate chips (optionalskip if you want a perfectly smooth “snow” look)
For the “Melted Snow” Icing (Choose One)
Option A: Candy-Melt Icing (sets faster, looks glossy)
- 8–10 oz white candy melts or vanilla almond bark
- 1–2 teaspoons neutral oil or shortening (helps it flow smoothly)
Option B: Quick Powdered Sugar Glaze (no specialty ingredients)
- 2 cups powdered sugar
- 2–3 tablespoons milk (add slowly)
- 1 teaspoon vanilla extract
- Pinch of salt (tiny, but it keeps the glaze from tasting flat)
Snowman Decorations
- 20–24 large marshmallows (or jumbo marshmallows cut in half)
- Black decorating gel, black icing, or melted semisweet chocolate for faces
- Orange sprinkles/jimmies, orange gel, or tiny orange candy triangles for noses
- Mini chocolate chips or black sugar pearls for eyes + buttons
- Pretzel sticks (break into small “arm” pieces)
- Optional hats: chocolate sandwich cookie halves + mini peanut butter cups (or chocolate wafers)
- Optional scarves: sour belt candy strips or fruit roll-up pieces
Tools You’ll Want (No, You Don’t Need a Culinary Degree)
- Mixing bowls + electric mixer (hand or stand)
- Measuring cups/spoons
- Baking sheets + parchment paper
- Cooling rack
- Microwave-safe plate
- Spoon or small offset spatula (for icing)
- Piping bag or zip-top bag (snip the corner) for faces and details
Step-by-Step Instructions
1) Make the Chocolate Cookie Dough
- Preheat oven to 350°F. Line 2 baking sheets with parchment.
- In a large bowl, cream the softened butter, granulated sugar, and brown sugar until fluffyabout 2 minutes.
- Beat in the egg and vanilla until smooth.
-
In a separate bowl, whisk flour, cocoa powder, hot chocolate mix, cornstarch (if using), baking soda, baking powder, and salt.
Whisking mattersit prevents “surprise” pockets of baking soda that taste like regret. - Add dry ingredients to wet ingredients and mix until just combined. Fold in mini chocolate chips if using.
2) Scoop, Chill (Quickly), and Bake
- Scoop dough into 1 1/2-tablespoon balls (cookie scoop = easiest). Place 2 inches apart on prepared sheets.
-
Chill the tray for 20 minutes (or chill the dough in a bowl). This helps control spread, keeps cookies thick,
and gives your snowmen a sturdier “puddle.” - Bake for 9–11 minutes, until edges look set and the centers look slightly underdone.
- Cool on the baking sheet for 10 minutes, then move to a rack. Let cookies cool completely before decorating.
3) Make the “Melted Snow” Icing
Option A: Candy-Melt Icing
- Melt candy melts/almond bark in a microwave-safe bowl in 20-second bursts, stirring each time.
- Stir in 1 teaspoon oil/shortening; add more only if needed. You want a thick-but-pourable consistency.
Option B: Powdered Sugar Glaze
- Whisk powdered sugar, vanilla, salt, and 2 tablespoons milk.
- Add more milk slowly until it ribbons off the whisk and spreads, but doesn’t run like water.
4) Ice the Cookies Like a Melting Snowbank
- Spoon 1–2 teaspoons icing onto each cooled cookie.
- Gently nudge it toward the edges so it “drips” a little over the sides. Imperfect is perfectreal snowbanks are chaotic.
- Let the icing sit for 3–5 minutes so it’s still tacky (this helps the marshmallow stick).
5) Melt the Marshmallows (Safely and With Minimal Drama)
You’re going for “soft slump,” not “marshmallow meteor.” Microwaves vary, so start small.
- Lightly grease a microwave-safe plate (tiny bit of oil or nonstick spray).
- Place 1 marshmallow on the plate.
- Microwave 10–15 seconds until it puffs slightly and starts to soften.
-
Using a spoon or clean fingers (carefulhot sugar!), slide it onto the cookie at an angle so it looks like the snowman is
dramatically face-planting into the icing. - Repeat for remaining marshmallows. Work in small batches (2–3 at a time) so they don’t cool before placement.
Shortcut method: Cut marshmallows in half and place cut-side down on the icing. If you want extra “melt,” give the whole cookie a
5-second microwave kissjust enough to slump, not enough to turn it into a sticky puddle.
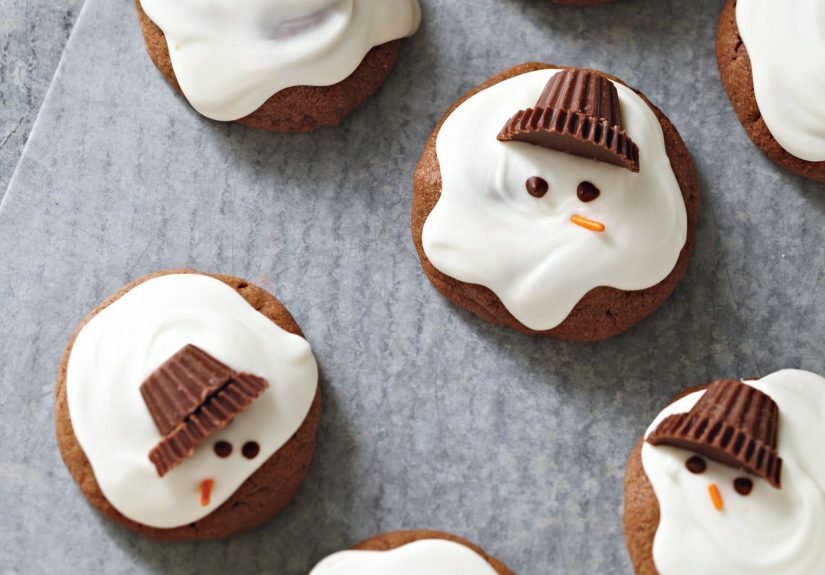
6) Decorate Your Tiny Marshmallow Tragedies
- Eyes + buttons: Press in mini chocolate chips (point side down) or use black gel/icing dots.
- Nose: Add an orange sprinkle/jimmy or pipe a tiny carrot with orange gel.
- Arms: Press pretzel stick pieces into the icing near the “body,” or pipe arms with chocolate.
- Hat (optional but iconic): Stick a mini peanut butter cup onto a chocolate sandwich cookie half using a dab of icing, then attach to the marshmallow.
- Scarf (optional): Wrap a thin strip of sour belt candy around the “neck” area. Suddenly your snowman is fashionable and doomed.
Let cookies set for 30–60 minutes before stacking or transporting. (Yes, you can taste-test one immediately.
No, I will not tell your future self.)
Pro Tips for Better Cookies (Because Snowmen Deserve Dignity)
Cookie Texture + Shape
- Chill the dough: The fastest way to avoid cookie “pancakes.” Thick cookies make better snowman puddles.
- Don’t overbake: Pull them when centers still look soft; they finish setting as they cool.
- Measure cocoa correctly: Spoon into the measuring cup and level. Packing cocoa makes dry cookies.
Icing That Sets (Instead of Sliding Off Like a Ski Slope)
- Candy melts set faster and handle humidity better than a thin glaze.
- If your glaze is too runny, add powdered sugar. If too thick, add milk one teaspoon at a time.
- Want extra-white icing? Use a bright white candy melt or add a tiny touch of white gel coloring.
Marshmallow Control
- Microwave in short bursts. Marshmallows go from “soft” to “volcanic” with zero warning.
- Grease the plate lightly so you can slide marshmallows off without leaving half their soul behind.
- Decorate once they’re set enough to hold details but still slightly tacky for good adhesion.
Flavor Variations (Choose Your Winter Personality)
Peppermint Mocha Melted Snowmen
Add 1/4 teaspoon peppermint extract to the dough (go easypeppermint is loud). For decoration, sprinkle crushed peppermint
over the icing before it sets. It’s like a candy cane and hot cocoa had a holiday meet-cute.
Double Chocolate “Hot Cocoa” Cookies
Keep the mini chocolate chips in the dough and drizzle the finished cookies with a little melted chocolate. Your snowmen will be
melting in a chocolate blizzard. Tragic. Delicious.
Gingerbread-Chocolate Mashup
Add 1/2 teaspoon cinnamon and a pinch of ground ginger to the dry ingredients. The result tastes like winter in a sweater.
Make-Ahead, Storage, and Party Logistics
Make-Ahead
- Dough: Chill up to 48 hours. Let it sit at room temp 10 minutes before scooping if it gets rock-hard.
- Baked cookies: Freeze undecorated cookies up to 2 months. Thaw at room temp, then decorate.
- Decorations: Pre-cut scarves, prep hats, and portion candies into bowls for an assembly line.
Storage
- Store in an airtight container at cool room temperature for 3–4 days.
- Place parchment between layers to protect faces (and snowman dignity).
- If your kitchen is warm, store in a cooler spot so marshmallows don’t get sticky.
Transport Tip (Cookie Exchange Survival)
Use a single layer in a shallow container if possible. If you must stack, add parchment and keep the container level.
These snowmen are already having a tough day.
Troubleshooting
My cookies spread too much.
Your dough likely needed more chill time, or the butter was too soft. Chill the scooped dough longer and bake on a cool sheet.
Also double-check your flour measurementtoo little flour = cookie sprawl.
My icing is lumpy.
Sift powdered sugar if you can. If not, whisk longer and press out lumps with the back of a spoon. Candy melts can seize if overheated,
so melt gently and stir often.
My marshmallow turned into a puffy balloon.
Shorter microwave time. Try 8–10 seconds first. You want it softened, not auditioning for a parade float.
FAQ
Can I use store-bought cookie dough?
Absolutely. If you’re going for maximum ease, bake your favorite refrigerated sugar cookies or chocolate cookies and focus your energy on
the decorating. This is supposed to be fun, not a baking endurance sport.
Do I have to microwave marshmallows?
Not strictly. You can cut them in half and press them into the icing for a “melted” look. Microwaving just adds extra slouch and drama.
Are these kid-friendly?
Yesespecially the decorating. For little helpers, skip the microwave and use marshmallow halves. Let them place eyes, noses, and scarves
like they’re running a tiny snowman costume department.
Kitchen Experiences: The Real Joy of Chocolaty Melted Snowmen Cookies (Extra Story Time)
The first time you make melted snowman cookies, you learn something important: no one is here for perfection. They’re here for personality.
In fact, the cookie that’s a little lopsidedthe one whose marshmallow head slid too far left like it’s trying to escape the scenewill get the most laughs.
People don’t point and judge. They point and say, “That one looks like me after holiday shopping,” and suddenly your dessert becomes a conversation starter.
That’s the magic. These cookies are edible comedy.
If you’ve ever hosted a holiday get-together where everyone brings a dish, you know the table can get a little… beige. Lots of dips. Lots of crackers.
Lots of “I made this because I had to.” Then you walk in with a tray of chocolaty melted snowmen cookies and it’s like dropping confetti
into a meeting. People crowd around. Someone takes a photo. Someone inevitably says, “I can’t eat it, it’s too cute,” and then immediately eats it.
Because it’s not that cute. It’s a melting marshmallow with candy eyes. We’re not adopting it.
These cookies also have a secret superpower: they turn baking into an activity instead of a chore. Set out bowls of mini chocolate chips, orange sprinkles,
pretzel arms, and candy scarves, and suddenly you’ve got a holiday craft session that ends with dessert. If kids are involved, the personalities get wilder.
One snowman becomes a pirate (hat slightly crooked, buttons everywhere). Another looks “shocked” because the eyes went on too high. And yessomeone will
create a snowman with five buttons because it “needed more.” Nobody correct them. You just nod like a supportive art teacher and call it “bold.”
My favorite way to make these is assembly-line style: bake the cookies earlier in the day, then decorate after dinner when everyone’s lingering at the table.
That timing is perfect because the pressure is low and the laughs are high. Someone sips coffee or cocoa, someone steals a mini peanut butter cup “for hat
testing,” and suddenly the kitchen feels like the holidays are actually happening instead of just being scheduled.
And if you’re the type who gives edible gifts, these are hilarious in cookie boxes. A row of neatly frosted cookies is nice, surebut a box containing
tiny melting snowmen? That’s memorable. Add a little note like, “They didn’t survive the heat, but they taste amazing,” and you’ve got a gift that feels
personal without requiring you to knit anyone a scarf. (Your snowmen already have scarves. You’re done.)
The best part is that these cookies forgive you. Icing too thick? It becomes a chunky snowbank. Marshmallow too melted? The snowman is having a tougher day.
Hat falls off? It’s windy on the tundra. The story always works. So the next time you want a holiday cookie decorating project that actually
tastes as good as it looks, make a batch, embrace the imperfections, and let your snowmen melt with dignitypreferably next to a mug of hot cocoa.


