Table of Contents >> Show >> Hide
- What Are Cookie Shooters?
- Why This Cookie Shooters Recipe Works
- Ingredients for Cookie Shooters
- Equipment You Need
- How to Make Cookie Shooters
- Best Fillings for Cookie Shooters
- Flavor Variations
- Troubleshooting Cookie Shooters
- Make-Ahead and Storage Tips
- Serving Ideas for Parties
- Expert Tips for the Best Cookie Shooters
- Experience Notes: What Making Cookie Shooters Teaches You
- Conclusion
Cookie shooters are what happens when chocolate chip cookies decide they are tired of being flat and want to become tiny edible cups. They are crisp on the outside, chewy in the middle, brushed with melted chocolate, and filled with cold milk, chocolate milk, vanilla cream, pudding, mousse, or any sweet sip-worthy filling you love. In other words, they are cookies with ambition.
This Cookie Shooters Recipe is designed for home bakers who want a party dessert that looks fancy but does not require pastry-school confidence, a marble countertop, or a dramatic cooking show soundtrack. The idea is simple: press chocolate chip cookie dough into a mini muffin pan or cookie shot mold, bake until golden, shape the centers while warm, coat the inside with chocolate to prevent leaks, then fill and serve.
The best part? Cookie shooters are flexible. You can make them for birthdays, sleepovers, holiday dessert boards, baby showers, movie nights, bake sales, or that completely valid Tuesday when regular cookies feel emotionally insufficient. This version focuses on a family-friendly milk-and-cookie style shooter, but you can easily customize the filling with strawberry milk, hot cocoa, espresso-flavored cream, whipped cheesecake filling, or chocolate mousse.
What Are Cookie Shooters?
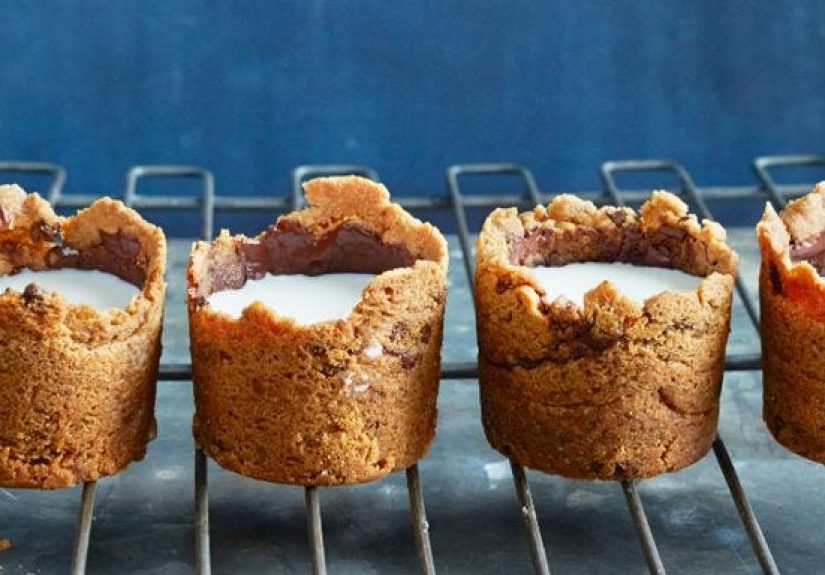
Cookie shooters are small cookie cups shaped like shot glasses or deep mini dessert cups. Instead of serving cookies beside milk, you serve the milk inside the cookie. It is the classic cookies-and-milk pairing, but with better architecture.
Most cookie shooters are made from chocolate chip cookie dough because the flavor is familiar, sturdy, and crowd-pleasing. The dough is baked in a mold or muffin tin so it forms a cup. After baking, the inside is coated with melted chocolate. This chocolate layer is important because cookies are naturally porous. Without a chocolate lining, liquid filling can seep through faster than a secret in a group chat.
Once the chocolate shell sets, the cookie cups are ready to fill. Serve them with cold milk for a nostalgic dessert, vanilla cream for a richer bite, or pudding for a spoonable party treat. They are especially fun because each guest gets an individual dessert that feels playful, polished, and just a little bit mischievous.
Why This Cookie Shooters Recipe Works
A good cookie shooter needs three things: structure, flavor, and leak control. Regular chocolate chip cookie dough can spread too much, so this recipe uses a slightly firmer dough with enough flour to hold its shape. Brown sugar adds chewiness and caramel flavor, while granulated sugar helps the edges bake up crisp enough to support the filling.
Mini chocolate chips are better than standard chips for this recipe because they distribute more evenly through the small cookie cups. Large chips can create weak spots in the walls, and nobody wants a dessert that springs a tiny milk leak five seconds after the photo is taken.
Chilling the dough also helps. Cold dough spreads less, firms up faster in the oven, and produces a better cup shape. After baking, pressing the centers while the cookies are still warm creates a clean well for filling. Finally, the melted chocolate coating acts like a delicious waterproof jacket. It seals cracks, adds flavor, and gives the finished cookie shooters a glossy, bakery-style look.
Ingredients for Cookie Shooters
For the Cookie Cups
- 1 cup unsalted butter, softened
- 3/4 cup packed light brown sugar
- 1/3 cup granulated sugar
- 1 large egg
- 1 large egg yolk
- 2 teaspoons pure vanilla extract
- 2 3/4 cups all-purpose flour
- 1 teaspoon cornstarch
- 3/4 teaspoon baking soda
- 1/2 teaspoon fine salt
- 1 cup mini semi-sweet chocolate chips
For the Chocolate Lining
- 1 1/2 cups semi-sweet chocolate chips or chopped chocolate
- 1 teaspoon coconut oil or vegetable shortening, optional for a smoother coating
For Filling
- 1 1/2 cups cold milk, chocolate milk, strawberry milk, or vanilla milk
- Optional: whipped cream for topping
- Optional: sprinkles, cookie crumbs, mini chocolate chips, or cocoa powder for garnish
Equipment You Need
You do not need a professional bakery setup to make cookie shooters. A cookie shot glass mold works beautifully, but a mini muffin pan is easier to find and still produces adorable dessert cups. You will also need a mixing bowl, hand mixer or stand mixer, rubber spatula, measuring cups, measuring spoons, cooling rack, and a small spoon or pastry brush for coating the inside with melted chocolate.
If using a mini muffin pan, a rounded teaspoon, small tart tamper, or the back of a wooden spoon can help press the warm cookie centers into neat wells. If using a silicone cookie shot mold, follow the mold’s guidance for filling and unmolding, but keep the same chilling and chocolate-lining technique.
How to Make Cookie Shooters
Step 1: Make the Cookie Dough
In a large mixing bowl, beat the softened butter, brown sugar, and granulated sugar for 2 to 3 minutes, until the mixture looks creamy and slightly fluffy. This step helps create a tender cookie texture, so do not rush it unless you enjoy dense cookie cups with the personality of a hockey puck.
Add the egg, egg yolk, and vanilla extract. Beat until fully combined. The extra egg yolk adds richness and chewiness, which is exactly what you want in a cookie cup that needs to hold its shape without turning dry.
Step 2: Add the Dry Ingredients
In a separate bowl, whisk together the flour, cornstarch, baking soda, and salt. Add the dry ingredients to the butter mixture in two additions, mixing on low speed until just combined. Do not overmix. Overworked dough can bake up tough, and cookie shooters should be sturdy, not stubborn.
Fold in the mini chocolate chips with a spatula. The dough should be soft but not sticky-wet. If it feels too warm or loose, that is normal. The refrigerator is about to do its quiet little magic trick.
Step 3: Chill the Dough
Cover the bowl and chill the dough for at least 45 minutes. If you have time, 1 to 2 hours is even better. Chilling firms the butter, hydrates the flour, and helps the cookie cups keep their shape while baking. For make-ahead convenience, the dough can be chilled overnight.
Step 4: Shape the Cookie Cups
Preheat the oven to 350°F. Lightly grease a mini muffin pan or cookie shot mold. If your pan tends to stick, add small parchment strips to the bottom of each cup so you can lift the cookies out more easily after baking.
Scoop about 1 1/2 tablespoons of dough into each mini muffin cup. Press the dough along the bottom and slightly up the sides, leaving a shallow indentation in the center. Do not make the walls too thin; cookie shooters need enough thickness to stay intact after baking and filling.
Step 5: Bake Until Golden
Bake for 11 to 14 minutes, or until the edges are golden and the centers look set but still soft. The exact baking time depends on your pan, oven, and dough temperature. The cookie cups will puff while baking, and that is expected.
As soon as the pan comes out of the oven, use the back of a rounded teaspoon or small tamper to gently press down the center of each cookie, creating a deeper well. Work carefully while the cookies are warm and flexible. If you wait too long, they may crack when pressed.
Step 6: Cool Completely
Let the cookie cups cool in the pan for 10 to 15 minutes. Then gently loosen the edges with a small offset spatula or butter knife and transfer them to a wire rack. Cool completely before adding chocolate. Warm cookies will melt the coating unevenly and may become fragile.
Step 7: Coat the Inside With Chocolate
Melt the chocolate chips with the coconut oil or shortening, if using, in a microwave-safe bowl. Heat in 20-second bursts, stirring after each burst, until smooth. You can also melt the chocolate over a double boiler if you prefer.
Spoon a small amount of melted chocolate into each cookie cup and brush or swirl it around the inside. Make sure the bottom and sides are fully coated. This creates the barrier that keeps the filling from soaking into the cookie too quickly. Place the coated cookie cups in the refrigerator for 15 to 20 minutes, or until the chocolate is firm.
Step 8: Fill and Serve
Right before serving, pour cold milk or your chosen filling into each cookie shooter. Add whipped cream, sprinkles, cookie crumbs, or a few mini chocolate chips on top. Serve immediately for the best texture.
Cookie shooters are at their finest when the cookie is crisp-chewy, the chocolate lining is firm, and the filling is cold. Once filled, they should be enjoyed soon. This is not the dessert to abandon on a table for three hours while everyone debates what movie to watch.
Best Fillings for Cookie Shooters
The classic filling is cold milk, but cookie shooters are basically tiny edible cups of opportunity. Chocolate milk gives them a double-chocolate vibe. Strawberry milk makes them playful and colorful. Vanilla milk tastes like melted ice cream in the best way.
For a richer dessert, try vanilla pudding, chocolate pudding, cheesecake mousse, whipped cream, or cookies-and-cream filling. If you want a brunch-style version, fill the cups with sweetened coffee cream or a chilled mocha-flavored milk. For kids’ parties, colorful milk, marshmallow cream, or pudding topped with sprinkles is usually a guaranteed win.
Flavor Variations
Double Chocolate Cookie Shooters
Replace 1/4 cup of flour with unsweetened cocoa powder and use white chocolate chips or mini chocolate chips. Fill with vanilla milk or chocolate pudding for a dramatic dessert-table look.
Sugar Cookie Shooters
Skip the chocolate chips and use a sugar cookie-style dough with vanilla and almond extract. Coat the inside with white chocolate and fill with strawberry milk or whipped cheesecake cream.
Peanut Butter Cookie Shooters
Replace half the butter with creamy peanut butter and reduce the flour slightly if the dough feels dry. Fill with chocolate milk or banana pudding for a classic flavor pairing.
Holiday Cookie Shooters
Add red and green sprinkles to the dough, dip the rims in white chocolate, and decorate with crushed peppermint or sanding sugar. Fill with cold cocoa milk for a festive dessert that looks like it came wearing a tiny holiday sweater.
Troubleshooting Cookie Shooters
Why Did My Cookie Cups Break?
Cookie cups usually break when they are removed from the pan too soon, pressed after they have cooled too much, or baked with walls that are too thin. Let them cool until firm but not rock-hard, and use a gentle twisting motion when removing them.
Why Are My Cookie Shooters Leaking?
Leaks usually mean the chocolate lining was too thin or did not fully cover the inside. Add a second layer of melted chocolate, especially around the bottom corners. Let the coating set completely before filling.
Why Did the Dough Puff Too Much?
Some puffing is normal. Press the centers down immediately after baking. If the dough rises excessively, check that you measured the flour correctly and did not add too much baking soda. Chilling the dough longer can also help.
Why Are the Cookie Cups Stuck in the Pan?
Grease the pan well and let the cups cool before removing. If your pan is older, parchment strips are your best friend. They create little handles that help lift the cookies out without a rescue mission.
Make-Ahead and Storage Tips
The cookie cups can be baked and coated with chocolate up to 2 days ahead. Store them in an airtight container at cool room temperature or in the refrigerator if your kitchen is warm. Wait to add the filling until just before serving.
Unfilled cookie shooters can also be frozen. Place them in a single layer until firm, then transfer to a freezer-safe container. Thaw at room temperature and refresh the chocolate lining if needed. Avoid freezing filled cookie shooters because the texture can become soggy when thawed.
If you are preparing these for a party, bake the cookie cups the day before, coat them with chocolate, and store them covered. Set up a small filling station with chilled milk, pudding, whipped cream, and toppings. Guests can fill their own cookie shooters, which saves you time and gives everyone the joy of playing dessert architect.
Serving Ideas for Parties
Cookie shooters look fantastic on a dessert board. Arrange them with small pitchers of milk, bowls of sprinkles, mini marshmallows, chocolate curls, crushed cookies, and whipped cream. For birthdays, use colorful cupcake liners or themed sprinkles. For holidays, choose seasonal toppings like crushed peppermint, cinnamon sugar, toasted coconut, or red and green mini candies.
You can also serve cookie shooters as part of a milk-and-cookie bar. Offer different fillings, such as classic milk, chocolate milk, strawberry milk, vanilla cream, and pudding. Label each one so guests know what they are pouring. This setup is easy, interactive, and much more memorable than a plain tray of cookies.
Expert Tips for the Best Cookie Shooters
Use mini chocolate chips for better structure. Chill the dough before baking. Press the centers while the cookies are still warm. Cool completely before coating with chocolate. Apply enough chocolate to seal the entire inside. Fill only when ready to serve.
Another helpful tip is to slightly underfill each shooter. It may be tempting to pour milk right to the top, but a little breathing room prevents spills. Cookie shooters are cute, but they are not professional plumbing fixtures.
For cleaner presentation, dip the rims in melted chocolate and then into sprinkles or cookie crumbs. Let the rims set before filling. This small step makes the cookie shooters look polished and adds extra texture to every bite.
Experience Notes: What Making Cookie Shooters Teaches You
The first time you make cookie shooters, you may feel like you are doing a tiny construction project with butter, sugar, and hope. That is part of the charm. Unlike regular cookies, cookie shooters ask you to think about structure. You are not just baking for flavor; you are baking for shape, strength, and the ability to hold a delicious filling without turning into dessert soup.
One of the biggest lessons is that patience matters. Chilling the dough may seem like the boring part, but it is the difference between neat little cookie cups and a muffin pan full of cookie lava. Cold dough is easier to shape, bakes more evenly, and holds the cup form better. If you have ever skipped chilling and watched dough spread like it was trying to escape the pan, you already understand why the refrigerator deserves respect.
The second lesson is that warm cookies are cooperative cookies. Right after baking, the centers are soft enough to press into shape. This is the golden window. Press too early and the dough may collapse; wait too long and the cookie may crack. The sweet spot is usually within the first minute or two after the pan leaves the oven. It feels a little fussy the first time, but after a batch or two, you will know exactly how much pressure to use.
The chocolate lining is another experience builder. At first, it may feel like an optional decoration. Then you fill one unlined cookie cup with milk and learn, very quickly, that cookies are not waterproof. A good chocolate coat changes everything. It creates a smooth inner shell, adds flavor, and gives you more time to serve the shooters before the filling softens the cookie.
Cookie shooters are also a great reminder that presentation does not need to be complicated. A tray of these tiny cookie cups instantly looks festive. Add a few toppings, a small pitcher of milk, and maybe some napkins because someone will absolutely overfill one, and suddenly you have a dessert that feels interactive and special.
Most importantly, cookie shooters are fun. They invite people to smile before they even take a bite. Kids love them because they are playful. Adults love them because they taste nostalgic. Bakers love them because they can be customized endlessly. Once you master the basic method, you can change the dough, coating, filling, and toppings to match almost any season or celebration.
If your first batch is not perfect, do not panic. Maybe a few crack. Maybe one leaks. Maybe one mysteriously disappears before serving because quality control is a serious responsibility. Each batch gets better, and even the imperfect ones taste like chocolate chip cookies. That is the beauty of this recipe: the learning curve is sweet, the mistakes are edible, and the final result is the kind of dessert people remember.
Conclusion
This Cookie Shooters Recipe turns the classic cookies-and-milk combination into a fun, creative dessert that works for parties, holidays, family nights, and special occasions. By using a sturdy chocolate chip cookie dough, chilling it before baking, shaping the centers while warm, and sealing each cup with melted chocolate, you get cookie shooters that are flavorful, cute, and ready to hold your favorite filling.
Serve them with cold milk for a nostalgic treat, pudding for a richer dessert, or flavored milk for a colorful twist. Whether you are making them for kids, guests, or your own very important snack agenda, cookie shooters bring big personality in a tiny edible cup.
Note: This article is written in original standard American English for web publishing and is based on established cookie cup, chocolate chip cookie, and dessert shooter baking techniques.