
Table of Contents >> Show >> Hide
- Why This Hybrid Storage Method Works So Well
- Start With the Cardboard, Not the Printer
- Let the 3D Printed Bits Do the Fancy Work
- A Practical Formula for Building Custom Storage Boxes
- Real-World Ideas for Cardboard-and-Print Storage
- Mistakes That Ruin a Good Storage Box
- When Cardboard Is the Wrong Material
- Conclusion
- Experience Notes: What It’s Like to Actually Live With These Boxes
There are two kinds of storage people in this world: the ones who buy a plastic bin and call it a day, and the ones who stare at a drawer full of random cables, screws, batteries, pens, adapters, and mystery widgets and think, “This needs a custom solution.” If you’re in the second camp, welcome. You are among friends, and also among people who have definitely printed one tiny bracket for a box, then spent 45 minutes admiring it like it was a museum piece.
The good news is that custom storage does not have to mean expensive plywood cabinetry, fancy acrylic, or a weekend lost to hardware-store wandering. One of the smartest DIY combinations around is also one of the most affordable: cardboard for the large surfaces and 3D printed parts for the precise, high-value details. In other words, let cardboard do the boring work and let the printer show off.
That hybrid approach works because each material is doing what it does best. Cardboard is light, cheap, easy to cut, and shockingly capable when you choose the right corrugated board. 3D printed parts, on the other hand, are excellent for corners, handles, feet, spacers, clips, dividers, rails, label frames, and other small components where accuracy matters. Together, they create storage boxes that feel custom, organized, and oddly satisfying without draining your wallet or your filament spool.
Whether you want workshop bins, office organizers, board-game inserts, media boxes, craft storage, or drawer-friendly containers that fit your space like they were born there, this method gives you the freedom to build exactly what you need. No dead space. No awkward almost-fits. No drawer that looks like it was organized by raccoons.
Why This Hybrid Storage Method Works So Well
The biggest strength of cardboard-and-print storage is efficiency. Large flat panels are the least exciting part of any storage box, and they are also the part that takes the most material. Printing those walls in plastic is possible, but it is usually the wrong kind of ambition. It takes more time, more filament, and more patience than most people want to spend on what is basically a rectangular container for Allen keys.
Cardboard solves that immediately. Corrugated board gives you stiffness with very little weight, it folds cleanly, and it is easy to replace if you redesign the box later. That last point matters more than people expect. The first version of a custom storage box is often a test. Maybe the handle needs to move. Maybe the divider spacing is off by half an inch. Maybe you forgot the charger cable has a giant brick on it. With cardboard, iteration is cheap.
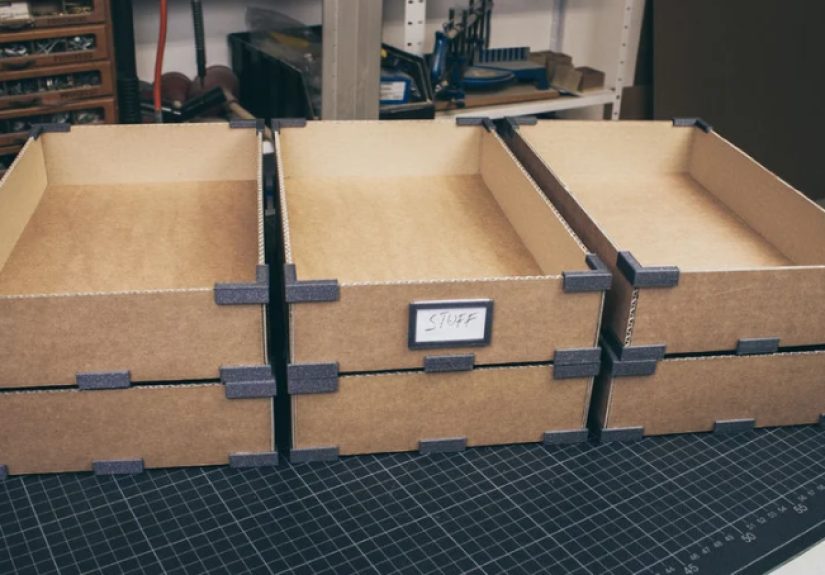
Then the 3D printed pieces come in like the supporting cast that steals the whole movie. Printed corners square up the structure. Printed rails guide sliding trays. Printed finger pulls make access easier. Printed latches, clips, and stackers add function that cardboard alone would struggle to provide. Instead of asking one material to do everything, you are assigning jobs intelligently. That is good design, and also a great excuse to make tiny useful gadgets.
Start With the Cardboard, Not the Printer
Choose the right board for the job
Not all cardboard deserves equal respect. Thin cereal-box board is fine for templates, drawer dividers, and light-duty inserts, but it is not your hero material for a box that will hold tools or heavy craft supplies. For that, corrugated cardboard is the move.
If you are building boxes from scratch, think about the board profile. Thicker corrugated board cushions well and adds stacking strength, while thinner profiles can be cleaner for smaller containers, tighter folds, and more precise-looking designs. That means your workshop fastener bin and your keepsake organizer may want very different wall material. A chunky utility box can benefit from sturdier corrugation, while a compact desktop organizer may look and behave better with thinner board and printed reinforcement at stress points.
Also pay attention to where the box will live. A box on a dry office shelf has a much easier life than one in a garage, attic, or damp basement. Ordinary cardboard is vulnerable to moisture, pests, and gradual sagging over time. So if you are organizing priceless family photos, critical documents, or treasured collectibles, standard cardboard is not your best option. Use archival or acid-free materials for long-term preservation, or switch to plastic, wood, or dedicated archival storage solutions.
Measure like a grown-up, not like an optimist
Custom storage fails most often at the measuring stage. People measure the item, sketch a rectangle, and move forward with the confidence of someone who has never been betrayed by a lid. Then the box ends up too tight, too tall, or weirdly roomy in exactly the wrong direction.
Measure the real object, not the fantasy version of the object. Include handles, feet, cable bends, label tabs, and the fact that human hands need room to grab things. If you are storing multiple items, stage them together first and determine how much clearance you need between compartments. A good custom box should feel intentional, not vacuum-sealed.
One practical trick is to prototype dimensions with scrap board first. Make the ugliest possible version of the box. Seriously. If it looks like a middle-school science-fair casualty but teaches you where the fit is wrong, it has done its job beautifully. Then refine the size before you print your nice hardware.
Think about shipping if the box will travel
If your custom box is meant for shipping products, gifts, kits, or Etsy orders, volume matters as much as strength. Carriers look at dimensional weight, which means oversized packages can cost more even when they are light. A box that is only a little too tall can quietly become a money leak. That is why custom depth, snug inserts, and reduced dead air are worth caring about. A better-fitting box protects the contents, uses less filler, and can be cheaper to ship.
Let the 3D Printed Bits Do the Fancy Work
The smartest hybrid boxes do not use 3D printing for everything. They use it where geometry, repeatability, and precision create a real upgrade.
Great things to print include corner brackets, edge caps, stacking feet, front label frames, locking tabs, hinge components, pull handles, divider clips, and modular connectors that let several boxes snap together. If you want drawers inside a larger cardboard shell, printed rails and stops are especially useful. If you want removable compartments, printed divider slots make the system feel more polished and less like a box that was bullied into cooperation.
Snap-fit parts are another excellent option. When designed well, snap fits can make assembly cleaner and faster than screws or glue-heavy methods. For small lids, removable trays, and reusable closures, a well-shaped printed latch can make a humble cardboard box feel surprisingly premium. Just remember that tolerances matter. Broad flat parts can warp, holes can print a bit undersized, and assemblies often need clearance so they do not bind like two toddlers refusing to share a sandbox.
Material choice matters too. For light-duty indoor parts, PLA is often perfectly fine for label plates, corner protectors, and brackets that are not under serious stress. But if you need tougher, more durable parts that flex a bit without snapping, PETG is usually the stronger pick. It is especially useful for handles, clips, rails, and parts that may get bumped, loaded, or repeatedly removed and reattached.
A Practical Formula for Building Custom Storage Boxes
Here is a clean process that works for almost any hybrid storage project:
- Define the job. Is this box for storage, display, shipping, archiving, or transport? The answer changes everything.
- Measure the contents and the space. The object has to fit the box, and the box has to fit the shelf, drawer, closet, or cart.
- Prototype with scrap cardboard. Confirm the dimensions before printing accessories.
- Identify stress points. These are corners, handles, front edges, stacking points, and anything that slides or locks.
- Assign those stress points to printed parts. Let plastic take the precision and wear. Let cardboard take the area and volume.
- Assemble simply. Use folds, tabs, hot glue, double-sided tape, or mechanical clips based on how permanent you want the build to be.
- Label aggressively. A custom box without a label is just a mystery with good posture.
This workflow keeps the project from becoming over-engineered. That is important because storage projects can become little ego traps. Suddenly you are designing a magnetic hinge system for a box that holds zip ties. Resist the siren song. Practical beats precious.
Real-World Ideas for Cardboard-and-Print Storage
1. Workshop fastener bins
Build a bank of shallow cardboard trays sized for screws, anchors, washers, and drill accessories. Add printed label holders on the front, printed rails if the bins slide, and printed corner guards if the fronts will take a lot of abuse. This setup is affordable, fast to expand, and much easier to customize than store-bought assortments.
2. Desk or office organizers
A desktop system can use cardboard shells wrapped in nice paper or paint, with printed feet, pen dividers, charging-cable guides, and front pulls. This is especially useful for awkward drawers where off-the-shelf organizers waste space. You can design each box to fit envelopes, notebooks, chargers, sticky notes, and other tiny chaos-makers.
3. Board game or hobby inserts
Board games, trading cards, miniatures, electronics kits, and craft tools all benefit from fitted storage. Cardboard keeps the inserts light, while printed trays, clips, and token wells give you accuracy where it matters. It is a great middle ground between flimsy packaging and a fully printed insert that takes half a semester to finish.
4. Closet and craft-room bins
If you are organizing ribbon, thread, vinyl scraps, seasonal decor, or paper supplies, custom-sized boxes are incredibly useful. Make the outer shell from corrugated board, then print finger pulls, tag holders, and stack spacers. The result looks cohesive without costing designer-bin money.
5. Shipping and gift boxes with repeatable dimensions
For small business owners, cardboard is already part of the workflow. Adding printed jigs, fold guides, corner protectors, and internal product cradles can dramatically improve consistency. That means less wasted fill, better presentation, and fewer packages arriving as if they had been drop-kicked into the delivery van.
Mistakes That Ruin a Good Storage Box
Printing giant walls instead of useful small parts. This is the number-one mistake. It burns time and material without creating much benefit.
Ignoring load direction. A cardboard box may feel strong until the weight hits the wrong edge or the front panel bows under repeated use. Reinforce expected stress points early.
Designing for the shelf but not for the hand. Boxes should be easy to grab, remove, open, and return. A beautiful box that requires tweezers and prayer is not a storage solution.
Using ordinary cardboard for sensitive long-term storage. Moisture, pests, acidity, and time are not kind. Use better materials for documents, photos, and heirlooms.
Skipping labels. Every unlabeled box eventually becomes “the one with the stuff in it,” which is not a real system no matter how much you squint at it.
When Cardboard Is the Wrong Material
Let’s be honest: cardboard is not magic. It is excellent for low-cost custom organization, but it has limits. If the box will live in a humid environment, hold very heavy contents, face frequent liquid exposure, or protect items with high sentimental or financial value, step up to a more durable material. Plastic totes, plywood cases, archival board, or foam-lined enclosures may make more sense.
The same goes for parts that demand high strength, heat resistance, or food safety. A hybrid build works best when you are realistic about the environment. A tidy craft room is one thing. A damp garage beside lawn chemicals is another. One is a Pinterest board. The other is a cautionary tale.
Conclusion
Custom storage boxes made from cardboard and 3D printed bits hit a sweet spot that a lot of DIY systems miss. They are affordable without feeling flimsy, flexible without becoming messy, and custom without turning into a six-week engineering saga. Cardboard gives you scale. 3D printing gives you precision. Together, they turn odd spaces and awkward objects into something organized, efficient, and genuinely pleasant to use.
The real beauty of this method is that it invites iteration. You can start small, improve fast, and tailor every box to the way you actually live or work. Make one for charging cables. Then one for hobby tools. Then one for the drawer that currently contains batteries, scissors, receipts, and a single mystery key from 2018. Before long, you are not just storing stuff. You are building a system.
And that is the difference between clutter control and clutter cosplay.
Experience Notes: What It’s Like to Actually Live With These Boxes
The first time I made a custom storage box from cardboard and a few printed parts, I expected it to feel temporary. You know, one of those “this will do for now” projects that quietly collapses in a month and teaches you a life lesson about ambition. Instead, it became one of the most useful things in the room. That is the sneaky charm of hybrid storage: it sounds humble, but it behaves like a smart upgrade.
What surprised me most was how quickly the project went from concept to daily use. The cardboard body came together fast, and the printed parts solved the little annoyances that usually make DIY boxes feel rough around the edges. A front pull made it easy to grab. Corner pieces kept the box square. A printed label frame turned “some cables in a box” into a category. Suddenly the shelf looked intentional instead of apologetic.
There is also something deeply satisfying about designing for your exact mess. Store-bought bins are always almost right. They are too tall, too narrow, too deep, too expensive, or somehow all four at once. A custom box fixes that. When a container is sized specifically for your camera batteries, soldering supplies, art markers, or tea bags, the whole area works better. You stop stuffing. You stop stacking weirdly. You stop making bargains with chaos.
Another good surprise is how easy it is to revise the design. That matters because the first version is rarely perfect. One of my early boxes had dividers that were too tight, so removing one item meant disturbing everything around it like a tiny domestic earthquake. In a fully printed build, that would have been irritating. With cardboard, I just cut a new internal panel, reprinted two clips, and called it progress instead of failure. That low-stakes iteration changes the whole mood of the project. You experiment more because mistakes are cheap.
Over time, the boxes that lasted longest were the ones where I respected the materials. Lightweight office supplies? Great. Craft tools? Also great. Heavy steel hardware in a damp area? That is when cardboard starts looking at you like, “I would prefer not to.” The best results came from using cardboard for structure and printed plastic for the parts that got touched, flexed, dragged, or bumped. Once I learned that balance, the builds got better fast.
I also learned that labels are not optional. They are part of the design. A custom storage box without a label is basically a beautiful lie. You think you will remember what is inside, and maybe you will for two weeks. Then life happens, the box rotates to a different shelf, and now you are opening three nearly identical containers trying to locate one USB adapter while silently questioning your system. A clean printed label holder fixes that nonsense immediately.
The biggest long-term benefit, though, is not aesthetic. It is behavioral. When a storage solution fits your life, you use it. That sounds obvious, but it is the entire game. People do not stay organized because they bought attractive bins. They stay organized because the system is easier than making a mess. A custom box with the right dimensions, the right openings, and the right dividers removes friction. It gives every object a home that actually makes sense.
And yes, there is a small emotional bonus too. It feels good to make something practical from simple materials. Cardboard is humble. 3D printing is precise. Put them together and you get a project that feels clever rather than flashy. It is the kind of build that makes you open a drawer just to admire how reasonable your life has become. For at least six seconds, anyway.


