
Table of Contents >> Show >> Hide
- Why a Decorative Dresser Makeover Is Worth It
- Start With the Right Piece
- Prep Work: The Least Glamorous Step and the Most Important
- Choosing the Best Finish for Your Dresser Style
- Decorative Upgrades That Make the Biggest Visual Difference
- Color Ideas for a Decorative Dresser Makeover
- How to Style the Finished Dresser
- Common Mistakes to Avoid
- Decorative Dresser Makeover Ideas by Style
- What the Experience of a Decorative Dresser Makeover Really Feels Like
- Final Thoughts
- SEO Tags
A decorative dresser makeover is one of those rare home projects that delivers drama without demanding a second mortgage, a contractor named Chad, or a complete emotional breakdown in the paint aisle. With the right prep, a little patience, and a good eye for details, an old dresser can go from “college apartment survivor” to “Where did you buy that?” faster than you can lose a screw from the hardware bag.
The beauty of a dresser makeover is that it blends function and personality. You are not just refinishing a piece of furniture. You are creating storage that actually contributes to the room. A plain dresser can become a vintage-inspired showpiece, a modern statement in a small bedroom, a nursery focal point, or even a soft, elegant accent in a guest room. And unlike giant renovation projects, this one lets you see meaningful progress quickly. That first fresh coat of paint is basically instant therapy.
If you want a decorative dresser makeover that looks intentional instead of accidental, the secret is not just color. It is the whole combination: prep work, paint choice, surface treatment, decorative accents, hardware, and styling. Done right, even a budget dresser can look custom. Done wrong, it can look like it lost a fight with a craft store. Let’s aim for the first option.
Why a Decorative Dresser Makeover Is Worth It
Dressers are perfect makeover candidates because they have strong structure, lots of visible surface area, and built-in design opportunities. Every drawer front is basically a mini canvas. That means you can use paint, wallpaper, trim, stain, overlays, decorative knobs, or mixed materials to create something unique.
A makeover is also practical. Maybe the dresser is sturdy but dated. Maybe the wood tone clashes with your room. Maybe the hardware says “builder-grade sadness.” Or maybe you found a secondhand piece that has good bones but bad vibes. In each case, a decorative update can give the dresser a new life without sending another bulky piece to the curb.
From an interior design perspective, a transformed dresser can help anchor a room. In a neutral bedroom, it can provide color and texture. In a bold room, it can support the palette with a coordinated finish. In a small space, it can act as both storage and decor, which is the kind of overachieving behavior we love in furniture.
Start With the Right Piece
Not every dresser needs to be an antique heirloom to deserve a glow-up. Solid wood is excellent because it is durable and forgiving, but laminate, MDF, and particleboard can also be successfully updated with the right preparation. The main thing to check is whether the dresser is stable. Open the drawers. Wiggle the frame. Inspect the legs, sides, and drawer bottoms. If it is collapsing like a tired croissant, decorative paint will not save it.
Look for a piece with good lines and workable proportions. Even if the finish is ugly, the shape matters. Curved drawer fronts, chunky legs, clean midcentury lines, or classic traditional details can all become assets once the surface is refreshed. Damage like dents, scratches, loose veneer, or chipped corners is often repairable. Structural disaster is another story.
Prep Work: The Least Glamorous Step and the Most Important
Let’s be honest: nobody daydreams about cleaning, patching, sanding, and priming. People dream about the pretty color, the fancy knobs, and the dramatic before-and-after reveal. But the makeover magic starts long before the fun stuff. Prep is what separates a durable finish from a flaky regret.
1. Remove Hardware and Drawers
Take off the knobs, pulls, and any removable trim. Pull the drawers out and label them if needed, especially if the fit is slightly different from drawer to drawer. This makes painting easier and helps you avoid awkward brush gymnastics later.
2. Clean Like You Mean It
Furniture collects dust, oils, wax residue, and mystery grime that no one invited. Clean all surfaces thoroughly before sanding or priming. If you skip this step, you risk trapping dirt under the finish, which is a terrible design choice.
3. Repair Imperfections
Fill dents, chips, and gouges with wood filler where appropriate. Tighten loose joints. Reglue lifting veneer if possible. For particleboard or MDF edges that look swollen or rough, repair and smooth them carefully before painting. Decorative results depend on a sound base.
4. Sand for Adhesion, Not Punishment
You usually do not need to sand every old finish down to bare wood. Most dressers just need the surface scuffed so primer and paint can grip properly. Smooth existing finishes often benefit from fine sanding, while rougher or peeling surfaces may need a more aggressive first pass before being smoothed again. After sanding, remove every trace of dust. Dust is the enemy of good paint and the best friend of weird texture.
5. Prime Before You Get Fancy
Primer helps with adhesion, evens out patchy surfaces, and creates a reliable base for color. This is especially important on glossy finishes, stained wood, laminate, MDF, and particleboard. If your dresser is dark and you want a light color, primer saves you from applying eleven thousand coats of paint while questioning your life choices.
Choosing the Best Finish for Your Dresser Style
A decorative dresser makeover should match both the piece and the room. Paint is the fastest way to transform a dresser, but stain, wax, topcoat sheen, and mixed finishes all affect the final vibe.
Classic Painted Finish
This is the most versatile option. A painted dresser can look coastal, traditional, farmhouse, modern, glam, or playful depending on the color and hardware. Soft white, warm greige, dusty blue, olive green, charcoal, navy, blush, and black all have strong design appeal. Satin and semi-gloss finishes tend to balance beauty and practicality well because they are easier to wipe clean than very flat finishes.
Chalk-Style Finish
Chalk-style paint is popular because it creates a velvety, character-rich look and often requires less fuss than traditional paint systems. It is great for vintage, cottage, and distressed styles. That said, it is not fairy dust. Slick surfaces still benefit from proper prep, and the finish often needs wax or a protective topcoat depending on how much wear the piece will get.
Paint and Stain Combo
One of the prettiest decorative approaches is mixing painted drawer fronts or frames with a stained wood top. This combination gives warmth, contrast, and a more custom look. It works especially well in modern rustic, transitional, and midcentury-inspired spaces.
Distressed or Layered Finish
If you love character, a layered paint treatment can create a timeworn effect. This works beautifully on traditional dressers with trim details or carved fronts. The key is control. A little distressing looks curated. Too much distressing looks like the dresser escaped a historical reenactment.
Decorative Upgrades That Make the Biggest Visual Difference
Paint is only the beginning. Decorative details are what take a dresser from “freshly painted” to “deliberately styled.”
Wallpaper or Peel-and-Stick Drawer Fronts
Adding wallpaper to drawer fronts is a smart way to introduce pattern without overwhelming the room. Floral prints, grasscloth looks, geometric designs, and subtle textures all work beautifully. This trick is especially effective when the frame is painted a solid color and the pattern becomes the star. It is also a budget-friendly way to fake a custom designer piece.
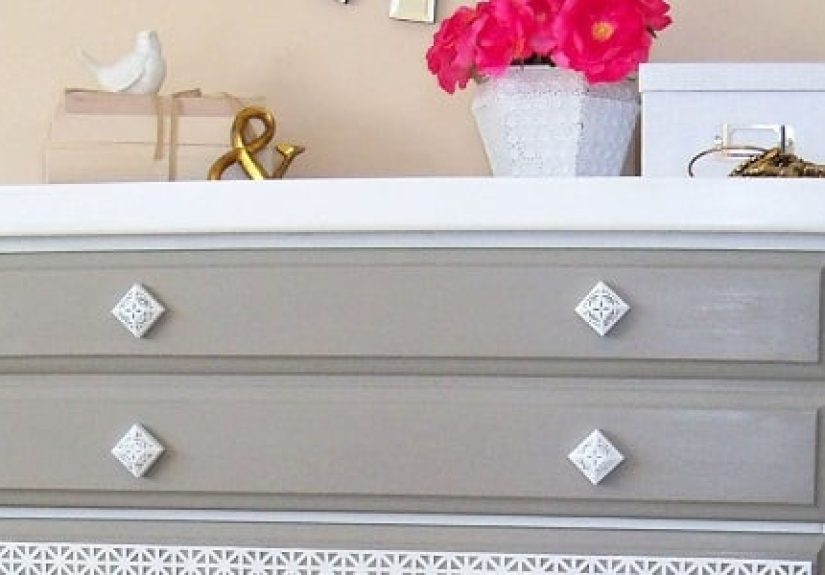
New Hardware
Never underestimate the power of knobs and pulls. Swapping hardware can change the entire personality of a dresser. Brass adds warmth. Matte black feels modern. Glass knobs can lean vintage. Wood pulls create a softer, organic look. Oversized hardware can feel dramatic, while smaller knobs keep things classic. If you only have room in the budget for one upgrade, hardware is a strong contender.
Decorative Trim and Overlays
Flat-front dressers can gain depth with applied trim, carved overlays, or molding. This is a great way to create faux paneling, traditional detailing, or European-inspired charm. Once painted, those added details can make a basic dresser look significantly more expensive.
Leg Swaps and Base Changes
Changing out the legs can dramatically alter the silhouette. Tapered legs can push a dresser toward midcentury style. Bun feet can make it more traditional. A plinth base can feel modern and grounded. Sometimes the makeover is not about the surface at all. Sometimes the bottom half of the furniture was simply living in the wrong decade.
Two-Tone or Ombre Color
If you want a dresser with more personality, use two coordinating colors or try an ombre effect across the drawers. A darker base with lighter upper drawers can feel refined, while tonal shading creates playful movement. This works best when the rest of the room is not fighting for attention.
Color Ideas for a Decorative Dresser Makeover
The right color depends on your space, lighting, and design goal.
For a Timeless Look
Try soft white, cream, taupe, or muted gray. These colors are easy to style and work across many decor trends.
For a Bold Statement
Go with deep navy, forest green, black, terracotta, or rich plum. These shades can make a dresser feel grounded, dramatic, and custom.
For a Soft, Decorative Touch
Consider sage, dusty rose, pale blue, or buttery beige. These shades feel inviting and pair well with brass, cane, floral wallpaper, or vintage-style hardware.
For a Modern Organic Room
Use earthy green, mushroom, clay, or warm brown with natural wood accents. This combination feels current without trying too hard.
How to Style the Finished Dresser
Once the makeover is done, styling matters. A decorative dresser should look like it belongs in the room, not like it wandered in from a completely different Pinterest board.
Start with scale. A large mirror or artwork above the dresser helps anchor it visually. Then add layers: a lamp, a tray, a small stack of books, greenery, a candle, or a ceramic vase. Vary height and texture, but do not overcrowd the top. This is still furniture, not a yard sale display table.
Think about how the dresser interacts with nearby elements. If your bedding is patterned, keep the dresser calmer. If the room is neutral, let the dresser carry more visual interest. Repeating a finish or color somewhere else in the room, like in lamp hardware or picture frames, will make the whole design feel more cohesive.
Common Mistakes to Avoid
The first mistake is rushing the prep. The second is ignoring dry time. The third is pretending the third one does not matter.
Another mistake is choosing a decorative treatment that fights the dresser’s shape. For example, a highly ornate wallpaper may overwhelm a heavily carved traditional piece. Meanwhile, an ultra-minimal look may leave a large, chunky dresser feeling visually unfinished. Let the furniture’s shape guide the makeover.
Do not forget durability, either. Dressers get touched constantly. Drawer edges, tops, and pulls see daily action. Thin coats, proper curing, and an appropriate protective finish can make a huge difference in how well your makeover holds up.
And finally, do not overdecorate every square inch. A decorative dresser makeover should feel edited. Paint, pattern, trim, hardware, and styling do not all need to scream at once. Let one or two elements be the stars.
Decorative Dresser Makeover Ideas by Style
Modern
Paint the dresser in a matte-looking neutral or deep moody color, add streamlined hardware, and keep the top styling minimal. Black, olive, mushroom, and walnut combinations work especially well.
Vintage Cottage
Use a soft pastel or creamy neutral, add floral or botanical drawer liners, choose antique-style knobs, and consider gentle distressing around edges.
Midcentury Inspired
Pair a stained wood top with painted drawers, add tapered legs, and choose brass or wood pulls. Keep the silhouette clean and uncluttered.
Glam
Choose a saturated jewel tone or soft blush, use gold hardware, and add a mirror above the piece. High contrast and polished accents do the heavy lifting here.
Playful Kids’ Room
Try color-blocking, ombre drawers, fun knobs, or whimsical wallpaper panels. The dresser can become part storage, part personality piece, and part daily proof that crayons should never be left uncapped.
What the Experience of a Decorative Dresser Makeover Really Feels Like
There is a particular kind of satisfaction that comes with transforming a dresser by hand. At the beginning, the piece often looks more like a problem than a possibility. It may be scratched, dull, heavy, outdated, or just plain awkward. But once the drawers come out and the hardware is removed, the dresser starts to look less like a burden and more like a blank page. That shift is part of the experience. You stop seeing what it was and start imagining what it could become.
The middle of the process is where most people earn their makeover confidence. Sanding is dusty. Priming is not glamorous. Waiting for coats to dry requires more patience than most of us naturally possess. Yet this is where the real transformation happens. Every repaired corner, every smoother edge, and every coat of paint builds momentum. By the time the color goes on evenly and the surface starts reflecting light in a clean, polished way, the dresser feels completely different. It no longer looks rescued. It looks intentional.
One of the best parts of the experience is making design decisions in real time. You may begin with a simple idea, then suddenly realize the dresser needs brass pulls instead of black ones, or a wallpaper accent on the top drawers, or a stained top to balance the paint. That creative flexibility is part of what makes the project memorable. It is functional work, but it also feels artistic. You are solving design problems with your hands.
There is also a strong emotional side to a decorative dresser makeover. For some people, the dresser belonged to a family member. For others, it was a thrift-store find that deserved another chance. Either way, the process creates attachment. You remember the ugly “before,” the moment the color finally clicked, and the tiny victory of getting all the hardware back on straight. That history gives the finished piece more character than something pulled from a warehouse shelf.
When the dresser is finally placed in the room and styled with a lamp, mirror, or vase, the payoff is immediate. The room feels more personal. The storage feels more beautiful. And the project often changes how people look at the rest of their furniture. Suddenly, that old nightstand does not seem hopeless. That plain desk starts looking suspiciously makeover-able. A decorative dresser makeover rarely ends with just one piece. It tends to create a new habit of seeing possibility where other people see junk. Honestly, that may be the most decorative upgrade of all.
Final Thoughts
A decorative dresser makeover is proof that great design does not always require a full room renovation. Sometimes all it takes is a sturdy old dresser, a thoughtful plan, and enough determination to finish the last coat without smudging it with your sleeve. When you combine smart prep, the right finish, and a few carefully chosen decorative details, you can create a piece that feels custom, stylish, and genuinely useful.
The best part is that no two projects need to look the same. You can go bold, soft, vintage, modern, playful, elegant, or somewhere in between. That freedom is what makes a dresser makeover so rewarding. It is not just about fixing furniture. It is about designing a piece that fits your home better than it ever did before. And that is a pretty impressive career pivot for an old dresser.


