
Table of Contents >> Show >> Hide
- What counts as a “digital panel meter” (DPM)?
- Before you open it: anatomy and safety
- The core blocks you’ll see on the PCB
- A guided teardown: what to look for, step by step
- Common gotchas (a.k.a. “why is my meter acting weird?”)
- Making the meter better (without turning it into a science project)
- Conclusion
- Hands-on experiences (the stuff you only learn after the third reassembly)
Digital panel meters are the tiny, cheerful snitches of the electronics world: they sit on your bench supply,
battery box, 3D-printed enclosure, or “totally temporary” project panel and loudly announce a number with
all the confidence of a game-show host. But what’s actually inside that $3 (or $30) display? A surprisingly
consistent mix of old-school measurement tricks, modern microcontrollers, and just enough cost-cutting to
keep teardowns interesting.
This teardown-style guide walks through what you’ll typically find inside common digital panel voltmeters and
volt/amp combo moduleshow they measure, how they power themselves, why they sometimes lie (a little),
and what to look for if you’re diagnosing weird readings. We’ll keep it practical, readable, and safely on the
hobby side of the fencebecause no number on a display is worth turning your screwdriver into a science
experiment.
What counts as a “digital panel meter” (DPM)?
A digital panel meter is a compact meter meant to be mounted in a panel (or a hole you swear you
measured twice). Most hobby-friendly versions fall into a few families:
- DC voltmeters (2-wire or 3-wire): show voltage only.
- DC volt/amp combo meters: show voltage plus current, usually via a shunt resistor.
- AC panel voltmeters: measure AC voltage (often not true RMS) in a round or rectangular body.
- Classic “3½-digit” modules (0–1999 counts): the vintage style still used in many DIY kits.
You’ll also see “range” variations: 0–30 V, 0–99.9 V, 0–100 V, 0–200 V, etc. The range is mostly set by
the input divider and the reference voltage used by the converter. That’s important because the display might
look identical across models, but the front-end resistors are doing totally different jobs.
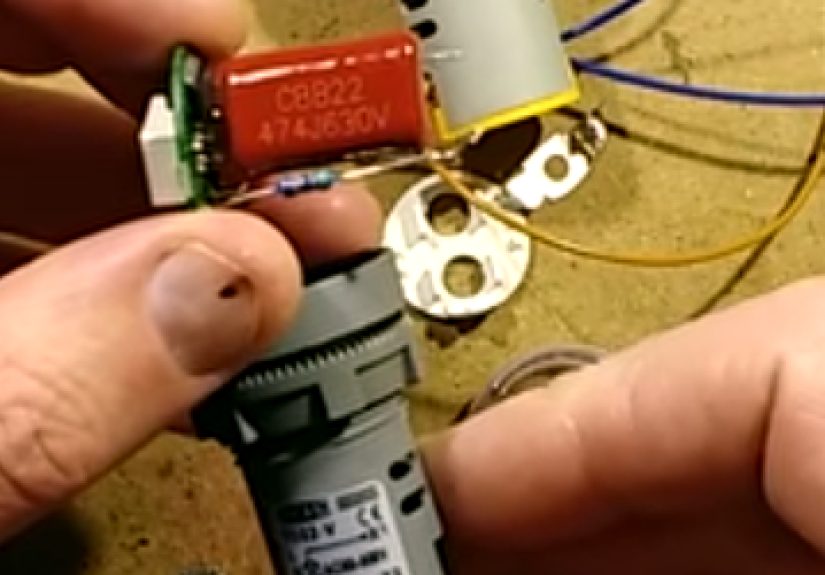
Before you open it: anatomy and safety
Quick safety reality check
Teardown rule #1: open only when it’s not powered. If your panel meter was connected to any
high-voltage source, don’t treat it like a toydisconnect it, wait, and avoid poking around if you’re not trained.
Many inexpensive panel meters (especially AC versions) are not built to the same safety standards as a
properly rated multimeter. The plastic bezel may look sturdy, but the internal spacing, insulation, and
protection can be… optimistic.
If you want a “teardown learning project,” choose a low-voltage DC module powered by batteries or a small
bench supply. You’ll still learn the good stuff (ADC, reference, dividers, shunts) without inviting unnecessary risk.
Tools that help (and don’t destroy the enclosure)
- Small screwdriver set
- Plastic spudger/guitar pick for clips
- Tweezers
- Magnifier (your future self will thank you)
- Multimeter (to trace continuity and identify railsironically, with a meter you trust)
- Phone camera (photos are “notes” that don’t get lost)
The core blocks you’ll see on the PCB
1) The display: seven-seg LEDs vs LCD glass
Most modern hobby modules use 7-segment LED displays because they’re bright, cheap, and easy
to read at a glance. LED modules draw more current, so they typically need a stable supply and sometimes
a transistor driver stage (especially for larger digits). Refresh can be slow on ultra-cheap designs, which is why
some meters look like they blink at you when you move your eyestiny “PWM theater.”
The classic 3½-digit world often uses an LCD glass display with a “zebra strip” connector (a rubber
conductive strip). LCD versions sip power and can run for ages, but the connection can be fussyone speck
of dust or a slightly uneven clamp pressure and suddenly your “8” becomes modern art.
2) The brain: how the number becomes a number
Two big approaches show up inside panel meters:
-
Dedicated panel-meter ADC + display driver (the classics): chips designed specifically to do
slow, accurate measurement and directly drive digits. -
Microcontroller-based meters: an MCU reads voltage with an internal ADC (or an external one),
then drives the display. Flexible and cheapalso dependent on how carefully the designer handled reference
stability and calibration.
In the classic camp, one of the most famous families is the ICL7106/ICL7107 style: a 3½-digit
converter that uses a dual-slope integrating ADC and includes the logic to drive an LCD (7106)
or LED (7107) display. The dual-slope approach is slow, but it’s wonderfully stubborn against noiseespecially
the kind of interference you get around power supplies and 50/60 Hz environments. That’s why old-school
panel meters can look boringly stable (which, in measurement, is a compliment).
Modern MCU meters can still be accurate, but you’ll often spot trade-offs: fewer input protection parts,
a less stable reference, and calibration done “good enough” for a consumer display rather than a lab instrument.
They shine when you want features (extra digits, mode switching, backlight control), but the analog front end
still makes or breaks the result.
3) The front end: dividers, shunts, and protection
The measurement path usually starts with one of these:
-
Voltage divider: a chain of resistors scales a higher voltage down into the ADC’s comfortable range.
If a meter reads up to ~100 V, it’s almost certainly dividing that down to something like a couple of volts (or less). -
Shunt resistor (for current): a very low-value resistor creates a small voltage drop proportional
to current. The meter measures that drop and converts it to amps. -
Protection bits: sometimes you’ll see input resistors, small capacitors for filtering, a diode, or a TVS.
On bargain meters, protection may be minimalbecause protection costs money, and money is the thing we’re not spending.
Teardown hint: look for the “honestly chunky” component. If there’s current measurement, the shunt is
typically the biggest, most metal-looking part on the boardsometimes a fat low-ohm resistor marked something
like R010 (0.01 Ω), R005 (0.005 Ω), or a metal bar style element. If the board measures only voltage,
the most important parts are often boring-looking resistors arranged like a tiny picket fence.
4) Power: regulators, references, and the “three-wire” trick
Cheap panel meters commonly offer either:
-
2-wire: the meter powers itself from the same two wires it measures. Convenient, but it only works
within a specific voltage window (because it has to stay alive while measuring). -
3-wire: two wires power the meter, and the third wire senses the voltage you want to measure.
This is how you measure a battery that’s higher than (or different from) the meter’s supply.
Inside, that often means a little regulator (or sometimes just clever design) plus a reference used by the ADC.
A stable reference is the difference between “nice meter” and “mood ring with digits.”
A guided teardown: what to look for, step by step
Step 1: Open the case like you want to close it again
Most panel meters use snap tabs, a couple of small screws, or a retaining ring. Work slowly. If you force the bezel,
the plastic clips can break, and then your meter becomes a “panel meter and also a rattle.”
Once open, take a photo before touching anything. Many displays rely on pressure contacts. A quick photo helps you
reassemble the exact alignment (and keeps your future troubleshooting from turning into a mystery novel).
Step 2: Identify the signal path
Start where the wires connect:
-
Voltage-only meters: trace from the input terminal to a resistor divider network, then toward the ADC/MCU pin.
You may see a small capacitor to ground for smoothing. -
Volt/amp meters: find the shunt. One side typically goes toward the load, the other toward supply/return.
The meter measures the tiny voltage across the shuntsometimes through an amplifier stage if it’s measuring small currents.
If there’s an op-amp or amplifier IC near the shunt, that’s a good sign: the designer is trying to read the shunt drop
accurately and reject noise. If it’s just a shunt slapped straight into an ADC pin with minimal filtering… well, it will still
produce a number. Whether it’s a helpful number is the adventure.
Step 3: Look for calibration points
Some meters include a trim potentiometer (a tiny adjustable “screw resistor”) for calibration. On classic dual-slope
designs, calibration often centers around setting the reference so the counts line up correctly. On MCU designs, calibration
might be fixed in firmware or done with a single trim.
If you see a trim pot, don’t spin it casually. Mark the original position first. Otherwise you’ll discover a fun new hobby:
recalibrating by regret.
Common gotchas (a.k.a. “why is my meter acting weird?”)
Common ground confusion
Many small meters assume the measurement ground is tied to the power ground. That’s fine until you try to place the
meter into a system where grounds shouldn’t be tiedlike measuring high-side current with a low-side shunt meter, or stacking
multiple meters on different rails. When grounds get forced together through the meter, you can create sneaky current paths
and “impossible” readings.
The fix is usually architectural: use proper isolation, use a meter designed for the topology, or measure using a dedicated
high-side current sense approach instead of forcing a low-side shunt into the wrong place. In teardown terms, this is why
the wiring style (2-wire vs 3-wire, isolated vs common ground) matters as much as the PCB itself.
Burden voltage and shunt sizing
Current measurement always adds some resistance in seriesyour shunt and the meter’s internal path cause a voltage drop.
That drop is called burden voltage. If it’s too large relative to your circuit voltage (think low-voltage digital
rails), it can distort the very thing you’re trying to measure and produce big percentage errors.
Teardown clue: a very low-value, higher-power shunt usually means lower burden voltage (good), but it may require amplification
to measure accurately (complex). A higher-value shunt is easier to measure but steals more voltage (not great for low-voltage loads).
In the real world, cheap combo meters often pick a compromise and call it a day.
Noise, flicker, and “digit jitter”
If your display jitters by a few counts, it’s often not “haunted”it’s noise, reference instability, or insufficient filtering.
Dual-slope meters are naturally good at rejecting certain interference, which is why that architecture shows up in classic
panel-meter chips. MCU meters can be stable too, but they depend heavily on filtering, layout, and a clean reference.
Making the meter better (without turning it into a science project)
Easy improvements that are usually worth it
- Add strain relief to the wiring so the solder joints don’t become the “fuse.”
- Improve filtering (when appropriate) with small capacitors across the input divider node to reduce display jitter.
- Shield or reroute noisy wiring away from the sense inputespecially in switching power supply enclosures.
- Use better connectors if the meter will live on a vibrating project (robots love to shake things loose).
When to stop modding and buy a better meter
If you need trustworthy readings around higher-energy circuits, or you’re measuring in environments where safety ratings matter,
the smartest “upgrade” is often using properly rated equipment designed for that job. Many panel meters are excellent for
hobby enclosures and low-voltage monitoring. They are not a substitute for a quality, safety-rated multimeter when you’re working
on anything that can deliver serious energy.
Conclusion
A digital panel meter teardown is a quick tour through measurement fundamentals: a display, an ADC strategy, a reference,
and a front end that quietly does the hard work. Whether it’s a classic dual-slope design driving digits directly or a microcontroller
doing the math in firmware, the same principles show up again and again: scale the signal, protect it, reference it, and display it
without letting noise turn your last digit into interpretive dance.
If you take away one thing, let it be this: the “cheap” part of a cheap meter is rarely the display. It’s usually the protection,
the isolation, and the careful analog design that makes a number both stable and meaningful. Open one up, learn the layout,
and you’ll never look at a three-digit voltmeter the same way again.
Hands-on experiences (the stuff you only learn after the third reassembly)
The first time you open a digital panel meter, it feels like magic got shrink-wrapped. Then you realize it’s mostly a few
predictable building blocks wearing a very confident costume. One of the most useful habits I’ve developed is treating a
teardown like a tiny detective story: photograph everything, trace the input path first, and don’t assume the wire colors mean
what you want them to mean. (They usually mean “whatever the factory had in the bin.”)
I’ve also learned that the mechanical design matters just as much as the circuit. Snap tabs break easily, and once they’re gone,
the meter can flexespecially in a panel cutout that’s slightly too large. That flex turns into intermittent display issues, because
pressure contacts (LCD zebra strips, spring contacts, or even the LED module’s pins) don’t appreciate being turned into a trampoline.
The “fix” is often hilariously low-tech: re-seat the board, clean the contact area, and make sure the enclosure clamps evenly.
The most common surprise is how often the last digit is basically a mood indicator. On a quiet bench supply, the display might look
rock solid. Put the same meter inside a box with a switching converter and long leads, and suddenly it’s counting like it’s trying to
set a personal record. The lesson: layout and wiring are part of the measurement system. Shorter sense leads, a calmer ground
path, and a little input filtering can do more than arguing with the spec sheet.
Current-measuring combo meters taught me respect for shunts. A shunt looks simplejust a low-value resistorbut it changes the
circuit by existing. On low-voltage loads, that drop can be the difference between “works” and “mysteriously resets.” When something
acts flaky after adding an ammeter module, it’s worth checking whether the burden voltage is stealing headroom. The best “upgrade”
I ever made wasn’t a fancier display; it was choosing a meter/shunt setup that matched the current range and the supply voltage of
the project.
Finally: cheap meters are fantastic teachers because they show you exactly where cost gets shaved. Sometimes it’s harmless (a slower
refresh rate). Sometimes it’s a bigger deal (minimal input protection, questionable spacing, optimistic labeling). Teardowns make you
a smarter builder because you start thinking in systems: not “does it display a number,” but “what’s the measurement path, what’s the
reference, what’s the failure mode, and does this belong in this project?” Once you start asking those questions, you’ve basically
leveled up from “user” to “builder”and your projects get better, not just brighter.


