
Table of Contents >> Show >> Hide
If you’re looking to add a touch of timeless elegance to your home’s outdoor space, Chippendale railings might just be the perfect choice. Known for their intricate design and sophisticated aesthetic, Chippendale railings are a classic addition that elevates any deck, porch, or balcony. While the name might sound fancy, creating your own DIY Chippendale railings is entirely possible with a bit of patience, precision, and the right materials. In this article, we’ll walk you through the process of building your own Chippendale railings and show you how you can master this charming craft yourself.
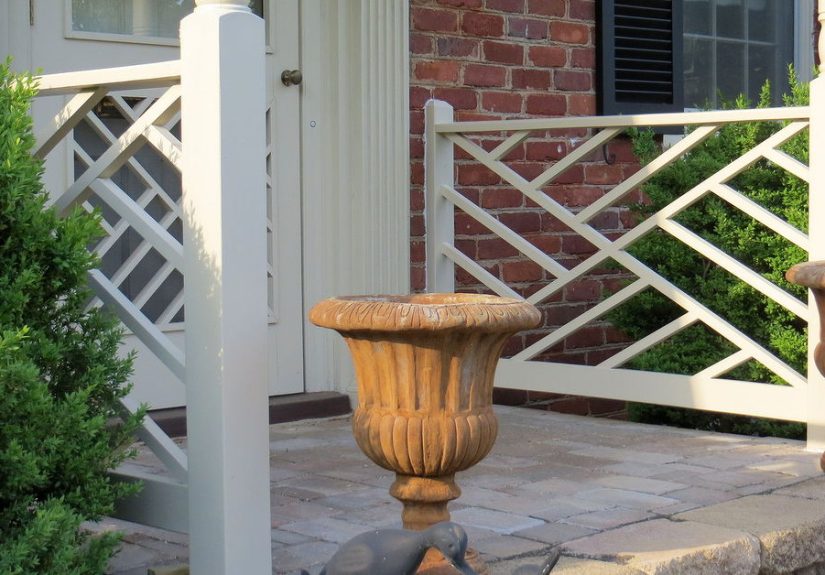
What are Chippendale Railings?
Chippendale railings are a type of decorative railing that was popularized during the 18th century, named after the English furniture designer Thomas Chippendale. They are distinguished by their intricate patterns, often featuring geometric designs, curved edges, and a sense of symmetry. These railings can be seen on various architectural styles, from colonial to Victorian, and they add an element of refined beauty wherever they’re placed. Today, Chippendale railings remain a staple in home design for their unique, elegant charm.
Why Choose DIY Chippendale Railings?
DIY Chippendale railings provide an excellent opportunity to save money while adding a personalized, high-end touch to your home. Instead of paying for custom railings from a designer or contractor, you can craft your own at a fraction of the cost. Additionally, building your own railings allows you to customize the design, color, and materials to perfectly suit your style and home decor. Whether you’re looking to match your existing exterior or create something entirely unique, DIY Chippendale railings are a rewarding project that will bring satisfaction for years to come.
Materials You’ll Need
Before you start crafting your Chippendale railings, it’s important to gather all the necessary materials. Here’s a basic list of what you’ll need:
- Wooden Boards: Choose a sturdy, weather-resistant wood, such as cedar or pressure-treated pine, for the framework and decorative elements.
- Wood Screws: These are essential for securing the parts of your railing together.
- Wood Glue: A strong adhesive will help keep your joints tight and prevent loosening over time.
- Wooden Dowels: For adding additional structure and support.
- Measuring Tape: Accurate measurements are key to creating well-fitted railings.
- Jigsaw: For cutting the intricate designs of the Chippendale pattern.
- Saw: A handsaw or circular saw will be useful for cutting straight lines for the rails.
- Sandpaper: To smooth out the surfaces after cutting.
- Paint or Stain: To finish your project and protect the wood from the elements.
Step-by-Step Guide to Building Your Own Chippendale Railings
Step 1: Measure and Plan Your Design
Start by measuring the area where you’ll install the railings. Be sure to account for the height and length of the railing, as well as the space between the posts. Once you have your measurements, sketch out a basic design. You can choose a traditional pattern with crisscrossing diamonds, or create your own variation. Make sure to take note of the sizes and angles of each component, as precision is important when building a railing that fits perfectly.
Step 2: Cut the Rails and Posts
Once you’ve finalized your design, begin by cutting the main rails (the horizontal pieces) and the posts (the vertical supports). Use a saw to cut the wood to the appropriate lengths. If your design requires angled cuts, take extra care to ensure accuracy. You may want to use a miter saw for precise angled cuts. Sand all of the pieces to remove any rough edges.
Step 3: Create the Chippendale Pattern
Now comes the fun part: creating the decorative Chippendale pattern. Using your measurements, cut the wooden pieces for the diagonal lines that will form the pattern. The Chippendale design typically consists of overlapping X-shaped pieces that create a grid-like pattern. Use a jigsaw to carefully cut out each shape. It may take some time to get the cuts right, but the results will be well worth the effort!
Step 4: Assemble the Railing
Start assembling your railing by attaching the diagonal pieces to the top and bottom rails. Use wood glue and screws to secure the pieces in place. Ensure that everything is level and that the joints fit snugly. You can use dowels or wooden pegs for extra strength at the connections. Once the decorative pattern is in place, attach the posts to the ends of the rails. Make sure the posts are securely fixed into place, as they will provide the necessary support for the entire railing structure.
Step 5: Sand and Finish
After the railing is assembled, give it a thorough sanding to smooth out any rough areas. Pay special attention to the edges of the decorative elements, as they can sometimes have splinters. Once the sanding is complete, apply a coat of paint or wood stain to protect the wood and enhance its appearance. Choose a finish that complements your home’s exterior and helps the railing blend seamlessly with your decor.
Step 6: Install the Railing
Once your railing is dry and fully finished, it’s time to install it. Mark the locations for the posts and drill holes to secure them in place. Use concrete anchors or screws, depending on the type of surface you’re attaching the railing to. Ensure that the railing is level and aligned properly before tightening all of the screws.
Tips for Success
- Work with Patience: Building Chippendale railings can take time, especially when crafting the intricate designs. Take your time with each step to ensure precision.
- Safety First: Always wear protective gear such as goggles and gloves when using power tools.
- Choose the Right Wood: For durability, choose a high-quality, weather-resistant wood that can withstand outdoor elements.
- Consider Pre-made Kits: If you’re not confident in your carpentry skills, there are also DIY Chippendale railing kits available, which come with pre-cut pieces and instructions.
Enhance Your Outdoor Aesthetic
DIY Chippendale railings are an excellent way to bring sophistication and charm to your outdoor space. Whether you’re updating your porch or creating a new deck, these railings will elevate the look of your home. Plus, the sense of accomplishment you’ll feel when you complete the project will be unmatched. With careful planning, the right tools, and a bit of patience, you’ll have stunning Chippendale railings that will last for years to come.
DIY Chippendale Railings: My Personal Experience
Building my own DIY Chippendale railings was an incredibly rewarding project. It all started when I decided to replace the worn-out railings on my front porch with something more elegant. I wanted something that would add visual interest and sophistication to my home, but I didn’t want to break the bank. After researching various designs, I decided on the Chippendale style. I was drawn to its intricate, timeless look and knew it would give my porch the upgrade it deserved.
One of the challenges I faced was cutting the intricate patterns. I wasn’t used to working with a jigsaw, and it took some practice to get the cuts just right. But once I figured out the technique, it became a fun challenge to make each piece fit together perfectly. The assembly process was straightforward, but I made sure to take extra care to align everything properly. It was so satisfying to see the design come to life.
As I finished sanding and painting, I could already imagine how the railings would look when installed. When the time came to secure them in place, I was thrilled with the result. The final product was even more beautiful than I had imagined, and it instantly transformed my porch into a welcoming space. Now, every time I step outside, I feel a sense of pride knowing that I crafted something so beautiful with my own two hands.
Conclusion
DIY Chippendale railings are a fantastic way to add elegance and style to your outdoor space. While the project requires some effort, the results are well worth it. By following the right steps and using the proper materials, you can create a stunning railing that will impress your guests and stand the test of time. With this guide, you have everything you need to get started on your own DIY Chippendale railing project and enjoy the satisfaction of building something beautiful and unique.


