Table of Contents >> Show >> Hide
- Why Clothespin Angels Are the Perfect Holiday Craft
- Main Keywords and LSI Keywords to Weave In Naturally
- Materials: Two Supply Lists (Simple vs. “Look What I Made!”)
- Pick Your Clothespin Base
- Core Method: The Classic Clothespin Angel Ornament (Fast + Cute)
- Three Crowd-Pleasing Variations
- Design Themes: Make a Whole “Angel Set” Without Repeating Yourself
- Kid-Friendly vs. Adult-Friendly: How to Adjust the Build
- Troubleshooting: When Your Angel Looks Like a Tiny Wood Gremlin
- Display and Gift Ideas
- Care, Storage, and Reuse
- Frequently Asked Questions
- Real-World Crafting Notes: What Usually Happens When You Make a Batch (And How to Enjoy It)
- Conclusion
There are two kinds of holiday crafts: the kind you pin to a board and never make, and the kind you actually finish
before the cookies burn. Clothespin angels belong to the second category. They’re cheap, fast, wildly customizable,
and somehow look charming even when they’re slightly lopsided (honestly, so do we in December).
In this guide, you’ll learn a few proven clothespin-angel buildsclassic ribbon-and-halo ornaments, coffee-filter
wing angels for classrooms, and “fancy” versions with yarn bodies, felt wings, burlap, lace, and bead heads. You’ll
also get troubleshooting tips, design themes, and batch-making strategies so you can create a whole choir without
losing your holiday spirit (or your glue gun).
Why Clothespin Angels Are the Perfect Holiday Craft
- Budget-friendly: One pack of clothespins turns into a tree’s worth of ornaments.
- Beginner-proof: Simple shapes (wings + halo + face) do most of the visual work.
- Kid-friendly options: Tape-and-marker versions work great for school or family nights.
- Genuinely giftable: They look sweet on presents, stockings, and mini trees.
- Easy to theme: Rustic farmhouse, glitter glam, minimalist Scandinavian, rainbowpick your vibe.
Main Keywords and LSI Keywords to Weave In Naturally
You’ll see these sprinkled throughout (like glitter that never fully leaves your home): DIY Christmas clothespin angels,
clothespin angel ornaments, handmade Christmas ornaments, kids Christmas crafts,
wooden clothespin crafts, coffee filter angel ornament, and doily angel craft.
Materials: Two Supply Lists (Simple vs. “Look What I Made!”)
The “Craft Drawer” Basic List
- Wooden clothespins (spring-loaded clip style or peg-styleboth work, just differently)
- Markers (black for eyes, optional red/pink for cheeks)
- Glue: school glue or tacky glue (and/or hot glue for adults)
- Chenille stems (pipe cleaners) for halos and hangers
- Paper coffee filters or paper doilies or ribbon (pick one for wings/gown)
- Scissors
- Optional: glitter glue, loose glitter, twine
The “Fancy Angel Choir” Upgrade List
- Wooden bead heads or small wood doll heads
- Acrylic paint + small brush (white, skin tone, gold, black)
- Felt sheets (white, cream, gold) for wings
- Yarn (white/cream) for bodies; tulle/boa trim for skirts
- Ribbon: satin for gowns, metallic for accents
- Optional embellishments: tiny rhinestones, mini buttons, pearl stickers
- Clear-drying sealer (optional, for durability)
Pick Your Clothespin Base
Before you start, decide which clothespin style you’re using. This one choice affects your build:
- Spring-loaded clip clothespin: Great for inserting coffee filters or doilies as wings/gowns.
Also easy for kids because the “clip mouth” does the holding. - Peg-style / dolly peg clothespin: Often used for classic ornaments where wings are glued to
the back. Looks a bit more like a tiny figurine. - Mini clothespins: Cute for gift toppers and garlands, but detail work is harder.
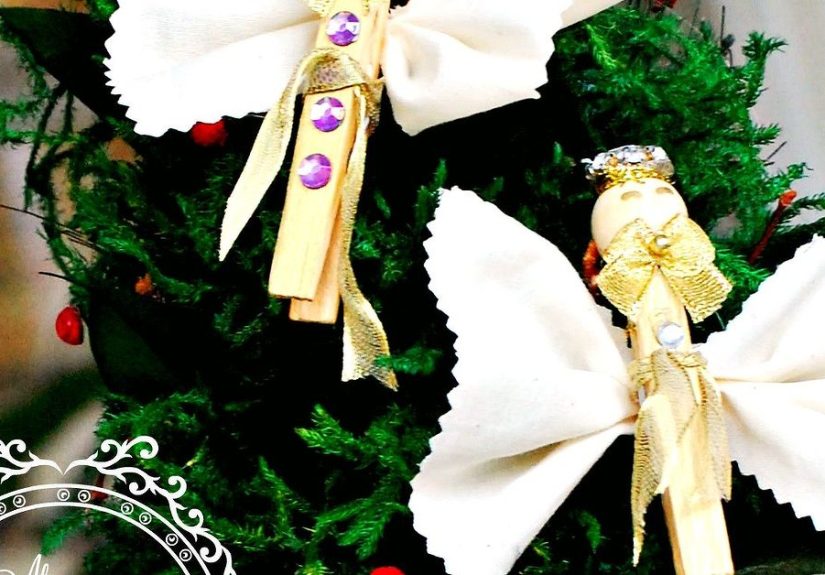
Core Method: The Classic Clothespin Angel Ornament (Fast + Cute)
This is your go-to build: face on top, wings behind, halo above. You can dress it up with ribbon, yarn, or lace, but
the structure stays the same.
Step 1: Prep (5 minutes)
- If painting, paint first. If not, leave the wood natural for a rustic look.
- Let paint dry completely before adding gluewet paint and hot glue are not friends.
- Optional: paint the bottom tips metallic to look like “little shoes.”
Step 2: Add a Face (1–3 minutes)
- Use a fine-tip black marker for eyes (two dots or tiny closed-lash arcs).
- Add a small smile and a blush dot on each cheek.
- For hair: draw a simple hairline, or glue a small tuft of yarn on the back/top.
Step 3: Make the Wings (choose one)
- Felt wings: Fold felt in half and cut a rounded “double wing” shape. Glue to the back.
- Coffee filter wings: Fold/filter and pinch into the clothespin clip to form wings.
- Doily wings: Pinch the doily at the center and clamp into the clothespin clip.
- Ribbon wings: Loop two short lengths of ribbon like a bow and glue behind the “head.”
Step 4: Dress the Angel (optional but adorable)
- Ribbon gown: Wrap a 2″ ribbon around the middle like a skirt; glue at the back.
- Yarn body: Wrap yarn around the clothespin to create a soft “robe.” Tie or glue ends behind.
- Doily or burlap gown: Wrap a doily (or doily + burlap circle) around the body and glue.
- Feather/boa trim: Add a short ring around the waist for a “tutu” effect.
Step 5: Halo + Hanger (the part everyone forgets until the end)
- Twist a chenille stem into a small loop (halo). Leave a tail for attachment.
- Attach to the back of the head with tape (kid-friendly) or a dot of hot glue (adult method).
- If you want it to hang, make a second loop above the halo or add a small twine loop behind the head.
Step 6: Dry + Optional Seal
Let glue dry fully (overnight is safest if you used glitter glue). If the ornament will be handled a lot, brush on a
thin clear sealerespecially over paint and marker details.
Three Crowd-Pleasing Variations
1) Coffee Filter Wing Angel (Best for Kids, Classrooms, and Quick Wins)
This version is popular because it uses a coffee filter as wingsbig impact, tiny effort. It also keeps the messy
steps simple: decorate wings, clamp them in, add a halo, draw a face.
- Decorate wings: Add glitter glue or a thin glue layer and sprinkle glitter. Let dry.
- Insert wings: Pinch the coffee filter in the middle and place it into the clothespin clip.
- Add halo: Twist a gold chenille stem into a loop and attach behind the head area.
- Face time: Draw a simple face with a permanent marker.
- Hang it: Use the halo wire as the hanger or add a loop of twine.
Pro tip: If you want extra sparkle without chaos, use glitter glue instead of loose glitter. Your vacuum will
send you a thank-you note.
2) Doily Angel (Vintage, Lacy, and Shockingly Easy)
Doilies instantly read as “angelic.” You can use them as wings, as a gown, or both. This is the version that makes
people say, “You made that?” like you didn’t just clamp lace into a clothespin and call it a day (which, to be clear,
is exactly what you did).
- Pinch a small paper doily at the center so it folds like wings.
- Clamp it into a mini clothespin (or a regular one if you want a bigger angel).
- Cut a small paper circle for the head (or use a small wooden bead) and glue it on.
- Make a silver or gold halo from a chenille stem and attach behind the head.
- Dust with glitter or add tiny sticker “jewels” for a keepsake look.
3) Yarn-Wrapped Body + Felt Wings (The “Heirloom-ish” Upgrade)
If you want your angels to look more like small figurines than kid crafts, this one’s your move: yarn makes a soft
robe, felt wings hold their shape, and a wood bead head levels up the whole ornament.
- Make the robe: Wrap white/cream yarn around the clothespin body until it looks like a cozy cloak.
Secure yarn ends on the back with tacky glue. - Add a skirt/trim: Glue a short ring of tulle, lace, or feather trim around the waist.
- Cut felt wings: Fold felt and cut a symmetrical wing shape. Glue to the back.
- Head + face: Push or glue a wooden bead head on top. Add simple facial features with a fine marker.
- Halo: Twist chenille stem into a halo and secure behind the head (leave a loop to hang).
Design Themes: Make a Whole “Angel Set” Without Repeating Yourself
If you’re making more than three angels, it helps to pick a theme. Here are some ideas that look intentional (even if
you’re improvising because you ran out of ribbon at 9:47 p.m.).
- Snow choir: White paint + silver glitter wings + tiny blue scarf (thin ribbon strip).
- Rustic farmhouse: Natural wood + burlap gown + lace collar + twine hanger.
- Gold glam: Metallic painted “shoes,” gold halo, and glittered wings.
- Rainbow kids’ set: Each angel gets a different ribbon gown color; halos stay gold for unity.
- Minimalist: No face, no glitterjust clean white wings and a gold halo.
Kid-Friendly vs. Adult-Friendly: How to Adjust the Build
Kid-Friendly Adjustments
- Use tape or glue dots instead of hot glue for halos and wings.
- Choose coffee filters (easy to pinch, forgiving shape, lightweight).
- Skip tiny embellishments if kids are under 4 (small parts + holidays = chaos).
- Use washable paint and markers where possible.
Adult-Friendly Upgrades
- Use hot glue for crisp, durable attachments.
- Switch to wood beads/heads for a polished figurine look.
- Add layered materials: felt wings + lace overlay + a small ribbon sash.
- Seal with a thin clear coat if you plan to store and reuse them for years.
Troubleshooting: When Your Angel Looks Like a Tiny Wood Gremlin
Problem: Wings droop or fall off
- Use thicker material (felt beats thin paper).
- Glue wings higher on the back so they sit “behind shoulders,” not “behind hips.”
- If using coffee filters, pinch tighter in the center before clamping.
Problem: Halo slides down like it’s tired
- Create a small hook or twist at the base of the halo to anchor it.
- Attach the halo to the back of the head with a stronger adhesive (hot glue or tacky glue).
- If using a clothespin that opens, keep the halo wire out of the hinge area.
Problem: Faces look… haunted
- Go smaller. Two tiny dots and a micro-smile are usually cuter than detailed eyes.
- Try “closed eyes” (two curved lines) for an instant peaceful look.
- Use a fine-tip marker; thick markers turn angels into cartoon mascots fast.
Display and Gift Ideas
- Tree ornaments: Add a looped hanger behind the halo.
- Gift toppers: Clip the angel onto ribbon or a gift tag for an instant “wow.”
- Garland: Make mini angels and clip them along a string of lights (unlit is safest).
- Place cards: Use mini clothespins to clip a name card; guests can take them home.
- Classroom keepsakes: Write the year on the back with a permanent marker.
Care, Storage, and Reuse
Store clothespin angel ornaments in a shallow box with tissue paper between layers. If you used glitter, let
everything cure fully before storing to avoid “ornament glitter transfer,” a phenomenon science has not yet
defeated. If wings get bent, reshape felt or paper gently and let it rest under a light book for a day.
Frequently Asked Questions
How long does it take to make one clothespin angel?
A simple version can take 10–15 minutes plus drying time. A “fancy” yarn-and-felt angel might take 20–30 minutes,
especially if you’re painting and adding details.
Do I need a hot glue gun?
No. For kid crafts, tape and tacky glue work. Hot glue is best for durable ornaments and layered materials. If you’re
crafting with kids, keep hot glue as the adult-only tool.
What’s the easiest wing material?
Coffee filters are the easiest because they’re lightweight, already rounded, and pinch nicely into a clothespin clip.
Doilies are the fastest way to get a “pretty” look with almost no effort.
How do I make them look cohesive on a tree?
Repeat one element across the setsame halo color, same wing material, or the same gown stylethen vary one accent
(like ribbon color or glitter type).
Real-World Crafting Notes: What Usually Happens When You Make a Batch (And How to Enjoy It)
Making one clothespin angel is a craft. Making twelve is an event. It’s the difference between making a single
pancake and declaring, “Brunch is happening.” If you’re planning a batchfamily night, classroom party, church group,
office “we’re festive now” tablehere’s what tends to happen in the real world, plus the little adjustments that keep
everyone happy.
First, someone will fall deeply in love with glitter. Not casually. Not “a tasteful shimmer.” We’re talking “I have
discovered my purpose and it is to become a human snow globe.” The easiest way to keep that joyful energy without
turning your home into a sparkly crime scene is to pre-decide the glitter plan. Glitter glue is your best friend. If
you must use loose glitter, place a rimmed baking sheet under the crafting area so you can funnel the extra back into
the container. It feels professional, like you’re running a tiny ornament factory (with slightly more snack breaks).
Second, halos will test your patience. Twisting chenille stems is easy until you’re trying to make them all the same
size while someone nearby is asking whether angels prefer chocolate chips or sprinkles. The trick is to use a quick
“halo template”: wrap the chenille stem around something round (a marker cap, a glue stick, or a small pill bottle),
twist once, and you’ve got consistent halos. Leave a longer tail than you think you need. A little extra wire makes
attachment simpler, and you can always trim it down later. Short tails are like short phone chargers: they only exist
to disappoint you.
Third, faces can unexpectedly become the comedic centerpiece of the evening. There is always a moment when someone
draws a face that looks a little too surprised to be heavenly. This is normal. A helpful fix is to embrace “minimalist
angel faces” for the whole set: two tiny dots for eyes and a small smile. Or go with closed eyes (two curved lines),
which instantly reads calm and sweet. If kids want individuality, let them choose gown color or wing sparkle level,
but keep the face style consistent. Cohesive set, happy artists, fewer “why does this angel look like it saw my
credit card bill?” jokes.
Fourth, you’ll discover the power of assembly-line crafting. If you let everyone build from start to finish, the table
will become a landscape of half-dried paint, misplaced wings, and one clothespin that has mysteriously become a
“dragon.” Instead, try stations: (1) paint or color clothespins, (2) decorate wings, (3) twist halos, (4) glue and
assemble, (5) hangers + final touch. Stations keep supplies organized and give kids quick winsespecially helpful for
shorter attention spans. It also makes it easier for adults to supervise the “hot glue station” without sprinting back
and forth like a holiday referee.
Fifth, the best “experience upgrade” is personalization. Write the year on the back. Add initials. Make one angel for
each family member with their favorite color. If you’re doing a classroom craft, take a quick photo of each child
holding their angel before it goes homeparents love seeing the maker with the ornament. If you’re gifting, clip the
angel onto the ribbon of a present so it becomes part of the wrapping. People remember that. It turns a simple gift
into a “you thought of me” moment, which is basically the holiday gold standard.
Finally, accept that the tiny imperfections are the charm. A wing might be slightly crooked. A halo might lean like it
is listening politely at a party. Those quirks are what make handmade Christmas ornaments feel alivelike they belong
to a real story instead of a store shelf. Clothespin angels are small, but they carry a lot of holiday magic: a little
time together, a little creativity, and a little sparkle that shows up again next year (possibly still in your carpet).
Conclusion
DIY Christmas clothespin angels are proof that holiday decor doesn’t have to be expensive or complicated to feel
special. Start with a simple face, a pair of wings, and a halo. Then choose your stylecoffee filter wings for quick
kid crafts, doilies for vintage sweetness, or yarn and felt for heirloom vibes. Make one, make ten, make a whole choir.
The goal isn’t perfection; it’s joy you can hang on a tree.