
Table of Contents >> Show >> Hide
- Why DIY Home Decor Works (Even If You’re “Not Crafty”)
- Start Here: The “Don’t Regret This Later” DIY Plan
- DIY Home Decor Toolkit: The Basics That Actually Matter
- The “Looks Expensive” Rules of DIY Decor
- 10 DIY Home Decor Projects That Give Big Results
- 1) The “Real Gallery Wall,” Not the Chaos Wall
- 2) Peel-and-Stick Wallpaper Accent (Renter-Friendly Drama)
- 3) Floating Shelves That Don’t “Float” to the Floor
- 4) Thrift Flip: The “Ugly Duckling” Furniture Makeover
- 5) Hidden Storage Wall Art (Sneaky and Chic)
- 6) Picture Frame Molding (Architectural Charm on a Budget)
- 7) Faux Shiplap or Planked Accent Wall (Cozy Without the Chaos)
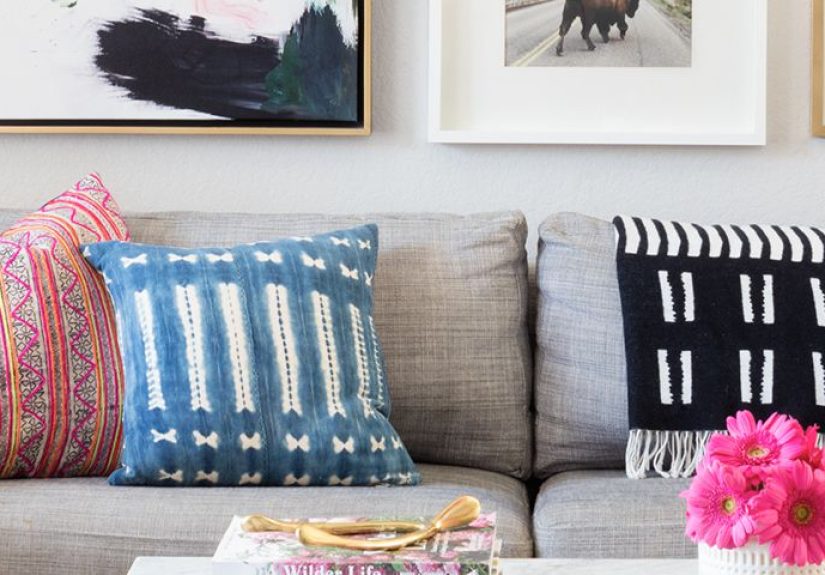
- 8) No-Sew Pillow Covers (Instant Cozy, Minimal Effort)
- 9) Lighting Upgrade: The “Mood Switch” Project
- 10) “Framed Wallpaper” Art Panels (Big Impact, Low Commitment)
- Common DIY Home Decor Mistakes (and How to Avoid Them)
- How to Make DIY Decor Look Cohesive Across Your Home
- Conclusion: DIY Home Decor That Feels Like You (Not Like a Trend)
- of Real-World DIY “Experience” (The Stuff People Only Learn After Doing It)
DIY home decor is basically the art of turning “I’m bored of this room” into “Wait… did I hire someone?”
(Spoiler: you did not. You hired youwith a playlist, a snack, and a mild fear of power tools.)
Whether you’re decorating a brand-new place, refreshing a rental, or trying to make your living room feel less
like a Wi-Fi waiting area, the best DIY home decor projects share three traits: they’re doable, they’re
budget-friendly, and they make your space feel intentionally you.
This guide breaks down smart, beginner-friendly ideas, the core techniques that make DIY look “store-bought,”
and specific projects you can knock out over a weekendwithout turning your home into a months-long construction
soap opera.
Why DIY Home Decor Works (Even If You’re “Not Crafty”)
DIY decor isn’t just about saving money (though your wallet will definitely send a thank-you note). It’s about
control: you choose the colors, textures, and vibe. You can customize for awkward walls, tiny rooms, weird
angles, and that one corner that looks like it was designed by a confused triangle.
The real superpowers of DIY
- Personalization: Your space stops looking like a furniture catalog and starts looking like you live there.
- Flexible budgets: You can splurge on one hero item and DIY the supporting cast.
- High impact, low commitment: Many upgrades (like peel-and-stick wallpaper) are renter-friendly.
- Confidence stacking: One simple win leads to bigger projectslike a decorating snowball, but cuter.
Start Here: The “Don’t Regret This Later” DIY Plan
The secret to DIY home decor that doesn’t scream “first attempt” is planning. Not a 47-tab spreadsheet planjust
a simple system that keeps you from painting a table before realizing it won’t fit through the doorway.
1) Pick a vibe, not a theme
Instead of “coastal grandma” or “modern farmhouse but make it mysterious,” choose a handful of guiding
preferences: warm or cool colors, light or moody, minimal or layered, sleek or cozy.
2) Choose a tight color palette
A reliable formula: one main neutral, one secondary color, and one accent (used in small doses). This keeps DIY
projects from looking like they came from different universes.
3) Measure like your dignity depends on it
Tape measure first, inspiration second. Measure wall width, furniture depth, and walking clearance. Then write
it down. Future-you will be grateful and slightly smug.
4) Decide what you’re solving
- Need more storage? Try shelves, hidden storage art, baskets, peg rails.
- Need more warmth? Add textiles, layered lighting, wood tones.
- Need a focal point? Accent wall, gallery wall, oversized art, statement mirror.
DIY Home Decor Toolkit: The Basics That Actually Matter
You don’t need a garage full of tools. You need a small set of “I can handle most things” suppliesplus patience
and at least one song you can listen to 17 times without losing your mind.
Core tools
- Measuring tape, pencil, painter’s tape
- Level (or a leveling app if you’re in a pinch)
- Stud finder (highly recommended for hanging anything heavier than a postcard)
- Drill/driver + bits, screwdriver set
- Utility knife + extra blades
- Sandpaper assortment (coarse to fine) or sanding sponge
- Spackle, putty knife, microfiber cloth
Painting essentials
- Primer (especially for glossy surfaces or big color changes)
- Quality brush + small foam roller for smooth finishes
- Drop cloth (old sheet worksunless you love abstract paint speckles)
Safety, but make it practical
- Ventilation (open windows, fans)
- Eye protection for drilling/sanding
- Mask for sanding and spray products
- Gloves for chemicals or staining
The “Looks Expensive” Rules of DIY Decor
Rule #1: Prep is the glow-up
The difference between “wow” and “why is it peeling?” is usually prep. Clean surfaces, remove dust, sand lightly
when needed, and don’t rush dry times.
Rule #2: Repeat elements on purpose
Repeating a finish (like matte black hardware) or material (like light wood) across multiple DIYs makes your
space feel designed, not assembled.
Rule #3: Scale beats quantity
One larger piece of wall art often looks more intentional than six tiny things floating around like lost
satellites.
Rule #4: Texture is the secret sauce
Mix smooth and nubby, shiny and matte, soft and structured. Think: linen curtains, woven baskets, a painted
frame, a ceramic vase, a cozy throw.
10 DIY Home Decor Projects That Give Big Results
Below are approachable projects with high payoff. Mix and match based on your space, tools, and patience level
(be honestyour patience has a budget too).
1) The “Real Gallery Wall,” Not the Chaos Wall
A gallery wall is the fastest way to make a room feel finishedif it’s planned. The trick: lay everything out
on the floor first and choose a consistent spacing (usually a couple inches).
- Style tip: Mix photos, art prints, and one unexpected item (like a small textile or vintage plate).
- Pro move: Use matching frames for a clean look, or a consistent color palette for an eclectic look.
- Rental-friendly: Use removable hanging strips for lighter frames.
2) Peel-and-Stick Wallpaper Accent (Renter-Friendly Drama)
Peel-and-stick wallpaper is the “commitment issues” champion of DIY. It delivers instant pattern and color and
can often be removed later without major heartbreak.
- Clean the wall and let it dry completely.
- Patch bumps/holes and lightly sand for a smoother surface.
- Use a level to create a plumb guide line for the first panel.
- Apply slowly, smoothing from the center outward to avoid bubbles.
- Trim edges with a sharp blade (change blades often for clean cuts).
Where it works best: behind a bed, on a powder-room wall, inside a bookcase back panel, or a
small nook that needs personality.
3) Floating Shelves That Don’t “Float” to the Floor
Floating shelves are equal parts decor and storage. The key is solid attachmentideally into studs, or using
the right anchors for your wall type and shelf weight.
- Mark your shelf height and make sure it’s level.
- Locate studs where possible; pre-drill for cleaner installation.
- Use manufacturer-rated hardware and avoid overloading.
Styling tip: Place heavier objects near the brackets and keep the front edge lighter (books,
small plants, framed prints).
4) Thrift Flip: The “Ugly Duckling” Furniture Makeover
A thrifted dresser or side table can become a statement piece with paint and new hardware. This is one of the
most budget-friendly home decor upgradesbecause you’re paying for structure, not trendy aesthetics.
- Clean thoroughly (grease and dust are paint’s worst enemies).
- Lightly sand or degloss if the finish is shiny.
- Prime if needed, then paint in thin, even coats.
- Lightly sand between coats for a smoother finish (optional, but fancy).
- Seal if using a paint system that benefits from protection.
- Swap hardware: knobs, pulls, even legs.
Style ideas: Two-tone drawers, painted interiors, or one “surprise” drawer with patterned liner.
5) Hidden Storage Wall Art (Sneaky and Chic)
Small spaces love dual-purpose decor. One clever move: turn framed art into a shallow cabinet for keys, cords,
or little items that otherwise multiply on countertops like they’re training for a takeover.
- Use a shallow wood box and attach a hinged frame front.
- Paint the box to blend with the wall or match the frame for camouflage.
- Add hooks or small compartments inside for organization.
6) Picture Frame Molding (Architectural Charm on a Budget)
Picture frame molding gives walls that “historic, high-end” feel without a full renovation. If you can measure,
cut, and keep lines straight, you can pull it off.
- Plan your grid layout first (symmetry is your friend).
- Use a level and consistent spacing between frames.
- Fill nail holes, caulk seams, then paint everything the same color for a seamless look.
Design tip: Painting the wall and molding the same color looks modern and polished.
7) Faux Shiplap or Planked Accent Wall (Cozy Without the Chaos)
Want texture and a focal point? A faux shiplap wall (using panels or boards) adds depth fast. Keep it to one
wall to avoid turning your home into a theme park.
- Mark studs, measure carefully, and keep rows level.
- Use spacers for consistent gaps (nickels work in a pinch).
- Finish with caulk + paint for a clean, built-in look.
8) No-Sew Pillow Covers (Instant Cozy, Minimal Effort)
Textiles are a shortcut to “this room has a personality.” If sewing isn’t your thing, you can still refresh
pillows with fabric glue, iron-on hem tape, or envelope-style wraps.
- Fabric tip: Choose upholstery-weight or durable cotton/linen blends for structure.
- Style tip: Mix solids + one pattern + one textured fabric (like boucle or faux fur).
9) Lighting Upgrade: The “Mood Switch” Project
Lighting is decor. Swap harsh bulbs for warmer tones (check lumens so it’s not cave-dark), add a floor lamp to
a corner, or install plug-in sconces for a more layered look.
- Use at least two light sources in a room (three is even better).
- Mix overhead + task + ambient lighting for depth.
- Add dimmers where possible (instant fancy).
10) “Framed Wallpaper” Art Panels (Big Impact, Low Commitment)
Love wallpaper, hate installing it across an entire wall? Frame it. Mount peel-and-stick wallpaper on a panel
(or foam board) and frame it like oversized art.
- Great for renters, dorms, and commitment-phobes.
- Looks especially strong in pairs or a triptych (three panels).
Common DIY Home Decor Mistakes (and How to Avoid Them)
Mistake: Starting with the hardest project first
Build momentum. Start with something quick (pillow covers, a small paint project, one shelf). Confidence is a
renewable resource.
Mistake: Skipping wall prep
Dust, grease, and bumps sabotage paint and wallpaper. Clean, patch, and let surfaces dry.
Mistake: Overcrowding shelves and surfaces
Leave breathing room. The goal is “styled,” not “gift shop checkout counter.”
Mistake: Buying decor before choosing a palette
If you buy first and plan later, you’ll end up with five wood tones and none of them speaking to each other.
How to Make DIY Decor Look Cohesive Across Your Home
The best DIY home decor isn’t a random collection of projects. It’s a system. Here’s how to make it feel
intentional:
- Repeat finishes: choose 1–2 metals (like matte black + brushed brass) and stick with them.
- Repeat colors: echo your accent color in 3–5 small spots (pillows, art, a vase, a candle).
- Balance old and new: thrifted pieces + modern shapes create contrast and personality.
- Use “anchors”: rugs, curtains, and large art pieces ground a room faster than small accessories.
Conclusion: DIY Home Decor That Feels Like You (Not Like a Trend)
DIY home decor isn’t about perfectionit’s about progress. The magic is in small upgrades that add up: a cleaner
gallery wall, a thrift flip that becomes your favorite piece, a wallpaper accent that makes you smile every time
you walk past it.
Start with one project that solves a real problem (storage, lighting, bland walls). Keep your palette simple,
prep like you mean it, and remember: if it’s level and it doesn’t fall off the wall, you’re already winning.
of Real-World DIY “Experience” (The Stuff People Only Learn After Doing It)
Here’s the truth about DIY home decor that every enthusiastic beginner eventually discovers: the project you
think will take 45 minutes will take 2 hours, and the project you schedule for Saturday will somehow become a
“weekend series.” Not because you’re bad at DIYbecause DIY has plot twists.
One of the most common experiences people report is the “prep surprise.” You start painting a thrifted nightstand
feeling confident… then realize the surface is slick, dusty, and possibly coated in a mysterious layer of
2007-era furniture polish. That’s when you learn the sacred order of operations: clean first, sand lightly,
prime when necessary, paint in thin coats, and let it dry like your future happiness depends on it.
(Because it kind of does.)
Wallpaperespecially peel-and-stickhas its own personality. People often say the first panel is the emotional
rollercoaster: you’re aligning, smoothing, stepping back, peeling it off, re-aligning, smoothing again, and
wondering if the wall is cursed. Then panel two happens and suddenly you’re a wallpaper whisperer. The lesson:
slow is fast. Starting with a plumb guide line and smoothing from the center outward saves you from bubble
cities and crooked seams.
Hanging shelves and art teaches another universal DIY experience: gravity is undefeated. Folks learn quickly that
“it looks sturdy” is not a measurement system. Studs are your best friend for heavy items, and the right anchor
matters when studs aren’t where you need them. The payoff, though, is huge: the moment your shelf is up, level,
and holding your favorite books without making ominous creaking noises, you feel like a capable adult who could
absolutely survive in the wilderness. (You could not. But enjoy the moment.)
Thrift flips come with a unique emotional arc: discovery, optimism, slight regret in the car, renewed hope after
cleaning, mild panic during sanding, and then delight when the new paint color transforms the piece into
something that looks custom. Many DIYers also learn a styling lesson here: updated hardware is the fastest way to
make furniture feel modern. A simple knob swap can give “grandma’s dresser” a glow-up worthy of applause.
Finally, there’s the “cohesion awakening.” After a few DIY wins, people notice that the room looks best when the
projects relate to each other. Repeating a metal finish, keeping a consistent palette, and mixing textures on
purpose makes everything look designedeven if you created it in sweatpants with a lint roller nearby.
The shared experience across almost all DIY home decor journeys is this: you don’t become “creative” by waiting
for inspiration. You become creative by making small decisions, trying things, and learning what you like. DIY
isn’t a talent testit’s a practice. And your home gets better every time you practice.


