
Table of Contents >> Show >> Hide
- What Are DIY Pressed Flower Coasters?
- Best Flowers for Pressed Flower Coasters
- How to Press Flowers Before Making Coasters
- Supplies You Need for Resin Pressed Flower Coasters
- Safety First: Resin Is Crafty, Not Candy
- Step-by-Step: How to Make DIY Pressed Flower Coasters With Resin
- No-Resin Alternative: Pressed Flower Tile Coasters
- Design Ideas for Pressed Flower Coasters
- Common Mistakes and How to Avoid Them
- How to Care for DIY Pressed Flower Coasters
- DIY Pressed Flower Coasters as Gifts or Small Business Products
- Experience Notes: What I Learned Making DIY Pressed Flower Coasters
- Conclusion
There are two kinds of people in this world: people who throw away fading flowers, and people who look at a wilted daisy and think, “You, my little botanical pancake, are about to become home decor.” If you are in the second groupor would like to beDIY pressed flower coasters are one of the prettiest, most beginner-friendly crafts you can make at home.
Pressed flower coasters turn delicate blooms, tiny leaves, fern tips, and sentimental petals into functional art. They protect your table from water rings, brighten up coffee breaks, and make excellent handmade gifts for birthdays, weddings, Mother’s Day, housewarmings, teacher appreciation, or the friend who owns seven mugs and still says, “I have nothing cute to put this on.”
This guide walks you through how to make pressed flower coasters using resin or decoupage-style sealing methods, how to choose and dry flowers, what materials you need, common mistakes to avoid, and how to make the finished pieces look clean, glossy, and gift-worthy. No art degree required. Just patience, ventilation, and the courage to poke a flower with tweezers until it behaves.
What Are DIY Pressed Flower Coasters?
DIY pressed flower coasters are handmade drink coasters decorated with dried, flattened flowers and sealed under a protective clear layer. The most popular version uses clear epoxy resin poured into silicone coaster molds, creating a glass-like finish that suspends flowers inside the coaster. Another beginner-friendly option uses ceramic tiles, glass blanks, cork, or wood rounds with Mod Podge or a clear waterproof sealer.
The appeal is simple: each coaster is unique. Even if you use the same flowers and mold, nature refuses to copy and paste. One petal bends dramatically, one fern stem looks like it’s auditioning for a wallpaper pattern, and suddenly you have a set that feels custom instead of mass-produced.
Best Flowers for Pressed Flower Coasters
Not every flower loves being pressed. Some blooms flatten beautifully, while others turn into sad little vegetable ghosts. For clean, colorful coasters, choose flowers and greenery that are naturally thin or can be separated into thinner pieces.
Great flowers to use
- Pansies and violas
- Daisies
- Baby’s breath
- Queen Anne’s lace
- Cosmos petals
- Forget-me-nots
- Small ferns
- Pressed leaves, herbs, and delicate greenery
Flowers to use carefully
Roses, peonies, carnations, zinnias, and chrysanthemums can work, but they are thicker. Instead of pressing the whole flower head, remove individual petals and press those separately. Whole thick blooms hold moisture, and moisture is the villain in this craft. It can cause discoloration, cloudiness, trapped bubbles, or even rotting inside resin. Nothing ruins a coaster faster than a flower trying to become compost in a luxury glass prison.
How to Press Flowers Before Making Coasters
Before you make coasters, your flowers must be completely dry. Fresh flowers may look gorgeous at first, but once sealed, they can brown, fade, or release moisture. Pressing removes water while preserving the flower’s shape.
Book pressing method
The classic method is simple and inexpensive. Place flowers between sheets of absorbent paper, such as parchment, coffee filters, blotting paper, or plain printer paper. Put the paper inside a heavy book, add more weight on top, and leave the flowers in a warm, dry place for two to three weeks. Replace damp paper after the first few days if the flowers are juicy or thick.
Flower press method
A wooden flower press works the same way but applies more even pressure. Layer cardboard, absorbent paper, flowers, and more paper, then tighten the press. This is a great option if you plan to make pressed flower crafts regularly.
Microwave pressing method
If patience is not your brand, microwave pressing can speed up the process. Flowers are placed between absorbent layers and heated in short bursts using a microwave flower press or microwave-safe materials. This method can preserve color well, but it requires careful monitoring because flowers can scorch quickly. Think “gentle drying,” not “botanical popcorn.”
Silica gel drying
Silica gel is useful for drying flowers while keeping more shape and color. It is often used for thicker blooms, though for coasters you still want the finished flowers to sit flat. Drying times vary depending on flower thickness, but the key rule is the same: the flowers must be dry before they meet resin or sealer.
Supplies You Need for Resin Pressed Flower Coasters
For a polished, durable set of resin flower coasters, gather your materials before mixing anything. Resin has a working time, and once it starts curing, it does not care that you forgot the tweezers in another room.
- Pressed and fully dried flowers
- Two-part clear epoxy resin suitable for craft coasters
- Silicone coaster molds
- Disposable or reusable silicone mixing cups
- Wooden stir sticks or silicone stir tools
- Nitrile gloves
- Tweezers
- Toothpicks for adjusting petals and popping bubbles
- Heat gun, small torch, or alcohol spray for surface bubbles, if recommended by your resin brand
- Level work surface
- Plastic sheet, wax paper, or silicone mat to protect the table
- Dust cover, such as a plastic storage bin turned upside down
- Rubber feet or cork backing for the finished coasters
Safety First: Resin Is Crafty, Not Candy
Epoxy resin can create beautiful results, but it should be handled responsibly. Work in a well-ventilated area, wear gloves, protect your surface, and follow the manufacturer’s instructions exactly. Avoid skin contact with uncured resin and hardener. Keep resin away from children, pets, food-prep surfaces, open flames, and your favorite shirt unless your favorite shirt is already emotionally prepared for retirement.
Different resin brands have different mixing ratios, cure times, heat resistance, and safety recommendations. Some are mixed 1:1 by volume, while others use another ratio. Read the label before starting. Resin chemistry is not the place to “measure with your heart.”
Step-by-Step: How to Make DIY Pressed Flower Coasters With Resin
Step 1: Plan your design
Lay your pressed flowers inside the empty silicone mold before mixing resin. Try a few layouts: a single statement flower in the center, a wreath around the edge, scattered petals like confetti, or a minimal fern-and-baby’s-breath arrangement. Take a quick photo of your favorite layout so you can recreate it once the resin is ready.
Step 2: Prepare your workspace
Cover your table, put on gloves, and make sure your molds are clean, dry, and sitting on a perfectly level surface. Resin self-levels, which is lovely unless your table slopes. Then your coaster may cure thicker on one side, like a tiny floral ski ramp.
Step 3: Mix the resin slowly and thoroughly
Measure the resin and hardener according to your product’s directions. Stir slowly to reduce bubbles, scraping the sides and bottom of the cup as you mix. Many craft resins require several minutes of steady stirring. The mixture should look clear and consistent, without cloudy ribbons.
Step 4: Pour a thin base layer
Pour a thin layer of resin into each mold. This base layer helps the flowers sit inside the coaster rather than directly on the surface. Let the resin settle for a few minutes, then pop visible bubbles with a toothpick or brief low heat if your resin instructions allow it.
Step 5: Add pressed flowers
Use tweezers to place the flowers face-down or face-up depending on your mold and desired final view. In many coaster molds, the bottom becomes the top when you demold, so test your mold style first. Gently press petals into the resin so they make contact and do not trap large air pockets underneath.
Step 6: Add the top layer
Pour more resin until the flowers are covered. Do not overfill the mold. A slightly domed edge can look nice, but too much resin may spill and create sharp edges. Use a toothpick to nudge floating flowers back into place.
Step 7: Remove bubbles
Wait a few minutes for bubbles to rise, then remove them. A heat gun or torch can help, but keep it moving and do not overheat the resin or silicone mold. Too much heat can damage the piece or create strange surface texture. When in doubt, use patience and a toothpick.
Step 8: Cover and cure
Cover the molds with a dust shield and let them cure undisturbed. Most resin coasters need at least 24 to 48 hours before demolding, though full cure can take longer. Temperature and humidity matter. A cool room may slow curing, while a dusty room may give your coaster a free layer of mystery fuzz.
Step 9: Demold and finish
Once the resin is fully cured enough to handle, gently peel the silicone mold away from the coaster. If the edges feel sharp, sand them carefully with fine-grit sandpaper. Add cork backing or small rubber feet to prevent slipping and protect furniture.
No-Resin Alternative: Pressed Flower Tile Coasters
If resin feels intimidating, make pressed flower coasters using ceramic tiles and a clear sealer. This method is less glassy but easier for beginners and works well for craft nights.
Supplies for tile coasters
- Plain ceramic tiles
- Pressed flowers
- Mod Podge or decoupage medium
- Small paintbrush or foam brush
- Clear waterproof topcoat or dishwasher-safe sealer
- Cork sheet or felt pads
How to make them
Clean the tile surface and let it dry. Brush on a thin layer of decoupage medium, arrange the pressed flowers, and gently smooth them down. Add several thin coats over the top, letting each coat dry before the next. Finish with a water-resistant or dishwasher-safe sealer if the coaster will be used with cold drinks. Many decoupage products require a long curing period before they reach maximum durability, so avoid heavy use or washing too soon.
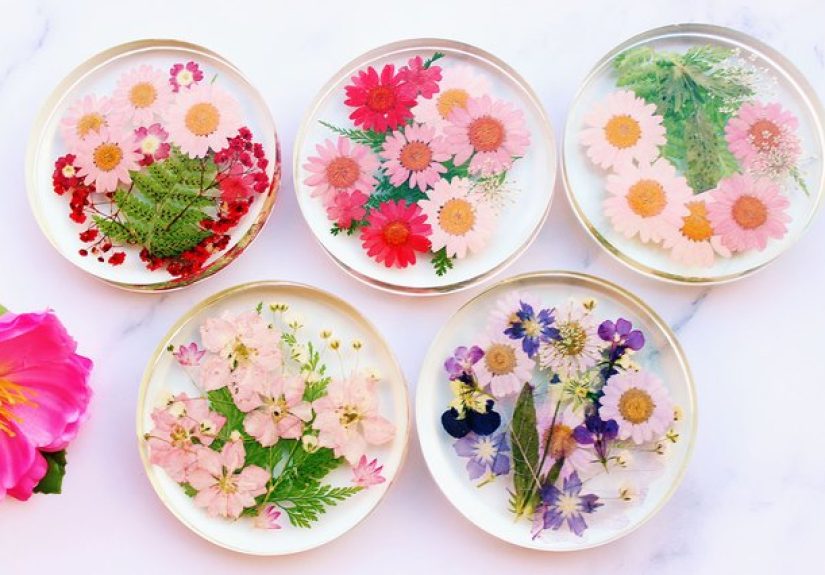
Design Ideas for Pressed Flower Coasters
Minimalist botanical coasters
Use one small flower or fern sprig per coaster. This style looks elegant, modern, and surprisingly expensive. It is perfect for neutral homes, wedding favors, or anyone who says “I like simple things” while owning 43 beige throw pillows.
Garden confetti coasters
Scatter tiny petals, baby’s breath, and greenery across the mold for a cheerful, colorful look. This style is forgiving because there is no exact layout. If a petal moves, congratulations: it is now whimsical.
Seasonal flower coasters
Create sets based on the seasons. Use violets and pansies for spring, bright cosmos and daisies for summer, golden leaves for fall, and evergreen tips or white petals for winter-inspired pieces.
Wedding bouquet keepsake coasters
Pressed flower coasters are a beautiful way to preserve wedding bouquet petals. Dry the flowers as soon as possible after the event for the best color. Use small petals from the bouquet and pair them with gold flakes, pearl powder, or clear resin for a keepsake that feels meaningful but still useful.
Herb garden coasters
Pressed herbs like thyme, mint, lavender, rosemary tips, or small basil leaves can create a fresh kitchen-friendly look. Make sure herbs are fully dry, and remember that some green leaves may darken over time.
Common Mistakes and How to Avoid Them
Using fresh flowers
Fresh flowers are one of the biggest causes of coaster heartbreak. They contain water, and water does not cooperate with resin. Always press and dry flowers thoroughly before sealing.
Mixing resin too quickly
Fast stirring introduces bubbles. Stir slowly, scrape the container, and give bubbles time to rise before pouring. Your coaster should look like a calm garden pond, not a carbonated science experiment.
Pouring too much at once
Thick pours can trap bubbles and shift flowers. For better control, use layers: a base layer, a flower layer, and a sealing layer.
Skipping the dust cover
Dust, lint, pet hair, and tiny airborne crumbs love wet resin. Cover your molds while they cure. This is especially important if you have a cat, because cats believe every horizontal surface is a personal invitation.
Demolding too early
If the coaster bends, fingerprints, or feels tacky, it needs more curing time. Demolding early can warp the coaster or damage the glossy surface.
How to Care for DIY Pressed Flower Coasters
Hand washing is usually safest for handmade coasters, especially resin or decoupage pieces. Wipe with a damp cloth and mild soap, then dry immediately. Avoid soaking, scrubbing with abrasive pads, or placing very hot pots or pans on them. Even heat-resistant resin has limits, and a coaster is not a trivet in a floral costume.
Keep coasters out of prolonged direct sunlight to reduce yellowing and fading. UV-resistant resin helps, but pressed flowers are natural materials, and natural color may soften over time. That gentle aging can be part of the charm.
DIY Pressed Flower Coasters as Gifts or Small Business Products
Pressed flower coasters make thoughtful handmade gifts because they feel personal without requiring the recipient to find wall space. Package a set of four with kraft paper, ribbon, and a care card. For weddings, use flowers that match the event palette. For birthdays, choose birth-month flowers or favorite colors. For housewarming gifts, pair the coasters with mugs, tea, coffee beans, or a bottle of sparkling lemonade.
If you plan to sell them, make test batches first. Check durability, heat performance, clarity, curing consistency, and packaging. Photograph each set in natural light and describe the flowers used. Since every coaster is unique, customers appreciate knowing that small variations are part of the handmade beauty.
Experience Notes: What I Learned Making DIY Pressed Flower Coasters
The first thing you learn when making DIY pressed flower coasters is that flowers have opinions. You may think you are placing a petal neatly in the corner of a mold, but the petal may decide it is destined for the center. Resin adds another layer of comedy because lightweight flowers can float, slide, or spin slightly after placement. The trick is not to panic. Give the resin a few minutes to thicken slightly, then use tweezers or a toothpick to guide the flowers back into position.
Another experience worth sharing: always make more pressed flowers than you think you need. Some petals tear when removed from the paper. Some lose color. Some look perfect until you place them in the mold and realize they are too large, too dark, or shaped like a tiny confused octopus. Having extras gives you creative freedom and prevents that dramatic moment when one coaster is finished and the fourth coaster has nothing but a lonely leaf and your regret.
Layout matters more than expensive supplies. A simple coaster with three tiny flowers and one curved fern stem can look more elegant than a crowded design packed with every petal from the garden. Negative space lets the flowers shine. Before pouring resin, arrange each design on a white sheet of paper or directly in the mold and take a photo. This tiny step saves time once your gloves are sticky and your brain has temporarily forgotten what “pretty arrangement” means.
Temperature also makes a noticeable difference. Resin behaves best in a comfortable, stable room. If the room is too cold, bubbles may linger and curing may slow down. If it is too warm, the working time may feel shorter. A level table is equally important. One slightly tilted surface can create coasters that look fine at first but cure unevenly. Use a small level if you have one, or test with a little water in an empty mold before starting.
The biggest patience test is curing. It is very tempting to touch the surface after a few hours, especially when the coaster looks finished. Do not do it. Fingerprints in half-cured resin are heartbreak with fingerprints. Cover the molds, walk away, and let time do its boring but important job. When the coasters finally demold cleanly, the wait feels worth it.
For gifting, I found that the finishing details matter. Adding cork backing makes the coasters feel more professional. A small care card prevents people from putting them in the dishwasher or using them under a hot saucepan. Wrapping them as a set turns a simple craft into a boutique-style present. The best part is watching someone realize the flowers are real. That little “Wait, you made these?” moment is the official reward for all the drying, mixing, pouring, and petal negotiations.
DIY pressed flower coasters are also a surprisingly meaningful memory craft. Flowers from a birthday bouquet, a wedding centerpiece, a garden harvest, or a simple walk can become something used every day. Instead of pressing flowers into a book and forgetting them until 2037, you turn them into practical art. They hold coffee, tea, lemonade, and tiny pieces of a season you wanted to keep.
Conclusion
DIY pressed flower coasters are beautiful, practical, and wonderfully customizable. Whether you choose clear resin molds or a no-resin tile method, the key steps are the same: dry the flowers completely, plan your design, seal everything carefully, and allow enough curing time. The process is simple enough for beginners but creative enough to keep experienced crafters entertained.
These coasters are more than table protectors. They are tiny preserved gardens, handmade gifts, memory keepers, and proof that the flowers on your counter do not have to end their lives in the trash. With the right materials and a little patience, you can turn pressed petals into glossy, functional art that makes every drink look more charmingeven plain tap water gets a glow-up.


