Table of Contents >> Show >> Hide
- Why a Rainbow Pallet Garden Works (Even If You’re Not “A Garden Person”)
- Before You Start: Pallet Safety and Sanity Checks
- Tools and Materials
- Step-by-Step: Build Your Pallet Rainbow Flower Garden
- Step 1: Prep the pallet (aka the “splinter prevention program”)
- Step 2: Decide how your pallet will stand
- Step 3: Map your rainbow layout before you paint
- Step 4: Paint your rainbow (and keep it looking good outdoors)
- Step 5: Create planting pockets with landscape fabric
- Step 6: Fill with potting mix (not garden soil)
- Step 7: Plant your rainbow flowers
- Step 8: Water properly from day one
- Rainbow Plant Recipes: Specific Flower + Foliage Combos That Actually Work
- Care and Maintenance: Keep It Blooming (Not Just Alive)
- Troubleshooting: Common Problems and Easy Fixes
- Upgrades and Variations (Because You’ll Want to Make Another One)
- Conclusion
- Experience-Based Tips (): What People Learn After Building a Rainbow Pallet Planter
- SEO Tags
If your patio is giving “great potential” (the polite way of saying “sad concrete rectangle”), a rainbow pallet flower garden is the quickest way to add
color, height, and personalitywithout committing to a full backyard makeover. You’re basically turning a humble shipping pallet into a vertical bouquet
display: part planter, part art, and 100% the kind of project that makes neighbors wander over and say, “Okay… that’s actually adorable.”
This guide walks you through building a DIY upcycled pallet rainbow flower garden that’s sturdy, practical, and easy to maintain. You’ll learn how to
choose a safer pallet, prep and paint it in rainbow stripes, create planting pockets, pick flowers by color (and sun needs), and keep everything thriving
long after the “cute weekend project” glow wears off.
Why a Rainbow Pallet Garden Works (Even If You’re Not “A Garden Person”)
A vertical pallet planter is a small-space cheat code. It lets you grow more blooms in less footprint by stacking your planting area upward. That means it
works for patios, balconies, tiny side yards, or any space where you want maximum wow without sacrificing your walking path.
The “rainbow” part isn’t just for looks (though yes, it’s the whole point). Organizing flowers by color makes the arrangement feel intentional, even if you
grabbed plants like you were speed-running the garden center. A color-wheel approachgrouping hues in a smooth progressioncreates harmony and contrast
that looks designed, not accidental.
Before You Start: Pallet Safety and Sanity Checks
Not every pallet deserves a second life as garden decor. Some are totally fine; others have lived a mysterious warehouse life and may be better left to
retirement. Take five minutes here and save yourself a long-term “what did I just plant my flowers in?” anxiety spiral.
Pick a pallet that’s more “porch swing” and less “chemical spill documentary”
- Look for “HT” (heat-treated) markings when possible. Heat-treated pallets are processed with heat rather than chemical fumigation.
- Avoid pallets marked “MB” (methyl bromide). That’s a chemical fumigant you do not want anywhere near your garden project.
-
Skip pallets with stains, oily patches, or strong odors. Even if the wood is technically treated correctly, you don’t know what’s soaked
into it from past use. - Choose a pallet that feels solid and unwarped. If it wobbles like a cartoon table, it’ll only get more dramatic once you add soil and water.
Quick cleanup matters
Brush off dirt, remove stray staples, and hammer down anything sharp. You’re making a gardenyour future self should not need a tetanus shot to deadhead
petunias.
Tools and Materials
You can keep this project budget-friendly by using what you already have. The most “extra” thing here is the rainbow paint lineup, and honestly? That’s
half the fun.
Materials
- 1 sturdy heat-treated pallet (a common size works great)
- Sandpaper (medium grit + fine grit) or a sanding block
- Acrylic paint (rainbow colors) or exterior paint in rainbow shades
- Exterior clear sealer (optional but strongly recommended)
- Landscape fabric (or breathable weed barrier fabric)
- Staple gun + staples
- Potting mix (not garden soil)
- Plants (flowers + a little foliage for “green” in your rainbow)
- Optional: small gravel, hanging hardware, or L-brackets for anchoring
Tools
- Work gloves + safety glasses
- Hammer and/or pry bar (for removing or adjusting slats)
- Paint brushes (a wider one for big stripes helps)
- Scissors or utility knife (for cutting fabric)
- Drill (optional, for mounting or extra drainage tweaks)
Step-by-Step: Build Your Pallet Rainbow Flower Garden
Step 1: Prep the pallet (aka the “splinter prevention program”)
Sand the front and edges, especially where hands will touch. You don’t have to sand it to silky furniture perfectionjust smooth the rough spots and knock
down splinters. Wipe away dust so your paint sticks instead of sliding around like it’s on a dusty dance floor.
Step 2: Decide how your pallet will stand
You have two easy options:
- Lean style: Lean the pallet against a wall or fence at a slight angle. This is the simplest setup and still looks amazing.
- Mounted style: Secure it to a wall or fence (especially if you have wind, kids, pets, or enthusiastic friends who gesture a lot).
Either way, stability matters. Soil is heavy, and wet soil is heavier. Plan to anchor it if there’s any chance it could tip.
Step 3: Map your rainbow layout before you paint
Decide whether you want rainbow stripes running horizontally (classic) or vertically (bold). Most people go horizontal because each “row” can become a
color zone for flowers. Quick tip: paint the pallet first, then add fabric and soil. It’s way easier than trying to paint around floppy fabric.
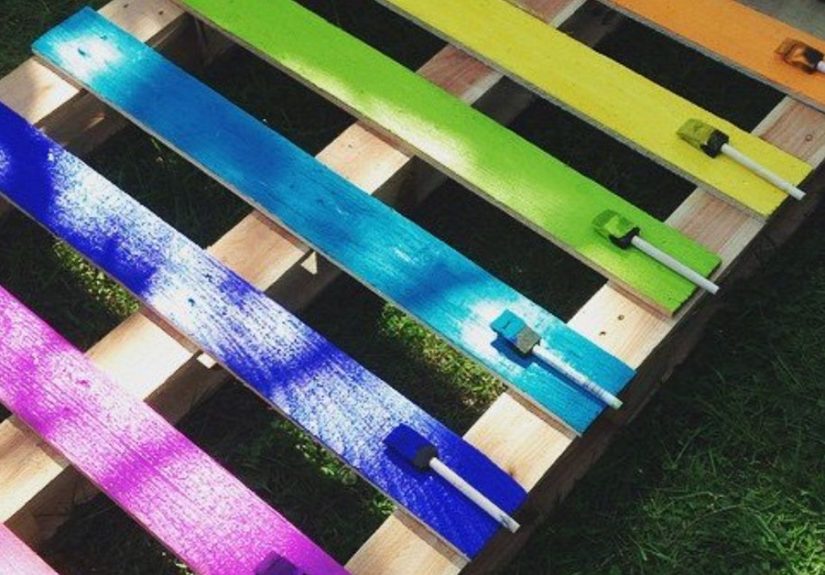
Step 4: Paint your rainbow (and keep it looking good outdoors)
Paint your stripes: red → orange → yellow → green → blue → purple. You can do clean blocks, blended ombré edges, or even fun patterns. Let everything dry
fully between coats. After the paint dries, add an exterior clear sealer if the pallet will live outdoors. This helps reduce fading and makes the wood more
weather-resistant.
If you’re using regular craft acrylics, sealing is especially helpful. Think of sealer as sunscreen for your palletwithout it, your rainbow may slowly
turn into “pastel sadness.”
Step 5: Create planting pockets with landscape fabric
Flip the pallet so the back side faces you. You’ll staple landscape fabric across the back to form “pockets” between slats where soil can sit.
- Cut landscape fabric so it covers the back and wraps around the bottom edge.
- Staple it securely along the outer edges and across the slats to create deep pockets.
- Leave a little slack in each section so the fabric forms a cradle. Tight fabric makes shallow pockets; shallow pockets make cranky plants.
If your pallet’s slats are extremely close together, you can remove every other slat to create larger planting openings. Save removed wood pieces in case
you want to add supports later.
Step 6: Fill with potting mix (not garden soil)
Use a quality potting mix designed for containers. Potting mix stays lighter and drains better than ground soil, which can compact and suffocate roots in a
contained space. Add mix into each pocket and gently firm it down.
Optional but helpful: blend in a little slow-release fertilizer at planting time, especially if you want heavy bloomers (petunias, calibrachoa, and friends)
to keep performing all season.
Step 7: Plant your rainbow flowers
Now for the fun part: assign each row (or section) a color. Plant with mature size in mindput trailing plants near edges, and keep taller plants toward the
back so they don’t block your rainbow effect.
Step 8: Water properly from day one
Water until moisture moves through the soil and you see drainage happening (or at least the whole pocket is evenly moist). For ongoing care, check moisture
with your fingerif the top inch or two feels dry, it’s time to water. In hot, sunny weather, small pockets can dry quickly, sometimes needing more frequent
watering.
Rainbow Plant Recipes: Specific Flower + Foliage Combos That Actually Work
You can swap plants based on your climate, season, and sun exposure, but these combos are reliable “garden center” staples. Pick plants with similar light
needs so you’re not forcing a shade lover to live in full sun just because it matched your purple stripe.
Option A: Full Sun “Bright and Unbothered” Rainbow
- Red: geraniums, red petunias, or red zinnias
- Orange: marigolds, orange calibrachoa, or lantana
- Yellow: yellow petunias, bidens, or coreopsis (compact varieties)
- Green: sweet potato vine (lime), creeping jenny, or compact coleus (sun-tolerant types)
- Blue: blue salvia (compact), lobelia (depending on heat), or blue plumbago (in warmer regions)
- Purple: verbena, purple petunias, or lavender-toned calibrachoa
Option B: Part Shade “Soft Rainbow” for Porches and North-Facing Spots
- Red: impatiens (red), coleus with red tones
- Orange: begonias (orange tones), shade-tolerant coleus mixes
- Yellow: begonias (yellow/peach), chartreuse coleus for a “yellow-green” pop
- Green: ivy, ferns (small), or creeping jenny
- Blue/Purple vibe: purple coleus, torenia (wishbone flower), or violet-toned impatiens
Option C: Low-Water “Desert Rainbow” (Succulents + Foliage)
If you want a rainbow look without daily watering, build your palette with foliage colors and succulents. Think red sedum, golden sedum, lime sedum,
blue chalk sticks, and purple echeveria. This version looks modern and is forgiving if you travel (or simply forget watering exists).
Care and Maintenance: Keep It Blooming (Not Just Alive)
Watering that makes sense
Container-style planters dry faster than in-ground beds, and vertical pockets can dry fastest of all. Check daily in summer heat. Water when the top layer
feels dry, and water thoroughly enough to moisten the full pocket. If the mix gets bone-dry and starts shrinking away from the edges, rehydrate slowly with
repeated watering until it absorbs again.
Feeding for nonstop flowers
Many blooming annuals perform better with regular feeding because nutrients wash out over time when you water. A water-soluble fertilizer every couple of
weeks (or a slow-release fertilizer early in the season) helps keep color coming.
Deadheading = more blooms
Removing spent blooms (deadheading) makes the planter look cleaner and can encourage more flowers for many annuals. It’s five minutes of work for a big
“wow, this is still going?” payoff.
Season swaps
Treat the pallet like a living art piece. In spring, go heavy on pansies and cool-season color. In summer, swap to heat-loving annuals. In early fall,
consider mums or ornamental kale for a fresh look without rebuilding the whole thing.
Troubleshooting: Common Problems and Easy Fixes
“My plants look thirsty… five minutes after I watered.”
In hot sun and wind, shallow pockets dry fast. Add a bit more potting mix if pockets are too shallow, group plants tightly to shade the soil surface, and
water early in the day. If you can, place the pallet where it’s protected from constant wind.
“My rainbow is fading.”
Outdoor sun will fade paint over time. A clear exterior sealer helps. If it’s already fading, you can touch up stripes and resealconsider it “seasonal
maintenance,” like washing patio cushions, but more satisfying.
“Soil is spilling out of pockets.”
Add more staples, especially at the bottom of each pocket, and make sure your fabric has enough slack to form a deep cradle. Landscape fabric should hold
soil while still letting water drain.
“Should I worry about treated wood?”
For pallets, the main concern is avoiding chemically fumigated or contaminated wood (and unknown spills). If you’re ever unsure, use a physical barrier:
line the inside planting area with a heavier plastic layer (while still allowing drainage) so soil is less likely to contact the wood directly.
Upgrades and Variations (Because You’ll Want to Make Another One)
- Add wheels: mount the pallet planter onto a sturdy base with casters to move it for sun or storms.
- Install drip irrigation: a simple drip line can make daily watering less of a lifestyle.
- Use nursery pots: instead of planting directly in pockets, add small shelves or brackets to hold pots you can swap anytime.
- Make it pollinator-friendly: choose blooms known to attract bees and butterflies and avoid spraying pesticides on flowering plants.
- Kid-friendly “forever rainbow” version: use faux flowers for pure decor, or mix faux blooms with real greenery.
Conclusion
A DIY upcycled pallet rainbow flower garden is one of those projects that looks far fancier than it is. With a safer pallet, a little sanding, a burst of
paint, and smart plant choices, you get a vertical garden that saves space, brings color to patios and balconies, and lets you change the vibe whenever you
feel like it. Plus, it’s hard to be in a bad mood while standing next to a rainbow made of flowers. That’s not science. That’s just common sense.
Experience-Based Tips (): What People Learn After Building a Rainbow Pallet Planter
The funniest thing about this project is how confident everyone feels right up until “Step 1: Find a pallet.” Suddenly you’re inspecting wood stamps like a
detective in a low-budget mystery series: The Case of the Suspicious Shipping Platform. The practical takeaway? Finding a clean, sturdy pallet is
worth the extra time. DIYers who start with a solid heat-treated pallet usually have a smoother build, fewer repairs, and less “why does this smell like
industrial regret?” energy.
Next lesson: sanding is not optional if you want to enjoy this planter with bare hands. A quick pass with sandpaper saves you from splinters and helps paint
look crisp instead of patchy. People who skip sanding often end up repainting sooner because rough wood drinks paint unevenly. And yes, painting the rainbow
is the “fun part,” but the secret to a rainbow that stays cheerful is letting coats dry properly. Rushing paint is how you end up with accidental tie-dye
which can be cute, but only if you meant it.
The biggest real-world surprise is watering. Vertical pockets can dry faster than traditional containers, especially in sun and wind. Many first-timers water
lightly (like they’re politely offering the plants a sip) and then wonder why everything wilts by noon. The better habit is watering thoroughly so the whole
pocket becomes evenly moist. A finger test is the simplest “smart garden tool” you already own. In peak summer, DIYers often find the planter needs more
frequent checks than ground bedssometimes daily, especially for thirsty annual flowers.
Plant choice is the next “aha.” People who pick flowers purely by color sometimes accidentally mix plants with opposite needslike sun-loving marigolds next
to shade-loving impatiens. The result is a rainbow where half the colors thrive and the other half stage a slow protest. The fix is easy: pick your plant
palette based on light first (full sun vs. part shade), then choose colors inside that category. Another trick experienced builders swear by is adding at
least one dependable green foliage plant (like a lime sweet potato vine or creeping jenny) to make bright blooms pop and to fill gaps as flowers grow.
Finally, the “long game” lesson: treat this pallet like living decor. Flowers don’t have to be permanent. A rainbow planter looks best when it’s refreshed
swap plants seasonally, replace tired sections, and deadhead blooms to keep things tidy. The most successful pallet gardens aren’t the ones that stay
identical all year; they’re the ones that evolve. Think of it less like a static craft project and more like a colorful stage where different plants get
their moment in the spotlight.