
Table of Contents >> Show >> Hide
- Why Doily Cloches Are Having a Moment
- What You’re Actually Making (So We’re All on the Same Plate)
- Materials and Tools
- Choose the Right Doily (and Keep It from Going Full Drama Queen)
- Method 1: The Classic Stiffened Lace Dome (Freestanding Cloche Cover)
- Method 2: The Washable Lace Sleeve (Doily Over Glass Cloche)
- Method 3: The Plate Cloche Cover (Low Dome, Picnic-Ready)
- Design Upgrades That Make Your Cloches Look Boutique-Level
- Troubleshooting: When Your Doily Has Opinions
- Care and Storage Tips (So They Last More Than One Picnic)
- Creative Ways to Use DIY Vintage Doily Cloche Covers
- Extra: of “Real-Life” Making Experience (What It’s Like, Start to Finish)
- Conclusion
Somewhere between “grandma’s linen drawer” and “Pinterest made me do it” lives the
vintage doily cloche cover: a lacy little dome that makes everyday plates look
like they’re attending a garden party. It’s part practical (keep things lightly covered),
part décor (instant romance), and part comedy (because yes, you are absolutely turning
a thrift-store doily into a fancy food hat).
In this guide, you’ll learn how to make DIY vintage doily cloche covers that are
sturdy, pretty, and surprisingly versatileperfect for picnics, parties, holiday tables,
baked goods, or simply giving your countertop a “curated antique shop” vibe.
Why Doily Cloches Are Having a Moment
Traditional cloches began as protective domesbasically mini greenhousesused to shield
delicate plants. These days, they’ve evolved into a décor staple because they make any
display look intentional: a candle, a small arrangement, a few pinecones, even a stack of
matches can suddenly look like a still life.
A doily cloche cover flips that idea into textile territory: instead of glass,
you’re using lace. The result is softer, more vintage, and more forgiving (glass cloches
don’t love being dropped; lace cloches just… sigh dramatically and keep going).
What You’re Actually Making (So We’re All on the Same Plate)
A “doily cloche cover” can mean a few different things, but this tutorial focuses on two
crowd-pleasers:
-
A freestanding lace dome (stiffened into shape) that sits over a plate, cake stand,
or serving tray. -
A removable lace “sleeve” that drapes over a glass cloche or dome for a layered
vintage look (more washable, less rigid).
If you want the classic “picnic plate cover” effect, go for the freestanding dome.
If you want easy cleaning and flexibility, the lace sleeve is your best friend.
Materials and Tools
Core Supplies
- Vintage doily (crocheted cotton works best; lace or cotton blends also work)
- Fabric stiffener (commercial fabric stiffener or a craft hardener)
- Form to shape the dome: inverted bowl, balloon, glass dome, or rounded colander
- Plastic wrap or aluminum foil (so the doily doesn’t glue itself to your form forever)
- Disposable gloves (unless you enjoy “hands permanently crunchy” as an aesthetic)
- Wax paper / craft mat to protect your surface
Optional “Make It Cute” Extras
- Small knob, drawer pull, bead, or button for a handle
- Needle and strong thread (or clear fishing line) to attach the handle
- Ribbon for edging or a bow around the base
- Spray starch for a lighter stiffening boost
Choose the Right Doily (and Keep It from Going Full Drama Queen)
Not every doily wants to become a cloche cover. Some are thrilled to help. Others will
unravel faster than a reality-show reunion.
-
Fiber matters: Cotton crochet doilies stiffen beautifully and keep definition.
Synthetic lace can work, but sometimes resists stiffener or dries unevenly. -
Size matters: For dinner plates, look for doilies roughly 12–16 inches wide.
For dessert plates, 8–12 inches can be perfect. -
Pattern matters: Open, airy lace looks elegant but may be less “bug-blocky.”
Denser patterns offer more coverage.
Prep: Wash, Dry, and Press (Yes, Even Thrift Store Doilies)
If you’re using true vintage linens, a gentle clean is worth it. Use cool water, mild
detergent, and gentle handling. Avoid hot water for delicate lace and crochet details,
and air-dry to protect fibers. A quick press (low heat, with care) helps the doily shape
smoothly when you stiffen it.
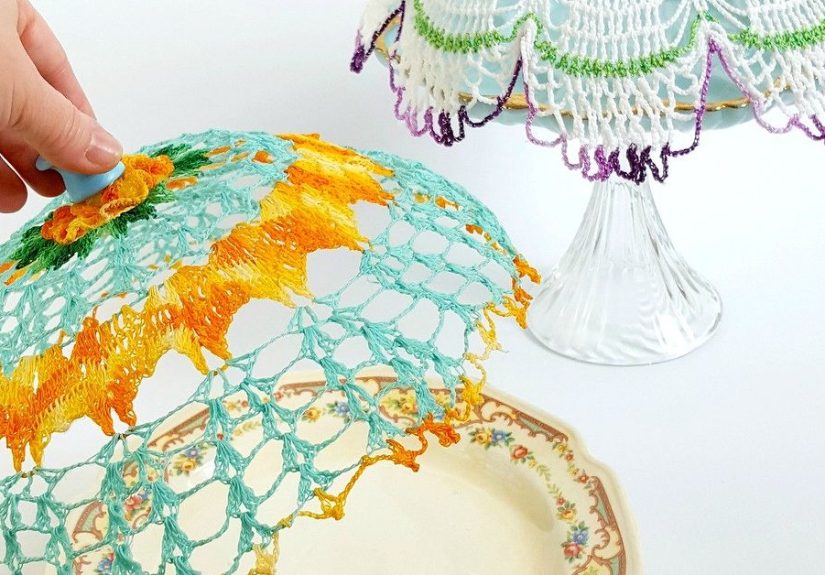
Method 1: The Classic Stiffened Lace Dome (Freestanding Cloche Cover)
This is the “wow, you made that?” method. You’ll saturate a doily with stiffener, drape
it over a form, let it dry, and end up with a rigid lace dome you can lift on and off
plates like the fanciest little serving guard.
Step-by-Step
-
Protect your workspace. Cover your surface with wax paper or a craft mat.
Stiffener is not a personality trait you want permanently bonded to your table. -
Prep your form. Flip a bowl upside down (or inflate a balloon and set it in a cup
to keep it stable). Wrap the form tightly with plastic wrap or foil. -
Soak the doily. Pour fabric stiffener into a disposable bowl. Submerge the doily and
gently press it so the stiffener saturates the fibers. Lift and lightly squeeze out excess.
You want “fully coated,” not “dripping like a haunted mop.” -
Drape and shape. Place the doily over your wrapped form. Smooth it with your fingers
so the pattern looks even. Adjust the edge so the “skirt” sits where you want it to land. -
Let it dry completely. Dry time varies by humidity and product, but plan on
overnight to 24 hours (sometimes longer). It should feel crisp and firm, not cool or tacky. -
Remove the dome. Gently lift the hardened doily dome off the form. If it clings,
don’t panicslide your hand between the plastic wrap and lace to release suction. -
Strengthen (optional). If you want extra sturdiness, brush or spray a second light
coat of stiffener on the inside and let dry again. -
Add a handle. Sew a small knob or bead cluster to the top center. For heavier knobs,
stitch through multiple threads and knot securely on the underside. (If the handle pops off,
the cloche becomes a very polite lace hatstill cute, just less functional.)
Best Uses for the Freestanding Dome
- Outdoor desserts (cupcakes, cookies, brownies on a platter)
- Cheese boards and snack plates (especially when you want a light cover between servings)
- Seasonal table styling (drape over a small vignette for texture)
- Gift presentation (cover homemade treats for a “grandmillennial” reveal)
Real talk: these lace domes are charming, but they aren’t airtight. Think “better than nothing”
for casual coveragenot “NASA-grade insect containment unit.”
Method 2: The Washable Lace Sleeve (Doily Over Glass Cloche)
If you love the look of lace but want a more washable, flexible option, use your doily as a
removable overlay on a glass dome. You still get vintage charmplus you can remove it and
hand-wash it like a civilized person.
How to Do It
- Select a glass cloche or dome that fits your plate or stand.
-
Center the doily on top of the dome and let it cascade naturally.
Adjust until the pattern falls evenly. -
Secure discreetly by stitching small loops of thread around the doily edge that
can hook under the dome’s rim, or tie a thin ribbon around the base like a soft “belt.” - Optional shaping: Lightly starch the doily so it drapes neatly without sliding.
This method is especially pretty for holidays: a lace-draped cloche over ornaments, pinecones,
or seasonal fruit looks curated without trying too hardlike it casually woke up this stylish.
Method 3: The Plate Cloche Cover (Low Dome, Picnic-Ready)
Want a classic plate cover shapemore “dome lid,” less “full bell”? Use a shallower form,
like a smaller bowl, and aim for a lower profile. This creates a cover that sits close to
the plate and feels purpose-built for outdoor dining.
- Use a medium bowl instead of a deep one so the dome height stays practical.
- Pick a doily with a slightly denser pattern for more coverage.
- Add a small handle (button cluster, bead loop, or petite knob) so lifting is easy.
Design Upgrades That Make Your Cloches Look Boutique-Level
1) Dye for Color (Without Ruining the Vintage Vibe)
If your doily is modern cotton, you can dye it with fabric dye for soft pastels or moody tones.
Vintage pieces are more delicatetest first and keep it gentle. A faded blush or dusty blue can
look like it came from a fancy antique market booth where everything costs $42 “because patina.”
2) Add a Handle That Doesn’t Look Like an Afterthought
Great handle options: tiny drawer pulls, wooden beads stacked into a “mushroom” shape, or a loop
of braided ribbon. Stitch firmly and keep it centeredoff-center handles make the cloche wobble
like a toddler in dress shoes.
3) Reinforce the Edge
If your dome edge curls or feels fragile, whip-stitch a thin ribbon around the base or add a line
of fabric stiffener just along the hem to create a subtle “rim.” It helps the cloche sit evenly
on plates and trays.
Troubleshooting: When Your Doily Has Opinions
Problem: The dome collapses or sags
- Use more stiffener saturation (fully coat the fibers).
- Try a second coat after the first dry.
- Choose a denser crochet doily for a stronger structure.
Problem: It dries tacky
- Humidity can slow curinggive it more time and airflow.
- Too much product can pool; squeeze out excess before draping.
Problem: It sticks to the form
- Use smoother plastic wrap and fewer wrinkles next time.
- Foil can imprint texture; plastic wrap often releases cleaner.
Problem: The pattern looks uneven
- Center the doily carefully before it starts drying.
- Gently smooth from the top down, keeping tension even.
Care and Storage Tips (So They Last More Than One Picnic)
-
Store upright in a box or on a shelf where it won’t be crushed.
A stiffened dome is sturdy… until it meets a pile of heavy cookbooks. - Keep away from heat (hot cars, direct sun for long periods) which can warp stiffness.
- Dust gently with a soft brush or microfiber cloth.
- If washable (lace sleeve method), hand-wash cool, air-dry, and press carefully.
Creative Ways to Use DIY Vintage Doily Cloche Covers
These covers aren’t just for food. They’re also the easiest way to make your home feel like
it’s wearing perfume.
- Centerpiece magic: cover a small seasonal arrangement or a candle for a romantic glow
- Holiday styling: lace + ornaments or pinecones = instant vintage Christmas energy
- Party displays: use multiple domes over desserts for a coordinated dessert table
- Heirloom spotlight: display a small keepsake under a lace dome for a soft museum vibe
- Outdoor dining: place over bread, cookies, or fruit when serving outside
Extra: of “Real-Life” Making Experience (What It’s Like, Start to Finish)
People who make DIY vintage doily cloche covers often say the process feels equal parts
treasure hunt, science experiment, and oddly soothing craft ritual. The treasure hunt comes first:
finding doilies with the right size and pattern is half the fun. Thrift stores, estate sales, and
antique malls are full of lacesome pristine, some yellowed, some with tiny repairs that basically
whisper, “I’ve seen some things.” The best picks usually have strong crochet thread, consistent
stitching, and a pattern that’s open enough to look delicate but structured enough to hold shape.
Then comes the “science experiment” moment: stiffening. The first time you dip a doily into fabric
stiffener, you may worry you’re committing a textile crime. It feels wrong… until you lift it out,
squeeze it, and realize you’re essentially giving lace a temporary backbone. Draping it over the form
is where makers learn the most: if you rush, you’ll trap wrinkles; if you overwork it, you can stretch
the pattern out of symmetry. The sweet spot is a gentle smoothing from the top down, like you’re
tucking a tiny lace blanket around a bowl-shaped burrito.
Drying time is the emotional test. Early on, the dome can look like it’s melting, especially if your
room is humid. That’s normal. Crafters often check it too soon (and leave fingerprints), or try to
“help” with a fan and end up with lopsided edges. Patience wins: when it finally dries, it transforms
from floppy lace into a crisp dome that sounds faintly confident when you tap it. Adding the handle is
the rewarding finishing touchsuddenly it’s not just stiff lace, it’s a functional cloche.
What surprises many people is how often these get used once they exist. A doily dome is the kind of
object you start grabbing reflexively: cover cookies while you set the table, protect fruit from curious
pets, or make a last-minute dessert platter look like it’s starring in a lifestyle magazine shoot. And
there’s a particular kind of satisfaction in using something that feels heirloom-y without being fragile
or precious. If a cloche gets a little dented, makers typically reshape it with a light recoat of stiffener
or a careful steam-and-press approach (for non-rigid versions). It’s forgiving, adaptable, andlet’s be
honestridiculously charming.
Finally, there’s the “story” factor. Doily projects are conversation starters because they blend nostalgia
with practicality. People will ask where you bought them. And you get to say, with total sincerity,
“Oh, these? I made them from vintage doilies,” which is the crafting equivalent of arriving at a potluck
with homemade pie and “just happening” to mention you also made the crust from scratch.
Conclusion
DIY vintage doily cloche covers are the kind of craft that feels fancy but stays approachable:
a handful of supplies, a little drying time, and a lot of visual payoff. Whether you go for a freestanding
stiffened dome or a washable lace overlay, you’ll end up with something that makes everyday hosting feel
more specialwithout demanding you become the kind of person who owns matching napkin rings. (No shade if
you do. We respect your commitment.)


