
Table of Contents >> Show >> Hide
- Why Elliott Wave Still Matters (Even If You’re Skeptical)
- The Core: 5 Up, 3 Down (or Vice Versa)
- 10 Elliott Wave Tricks That Actually Improve Your Trading
- 1) Start With Degrees: Align the “Big Song” and the “Solo”
- 2) Use the Channeling Technique to Corral Price
- 3) Respect Alternation: Depth vs. Complexity
- 4) Fibonacci Confluence Isn’t a BuzzwordIt’s a Map
- 5) Momentum Tells You If It’s Wave 3 or Wave 5
- 6) Triangles Warn: “One More Push, Then We’re Done”
- 7) Treat Invalidations as Stop-Loss Blueprints
- 8) No Lone-Wolf Counts: Cross-Validate
- 9) Learn the Correction Zoo (and Don’t Over-Name It)
- 10) Practice “Two-Count Thinking”
- Practical Playbooks You Can Actually Use
- Common Mistakes (and Fixes)
- Risk Management the Wave Way
- Mini Case Studies
- Putting It All Together: A Quick Checklist
- Conclusion: Wave Smart, Not Hard
- of Hard-Won Experience
If price charts look like modern art to you, Elliott Wave is the moment you stop staring and start seeing. Think of it as market karaoke: the crowd (investors) sings the same chorus over and overfive steps with the trend, three steps against itjust in different keys and tempos. This guide keeps the theory practical, tactical, and just nerdy enough to sharpen your edge without turning your chart into conspiracy art.
Why Elliott Wave Still Matters (Even If You’re Skeptical)
Elliott Wave maps how herd behavior tends to express itself in structured surges (impulses) and breathers (corrections). You can use those structures to frame trade ideas, define invalidation levels, and time entries with more confidence. It’s not magic; it’s a disciplined way to say: “If I’m right, price should behave like thisand if it doesn’t, I’m out.”
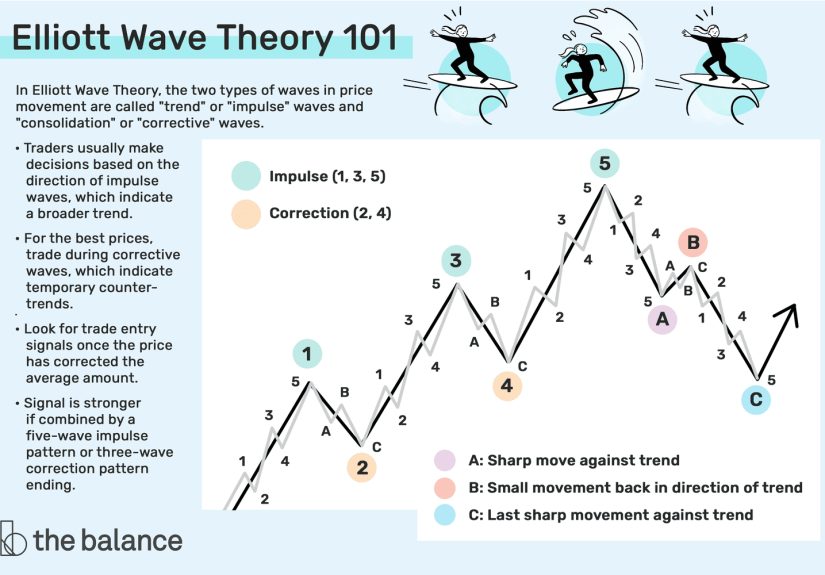
The Core: 5 Up, 3 Down (or Vice Versa)
In its simplest form, a trend unfolds in five waves (1–2–3–4–5). Then the market cools off in three waves (A–B–C). Inside each big wave, smaller waves nest like Russian dolls. That fractal nature lets you apply the same playbook on the 1-minute chart or the monthly chart.
The Three Non-Negotiable Rules
- Rule 1: Wave 2 never retraces beyond the start of Wave 1.
- Rule 2: Wave 3 is never the shortest of the three motive waves (1, 3, 5).
- Rule 3: In a standard impulse, Wave 4 typically does not overlap Wave 1’s price territory (diagonals are the main exception).
These rules anchor risk: when a rule is violated, your countand probably your trade ideais wrong. Flip the chart for downtrends.
10 Elliott Wave Tricks That Actually Improve Your Trading
1) Start With Degrees: Align the “Big Song” and the “Solo”
Do a quick top-down pass: monthly → weekly → daily (or 4H → 1H → 5m for intraday). Label the largest clear structure first. Ask: are we likely in a major Wave 3 (fast, aggressive) or a Wave 5 (tiring, divergence-prone)? Then zoom in to find entries aligned with that higher-degree bias. This one habit cures half of all bad counts.
2) Use the Channeling Technique to Corral Price
Draw a channel around Waves 1 and 2, then project it through Wave 3 to anticipate where Wave 4 might land. For corrections, connect A and C or A and B to anticipate the next touch. Channels make your wave ideas falsifiable and give you natural spots for stops and take-profits.
3) Respect Alternation: Depth vs. Complexity
If Wave 2 is deep and sharp (a fast zigzag), expect Wave 4 to be shallow and sideways (flat, triangle, or complex combo)and vice versa. Alternation is not a rule, but it’s a strong tendency that helps choose between multiple plausible counts.
4) Fibonacci Confluence Isn’t a BuzzwordIt’s a Map
In impulses, Wave 3 often extends ~1.618 × Wave 1; Wave 5 often equals Wave 1 or extends 1.618 × Wave 1. In zigzags, Wave C commonly equals Wave A (1.0×) or extends to 1.618×. Stack these with retracement grids (38.2%, 50%, 61.8%) from the prior swing. Levels that cluster (confluence) often act like magnets and speed bumps, giving you tight entry zones and pre-planned exits.
5) Momentum Tells You If It’s Wave 3 or Wave 5
Wave 3 tends to be the locomotive: highest momentum, widest candles, strongest volume. If the supposed “Wave 3” looks sleepy, you probably miscounted. Conversely, new price highs with weaker momentum often tag a Wave 5perfect conditions for profit-taking or reversal hunts.
6) Triangles Warn: “One More Push, Then We’re Done”
Triangles often appear as Wave 4 in impulses or Wave B in corrections. They usually resolve in the direction of the prior trend and precede the final thrust (Wave 5 or Wave C). When you spot a clean contracting triangle, plan for a breakout, then a terminal move, then be ready for the whole pattern to reverse or consolidate.
7) Treat Invalidations as Stop-Loss Blueprints
If you buy a Wave-3 setup, the Wave-2 low is your line in the sand. If price undercuts it, the count is wrongexit without drama. Tighten stops as price accelerates through your projected Wave-3 “sweet spot” (often between 1.618–2.0 × Wave 1) to lock in gains while you fish for Wave 5.
8) No Lone-Wolf Counts: Cross-Validate
Pair wave counts with simple, robust tools: market structure (higher highs/lows), basic moving averages, volume profile, VWAP, or time-of-day flows. When your waves and your non-wave tools agree, trade harder. When they disagree, trade lighter or pass.
9) Learn the Correction Zoo (and Don’t Over-Name It)
Most corrections are either zigzags (5-3-5), flats (3-3-5), or triangles (3-3-3-3-3). Complex combos just chain these together. Don’t waste time forcing a Latin name on every squiggle; instead, ask: is this sharp and directional (zigzag), sideways and time-burning (flat/triangle), or choppy and extending (combo)? Your trade plan will suggest itself.
10) Practice “Two-Count Thinking”
Always keep a preferred count and a credible alternate. Trade the preferred; define a flip plan if the alternate starts to win (e.g., if price breaks the channel or an invalidation level). This keeps you nimble and stops you from arguing with price.
Practical Playbooks You Can Actually Use
Playbook A: The Classic Wave-3 Breakout
- Identify Wave 1 and a deep Wave 2 pullback (50–61.8% is common).
- Enter on a break above the Wave 1 high (or on the first higher-low after reclaiming the 61.8%).
- Stop below the Wave 2 low (hard invalidation).
- Targets: 1.272–1.618 × Wave 1 for partials; trail the rest into 2.0× with a channel or ATR-based stop.
Why it works: you’re leveraging the market’s most impulsive leg while using an objective invalidation.
Playbook B: Wave-5 With Momentum Divergence
- Spot a clean five-wave advance where price makes a new high, but RSI/MACD makes a lower high.
- Scale out if you’re long, or prep a reversal trade once price breaks back inside the channel.
- Target the prior Wave-4 area (often a liquidity magnet) for mean reversion.
Why it works: late-trend exhaustion plus divergence often produce sharp snapbacks.
Playbook C: A–B–C Zigzag Completion
- Measure Wave A; project A = C or A × 1.618 from the B pivot.
- Layer a retracement grid (38.2–61.8%) from the prior impulse for confluence.
- Enter on the turn (reclaim of a key level or break of the corrective channel).
- Stop below the C extreme; target the origin of the correction, then the channel midline.
Why it works: confluence + structure = asymmetric entries.
Common Mistakes (and Fixes)
- Forcing a count on noise: If you can’t label it without three do-overs, zoom out one degree.
- Ignoring alternation: Expect varietydon’t anticipate two deep, sharp pullbacks in the same impulse.
- Trading without invalidations: If you can’t name the stop that invalidates your count, you don’t have a setupjust a wish.
- Misusing Fibonacci: One ratio is a hint; confluence is a plan. “Cluster or pass.”
- Confusing diagonals and impulses: Leading/ending diagonals allow overlaps and often come with wedge-like channels and weaker momentumtrade them smaller.
Risk Management the Wave Way
Let structure dictate size. Wave-3 entries can justify slightly larger risk budgets; Wave-5 fades deserve smaller sizes, faster partials, and tighter leashes. Keep unit risk constant (e.g., 0.5–1.0R per idea), and fight the urge to martingale when a count breaks. When in doubt, move back to your higher-degree map and wait for the next clean 1–2 or A–B–C.
Mini Case Studies
Case 1: Trend Resumption After Deep Wave 2
A stock rallies from $50 → $60 (Wave 1), retraces to $54 (Wave 2 ~61.8%), then breaks $60 with rising volume. The Wave-2 low at $54 is your invalidation. Targets: $66–$68 (1.272–1.618× Wave 1), then $72–$74 (2.0×). Even if you only capture the first leg, you’ve booked a textbook Wave-3 trade with a tight initial stop.
Case 2: Ending Diagonal Trap
After a long uptrend, price grinds higher in a narrowing wedge with frequent overlapsmomentum lags. That’s consistent with a Wave-5 ending diagonal. Instead of chasing, you scale out on strength and watch for a wedge break to fade back into the prior Wave-4 region.
Putting It All Together: A Quick Checklist
- Top-down bias set? (major wave context)
- Clean 1–2 or A–B–C you can trade?
- Channel drawn with clear invalidation?
- Alternation considered?
- Fibonacci confluence (projections + retracements)?
- Momentum confirms (acceleration for Wave 3, divergence for Wave 5)?
- Position size and exits pre-written?
Conclusion: Wave Smart, Not Hard
Elliott Wave is a language. Once you speak it, markets stop sounding random. Use it to set context, define invalidations, and plan realistic targets. Layer in confluence, stay humble with two counts, and let pricenot egodecide who’s right.
of Hard-Won Experience
Lesson 1: The Market Owes You NothingYour Count Owes You a Stop. My most expensive Elliott Wave mistakes weren’t “bad reads”; they were “no stops.” When a supposed Wave 3 stalled and rolled over, I sat there rationalizing. Now, I place stops exactly where a rule would be broken (e.g., below the Wave-2 low). The clarity is liberating: either I’m early, or I’m wrong. Both are survivable if I respect the invalidation.
Lesson 2: Two Counts Keep You Honest. Early in my journey, I fell in love with my preferred count. Then price married my alternate. These days, I always write the flip script beside the main plan: “If Channel A breaks and we overlap Wave 1, flip to the diagonal count and trade smaller.” No dramajust execution.
Lesson 3: Wave 3 Feels Different. Lean In. The cleanest trades I’ve logged shared a vibe: candles widen, pullbacks get bought fast, and momentum pops. When that happens inside a valid 1–2 launch with volume confirmation, I size to the upper end of my risk budget and trail aggressively. It’s not bravadoit’s statistics mixed with structure.
Lesson 4: Wave 5 Is Where Hubris Goes to Die. Chasing late Wave-5 thrusts burned me repeatedly. What saved me was learning to sell strength into divergence and channel resistance, not buy it. If I do trade Wave-5 extensions, I scale out fast and accept that the move can end with a single nasty engulfing bar.
Lesson 5: Fibonacci Confluence Is a Sanity Check, Not a Prediction. I’ve watched 61.8% retracements slice like butter and 38.2% hold like Fort Knox. The difference? Confluence. When projections (like A=C) and retracements cluster near prior structure with confirming order flow, I act. If it’s just a lonely ratio on an empty island, I pass.
Lesson 6: Sideways Time Hurts More Than Wrong Way Price. Complex corrections drain emotional capital. I’ve learned to identify “time burners” (flats, triangles) and reduce size or step aside until the range resolves. The best trades often come right after the market stops wasting time.
Lesson 7: Journals Beat Memory. I screenshot every trade with labels, channels, Fibs, and notes on what I believed before entry. Patterns emerge: which counts I nail, which contexts I butcher, which sessions I trade well. The meta-pattern (my behavior) is the real edge.
Lesson 8: Wave Counting Is a Team Sport (Even Solo). I ask dumb questions of my own chart: “If this is a triangle, where’s E?” “If this is Wave 3, why is momentum lagging?” That Socratic self-heckling has saved me more than any fancy indicator.
Lesson 9: Know When Not to Count. Earnings week, news shocks, and thin overnight sessions can mangle structure. If candles look like a heart monitor, I default to basic market structure and VWAP, then return to waves when the rhythm normalizes.
Lesson 10: Consistency > Genius. The traders who last don’t count better; they manage risk better. Elliott Wave gives them a framework for precise stops and realistic targets. The rest is repetition: plan, execute, journal, refine, repeat.
SEO Goodies
sapo: Elliott Wave doesn’t have to be mystical. In this practical guide, you’ll learn 10 field-tested trickslike degree alignment, channeling, alternation, Fibonacci confluence, momentum tells, and triangle tacticsto plan cleaner entries, place objective stops, and manage risk like a pro. Real checklists, simple playbooks, and hard-won lessons included.


