
Table of Contents >> Show >> Hide
- Why Store-Bought Drawer Organizers Don’t Always Work
- The Hometalk-Style Solution: Custom, Inexpensive Drawer Organizers
- Budget-Friendly Materials That Work Hard
- Layout Ideas for Every Type of Drawer
- How to Make Your Inexpensive Drawer Organizers Last
- 500+ Words of Real-Life Experience with Inexpensive Drawer Organizers
- Wrapping It Up: Your Perfect, Low-Cost Drawer Solution
Open any random drawer in your home and there’s a 60% chance something embarrassing is living in there:
a takeout menu from 2014, five tape measures, three mystery keys, and one lone chopstick.
Drawer clutter happens to all of us, especially when custom organizers cost more than what we’re actually storing.
The good news? You don’t need fancy acrylic trays or designer pegboard systems to tame the chaos.
Hometalk-style DIY projects, combined with smart ideas from home bloggers, pro organizers, and budget-friendly brands,
prove that inexpensive drawer organizers can look custom, last for years, and cost less than a coffee.
In this guide, we’ll walk through a simple, flexible system inspired by Hometalk projects and other real-life organizing hacks.
You’ll learn how to build your own DIY drawer organizers using foam board, cardboard, and dollar-store bins,
how to lay out drawers so everything actually fits your life, and how to keep them neat long-termwithout blowing your budget.
Why Store-Bought Drawer Organizers Don’t Always Work
Store-bought organizers are great… until you get them home. You line them up in the drawer and discover a tragic 2-inch gap
where crumbs go to retire, or your favorite spatula hangs over the edge like it’s on a cliff.
Even highly rated organizerslike expandable bamboo trays or compact, stacked cutlery trays from brands such as Joseph Joseph
and OXOstill rely on standard dimensions. They’re fantastic for “normal” drawers, but not for the random, narrow, deep, or
just-weird drawers many of us actually own.
That’s where DIY and ultra-budget options shine. With materials like foam board or cardboard, you can create dividers that fit
exactly to the millimeter, so there’s no wasted space and no rattling organizers sliding around every time you open the drawer.
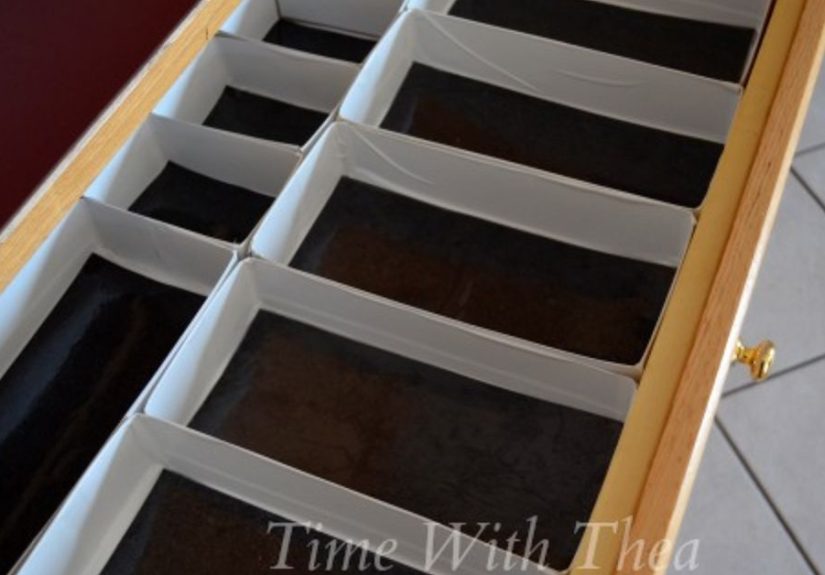
The Hometalk-Style Solution: Custom, Inexpensive Drawer Organizers
Hometalk and similar DIY communities are full of smart projects that turn everyday materials into made-to-measure drawer systems.
Think foam board dividers wrapped in pretty contact paper, cardboard grids built from Amazon boxes, and Dollar Tree bins arranged
like a little puzzle of joy.
The basic idea: instead of forcing your stuff to fit a tray from the store, you build the tray around your stuff and your drawer.
Here’s how to copy that approach step-by-step.
Step 1: Declutter and Define the Drawer’s Job
Before you touch a ruler, empty the drawer completely. Pro organizers agree: pulling everything out, sorting, and cleaning the space
is the fastest route to a drawer that stays neat.
- Empty: Take everything out and wipe down the drawer.
- Sort: Toss trash, re-home random items, and group like with like.
- Decide its job: Is this a cutlery drawer, a cooking-tools drawer, a “junk” drawer (no judgment), a makeup drawer, or a tech drawer?
Give each drawer one main purpose. A “random everything” drawer is almost impossible to organize cheaply because you need
a thousand different compartments. A “pens and notepads” drawer? That’s easy.
Step 2: Measure Like a Pro (But Without the Drama)
Grab a tape measure and note three numbers: interior width, depth (front to back), and height.
These measurements will decide how tall your dividers can be and how you’ll arrange them.
Next, measure the things that live in the drawer:
- Longest utensil or tool
- Typical width of items (spoons, pens, brushes, etc.)
- Any oversized items (whisks, ladles, hair tools, gadgets)
Use these measurements to sketch a quick layout on paper. Don’t worry about perfect art; you just need a rough idea of where
long items, small items, and “grab-and-go” items will sit.
Step 3: Build Dividers from Foam Board or Cardboard
Now the fun, crafty part. Many Hometalk-style projects and organizing bloggers swear by foam board from the dollar store
(usually around $1–$1.25 a sheet) and recycled cardboard to create dividers that are both sturdy and cheap.
The basic method is simple:
- Cut strips of foam board or cardboard to the height of your drawer (minus a tiny bit so they slide in easily).
- Cut them to length so they run front-to-back and side-to-side.
- Slot them together by cutting halfway-through slits where they intersect, forming a grid.
- Secure with hot glue or tape if you want them permanent, or leave them slotted-only if you want to adjust later.
To level up the look, wrap the pieces in contact paper, decorative duct tape, or leftover gift wrap before assembling.
Suddenly your “trash cardboard” organizer looks like something you ordered from a boutique.
Step 4: Add Dollar-Store Bins for Flexible Zones
Foam board or cardboard grids are perfect for small items, but sometimes you just need small bins you can slide in and out.
That’s where Dollar Tree or Walmart bins and trays come in. Many popular organizing videos show these cheap bins completely
transforming drawers, especially when combined with a few simple dividers to keep them in place.
Mix-and-match approach:
- Use long bins for spatulas, tongs, rulers, or makeup brushes.
- Square bins hold batteries, paper clips, sauces, or packet mixes.
- Tiny cups are perfect for hair ties, thumb drives, or pushpins.
Line the bottom of the drawer with a bit of grippy shelf liner so bins don’t slide, or use thin foam-board “rails” to wedge them snugly in place.
Budget-Friendly Materials That Work Hard
What makes this type of drawer system so powerful is that you can adapt it using materials you probably already haveor can pick up
for a few dollars.
Foam Board: The Secret Hero of Drawer Organizing
Foam board is sturdy, light, and easy to cut. Many budget organization pros use it for custom dividers because it holds its shape
but doesn’t require power tools.
Why it’s great:
- Cheap (often around $1 per sheet at dollar stores)
- Easy to cut with a craft knife
- Doesn’t warp easily in regular household conditions
- Can be wrapped to look high-end
Cardboard: The Zero-Cost MVP
If you’ve got Amazon boxes, you’ve got organizer material. Many tutorials show how to turn plain cardboard into custom drawer
dividers and boxes shaped exactly to your drawers and items.
The key is to:
- Use double-wall or heavier cardboard for long spans.
- Cut carefully so edges stay straight and snug.
- Reinforce long dividers with tape to avoid bowing.
Dollar-Store Bins and Trays
Dollar stores and big-box retailers carry an ever-expanding range of small plastic trays, narrow bins, and caddies.
Organizing bloggers often use these to fill awkward spaces, especially in kitchens and bathrooms.
Look for:
- Long, narrow organizers for cooking tools, makeup brushes, or toothbrushes.
- Small modular trays that can be combined like a puzzle.
- Stackable containers for deep drawers.
Layout Ideas for Every Type of Drawer
Once you know how to build dividers, you can adapt the layout to almost any drawer in your home.
1. Kitchen Utensil Drawer
Create a long channel across the back for spatulas and wooden spoons, a wide section in the middle for everyday tools,
and a few small front compartments for bottle openers, peelers, and measuring spoons.
2. “Junk” Drawer (a.k.a. Command Center)
Use a cardboard or foam board grid with small squares for batteries, rubber bands, tape, and keys.
Add one slightly larger zone for notepads and pens. Label the compartments so everyone in the house knows where things go.
3. Bathroom Drawer
Combine small bins for cotton rounds, floss picks, and hair ties with a couple of long compartments for brushes and razors.
Line the bottom so spills are easy to wipe up and don’t soak into cardboard.
4. Office or Craft Drawer
Many crafters use foam core or cardstock to divide drawers for pens, markers, tape, and embellishments.
The same strategy works for a home office: dedicate zones for stationery, tech cords, sticky notes, and stamps.
5. Kids’ Drawers
Lightweight dividers are perfect for kids’ rooms because they’re safe and easy to replace. Use roomy compartments for
socks, underwear, and accessories in dresser drawers, and shallow trays for crayons and small toys in desk drawers.
How to Make Your Inexpensive Drawer Organizers Last
Cheap doesn’t have to mean flimsy. With a few small upgrades, your DIY organizers can hold up surprisingly well.
- Seal surfaces: Wrap cardboard in contact paper or tape to protect it from spills and grime.
- Anchor dividers: Use a bit of hot glue, removable mounting putty, or non-slip liner so things don’t shift.
- Right-size the compartments: Don’t cram 20 tools into one space; it’s better to add one more divider than to overstuff.
- Set a reset routine: Once a week, do a 30-second tidy of your most-used drawers.
Many kitchen organizing guides emphasize that the real magic isn’t just in the product you useit’s in the habits you build
around putting things back where they belong. A simple, cheap system that matches your actual routines will always beat a
gorgeous, expensive tray you stop using after a month.
500+ Words of Real-Life Experience with Inexpensive Drawer Organizers
Let’s talk about what really happens after you install those dreamy dividersbecause drawer organizing is not a one-and-done
fairy tale. It’s more like a low-effort relationship you have to maintain.
The first time you build foam board dividers, you’ll probably overthink everything. You’ll measure the drawer nineteen times,
sketch out four possible layouts, and stare at your utensils like you’re planning a seating chart for a wedding. Then you’ll
cut the pieces, slot them together, drop them in, and think, “Oh. That was it?” In the best way.
What surprises most people is how quickly the drawer starts to “teach” you what works and what doesn’t. For example, you might
give your garlic press this luxurious extra-long compartment, only to realize after two weeks that you barely use it. Meanwhile,
you’re shoving measuring spoons into a tiny space like they’re trying to board an overbooked flight. That’s the beauty of
inexpensive, DIY organizers: you can fix your mistakes without feeling guilty about the money.
One common lesson is that access matters more than aesthetics. It’s tempting to make every compartment the exact
same size for that satisfying grid look, but your hands don’t live in a Pinterest photo. You’ll quickly notice that you want
your most-used tools near the front and in slightly larger zones so you can grab them without micro-surgery.
Another real-world insight: very small compartments are a double-edged sword. Yes, it’s satisfying to have a perfectly sized
square just for rubber bands. But if it’s too tiny or too far back, people will still toss rubber bands into the nearest open spot.
A better strategy is to use “macro” categoriesone section for writing tools, one for batteries and chargers, one for small
fixer-upper itemsrather than dozens of micro-zones that only you can decode.
When families or roommates are involved, labels can be a game changer. Even a super simple setuplike small label stickers that say
“TOOLS,” “BASICS,” or “EXTRAS”helps everyone understand your system. If people know where scissors live, they’re more likely to
return them to the right neighborhood.
Another thing you’ll notice over time is how flexible foam board and cardboard systems are. Need to convert a kitchen drawer into
a baking-only zone because you suddenly became the household cookie supplier? Pull out a couple of dividers, adjust a few pieces,
and you’ve got long runs for rolling pins and spatulas plus smaller pockets for pastry brushes and cookie scoops. No shopping trip,
no new order, just a little time with a craft knife.
For deep drawers, custom dividers are especially helpful. Store-bought trays often leave a canyon of unused vertical space. With
inexpensive materials, you can create two-tier systems or tall divided bins. One real-world trick: use shorter dividers near the
front for things you grab often, and taller, more contained sections at the back for backup supplies or extras.
Maintenance-wise, the best decision you can make is to schedule one “drawer check-in” every month or so. It doesn’t have to be
dramaticjust a quick scan: Are any sections overflowing? Is there a random object camping out where it doesn’t belong?
Does a divider need a bit of glue or tape? Because the system is inexpensive and customizable, you’ll feel empowered to fix and
tweak instead of silently resenting it.
Over time, you may even find yourself applying the same approach beyond drawers: pantry shelves, fridge zones, bathroom cabinets,
craft closets. Once you realize you can carve order out of chaos with a few dollars and some clever cuts, it’s hard to unsee the
potential. And that’s really the heart of this Hometalk-style solution: it’s not just about tidy drawers, it’s about the confidence
that you can improve your space without waiting for a big budget or a big remodel.
So if you’re standing in front of a chaotic drawer right now, foam board in one hand and scissors in the other, congratulationsyou’re
about five cuts away from that deeply satisfying moment when everything clicks into place and the drawer glides shut with a soft,
organized whoosh. That’s the sound of inexpensive perfection.
Wrapping It Up: Your Perfect, Low-Cost Drawer Solution
You don’t need custom cabinetry or pricey organizers to create drawers that work beautifully. By combining decluttering, smart
layout planning, and DIY foam board or cardboard dividers with a few cheap bins, you can build a tailored system in every drawer
of your home.
Start with one problem drawer, experiment with a Hometalk-inspired solution, and let your success there ripple outward.
The more intentional your drawers become, the easier your daily routines feelwhich is the real payoff of any organizing project,
no matter how inexpensive the materials.


