
Table of Contents >> Show >> Hide
- Why This Project Works So Well
- Before You Build: Choose the Right Fence Wood
- How to Turn a Broken Fence into a Super Sized Antique Tray
- Design Details That Make It Look Antique
- How to Style a Super Sized Cutting Board Tray
- Common Mistakes to Avoid
- Why This Upcycled Project Has Real Staying Power
- Experience and Lessons Learned From Making One
- Final Thoughts
Every backyard has one. That sad, splintery fence board leaning in the corner like it has seen things. Most people look at it and see trash. A DIY lover looks at it and sees potential, character, and a future starring role on a kitchen island. That is the magic behind turning broken fence wood into a super sized antique cutting board tray: you are not just building a project, you are rescuing a story.
And what a story it can become. With the right prep, design choices, and finish, a weathered board can transform into a rustic oversized tray that looks like it came from an old farmhouse market, a French country kitchen, or the kind of shop where everything costs too much but somehow still feels worth it. Better yet, this kind of project sits right at the sweet spot between practical and decorative. It can hold candles, corral coffee syrups, style a dining table, or serve bread and fruit at a gathering. It is the overachiever of home decor.
This makeover also checks every box modern readers love: upcycling, budget-friendly design, vintage charm, and a custom piece that does not scream “I bought this at the mall.” If your goal is to create a reclaimed wood tray with personality, this project delivers. If your goal is to make guests ask, “Wait, you made that from a broken fence?” then congratulations, you are about to win the weekend.
Why This Project Works So Well
The reason this oversized antique cutting board tray feels so satisfying is simple: contrast. You start with rough, neglected material and end with something polished, useful, and striking. The raw texture of fence wood gives the finished piece age and warmth. The tray format adds function. The oversized scale gives it drama. Put those three things together and you get a project that feels designer-y without requiring designer money.
There is also a visual trick at work here. Vintage cutting boards and old bread boards have become beloved decor pieces because they soften a kitchen. They bring in natural wood tones, imperfect edges, and that “collected over time” look. An extra-large tray built in that style gives you the same old-world appeal, but with more flexibility. It can be leaned against a backsplash, layered on open shelving, or laid flat as a centerpiece. Basically, it is a cutting board’s more glamorous cousin who also knows how to host brunch.
Before You Build: Choose the Right Fence Wood
Not every broken fence deserves a second act. Some boards are beautifully weathered. Others are one nail away from becoming a public health announcement. So selection matters.
Look for Character, Not Catastrophe
The best boards have surface wear, gray patina, old saw marks, and maybe a few honest imperfections. What you do not want is rot, active mold, crumbling fibers, or anything that smells suspiciously like chemicals and regret. If the wood is too far gone, it will not hold up to milling, assembly, or use.
Avoid Treated or Questionable Lumber for Food Use
This is important. If the fence wood is old, pressure-treated, or of unknown origin, treat the finished piece as decorative or light serving decor only, not a surface for chopping or direct heavy food prep. If you want a tray that will regularly touch bread, fruit, or crackers, use untreated reclaimed wood that has been thoroughly cleaned, or build the top from known safe hardwood and use reclaimed wood for the sides and detailing. Rustic is charming; toxic is not a design style.
Check Every Inch for Metal
Old fence boards love to hide nails, screws, staples, and tiny bits of metal just waiting to destroy your tools and your mood. Remove all visible fasteners, then scan for hidden ones. This step is not glamorous, but neither is replacing a saw blade because a 20-year-old staple decided to fight back.
How to Turn a Broken Fence into a Super Sized Antique Tray
The beauty of this project is that you do not need to overbuild it. In fact, keeping the construction simple often makes the final piece feel more authentic. The goal is not factory perfection. The goal is a sturdy reclaimed wood tray that looks timeworn, intentional, and useful.
Step 1: Clean the Wood Without Erasing Its History
Start by scrubbing off dirt, cobwebs, and loose debris. Let the boards dry completely. Then sand just enough to remove splinters and unstable fibers. Do not sand away every mark. The weathering is the point. You want “beautifully aged,” not “fresh from aisle seven at the home center.”
A good rule is to smooth what your hands will touch and leave the rest alone. The edges can keep some texture. The face can keep color variation. Old nail holes? Those are free personality.
Step 2: Square It Up, But Keep It Rustic
Once the wood is clean and safe to handle, trim it to workable pieces. If you are building a super sized tray, aim for generous proportions. Something in the range of 24 to 36 inches long instantly creates impact. It looks substantial on a table, island, or ottoman and gives the piece that antique-market energy people love.
If one edge has a beautiful worn profile, consider preserving it as part of the design. Straighten only the edges that need to join cleanly. This balance between order and irregularity is what makes the tray look curated rather than clumsy.
Step 3: Create the Main Panel
Lay two or more boards side by side to form the face of the tray. Join them with glue and clamps, pocket screws from the underside, or support battens on the bottom depending on your tools and comfort level. If you want the piece to mimic an antique cutting board, a wide flat face is your hero feature.
For extra style, you can add breadboard-style ends. That old-school detail gives the tray a classic cutting-board silhouette. Just remember that wide wood panels move with seasonal humidity, so you do not want to lock the entire width too rigidly. The smartest builds allow a little movement instead of pretending wood will behave like plastic. It will not. Wood has opinions.
Step 4: Add the Tray Lip
Now turn the board into a tray. Attach low rails around the perimeter using slim reclaimed strips or clean new wood stained to match. Keep the sides modest, around 1 to 2 inches tall, so the piece still reads like a giant cutting board tray instead of a toolbox with ambition.
Mitered corners look refined. Butt joints look more rustic. Both can work. The choice depends on whether you want “vintage farmhouse” or “general store find from 1898.”
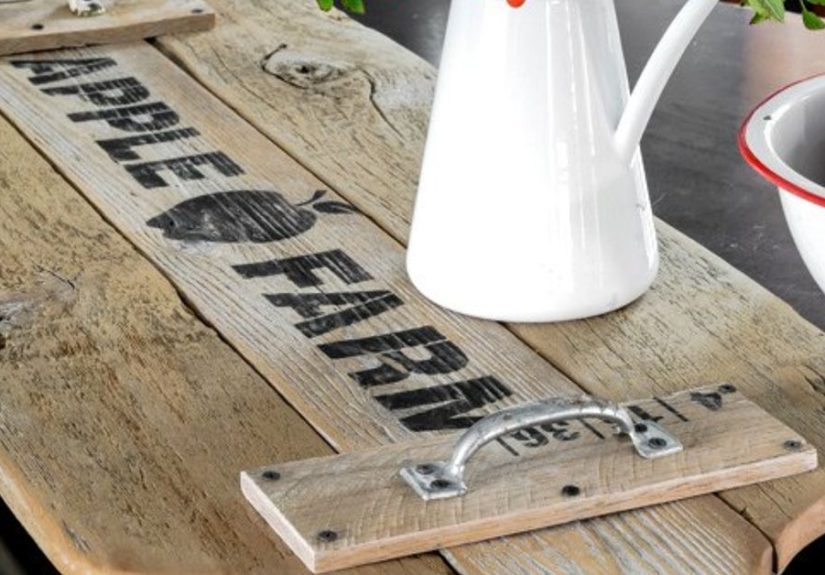
Step 5: Add Handles
Handles completely change the personality of the piece. Black iron pulls create an industrial farmhouse look. Cutout handles feel more traditional. Leather pulls add a softer handmade vibe. If you are chasing the antique cutting board tray aesthetic, dark metal hardware is hard to beat.
Place the handles carefully so the tray balances when lifted. Nothing ruins a dramatic entrance with snacks faster than a tray that tilts like it is trying to throw a small charcuterie tantrum.
Step 6: Finish for the Right Use
If the tray is decorative only, you have more finish options. Wax, matte polyurethane, hemp oil, or a soft furniture finish can all work depending on the look you want. If the tray may lightly touch food, choose a finish appropriate for that use and avoid thick glossy coatings that feel more bar-top than bread-board.
A popular approach is a mineral oil and beeswax style finish because it enriches the grain, keeps the surface looking natural, and does not make old wood look plastic. That said, if you are working with unknown reclaimed fence lumber, keep the finished piece in the decorative lane. It can still hold bowls, linens, candles, and wrapped food beautifully.
Design Details That Make It Look Antique
A project like this lives or dies by the details. The construction may be simple, but the styling choices are what sell the illusion of age.
Keep the Color Muted
Resist orange stains and glossy topcoats. Antique-inspired wood is usually softer in tone: weathered brown, gray-washed oak, smoky walnut, or warm honey. If your reclaimed board looks too flat after sanding, use a light antiquing glaze or a toned wax rather than drowning it in color.
Let Imperfections Stay
One wormhole? Charming. Slight saw mark? Lovely. Tiny knot crack? Character. The trick is knowing which imperfections add beauty and which ones invite the tray to fall apart during dessert. Keep the visual history. Lose the structural chaos.
Use Hardware That Feels Earned
Shiny chrome will fight the whole vibe. Aged brass, black iron, or darkened steel will support it. The tray should look like it could have lived a previous life in a bakery, a pantry, or a farmhouse kitchen where somebody named Ruth was very serious about pie.
How to Style a Super Sized Cutting Board Tray
Once finished, this piece becomes a decorating powerhouse. That is one reason oversized wood trays are so popular: they do practical work while making a room feel layered and warm.
On a Kitchen Island
Use the tray to group olive oil, salt cellar, a crock of utensils, and a small plant. Suddenly the counter looks intentional instead of like a grocery bag exploded.
On a Dining Table
Set the tray in the center with candles, a vase, and seasonal produce. In fall, add pears and mini pumpkins. In spring, use branches and ceramic bowls. The wood anchors everything and makes even simple objects feel styled.
On an Ottoman or Coffee Table
This is where the oversized scale really shines. A large rustic tray can hold remotes, books, coasters, and a candle while making the whole room feel pulled together. It is like a polite bouncer for clutter.
Leaning as Decor
If the tray is especially beautiful, do not hide it flat. Lean it against a backsplash or on open shelves like a vintage board. Layer it with smaller cutting boards and ceramics for that collected-kitchen look people spend years trying to fake naturally.
Common Mistakes to Avoid
First: over-sanding. If you sand reclaimed wood until it looks brand new, you have removed the plot twist.
Second: making it too flimsy. A giant tray needs support. Thin rails and weak hardware can turn a lovely project into a dramatic collapse.
Third: ignoring wood movement. Wide wood panels expand and contract. If you attach every piece as though humidity does not exist, the wood will eventually educate you.
Fourth: confusing “rustic” with “unfinished.” Rustic still needs smooth touch points, secure joinery, and a finish that suits the use. Splinters are not artisanal.
Why This Upcycled Project Has Real Staying Power
Trends come and go, but reclaimed wood projects keep surviving because they offer something rare: authenticity. A tray made from a broken fence board has marks, color shifts, and grain patterns that cannot be mass-produced. It brings sustainability into the conversation without becoming preachy, and it gives homeowners a chance to create something deeply personal.
It also reflects how people want their homes to feel right now. Less sterile. Less disposable. More layered, useful, and human. An oversized antique cutting board tray fits that mood perfectly. It is functional, tactile, and just imperfect enough to feel real.
Experience and Lessons Learned From Making One
The first time I turned old fence wood into a giant tray, I expected a quick weekend project. What I got instead was a crash course in patience, humility, and the surprisingly emotional power of sandpaper. Reclaimed wood does not behave like fresh lumber. It argues. It twists. It hides metal like a tiny wooden magician. But once you stop fighting it and start working with what it wants to be, the whole process becomes more enjoyable.
One of the biggest lessons is that preparation matters more than perfection. The boards that look the roughest at the start often become the most beautiful, but only if you clean them well, stabilize them, and remove the dangerous nonsense. I learned to stop rushing the boring parts. Pulling fasteners, scrubbing grime, checking for soft spots, and testing finishes may not be glamorous, but they are what separate a lasting piece from a decorative disaster.
I also learned that scale changes everything. A small tray can be cute. A super sized tray feels intentional. It becomes a centerpiece rather than an accessory. On a big table or island, the larger size adds confidence and presence. It says, “Yes, I was made from a broken fence, but I have since entered my main-character era.” That oversized look is especially effective when the wood has visible age. The size gives the grain and weathering room to show off.
Another surprise was how much restraint improves the final result. Early on, it is tempting to add more distressing, more stain, more hardware, more “character.” But reclaimed wood already comes with character baked in. It does not need theatrical assistance. The best version of the project usually happens when you preserve the good flaws, strengthen the weak areas, and let the material speak in its own voice. Old wood is not shy.
Styling the finished piece taught me just as much as building it. I originally thought of the tray as a serving item, but it quickly became one of the hardest-working objects in the house. One week it held candles and a vase on the dining table. The next week it organized coffee essentials on the kitchen counter. During gatherings it carried bread, folded napkins, and little bowls of snacks. Between events it leaned against the backsplash looking effortlessly expensive. Few DIY projects earn that kind of job security.
Most of all, this project reinforced why upcycling is so satisfying. You are not just saving money. You are changing your relationship with materials. A broken fence board stops being waste and starts being potential. You begin to notice grain, texture, weight, color, and shape in a new way. You become slower to throw things out and quicker to imagine second lives for them. That mindset spills into other projects, other rooms, and eventually the whole way you decorate.
So yes, the finished tray is beautiful. Yes, it is practical. Yes, it makes a kitchen feel warmer and more collected. But the real reward is the transformation itself. Taking something worn down and making it useful again is deeply satisfying. It feels creative, grounded, and just a little rebellious in the best way. And honestly, that may be the most antique thing about it: the idea that good materials deserve another chance.
Final Thoughts
Turning a broken fence into a super sized antique cutting board tray is the kind of DIY project that punches above its weight. It is approachable, affordable, and packed with visual payoff. It embraces reclaimed wood, vintage style, and practical design in one handsome package. With careful prep, smart finishing, and a little restraint, you can create a tray that looks storied rather than store-bought.
Best of all, the result feels personal. Nobody else will have your exact grain pattern, your exact wear marks, or your exact mix of rustic charm and useful function. That is the beauty of upcycled design. It does not just decorate a home. It gives it a point of view.


