Table of Contents >> Show >> Hide
- Why I Chose an Electric Fireplace for My DIY Fireplace Project
- Planning the DIY Fireplace Before I Touched a Saw
- Materials I Used for the DIY Fireplace Wall
- How I Built the Fireplace Frame
- Finishing the DIY Fireplace Feature Wall
- What I Learned While Building My DIY Fireplace
- DIY Fireplace Safety Rules I Would Never Skip
- The Finished DIY Fireplace Changed the Entire Room
- My Extended DIY Fireplace Experience: What the Project Was Really Like
- SEO Tags
Note: This first-person story is a practical composite based on a DIY electric fireplace project. Always follow the manufacturer’s installation manual, local building rules, and electrical requirements for your specific unit. A fireplace should make your home cozier, not turn it into an episode of a home-renovation disaster show.
My living room had all the ingredients of a comfortable space: a decent couch, warm lighting, a rug that had survived both movie nights and mysterious snack crumbs, and one large blank wall that somehow made the entire room feel unfinished.
For years, I treated that wall like a difficult relative at Thanksgiving. I acknowledged it, avoided eye contact, and hoped nobody would bring it up. Then one chilly evening, while wrapped in a blanket that had become less of an accessory and more of a lifestyle choice, I decided the room needed a fireplace.
Not a massive masonry fireplace with a chimney, a truckload of bricks, and the structural engineering demands of a medieval castle. I wanted a practical DIY fireplace: an electric fireplace insert surrounded by a custom-built feature wall, finished with trim, paint, and a mantel that made the room feel intentional.
The project changed more than one wall. It changed how the entire room worked. It created a focal point, added soft light, made winter evenings feel less bleak, and gave guests something to compliment before they noticed the pile of shoes by the front door.
Why I Chose an Electric Fireplace for My DIY Fireplace Project
Before buying lumber, I had to decide what kind of fireplace made sense for my home. A wood-burning fireplace has undeniable charm, but it also requires proper venting, chimney maintenance, inspections, fire-rated materials, and a healthy respect for physics. A gas fireplace can be convenient, but gas lines, ventilation, permits, and installation requirements can quickly turn a “simple project” into a professional construction job.
An electric fireplace insert was the most practical option for my situation. It gave me the look of flames, optional heat, and a much simpler installation path than a wood-burning or gas system. Since it does not burn wood or gas, it did not require a chimney or flue. That alone saved me from trying to explain to a contractor why I had suddenly become interested in rooftop demolition.
I also liked the flexibility. I could run the flame effect without heat, which meant the fireplace could stay on during mild weather when I wanted ambiance but did not want to turn the living room into a rotisserie oven. Many electric fireplace inserts also include adjustable flame colors, brightness settings, timers, thermostats, and remote controls.
Still, “electric” does not mean “ignore the instructions and hope for the best.” The unit needed proper electrical supply, open airflow around its vents, and the exact framing clearance required by its manual. I treated those instructions as the boss of the project, because they were.
Planning the DIY Fireplace Before I Touched a Saw
The best thing I did was plan the entire fireplace wall before buying materials. I know that sounds suspiciously responsible for a DIY project, but one wrong measurement can create the kind of problem that makes you stare at a wall for twenty minutes while whispering, “Maybe nobody will notice.”
I Measured the Fireplace Insert First
I chose a recessed electric fireplace insert rather than a wall-mounted model. A recessed insert sits inside a framed opening, which makes it look more like a built-in fireplace and less like a very glamorous television accessory.
I wrote down the insert’s:
- Overall width, height, and depth
- Required rough opening dimensions
- Vent locations
- Clearance requirements
- Electrical specifications
- Mounting instructions
- Mantel and TV placement recommendations
I did not guess at any of these measurements. The front glass can make an insert look smaller than the actual metal housing, and the housing is the part that must fit inside the wall. The manual also specified where the air intake and warm-air outlet had to remain clear. Covering those vents would be a fast way to turn a cozy fireplace into a very expensive troubleshooting exercise.
I Used Painter’s Tape Like a Design Wizard
Before framing anything, I used painter’s tape to mark the fireplace insert, mantel, and upper feature wall directly on the living room wall. It looked a little like a crime scene investigation for interior design, but it helped enormously.
The tape outline showed me whether the insert was too low, too narrow, or too high for the room. It also helped me decide how wide the finished fireplace wall should be. A fireplace that is too small can disappear into a large room. A fireplace that is too large can make the room feel as though the wall is attempting to swallow the furniture.
I stepped back, sat on the couch, checked sight lines from the dining area, and even took photos. Photos are brutally honest. They will point out every proportion problem your eyes politely ignored.
I Checked the Electrical Plan Early
My insert could be plugged into a standard household outlet, but I wanted a cleaner built-in look with no visible cord. That meant planning for a recessed outlet inside the fireplace chase. Because electrical work can involve permits, circuit capacity, and code requirements, I had a licensed electrician evaluate the setup and install the outlet.
This was one of the smartest decisions I made. I can build a wall, patch drywall, and obsess over trim corners with the best of them. But I do not believe in developing sudden electrical confidence simply because I own a drill.
I also made sure the fireplace would not rely on an extension cord. An electric fireplace heater can draw significant power, and extension cords are not a permanent substitute for properly installed electrical service.
Materials I Used for the DIY Fireplace Wall
The exact materials will depend on your room, fireplace insert, and finish style. My project used a simple painted feature wall with a wood mantel, so I kept the material list fairly straightforward.
- Electric fireplace insert
- 2×4 lumber for framing
- Construction screws
- Stud finder and level
- Measuring tape and carpenter’s square
- Drywall sheets
- Drywall screws, joint compound, and tape
- Corner bead
- Primer and paint
- Decorative trim and base molding
- Wood mantel board and mounting hardware
- Caulk, wood filler, sandpaper, and paint supplies
- Safety glasses, hearing protection, gloves, and a dust mask
I also bought extra screws, extra drywall compound, and extra patience. The first two were easy to find at the hardware store. The third one was apparently backordered.
How I Built the Fireplace Frame
Step 1: I Located the Wall Studs
I started by locating and marking the existing wall studs. The fireplace wall had to be securely attached to the structure behind it, not merely floating in front of drywall like an optimistic cardboard display.
Using a stud finder, I marked the studs from floor to ceiling. I checked the marks with a small test hole in a discreet location, because stud finders are useful but occasionally develop the confidence of a weather forecast.
Step 2: I Built the Outer Fireplace Wall Frame
I built a shallow false wall in front of the existing wall using 2×4 lumber. The depth gave me room for the electric insert, wiring access, and framing support. The size of this chase depended entirely on the depth of the fireplace insert and the manufacturer’s required clearances.
I attached the bottom plate to the floor, secured vertical studs at regular intervals, and tied the upper portion into the wall framing. I checked for level, plumb, and square repeatedly. It is much easier to correct a crooked frame before drywall goes on than after you have painted it twice and emotionally committed to it.
Step 3: I Framed the Fireplace Opening
Next, I built a boxed opening for the electric fireplace insert. I followed the rough opening dimensions from the manufacturer rather than making the opening “a little tight so it looks custom.” Tight does not equal custom. Tight often equals scratched metal, blocked vents, and a muttered apology to the instruction manual.
I added horizontal framing above and below the insert opening, then reinforced the sides. I checked the opening with the actual fireplace housing before covering the frame. This test fit was not glamorous, but it prevented a very unglamorous moment later.
The fireplace slipped into the opening with enough room for the required ventilation and mounting hardware. At that point, I removed it again before drywall work. Keeping the insert out of the dust zone saved me from spending the next year vacuuming drywall powder out of decorative fake logs.
Step 4: I Planned the Mantel Before Closing the Wall
I wanted a substantial wood mantel, so I added solid blocking inside the frame where the mantel would attach. This step is easy to forget, especially when you are focused on the fireplace opening itself. But a mantel needs a secure mounting surface, particularly if it will hold framed photos, seasonal decorations, or the collection of small ceramic houses that somehow appears every December.
I also checked the fireplace manual for mantel-clearance guidance. Even with an electric unit, heat outlets can warm the space above the insert. The safe distance depends on the model, the vent design, and the manufacturer’s directions.
Finishing the DIY Fireplace Feature Wall
Drywall Made It Feel Real
Once the framing, electrical work, and blocking were complete, I covered the wall with drywall. This was the moment the project stopped looking like a construction site and started looking like a future fireplace.
I installed drywall around the opening, added corner bead to the outside corners, taped the seams, and applied several thin coats of joint compound. Thin coats are slower, but they sand more easily and create a smoother result. Thick joint compound is tempting only until you spend an afternoon sanding a lumpy wall and questioning every decision that led you there.
After sanding, I primed the wall and painted it in a warm neutral color. I chose a soft greige that worked with the room’s existing flooring and furniture. The goal was to make the fireplace wall feel architectural rather than like a random box had moved into the living room.
I Added Trim for a Built-In Look
Trim made a bigger difference than I expected. I added simple vertical trim pieces on either side of the fireplace wall and a clean horizontal detail near the ceiling. The design was intentionally restrained. A fireplace wall already attracts attention, so it does not need every decorative idea in the hardware aisle attached to it.
For a more traditional look, you could add picture-frame molding, shiplap, board-and-batten panels, tile, stone veneer, or built-in shelves. For a modern fireplace design, a smooth painted wall with a simple mantel can feel polished and timeless.
The Mantel Was the Final Personality Upgrade
I installed a chunky wood mantel above the fireplace insert. I sanded the board, stained it in a medium walnut tone, and sealed it with a durable finish. The wood added warmth against the painted wall and made the fireplace feel less like an appliance and more like a permanent part of the home.
I attached it to the blocking I had installed earlier, checking level several times before tightening everything down. A crooked mantel is one of those things people may not consciously notice, but they will feel it in their souls.
What I Learned While Building My DIY Fireplace
The biggest lesson was that a fireplace project is not just about the fireplace insert. It is about scale, safety, electrical planning, ventilation, structure, and finishing details. The insert may take up a small rectangle in the wall, but the entire feature wall needs to work visually and practically.
I also learned that mockups are worth the extra hour. Painter’s tape, cardboard templates, and test fits can prevent expensive corrections. The moment you install drywall is not the moment to discover your mantel looks too high, your insert looks too small, or your television will sit at the altitude of a commercial airplane.
Another lesson: not every part of a DIY fireplace needs to be DIY. I built the structure, handled the drywall, painted, installed trim, and finished the mantel. I brought in a professional for the electrical work. That was not a failure of confidence. It was a success of judgment.
DIY Fireplace Safety Rules I Would Never Skip
Even though my project used an electric fireplace, I treated safety as the first design decision rather than the final checklist item.
- Follow the fireplace manufacturer’s installation manual exactly.
- Keep intake and exhaust vents open and free of trim, décor, curtains, or furniture.
- Do not use an extension cord as a permanent power solution.
- Use a qualified electrician for hardwiring, new outlets, circuit questions, or panel-capacity concerns.
- Confirm local permit and inspection requirements before construction.
- Use the required clearances for mantels, televisions, trim, and combustible materials.
- Install and maintain working smoke alarms according to local safety recommendations.
- Keep flammable décor, blankets, and furniture away from any heater outlet.
- Do not convert an electric fireplace project into a gas or wood-burning installation without proper professional planning.
If you are remodeling an existing wood-burning fireplace, gas fireplace, chimney, or vented appliance, the stakes are higher. Chimneys and combustion appliances can involve fire hazards, carbon monoxide concerns, venting rules, and structural requirements. In those situations, the right move is to consult a qualified fireplace professional, chimney specialist, or licensed contractor before changing anything.
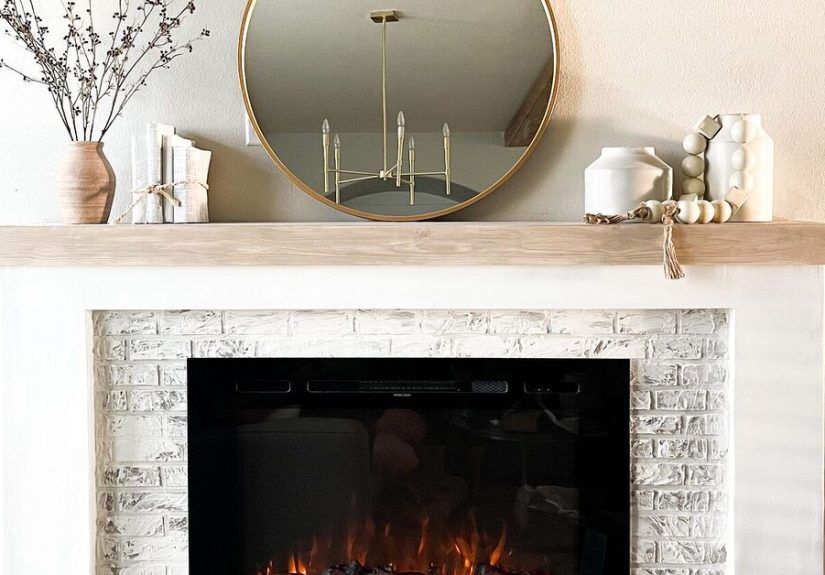
The Finished DIY Fireplace Changed the Entire Room
When I finally installed the fireplace insert, turned on the flame effect, and stepped back, the room looked completely different. The same couch was there. The same rug was there. The same suspiciously overstuffed blanket basket was still there. But the room finally had a center.
The fireplace became the anchor for the seating area. It softened the blank wall, created a warm glow at night, and made the room feel more finished without requiring a full-scale renovation. It also gave me a place to decorate for the seasons, which is either delightful or dangerous depending on how many miniature pumpkins you are willing to own.
The best part was that the project felt personal. I could point to the finished wall and remember every measurement, every drywall patch, every trip to the hardware store, and every time I said, “This should only take a weekend.”
It did not only take a weekend.
But it was worth it.
My Extended DIY Fireplace Experience: What the Project Was Really Like
Looking back, the most surprising part of adding a DIY fireplace to my home was not the amount of work. I expected work. I expected sawdust in places where sawdust should never exist, multiple trips to the hardware store, and at least one moment where a tape measure would mysteriously vanish even though it was sitting directly in front of me.
What surprised me was how much the project affected the way I used the room. Before the fireplace, the living room was functional but vague. It had furniture, lamps, and a television, but it did not have a reason for people to gather there. Everyone sat facing the screen, which made the room feel more like a waiting area at an airport with better snacks.
After the fireplace was finished, the room developed a natural rhythm. In the evening, I could switch on the flame effect while reading or talking with friends. During colder weather, I could use the heat setting to make the room more comfortable without relying on the fireplace as the only source of heat for the house. During warmer months, I could run the visual flame setting alone and still enjoy the atmosphere.
I also became more thoughtful about scale. At first, I wanted the biggest fireplace insert I could fit on the wall. Bigger seemed better because bigger usually looks more impressive in showroom photos. But showroom photos do not have my ceiling height, furniture arrangement, windows, or slightly questionable collection of throw pillows.
Once I marked out the wall with painter’s tape, I realized that the best fireplace size was the one that looked proportional from where people actually sat. The insert needed enough width to feel intentional, but not so much width that it turned the entire wall into a giant glowing rectangle. I chose balance over drama, which may be the most mature design decision I have ever made.
The framing process taught me another important lesson: a finished wall hides a lot of decisions. Guests see paint, trim, a mantel, and flickering flames. They do not see the blocking for the mantel, the carefully measured opening, the extra framing support, the outlet placement, or the number of times I checked whether everything was level.
That invisible planning is what made the project successful. A beautiful finish can hide minor imperfections, but it cannot fix poor structure, blocked vents, or careless electrical work. The prettier the final wall became, the more grateful I was that I had taken the unglamorous planning steps seriously.
I also learned to separate “can I do this?” from “should I do this?” I could have attempted the electrical work myself after watching several confident videos online. I could have skipped the professional review and hoped the circuit was fine. I could have improvised around the fireplace manual because the instructions seemed overly cautious.
But a fireplace wall is not the place for improvisation. I wanted the finished room to feel peaceful, not to make me wonder whether I had created an expensive decorative liability. Hiring a professional for the electrical work gave me more confidence in the finished project and let me focus my DIY energy on the parts I genuinely enjoyed.
The project also reminded me that a fireplace does not need to be expensive, ornate, or built from stone to feel special. Mine did not require a chimney, a gas line, or a crew of masons. It required planning, patience, basic construction skills, a well-chosen electric insert, and a willingness to accept that drywall dust is apparently a permanent interior design feature.
Today, the fireplace is one of the first things people notice when they walk into the room. It gives the space a sense of warmth even when the heater is off. It makes rainy afternoons feel more relaxed, holiday decorating more fun, and ordinary weeknights a little more inviting.
That is why I would build it again. Not because I miss sanding drywall or carrying long boards through a narrow hallway, but because the finished DIY fireplace gave my home something it did not have before: a place that feels like the heart of the room.