Table of Contents >> Show >> Hide
- Quick 60-Second Checklist (Do This First)
- Step 1: Pick the Correct Microphone (macOS Input Settings)
- Step 2: Allow Microphone Access (Privacy & Security Permissions)
- Step 3: Check Microphone Settings Inside the App
- Step 4: Enable the Microphone for Websites (Browser Permissions)
- Step 5: Test the Microphone (So You Know It’s Actually Working)
- When Your Mic Still Won’t Work: A Troubleshooting Flow That Actually Helps
- 1) Check the obvious (because it’s usually the obvious)
- 2) Quit the app and reboot your Mac
- 3) Check privacy indicators so you know what’s using the mic
- 4) Re-check permissions (and restart the app afterward)
- 5) Confirm the website isn’t blocked
- 6) Update macOS and the app
- 7) Advanced: Reset microphone permission prompts (when an app won’t re-ask)
- 8) Still stuck? Try a new user profile
- 9) If nothing works: run diagnostics and check hardware
- Privacy Tips (Because Mic Access Is Powerful)
- Real-World Experiences: What Usually Goes Wrong (and How People Fix It)
- Scenario 1: The “It Works in One App, Not Another” Mystery
- Scenario 2: The “Browser Bouncer” Double-Permission Trap
- Scenario 3: The “Bluetooth Headset Betrayal”
- Scenario 4: The “I Clicked Don’t Allow Once, and Now I’m Doomed Forever” Panic
- Scenario 5: The “My Audio Is On, But I Sound Like a Ghost” Problem
- Scenario 6: The “High-Stakes Moment” Setup (Interview, Class, Live Webinar)
- Conclusion
“Activate the microphone” on a Mac can mean three different things:
(1) picking the correct mic as your input device,
(2) giving macOS permission to let an app or browser use it, and
(3) selecting the mic inside the app you’re actually using.
Miss any one of those, and your Mac will happily sit there like, “What? I’m listening.”
(It isn’t.)
This guide walks you through every layersystem settings, app permissions, browser permissions, and testing
plus a troubleshooting flow for when your mic still refuses to cooperate. Let’s get your Mac speaking again.
Quick 60-Second Checklist (Do This First)
- Unmute everything: your headset, your app’s mute button, and any inline cable switch.
- Select the right input: System Settings → Sound → Input → choose your microphone.
- Raise input level: increase input volume/sensitivity and watch the input meter react when you talk.
- Grant permission: System Settings → Privacy & Security → Microphone → enable your app/browser.
- Quit and reopen the app: many apps need a restart to “notice” a permission change.
Step 1: Pick the Correct Microphone (macOS Input Settings)
Your Mac can have multiple “microphones” available at the same time: the built-in mic, AirPods, a USB mic,
a webcam mic, or an audio interface. If the wrong one is selected, your audio can sound distant… or like you’re
broadcasting from inside a sock drawer.
How to select your input mic
- Open System Settings (Apple menu → System Settings).
- Click Sound in the sidebar.
- Go to Input.
- Select the microphone you want to use.
- Talk normally and watch for movement on the input level meter.
What to look for in the Input panel
- Input level meter: If it never moves, macOS isn’t receiving audio from that device.
- Input volume/sensitivity: If it’s near zero, your mic can be “working” but effectively silent.
- Device name clues: Built-in mics often show up as “[Your Mac model] Microphone.” USB mics show their brand/model name.
Common “wrong mic” situations
- Bluetooth headsets: Your Mac may switch input to the headset automaticallyeven if you wanted the USB mic.
- External displays: Some monitors/webcams include a mic. If it’s selected, your voice may sound far away.
- Audio interfaces: An interface can be selected even if nothing is plugged into its mic input.
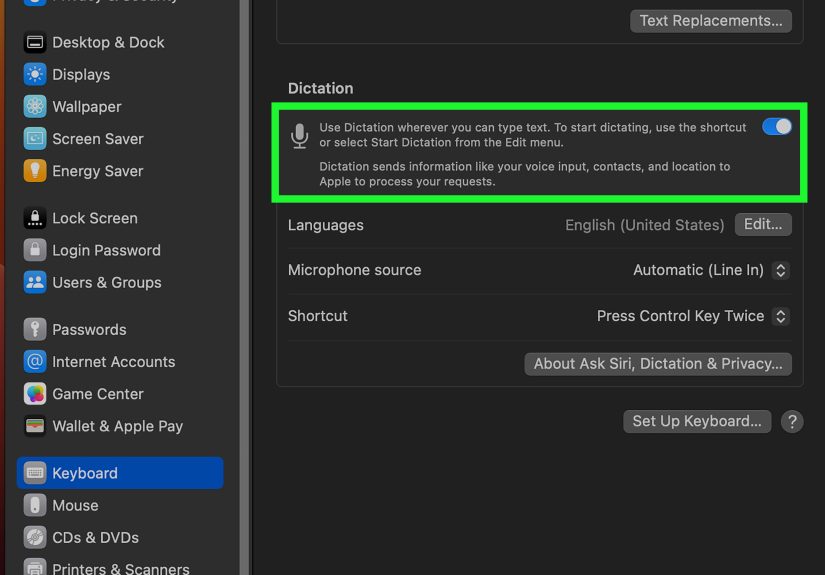
Step 2: Allow Microphone Access (Privacy & Security Permissions)
Since modern versions of macOS, apps (and browsers) must ask permission before they can use your microphone.
That’s great for privacyand occasionally terrible for your patience right before a meeting.
Turn on microphone permission for an app
- Open System Settings.
- Go to Privacy & Security.
- Click Microphone.
- Find the app in the list and toggle it on.
- Quit and reopen the app so it can re-check permissions.
If your app isn’t listed under Microphone
macOS usually lists an app only after it has requested microphone access at least once.
So if you don’t see the app:
- Open the app.
- Try to start a call, record audio, or enable voice chatanything that forces a microphone request.
- When prompted, choose Allow.
- If you clicked “Don’t Allow” earlier, use the Microphone list to re-enable it.
Older macOS wording (if you don’t see “System Settings”)
On older macOS versions, you may see System Preferences instead of System Settings.
The path is typically: System Preferences → Security & Privacy → Privacy → Microphone.
Step 3: Check Microphone Settings Inside the App
Even when macOS permission is correct, your app can still be set to the wrong input device.
Many apps have their own “Audio” or “Input device” selector.
What to do inside most calling/recording apps
- Open the app’s Settings or Preferences.
- Find Audio, Devices, or Input.
- Select the same microphone you chose in macOS Sound Input.
- Run the app’s test microphone feature (many apps have one).
Pro tip: If the app offers “Automatically adjust microphone volume,” try toggling it off if your audio sounds like
it’s pumping up and down. Auto-gain can be helpful… or it can act like a DJ who just discovered the volume knob.
Step 4: Enable the Microphone for Websites (Browser Permissions)
Web apps (online interviews, video calls, voice tools, dictation sites) need permission in two places:
macOS must allow the browser to use the mic, and the browser must allow the website.
Think of it like two bouncers guarding the same door.
Browser layer 1: macOS permission for your browser
- System Settings → Privacy & Security → Microphone.
- Enable the toggle next to your browser.
- Quit and reopen the browser.
Browser layer 2: website permission inside the browser
Each browser looks different, but the idea is the same: the site must be set to “Allow” for Microphone.
If you previously blocked it, you’ll need to change it back.
Safari (common path)
- Open Safari.
- Safari menu → Settings (or Preferences).
- Click Websites.
- Select Microphone on the left.
- Set the website to Allow (or “Ask” if you prefer prompts).
Chrome / Chromium-based browsers (common path)
- Open browser Settings.
- Go to Privacy and security → Site settings.
- Click Microphone.
- Choose your default mic and set the site to Allow.
Firefox (common path)
- Open Firefox Settings.
- Go to Privacy & Security.
- Find Permissions → Microphone → manage settings.
- For a single site, use the site info/lock icon in the address bar and allow microphone access.
Step 5: Test the Microphone (So You Know It’s Actually Working)
Testing matters because it tells you whether the problem is: (A) system-level, (B) app-level,
or (C) website/browser-level. Here are reliable tests:
Test 1: Watch the input meter
System Settings → Sound → Input. Talk. If the meter moves, macOS is receiving audio.
If it doesn’t, focus on hardware/device selection.
Test 2: Record a quick clip
Use a basic recording tool (for example, a simple audio recording app) and record 5–10 seconds. Play it back.
If it sounds fine there but not in your meeting app, you’re dealing with app settings or permissions.
Test 3: Try a second app or a second website
If your mic works in one app but not another, permissions or in-app device selection is the likely culprit.
If it works in one browser but not another, browser permissions/site settings are the likely culprit.
When Your Mic Still Won’t Work: A Troubleshooting Flow That Actually Helps
If you’ve done the steps above and your Mac is still giving you silent treatment, don’t panic.
Work through this list in orderthe early steps fix the majority of issues.
1) Check the obvious (because it’s usually the obvious)
- Hardware mute: Many headsets have an inline mute switch.
- App mute: Meeting apps often have a mic icon you can mute independently of macOS.
- Correct device: Confirm the selected input device didn’t switch after connecting Bluetooth.
- Bluetooth weirdness: Disconnect and reconnect the headset, or temporarily switch to the built-in mic.
2) Quit the app and reboot your Mac
Yes, it’s the oldest advice in the book. It’s also in the book because it works.
Restarting clears stuck audio services and resets device handshakes.
3) Check privacy indicators so you know what’s using the mic
macOS shows a privacy indicator in the menu bar when an app is using the microphone.
If you see it when you don’t expect it, something is actively accessing your mic.
Open Control Center and look for which app is responsible, then quit it or revoke permission if needed.
4) Re-check permissions (and restart the app afterward)
Go back to Privacy & Security → Microphone. Toggle the app off, then back on.
Then fully quit the app (not just close a window) and reopen it.
5) Confirm the website isn’t blocked
If the problem is in a web app, re-check both layers:
macOS permission for the browser and the site-specific microphone permission inside the browser.
Also try a different browser to isolate whether it’s a browser-specific setting.
6) Update macOS and the app
Audio bugs, driver quirks, and permission glitches often get fixed in updates.
If your mic “used to work” and suddenly doesn’t, updates are a strong suspect.
7) Advanced: Reset microphone permission prompts (when an app won’t re-ask)
If you accidentally denied access and the app won’t prompt againeven after reinstallingmacOS provides a way
to reset the microphone authorization state so the permission dialog can appear again.
This is an advanced step, but it’s useful when your settings feel stuck.
After resetting, reopen the app and attempt to use the microphone so macOS prompts you again.
(If you’re managing a shared computer or work device, follow your organization’s policies before changing
permission behavior.)
8) Still stuck? Try a new user profile
Create a new macOS user account and test the mic there. If it works in the new account,
your original account likely has a setting, permission database issue, or app preference conflict.
9) If nothing works: run diagnostics and check hardware
- Test with a different microphone (even cheap earbuds) to rule out hardware failure.
- If your Mac’s built-in mic never shows input level movement, consider hardware service or support.
Privacy Tips (Because Mic Access Is Powerful)
Giving microphone access is like handing out a spare key to your voice.
Most apps are fine, but it’s smart to keep permissions tidy:
- Audit occasionally: Privacy & Security → Microphone. Disable anything you don’t use.
- Use “Ask” for websites: It’s a nice balanceconvenient, but not forever.
- Watch the indicator: If the mic indicator shows up unexpectedly, investigate.
- Grant the minimum: If an app doesn’t truly need your mic, it doesn’t get your mic.
Real-World Experiences: What Usually Goes Wrong (and How People Fix It)
To make this guide feel less like a manual and more like a “yes, humans have struggled here before” support group,
here are common real-world scenarios people run into when activating a microphone on a Mac. These are the patterns
that show up again and againespecially when the stakes are high (like interviews) and the mute button becomes your
sworn enemy.
Scenario 1: The “It Works in One App, Not Another” Mystery
Someone tests their mic by recording a quick voice clip and everything sounds perfect. Then they join a meeting and
nobody hears them. This is almost always an in-app device selection issue. The Mac is receiving audio,
but the meeting app is listening to the wrong inputlike a disconnected USB interface or a monitor mic across the room.
The fix is boring but effective: open the app’s audio settings and choose the same mic you selected in System Settings.
Scenario 2: The “Browser Bouncer” Double-Permission Trap
Web calls are famous for this: the user allows the site, but the browser itself isn’t allowed at the macOS level (or vice versa).
It feels unfair because you already clicked “Allow,” and you didjust not in the other place that also wants an opinion.
The winning move is to treat it as two separate yes/no gates:
(1) macOS permission for the browser, and (2) site permission inside the browser settings.
Scenario 3: The “Bluetooth Headset Betrayal”
Bluetooth audio can switch inputs behind your back. People connect earbuds and expect only the output to change,
but macOS may also set the input to the earbuds’ mic. Sometimes that mic is lower quality; sometimes it’s not connected
properly; sometimes it’s simply not what you intended. The common fix: explicitly set your desired microphone in Sound → Input,
then re-check the app’s audio settings. If the audio still sounds choppy, temporarily switch input to the built-in mic and see if it stabilizes.
Scenario 4: The “I Clicked Don’t Allow Once, and Now I’m Doomed Forever” Panic
This happens a lot during first-time setup. A permission prompt appears at the exact moment someone is distracted,
they click “Don’t Allow,” and later discover the app never asks again. The good news: you’re not doomed. The app’s access can be
re-enabled in Privacy & Security → Microphone. And if the permission state seems “stuck,” resetting the authorization state can
force the prompt to appear again when you try to use the mic.
Scenario 5: The “My Audio Is On, But I Sound Like a Ghost” Problem
Sometimes the mic is technically active, but the input volume is too low, or a noise-processing mode is making your voice thin.
People describe it as “faint,” “distant,” or “underwater.” The fix is to raise input volume, move closer to the mic, and then check whether
any voice-isolation or noise-reduction features are affecting clarity. If you’re in a loud space, voice isolation can be helpful; if you’re in a quiet room,
aggressive filtering can make you sound unnatural. Testing with a simple recording helps you hear the difference quickly.
Scenario 6: The “High-Stakes Moment” Setup (Interview, Class, Live Webinar)
The best practical advice here is to run a two-minute rehearsal:
pick the correct input device, confirm the input meter moves, test with a short recording, then open the exact app or website you’ll use and test again.
If you do that before the event, you avoid the classic experience of frantically clicking menus while everyone watches your mute icon like it’s a suspense movie.
The takeaway from all these experiences is simple: when your microphone won’t activate, it’s rarely “broken.”
It’s usually a mismatch between device selection, permissions, and in-app settings.
Once you check those in a logical order, the problem tends to fold faster than a cheap lawn chair.
Conclusion
Activating your microphone on a Mac is a layered process: pick the right input device, allow access in Privacy & Security,
confirm the app (or website) is allowed, and then verify the app is using the right mic. If something breaks, test at the macOS level first,
then move outward to apps and browsers. Do that, and you’ll spend less time troubleshooting and more time being heardliterally.