
Table of Contents >> Show >> Hide
- Quick Reality Check: What “Approved Sender List” Means in Gmail
- Method 1: Add a Sender to Google Contacts (Fast, Clean, and Surprisingly Effective)
- Method 2: Mark an Email as “Not Spam” (Because Gmail Learns… Eventually)
- Method 3: Create a Gmail Filter That Says “Never Send It to Spam” (The Closest Thing to a Personal Approved Sender List)
- Method 4 (Google Workspace): Add Approved Senders / Allowlists at the Admin Level
- Bonus: Keep Safe Senders Out of Promotions (Not Spam, Just… Banished to Another Tab)
- Troubleshooting: “I Did All That and Gmail Still Sends It to Spam”
- Safety First: “Safe Sender” Should Still Mean “Safe”
- Conclusion: Your Gmail Approved Sender List (Even If Gmail Won’t Call It That)
- Extra: Real-World “Safe Sender” Experiences (500+ Words of What Actually Happens)
Ever watch an important email do the “I’m not spam, I swear!” routine… and Gmail still escorts it straight into the Spam folder? Yeah. It’s like watching your pizza delivery get redirected to a mysterious alley behind your inbox.
Here’s the good news: you can absolutely create a “safe senders” setup in Gmail so trusted people (and legit businesses you actually asked to hear from) stop getting treated like shady strangers in sunglasses. The slightly weird news: Gmail personal accounts don’t offer a single, obvious button labeled Approved Sender List. But you can achieve the same resultsometimes even betterusing a few built-in tools.
In this guide, you’ll learn exactly how to add safe senders to Gmail using contacts, “Not spam,” and the powerful Never send it to Spam filter. And if you’re using Google Workspace (work/school Gmail), we’ll cover the real deal: admin-level allowlists and approved sender lists.
Quick Reality Check: What “Approved Sender List” Means in Gmail
People say “Gmail approved sender list” for two different scenarios:
1) Personal Gmail (gmail.com)
There’s no single master list called “Approved Senders.” Instead, Gmail uses signals like:
- Whether you’ve added the sender to Google Contacts
- Whether you’ve marked messages as Not spam
- Whether you’ve created a Gmail filter that says Never send it to Spam
2) Google Workspace Gmail (company/school email)
This is where “Approved senders list” is an actual admin feature. A Workspace admin can create an allowlist (often via an address list) that bypasses spam filtering for approved senders or domains.
Translation: If you’re on personal Gmail, you’re building a safe-senders “system.” If you’re on Workspace, you might be building an actual safe-senders “policy.” Either way, we’re getting your emails delivered.
Method 1: Add a Sender to Google Contacts (Fast, Clean, and Surprisingly Effective)
If you want Gmail to treat someone like a known, trusted human, adding them to your contacts is step one. It’s the email equivalent of telling the bouncer, “This person’s with me.”
How to add a sender to Contacts from Gmail (Desktop)
- Open an email from the sender you trust.
- Hover your mouse over their name/email at the top of the message.
- Click Add to Contacts (or open the contact card and choose Add).
- Optional but smart: add their email and save.
How to add a sender to Contacts on mobile
- Open the email in the Gmail app.
- Tap the sender’s name or profile icon.
- If you see an option like Add to Contacts, tap it.
- If you don’t see it, use the Google Contacts app (or visit Google Contacts in a browser) to add them manually.
Best for: real people, coworkers, friends, schools, doctors, client emails, HR/payroll emailsanything where you want ongoing reliable delivery.
Pro tip: Add both the “pretty” address and the “real” address. Some newsletters or services send from one domain but reply from another (more on that later).
Method 2: Mark an Email as “Not Spam” (Because Gmail Learns… Eventually)
If an email already landed in Spam, don’t just sigh dramatically and move on. Teach Gmail what you want.
Desktop: Move a message out of Spam
- In Gmail, open the left menu and find Spam (you may need to click More).
- Select the email you want to rescue.
- Click Not spam.
Mobile: Remove a message from Spam
- Open the Gmail app and go to the menu (three lines).
- Tap Spam.
- Open the message.
- Tap the three-dot menu and choose something like Report not spam (wording can vary).
Why this works: Gmail’s filtering uses signals from what you mark as spam/not spam to improve future classification. You’re not just saving one emailyou’re training your inbox’s habits (like teaching a dog not to eat your shoes, but with fewer treats).
Best for: legit senders who accidentally got filtered, especially if you only need this for a handful of messages.
Method 3: Create a Gmail Filter That Says “Never Send It to Spam” (The Closest Thing to a Personal Approved Sender List)
If you want a reliable, “don’t argue with me, Gmail” solution, use a filter. Filters are your inbox’s rulebook. And the rule we want is: Never send it to Spam.
Step-by-step: Whitelist an email address in Gmail with a filter (Desktop)
- Open Gmail on a computer.
- In the search bar at the top, click the Show search options icon (it looks like sliders).
- In the From field, enter:
- One email address (example:
[email protected]) - Or an entire domain (example:
@company.com)
- One email address (example:
- Click Create filter.
- Check Never send it to Spam.
- Optional but useful:
- Always mark it as important
- Star it
- Apply the label (create a label like “VIP Senders”)
- Click Create filter again to save.
Example filters you might create
- School emails: From
@schooldistrict.edu, never send to spam, apply label “Kids & School.” - Payroll/HR: From
[email protected], never send to spam, always mark important. - Receipts you actually want: From
[email protected], never send to spam, apply label “Receipts.”
Can you do this in the Gmail mobile app?
Not reliably. The Gmail app is great at many things, but creating filters is mostly a desktop experience. If you’re stuck on a phone, your best bet is to use a mobile browser in a full desktop-style viewor do the filter creation later on a computer.
Best for: anything you must not missclient leads, job offers, calendar invites, invoices, legal stuff, school alerts, password reset emails (from trusted sources only!).
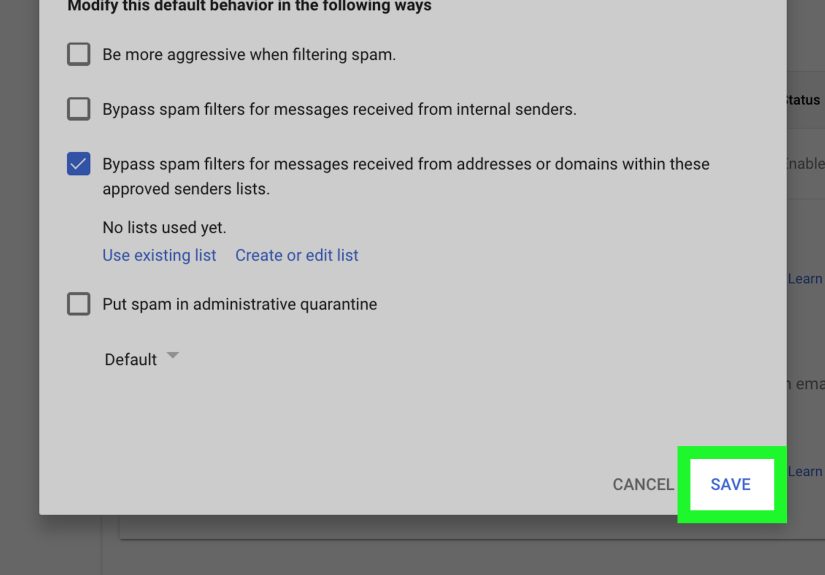
Method 4 (Google Workspace): Add Approved Senders / Allowlists at the Admin Level
If you’re using Gmail through work or school (Google Workspace), you may have access to true allowlisting. This is the official “approved senders list” concept: your admin can tell Gmail to bypass spam filtering for specific senders or domains.
What admins can do (high level)
- Create an allowlist (sometimes called an approved sender list) for trusted senders/domains.
- Use address lists and custom spam filter settings to apply org-wide rules.
- Keep security in mind: bypassing spam checks should be for trusted senders only.
When you should ask your admin for help
- A vendor’s invoices never arrive (or always land in quarantine/spam).
- A critical system notification domain is being filtered.
- A partner organization’s email is consistently misclassified for multiple users.
Email you can send to IT (copy/paste):
Hi teamcould you allowlist/approve emails from [domain or address] in Google Workspace Gmail? We’re missing legitimate messages due to spam filtering. Thanks!
Important: Admin allowlisting can be powerful, but it’s not a “set it and forget it” toy. You’re making a trust decision for the whole organization.
Bonus: Keep Safe Senders Out of Promotions (Not Spam, Just… Banished to Another Tab)
Sometimes the issue isn’t Spamit’s the Promotions tab. That’s not necessarily “bad,” but it can still cause you to miss time-sensitive emails.
What helps:
- Drag an email from Promotions to Primary (desktop) and confirm “Do this for future messages.”
- Create a filter that applies a label and marks important (this can increase visibility).
- Use a dedicated label like “Subscriptions I Actually Read” (rare, but admirable).
Troubleshooting: “I Did All That and Gmail Still Sends It to Spam”
If Gmail is still playing hard-to-get with your trusted sender, here are the usual culpritsand fixes that work.
1) The sender’s “From” address isn’t the real sending address
Some newsletters show a friendly “From” name, but the underlying sender might be a third-party mailing service domain. Your filter must match the actual sending address. Open the email, view details, and confirm what address/domain is truly used.
2) You accidentally blocked them
Go to Settings → See all settings → Filters and Blocked Addresses. If the sender is listed as blocked, unblock them. Also check filters that might be auto-archiving, labeling, or sending messages away from your inbox.
3) You’re using a “basic HTML” view where options disappear
Some simplified Gmail views don’t show every filtering option. If you can’t find “Never send it to Spam,” switch to the full Gmail interface on a desktop browser.
4) The email did arrive… just not where you expected
After marking “Not spam,” the message usually returns to your inboxbut it might land under a different tab (Primary/Social/Promotions), or not at the top if it’s older. Search for the subject line or sender to confirm it’s there.
5) The sender has deliverability problems
If a company’s emails frequently get flagged across many inboxes, they may have authentication or reputation issues (like missing/incorrect SPF, DKIM, or DMARC, or poor engagement rates). You can still allowlist them personallybut it might be worth asking them to fix their sending practices if it’s a business-critical contact.
Safety First: “Safe Sender” Should Still Mean “Safe”
Whitelisting is powerful because it can bypass spam detection. That’s great when it’s your payroll department. It’s less great when it’s “TotallyRealBankSupport123.biz.”
Before you add a sender to your Gmail safe sender list:
- Double-check the domain spelling (look for sneaky lookalikes).
- If it’s a brand, confirm the message matches what you actually signed up for.
- Never allowlist unexpected password reset emails or attachments from unknown sources.
- When in doubt, verify via the company’s official site or known phone numbernot the email itself.
Bottom line: You’re giving a sender VIP access to your inbox. Don’t hand out backstage passes to strangers.
Conclusion: Your Gmail Approved Sender List (Even If Gmail Won’t Call It That)
To keep important emails out of Spam in Gmail, you don’t need magicyou need the right combo:
- Add to Contacts for basic trust signals
- Mark as Not spam to correct mistakes and train Gmail
- Create a filter with “Never send it to Spam” for the strongest personal solution
- Ask a Workspace admin for approved sender lists/allowlisting if you’re in an organization
Do those, and your inbox stops acting like a bouncer with a power tripand starts delivering the messages you actually care about.
Extra: Real-World “Safe Sender” Experiences (500+ Words of What Actually Happens)
Let’s talk about what people think will happen when they add a safe sender in Gmail… versus what actually happens in the wild.
Scenario #1: “I added them to Contacts, so we’re good.”
Adding a sender to Google Contacts is often enough for normal person-to-person email. But the moment you’re dealing with newsletters, billing systems, appointment reminders, or anything sent through an email platform, Contacts alone can be a coin flip. Why? Because the email you see in the inbox might be a “friendly from,” while the true sending infrastructure could be different. The practical fix is boring-but-effective: create a filter for the exact address or the domain that’s truly sending the mail, then check Never send it to Spam. It’s the difference between “I know this person” and “I have a written contract with my inbox.”
Scenario #2: “I clicked Not spam, but the email disappeared.”
This one causes panic. People picture Gmail shredding the email into confetti and launching it into the sun. What’s usually happening is simpler: the email returns to the inbox, but it may land in a different category tab or get buried because it’s older than your latest email pile. The move that saves sanity: use Gmail search right after marking Not spam. Search the sender address, then the subject line, then check “All Mail.” If you find it, you’re fineand you’ve also trained Gmail a little for next time. If it keeps happening, step up to a filter.
Scenario #3: “We’re a business and clients keep missing our emails.”
When this happens at scale, end-users can whitelist you one-by-one, but that’s like fixing a leaky roof with a spoon. If you’re the sender, your best long-term play is improving deliverability: proper authentication (SPF/DKIM/DMARC), consistent sending, and content that doesn’t scream “I am definitely a scam, please click immediately.” If you’re the recipient (the one missing messages), you can ask the sender to confirm the exact sending domain and address, then you filter that. If you’re in Google Workspace, your IT team might implement a domain allowlist for a trusted vendorbut only after verifying it’s legit.
Scenario #4: “I want the email to never go to Spam… but also not clutter my inbox.”
Totally fair. You can build a filter that says “Never send it to Spam,” apply a label (like “Receipts” or “Reports”), and skip the inbox (archive) so it’s safely stored but not shouting for attention. This is the grown-up version of inbox organization: messages aren’t lost, but they also aren’t camping in Primary like they pay rent.
Scenario #5: “I accidentally safe-listed something sketchy.”
It happensespecially when a phishing email pretends to be a service you use. If you ever realize you’ve given VIP access to the wrong sender, undo it immediately: remove filters, remove them from contacts if necessary, and check your blocked/safe patterns. Then change passwords if you clicked anything suspicious. The real lesson: safe-sending is not a convenience featureit’s a trust decision. Treat it like you would handing someone a key to your front door.
In real life, the best setup is usually a two-step combo: add to Contacts for convenience, then use a filter for the senders you truly can’t miss. That way, Gmail doesn’t get to “guess” what matters to you. You’ve made it official.


