Table of Contents >> Show >> Hide
- Why Brightness Matters More Than You Think
- Meet the iPhone Photos App Brightness Tools
- Step-by-Step: How to Adjust Photo Brightness in the iPhone Photos App
- When Simple Brightness Isn’t Enough
- Pro Tips for Natural-Looking Bright Photos
- Common Mistakes to Avoid When Adjusting Brightness
- Brightness vs. Screen Brightness vs. HDR
- Real-World Experiences: Getting Comfortable with iPhone Brightness Edits
- Conclusion: Brighten Smart, Not Just Brighter
You took a great shot… or at least you thought you did, until you
opened it and realized it looks like it was taken inside a cave. The good
news? Your iPhone Photos app has powerful brightness tools built in, and
you don’t need to be a pro photographer (or buy an expensive app) to use
them well.
In this guide, we’ll walk through exactly how to adjust photo brightness in
the iPhone Photos app, what each “light” control actually does, and how to
avoid the dreaded washed-out look. We’ll also share real-world editing
experiences and examples so you can turn dark, dull photos into bright,
clear images you actually want to post.
Why Brightness Matters More Than You Think
Brightness isn’t just about making a photo lighter. It affects how sharp
your subject looks, how much detail you can see in the shadows, and even
how professional the photo feels. A slightly underexposed photo can look
moody and artistic. A wildly over-brightened one just looks flat and
cheap.
Because the iPhone’s camera is constantly making automatic exposure
decisions, your photos can come out:
- Too dark when you shoot indoors or in backlit scenes.
- Too bright when you’re in direct sunlight or with a light source behind the subject.
- Fine overall but with a subject that’s just a bit too shadowy.
That’s where the Photos app’s brightness and light tools shine (pun 100%
intended). With a few slider adjustments, you can fix most lighting
issues in secondswithout leaving your Camera Roll.
Meet the iPhone Photos App Brightness Tools
When you tap Edit on a photo, you’ll see three main
sections at the bottom: Styles (or Auto),
Adjust, and Filters, plus the
crop/rotate tools. For brightness and overall light, you’ll live mostly in
the Adjust area.
Exposure vs. Brightness (What’s the Difference?)
Two sliders often confuse people: Exposure and
Brightness. They both make the photo lighter or darker,
but in different ways:
-
Exposure acts like a global power switch for light. It
raises or lowers the overall amount of light in the entire image,
similar to changing exposure when you actually take the photo. Push it
too far, and bright areas can blow out quickly. -
Brightness is more subtle. It adjusts midtones more
than extremes, making the photo look lighter or darker without wrecking
highlights quite as aggressively.
In practice, you’ll often:
- Raise Exposure a bit for very dark photos.
- Then fine-tune with Brightness for a more natural look.
Brilliance, Highlights, Shadows, and More
Apple doesn’t just give you a single “brightness” slider and call it a
day. Under the Adjust section, you’ll see several tools
related to light:
-
Brilliance: Smart contrast and brightness combined. It
brightens darker areas, controls highlights, and adds depth without
making things look fake. This is a great “first slider” for dull
photos. -
Highlights: Targets the brightest parts of the image.
Sliding left can recover detail in blown-out skies or bright faces;
sliding right makes bright areas even brighter. -
Shadows: Lifts or darkens the darker areas. Sliding
right brightens shadows and reveals hidden detail; sliding left makes
shadows deeper and more dramatic. -
Contrast: Increases the difference between light and
dark. A small boost can make a brightened photo look punchy again. -
Black Point: Sets how dark the darkest areas can go.
Increasing it adds depth and “anchor” to the photo, especially after
lifting shadows.
You don’t need to touch every slider on every photo. But knowing what each
one does helps you adjust brightness more precisely instead of just
blasting one slider to the right and hoping for the best.
Step-by-Step: How to Adjust Photo Brightness in the iPhone Photos App
Let’s go through the basic, reliable workflow for brightening a photo in
the Photos app.
-
Open the Photos app.
Tap the Photos icon on your Home Screen. -
Select the photo you want to fix.
Scroll through your library or use the Albums or
Search tabs to find your image. Tap it to open it
full-screen. -
Tap Edit.
In the top-right corner, tap Edit to open the editing
tools. -
Go to the Adjust section.
At the bottom, tap the icon that looks like a dial or sliders
(depending on your iOS version). This is where you’ll find Exposure,
Brilliance, Brightness, and more. -
Start with Brilliance or Exposure.
Swipe through the adjustment icons underneath the photo until you see
Brilliance or Exposure.- Tap Brilliance, then drag the slider slowly to the right.
- If the photo is very dark, try nudging Exposure up first, then refine with Brightness.
-
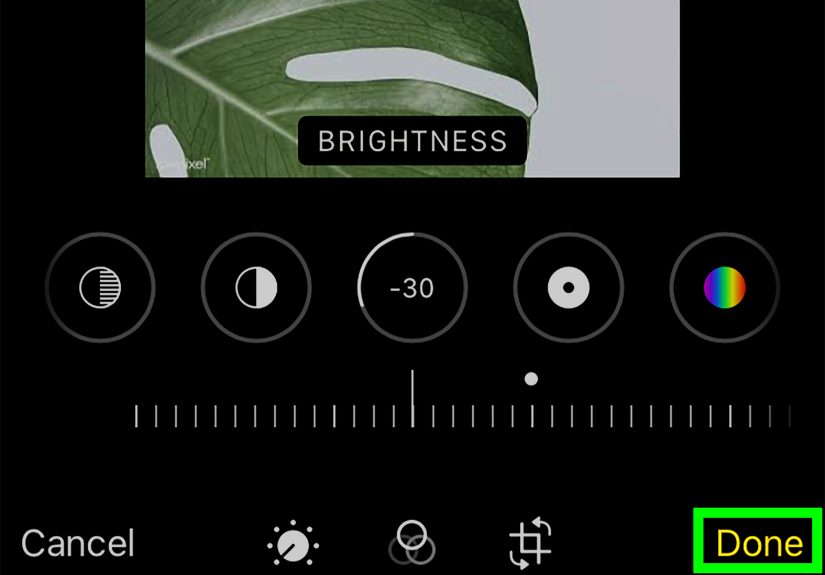
Adjust the Brightness slider.
Find Brightness and move the slider:- Right to lighten the photo.
- Left to darken if it’s too washed out.
Watch your subject’s face and important details as you adjust; that’s
what matters most. -
Fine-tune Highlights and Shadows.
If the background looks too bright or shadows are still heavy:- Lower Highlights slightly to bring back detail in bright areas.
- Raise Shadows to reveal more detail in darker areas (like hair, clothes, or a dark background).
-
Add a touch of Contrast and Black Point.
After brightening, your photo might look a bit flat. Try:- Adding a little Contrast to sharpen the separation between light and dark.
- Raising Black Point to deepen shadows and keep the image from looking gray.
-
Compare before and after.
Tap and hold the photo (or tap the adjustment icon) to quickly see the
original versus the edited version. If the edit looks too extreme, pull
the sliders back a bit. -
Tap Done to save.
Once you like the result, tap Done. Your edit is saved
non-destructively, so you can always revert to original later.
That’s the core brightness workflow. Once you’re comfortable with it, you
can experiment with color tools and filters, but good lighting fixes 80%
of a photo’s problems all by itself.
When Simple Brightness Isn’t Enough
Some photos need more than “drag the Brightness slider to the right.”
Harsh sunlight, deep backlighting, or shade can make certain areas look
weird even after a basic adjustment. Creators often rely on a combination
of Exposure, Brilliance,
Shadows, and Highlights to fix tricky
shots, especially those taken in the shade or against strong light.
Here’s a more advanced approach you can try for dark or shady photos:
- Increase Exposure slightly (+10 to +20).
- Boost Brilliance for overall richness.
- Lower Highlights to keep bright areas from blowing out.
- Raise Shadows to bring detail back into darker parts.
- Drop Contrast a bit if things look too harsh.
- Raise Black Point just enough to keep depth in the image.
You don’t have to memorize numbers; think more in terms of “small nudges”
until it looks right. The Photos app updates in real time, so let your
eyes be the judge.
Pro Tips for Natural-Looking Bright Photos
Want your edits to look less “I just discovered sliders” and more “I know
what I’m doing”? Try these practical tips:
-
Zoom in on faces. After brightening, pinch to zoom on
your subject’s face. If skin looks flat, paper-white, or overly shiny,
dial back your changes. -
Protect the sky. Watch bright parts like skies, white
shirts, or windows. If they lose all detail (pure white), back down the
Exposure and lower Highlights. -
Use Brilliance as your “secret weapon.” Not sure where
to start? Brilliance often gives a nice pop without destroying the
photo. It’s a good first move before tweaking single sliders. -
Copy edits to similar photos. After editing one photo,
you can tap the More (…) menu and choose
Copy Edits, then paste them onto similar photosperfect
for a set of shots taken in the same lighting. -
Don’t fear the Revert button. If you went too far,
open the photo, tap Edit, and choose
Revert to go all the way back to the original. -
Combine brightness tweaks with a soft filter. After
dialing in light, a gentle filter (at low intensity) can unify colors
and make the photo feel cohesive without screaming “filter.”
Common Mistakes to Avoid When Adjusting Brightness
-
Cranking brightness to the max. If your slider is at
100, odds are the photo looks washed out. Try smaller movements and
complement brightness with Shadows and Highlights instead. -
Ignoring color. After brightening, colors may look a
little off. A subtle tweak to Saturation,
Vibrance, or Warmth can bring the
image back to lifejust keep it gentle. -
Editing with your screen too bright. If your iPhone
screen brightness is maxed out, your photo may look brighter than it
really is. Try editing with screen brightness around the middle so your
adjustments translate better to other devices. -
Not paying attention to HDR display. Some photos can
look brighter or more intense because the Photos app is showing HDR
detail. If it looks drastically different elsewhere, this might be why. -
Over-editing every photo. Not every image needs heavy
brightness fixes. Sometimes a small bump to Brilliance and a tiny
exposure tweak is all you need.
Brightness vs. Screen Brightness vs. HDR
Here’s a quick sanity check: editing brightness in the Photos app is not
the same as turning your iPhone’s screen brightness up.
They affect two totally different things.
-
Photo brightness (in the Photos app) changes the image
data. When you export or share the photo, those changes go with it. -
Screen brightness (in Control Center or Settings) only
affects how bright the display appears to your eyes. It doesn’t edit the
actual image. -
HDR display (High Dynamic Range) can make compatible
photos look brighter or more vivid in the Photos app, but the underlying
data still contains detail. Turning HDR display off changes how it
looks, not what’s “stored” in the file.
If your photo looks great on your iPhone but dull elsewhere, it may be a
combination of HDR, screen brightness, and the other device having a less
capable display. To be safe, avoid extreme edits and aim for a balanced,
natural look.
Real-World Experiences: Getting Comfortable with iPhone Brightness Edits
Understanding sliders is one thing. Actually using them on real, messy,
“I took this in terrible lighting” photos is another. Here are some
practical editing experiences and workflows that can help you feel more
confident.
1. The Backlit Café Portrait
You’re at a café, your friend is near a big window, and the camera exposes
for the bright outdoor light. Result: your friend’s face looks dark while
the background is glowing.
Try this workflow:
- Open the photo, tap Edit, go to Adjust.
- Raise Exposure slightly to brighten the entire image.
- Lift Shadows to bring your friend’s face out of the darkness.
- Lower Highlights a bit so the window isn’t pure white.
- Add a touch of Contrast and Black Point to keep the photo from looking hazy.
In a few seconds, your “mysterious silhouette” becomes a clean portrait
where you can actually see facial expressions.
2. The Dim Restaurant Food Shot
Restaurant lighting is great for atmosphere, terrible for photos. You
get a moody, yellowish, dark image of your plate that doesn’t do your
meal justice.
What usually helps:
- Increase Brilliance to add overall clarity.
- Bump Brightness and Exposure just enough so the food looks appetizing.
- Lift Shadows so dark parts of the plate are visible.
- Optional: slightly adjust Warmth and Saturation so colors look natural, not neon or muddy.
The goal isn’t to make it look like daylightjust bright and inviting
enough that your pasta doesn’t resemble a horror movie prop.
3. The Overexposed Beach Day
Bright sand, bright sky, bright wateryour iPhone is fighting a lot of
light at once. Maybe your friends look okay, but the background looks
pale and blown out.
Here’s a good fix pattern:
- Lower Highlights to recover detail in the sky and water.
- Reduce Exposure slightly until the brightest areas calm down.
- Add a bit of Contrast and Black Point for depth.
- If faces got too dark again, gently raise Shadows.
Small, balanced moves usually beat one big, dramatic slider swipe. Think
“nudges,” not “emergency rescue.”
4. Batch-Editing Vacation Photos
On trips, you often shoot multiple photos in the same spot with the same
lighting. Instead of editing each one from scratch, you can:
- Perfect one photo using Exposure, Brightness, Brilliance, Highlights, and Shadows.
- Tap the More (…) button and choose Copy Edits.
- Select other similar photos, tap Paste Edits.
Suddenly, a batch of dull, gray vacation photos turns into a cohesive,
bright set in minutes. It’s one of the easiest ways to make your whole
trip album look like you’ve actually slept in the last week.
5. Building Your Own “Editing Style”
As you edit more photos, you’ll notice patterns. Maybe you prefer:
- Bright, airy photos with lifted Shadows and low Contrast.
- Moody images with moderate Brightness but deeper Blacks.
- Clean, realistic edits that stay close to what your eye actually saw.
Pay attention to what you like and repeat it. Your “style” doesn’t need
to be complicated. It can simply be:
- Brilliance +10 to +20.
- Brightness +5 to +15.
- Shadows +10, Black Point +5.
When you apply that formula consistently, your photos start to feel
recognizable and intentionalwithout any special presets or third-party
apps.
Over time, you’ll stop thinking of brightness edits as a chore and start
treating them as the last creative step before sharing your favorite
moments with the world.
Conclusion: Brighten Smart, Not Just Brighter
Adjusting photo brightness in the iPhone Photos app is about control, not
chaos. Instead of randomly dragging sliders around, you now know what
each brightness-related tool does, how to combine them, and how to keep
your edits natural and flattering.
Start with Brilliance and Exposure, refine with Brightness, Highlights,
and Shadows, then anchor everything with Contrast and Black Point. Use
copy-and-paste edits for consistency, watch out for over-brightening, and
remember that your eyes, not the slider numbers, are the final judge.
With a bit of practice, you’ll go from “Why is this photo so dark?” to
“Wait, you edited that on your phone?”and your Camera Roll will
finally look as good as the moments felt.