
Table of Contents >> Show >> Hide
- Before You Touch a Palette: Prep Like You Mean It
- The 7-Step Eyeshadow Blueprint (Works for 90% of Looks)
- Step 1: Prime and set (lightly)
- Step 2: Sweep a base shade over the lid
- Step 3: Add a transition shade in the crease
- Step 4: Deepen the outer corner for lift
- Step 5: Pack lid color (shimmer or satin, if you want)
- Step 6: Blend the edges (the “no harsh lines” pass)
- Step 7: Finish details (lower lash line, highlight, liner, mascara)
- Placement 101: Where Each Shade Actually Goes
- Three Foolproof Looks You Can Do Without Stress-Sweating
- Adjust for Your Eye Shape (So Your Shadow Shows Up IRL)
- Brushes, Fingers, and Tiny Tools That Make Life Easier
- Common Eyeshadow Problems (and How to Fix Them Fast)
- The 60-Second Routine (When You’re Late But Still Have Standards)
- Real-World Eyeshadow Experiences ( of “Yep, Been There” Energy)
- Conclusion: Your Best Eyeshadow Look Is the One You Can Repeat
Eyeshadow has a reputation for being “advanced makeup,” right up there with winged liner and getting your phone to stop autocorrecting “smoky” to “smocky.” But here’s the truth: most great eye looks are the same handful of steps, repeated with different colors and a little attitude. Once you learn where shadows go (and why), you can do anything from “clean and awake” to “I might be the lead singer tonight.”
This guide breaks down how to apply eyeshadow in a way that actually makes sense: prep, placement, blending, and a few foolproof looks you can copy without needing a degree in Color Theory (or a ring light the size of a satellite dish).
Before You Touch a Palette: Prep Like You Mean It
If eyeshadow is sliding, creasing, or disappearing by lunch, it’s usually not the palette’s fault. It’s the “canvas.” Think of your eyelid like a tiny, oily slip-n-slide that also blinks. Prep makes everything easier.
1) Start with clean, dry lids
- If you have leftover skincare or sunscreen on your lids, gently blot. Too much slip = instant crease city.
- Oily lids? A light dusting of translucent powder after primer can help control shine without turning your eyelids into the Sahara.
2) Use an eyeshadow primer (or a smart substitute)
- Primer helps shadow grip, boosts pigment, and dramatically reduces creasing.
- If you don’t have primer, a thin layer of concealer can workjust set it lightly so shadows blend instead of sticking in patches.
3) Decide your “order of operations”
If your shadows tend to fall onto your cheeks, do eye makeup firstthen clean up and apply base makeup. If you’re using mostly creams or sticks (minimal fallout), face-first is fine. You’re the boss.
The 7-Step Eyeshadow Blueprint (Works for 90% of Looks)
This is the core routine for a classic eyeshadow tutorial. Once you’ve got this down, you can freestyle with color, shimmer, liner, glitter, or whatever makes you feel powerful.
-
Step 1: Prime and set (lightly)
Apply primer from lash line to brow bone. Let it sit for 20–30 seconds. If it feels tacky, that’s goodshadow likes tacky. If it feels wet, you used too much. Blot or add a whisper of powder.
-
Step 2: Sweep a base shade over the lid
Choose a shade close to your skin tone (or a soft neutral). This evens out discoloration and gives you a smoother blend later. Use a fluffy brush for a light wash.
-
Step 3: Add a transition shade in the crease
A transition shade is your “blending buffer”usually a matte mid-tone (soft tan, warm brown, taupe, muted peach). With a fluffy crease brush, apply it where your lid folds (the crease) using small windshield-wiper motions.
Pro tip: Keep your brush pressure light. If you’re pressing hard enough to erase your thoughts, you’re pressing too hard.
-
Step 4: Deepen the outer corner for lift
Take a slightly deeper matte shade (medium-to-deep brown, plum, charcoal, etc.). Place it on the outer third of the eye, focusing on the outer corner. Blend upward and outwardlike you’re aiming for the tail of your eyebrow.
-
Step 5: Pack lid color (shimmer or satin, if you want)
For maximum impact, use a flat shader brush (or your ring finger) to press shimmer onto the mobile lid. Pressing builds pigment; swiping invites fallout and patchiness to the party.
-
Step 6: Blend the edges (the “no harsh lines” pass)
Use a clean fluffy brush to soften the border between shades. If you over-blend and everything turns into one sad beige cloud, reintroduce depth by tapping a bit of your deeper shade back into the outer corner.
-
Step 7: Finish details (lower lash line, highlight, liner, mascara)
- Lower lash line: Smudge your transition shade, then add a touch of the deeper shade on the outer third.
- Inner corner highlight: A tiny pop of shimmer makes eyes look bigger and more awake.
- Liner: Optional. Shadow can be used as liner for a softer look.
- Mascara: Curl first if you want your eyes to look more openespecially helpful for hooded lids.
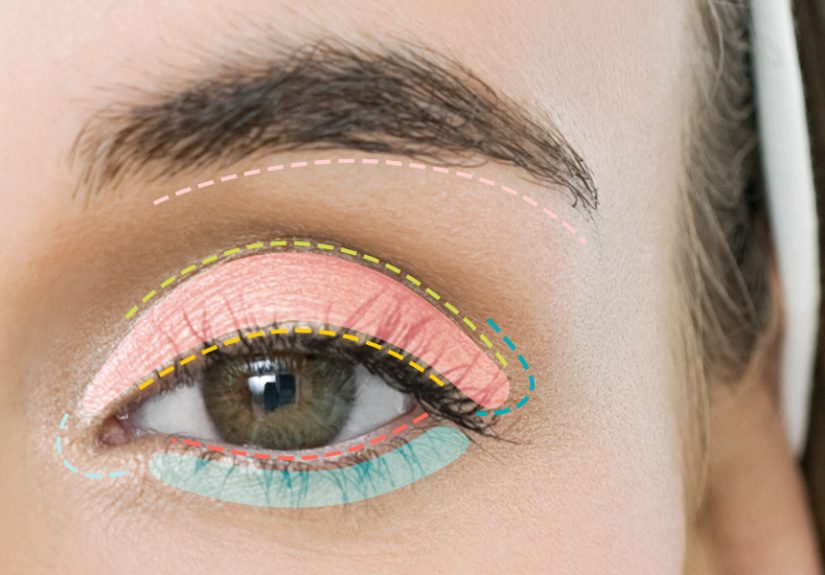
Placement 101: Where Each Shade Actually Goes
The easiest way to level up your eye makeup tutorial is understanding placement. Here’s the cheat sheet:
| Shade Type | Best Placement | Why It Works |
|---|---|---|
| Base (skin-tone or light neutral) | All over lid / up to brow bone (lightly) | Smooth canvas; easier blending |
| Transition (matte mid-tone) | Crease / slightly above crease | Creates dimension without harshness |
| Depth (deeper matte) | Outer corner / outer crease | Adds lift and structure |
| Lid shimmer/satin | Mobile lid (center for spotlight effect) | Reflects light, makes lid look fuller |
| Highlight (soft shimmer) | Inner corner / brow bone (subtle) | Brightens and opens the eye |
Three Foolproof Looks You Can Do Without Stress-Sweating
Look 1: The Everyday “Put-Together” Eye (5–7 minutes)
- Prime.
- Sweep a matte neutral over lid and crease.
- Add a slightly deeper matte to the outer corner.
- Tap a soft satin or shimmer on the center of the lid.
- Smudge leftover transition shade on lower lash line.
- Mascara. Done. You look awake and expensive.
Look 2: The Soft Smoky Eye (Beginner-friendly, not raccoon-y)
- Prime, then apply a medium matte shade through the crease.
- Pack a deeper matte onto the outer third of the lid.
- Blend edges upward (lift, not droop).
- Press a satin shimmer on the lid (optional but fun).
- Smudge the deeper shade along the outer lower lash line.
- Use shadow as liner: press dark shadow along top lash line with an angled brush.
Color idea: Taupe + charcoal for cool-toned smoky. Warm brown + bronze for a classic soft glam.
Look 3: The Quick Cut Crease (Sharp-ish, but still wearable)
- Apply a transition shade slightly above the crease.
- Use a deeper matte to define the crease line (small brush = control).
- Blend the top edge softly so it looks intentional, not like an accident you’re defending.
- Tap a lighter shimmer or satin onto the lid below the crease line.
- Optional: add a tiny bit of liner or shadow-liner for definition.
This is especially helpful if you love definition but your eyelids tend to “eat” your eyeshadow when your eyes are open.
Adjust for Your Eye Shape (So Your Shadow Shows Up IRL)
Hooded eyes: apply with your eyes open
- Look straight into the mirror while placing crease color. If you can’t see it with eyes open, bring it slightly higher.
- Focus depth on the outer corner and blend upward for lift.
- Keep liner thin near the inner corner; build thickness toward the outer edge.
Monolids: build dimension above the fold
- Place your “crease” shade slightly above where you want the dimension to appear, because the natural fold may be minimal.
- Try a gradient: deeper on the outer corner, brighter toward the inner corner.
- Metallic or satin finishes can look incrediblejust press them on to reduce fallout.
Downturned eyes: angle your blend upward
- Keep the deepest shade on the outer corner, then blend up and out (not down and back).
- Smudged shadow-liner on the outer third can create a subtle “lift” without a dramatic wing.
Mature lids: favor soft mattes and satins
- Matte in the crease tends to look smoother and more sculpting.
- Use shimmer strategically: center of the lid and inner corner, not heavily into textured creases.
- Cream shadows and sticks can be more forgivingapply thin layers, then set lightly if needed.
Brushes, Fingers, and Tiny Tools That Make Life Easier
You don’t need 47 brushes. You need a few that do the job well:
- Fluffy blending brush: For transition shades and softening edges.
- Crease brush (tapered): For controlled depth placement.
- Flat shader brush: For packing lid color (especially shimmer).
- Pencil or smudge brush: For lower lash line or inner corner details.
- Angled brush: For using eyeshadow as eyeliner or defining the outer corner.
And yesfingers count as tools. For shimmer, your ring finger is basically a built-in pigment press. Convenient. Always charged.
Common Eyeshadow Problems (and How to Fix Them Fast)
Problem: Everything looks muddy
- Use fewer shades. Two to three well-placed colors beat seven confused ones.
- Keep your transition shade lighter than your depth shade.
- Use a clean blending brush for the final blend so you’re not dragging dark pigment everywhere.
Problem: Fallout under the eyes
- Press shimmer instead of swiping it.
- Tap excess off the brush before applying.
- Do eyes first, then clean up and apply concealer/foundation.
Problem: Creasing by midday
- Use primer (thin layer) and let it set briefly.
- Avoid thick concealer layers on the lidmore product = more movement.
- Set lightly with powder, especially on oily lids.
Problem: Patchy shimmer
- Apply with a fingertip or dampened brush (lightly misted, not soaked).
- Build in thin layers and press.
- If needed, add a tacky base (primer or a tiny dab of cream shadow) under shimmer.
The 60-Second Routine (When You’re Late But Still Have Standards)
- Prime (or quick concealer + light set).
- One matte neutral through crease and lid.
- Deeper shade on outer corner only.
- Shimmer tap on the center of lid.
- Mascara.
This is the makeup equivalent of putting on clean sneakers: not formal, but undeniably functional.
Real-World Eyeshadow Experiences ( of “Yep, Been There” Energy)
Let’s talk about the part of eyeshadow tutorials that never makes the highlight reel: the learning curve. Not the dramatic kind where you drop a palette and watch your soul leave your body (moment of silence), but the everyday micro-mistakes that everyone makes while figuring out how to apply eyeshadow in real life.
One super common experience is discovering that blending is not one single motion. At first, most people blend like they’re sanding a coffee table: big aggressive swipes until everything becomes the same color. The breakthrough moment is realizing blending is more like whispering. You place color, then you soften the edges with tiny movementslittle circles, short sweeps, light pressure. It’s less “scrub” and more “gently convince this shadow to cooperate.”
Another classic: the “Where did my eyeshadow go?” panic. You finish a gorgeous look with your eyes closed, then open them andpoofyour lid eats the art. This hits especially hard with hooded eyes and monolids. The practical lesson people learn is simple: apply with eyes open sometimes, and place crease color slightly higher so it’s visible when you’re looking straight ahead. It feels weird at first, like you’re breaking a rule, but it’s actually the rule you needed all along.
Then there’s fallout: that sparkly dusting under your eyes that makes you look like you hugged a disco ball. A lot of folks learn (usually the hard way) that shimmer often performs best when you press it on instead of sweeping. Pressing keeps the sparkle where you want it and gives that “wow” payoff without turning your cheeks into a glitter crime scene. Many people also end up switching their routine to “eyes first” on big shadow days, because cleaning up fallout is way easier before you’ve perfected your base makeup.
People also tend to go through a “more colors = more pro” phase. It’s understandablepalettes have 18 shades and you want to honor each one like a bridesmaid roster. But the experience most makeup learners report is that their best looks come from fewer shades used with smarter placement: one transition shade, one deeper outer-corner shade, and one lid shade. Suddenly the eye looks polished instead of busy.
Finally, there’s the confidence shift. The first time someone nails a soft smoky eye that doesn’t look harsh, or a cut crease that doesn’t require a full emotional support playlist, they realize eye makeup is a skillnot magic. It’s repetition, lighting, tools that fit your eye shape, and forgiving yourself for the occasional “why is this darker on one side?” moment. That’s normal. Sisters, not twins. Eyes included.
Conclusion: Your Best Eyeshadow Look Is the One You Can Repeat
The best eye makeup tutorial isn’t the most complicatedit’s the one that works with your eye shape, your schedule, and your patience level. Master the basics: prime, transition, depth, lid color, and blend. From there, every palette becomes less intimidating and more like a buffet: you pick what you want, skip what you don’t, and leave feeling satisfied.
Start simple, repeat what works, and when in doubt: blend the edges, add mascara, and walk away like you meant it.


