Table of Contents >> Show >> Hide
- Start With a Plan Before You Buy a Single Hook
- Fix the Bones: Insulation, Air Sealing, and Moisture Control
- Upgrade the Electrical Setup the Safe Way
- Lighting Is the Secret Weapon of a Great Garage Workshop
- Build the Workbench Around Real Projects
- Use Vertical Storage Like It Owes You Money
- Choose Flooring That Can Survive Real Life
- Ventilation and Air Quality: The Part Everyone Forgets Until the Fumes Arrive
- Heat, Cool, and Protect the Space Safely
- Small Upgrades That Make a Big Difference
- Common DIY Garage Reno Mistakes to Avoid
- Final Thoughts
- Garage Workspace Experiences and Real-World Lessons
- SEO Tags
If your garage currently looks like a place where holiday decorations go to retire, you are not alone. A lot of garages start life as “temporary storage,” then slowly evolve into a chaotic museum of extension cords, mystery screws, half-used paint cans, and one folding chair nobody trusts. The good news? With the right plan, that same square footage can become a clean, hard-working garage workspace that makes DIY projects easier, safer, and a lot more enjoyable.
A smart DIY garage reno is not just about making the room look pretty enough for Instagram. It is about building a space with good lighting, safe power, practical storage, a sturdy workbench, durable flooring, and enough ventilation that you do not feel like you are sanding wood inside a toaster. Whether you want a basic home repair station, a woodworking setup, a bike tune-up zone, or an all-purpose workshop, the best garage renovation starts with function first and fancy second.
Start With a Plan Before You Buy a Single Hook
The fastest way to waste money on a garage makeover is to buy storage systems before deciding what the space actually needs to do. So before you install shelves or build a bench, define the mission of your garage workspace.
Ask yourself what kind of work will happen here
Will you be doing woodworking, automotive repairs, gardening projects, painting, or general household fixes? Each use changes the layout. A woodworking shop needs dust control and room for long boards. An automotive workspace needs durable flooring, better lighting underneath vehicles, and tool storage that can handle heavy gear. A family DIY station might need flexible surfaces and easy cleanup more than specialized tools.
Break the garage into zones
Think in zones: a work zone, a tool zone, a storage zone, and a parking or overflow zone if the garage still needs to hold a vehicle. This one move makes the rest of the project easier. Your main bench should live where light is strongest and frequently used tools are within easy reach. Seasonal bins, camping gear, and once-a-year decorations can move up high or toward the back. In other words: put the stuff you use weekly where your arms can reach it, and the stuff you use yearly where a ladder can complain about it.
Fix the Bones: Insulation, Air Sealing, and Moisture Control
A garage workspace is miserable if it is freezing in winter, boiling in summer, and dusty all year. That is why the envelope matters. If your garage is attached to the house, this step matters even more because fumes, carbon monoxide, and chemical odors can migrate into living spaces.
Seal gaps first
Before adding insulation, seal air leaks around the rim joist, wall penetrations, gaps near doors, and cracks where the garage meets conditioned space. Even a well-organized workshop feels less impressive when cold air whistles through it like a haunted harmonica.
Insulate what makes sense
If you use the garage regularly, insulating walls and the garage door can dramatically improve comfort. If there is living space above the garage, sealing and insulating the shared boundary becomes even more important. Good insulation also helps stabilize temperature swings, which is good for tools, paint, adhesives, and your willingness to spend more than eleven minutes out there.
Do not ignore moisture
Concrete floors can wick moisture, garages can collect humid air, and poorly sealed walls can create condensation. Repair cracks, manage drainage outside, and avoid trapping moisture behind sloppy finishes. If the garage smells damp, solve that problem before you start adding cabinetry and wood surfaces.
Upgrade the Electrical Setup the Safe Way
If your dream workshop depends on one tired outlet and a heroic extension cord, it is time for an intervention. Power matters in a garage workspace, but safe power matters more.
Add the right outlets in the right places
Plan outlet locations around your actual work zones. Put receptacles near the bench, near battery charging stations, near garage door walls, and anywhere stationary tools may live. If you are running larger equipment, check whether dedicated circuits make sense. You do not want your saw, heater, and shop vacuum teaming up to trip breakers like it is a group hobby.
Respect grounding and cord safety
Use properly grounded receptacles and avoid running cords across the floor where they can be damaged, snagged, or rolled over. A clean electrical layout is not just neat; it reduces shock and trip hazards and makes the whole workspace feel intentional.
Protect lights and power in rough spaces
Garages are not gentle environments. Fixtures can get bumped, dust gets everywhere, and tools have a way of turning “temporary” into “permanent.” Choose durable fixtures, protect bulbs where needed, and keep wiring tidy and secure. If electrical upgrades go beyond basic comfort level, bring in a licensed electrician. Bravery is useful in DIY. So is knowing when not to cosplay as one.
Lighting Is the Secret Weapon of a Great Garage Workshop
Bad lighting makes every task more annoying. It also makes every project look like a crime scene reenactment. Good garage workshop lighting should come in layers: general overhead lighting, task lighting, and a few supplemental lights where shadows tend to gather.
Use overhead lighting for the whole room
LED fixtures are the obvious winner for most garage renovations. They are efficient, bright, long-lasting, and better suited to frequent switching than older technologies. Start with even overhead coverage so you are not working in dim corners.
Add task lighting where detail work happens
Your workbench, saw station, drill press area, and parts shelves all benefit from focused task lighting. Position lights so they illuminate the work surface without blasting glare directly into your eyes. This is one of those small decisions that makes the entire shop feel ten times more professional.
Choose light quality, not just brightness
If you paint, finish wood, sort wiring, or repair small parts, color quality matters. Brighter is not always better if everything still looks vaguely beige. A crisp, neutral LED light makes it easier to see surface defects, wire colors, hardware sizes, and the difference between “finished” and “why is this still sticky?”
Build the Workbench Around Real Projects
The workbench is the anchor of your garage workspace. It should fit your projects, your body, and your available floor area. Too small, and it becomes frustrating. Too huge, and it turns into a horizontal storage trap where random stuff goes to become permanent.
Pick the right size
A practical garage workbench is often somewhere around 28 to 36 inches deep, 48 to 96 inches wide, and around standard working height, but the right dimensions depend on your body and your projects. Leave enough room to move material around it and walk comfortably past it. In smaller garages, a folding or mobile bench can be a lifesaver.
Choose materials that match your use
A layered wood top works well for many DIY projects and is usually more budget-friendly than steel. If your work is rougher, dirtier, or more mechanical, a tougher top or sacrificial surface can make sense. Storage underneath is also a smart move. A lower shelf, drawers, or cabinets keep commonly used tools close without eating more wall space.
Keep the bench in the best location
Place the main bench in a well-lit area with easy access to hand tools, outlets, and storage. If you frequently assemble or finish projects, consider a secondary rolling surface or assembly table. Your bench should support your workflow, not force you to perform interpretive dance with plywood sheets.
Use Vertical Storage Like It Owes You Money
One of the smartest things you can do in a DIY garage reno is get stuff off the floor. Floor clutter kills flexibility, makes cleaning harder, and turns simple tasks into obstacle courses.
Combine storage types
The best garage storage systems mix open shelving, cabinets, pegboards, hooks, and overhead racks. Open shelves are great for bins and bulky items. Cabinets help hide visual clutter and protect supplies from dust. Pegboards and wall systems are perfect for hand tools and frequently used accessories. Overhead storage works well for seasonal or rarely used items.
Store by frequency of use
Daily-use tools should be between waist and eye level. Heavy items should stay lower. Rarely used bins can move up high. Keeping frequently used gear visible and easy to return is what makes a garage stay organized after the reno glow fades.
Do not overload the structure
Wall-mounted and ceiling-mounted storage must be anchored correctly for the wall type and weight load. This is not the place for optimistic screws and good vibes. If you are hanging hundreds of pounds overhead, install it like gravity is absolutely paying attention.
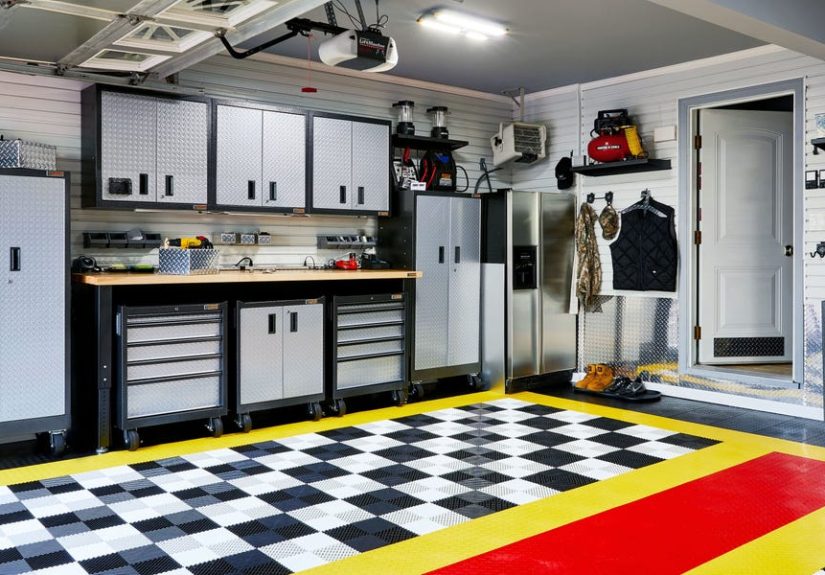
Choose Flooring That Can Survive Real Life
Garage floors take abuse from cars, tool chests, spills, dropped hardware, and muddy shoes. So while flooring does improve appearance, its main job is to handle punishment.
Prep the concrete first
Before adding any coating or covering, clean the slab thoroughly and repair cracks or surface defects. Floor prep is boring, dusty, and deeply unglamorous. It is also the difference between a floor that lasts and one that starts peeling the moment you feel proud of it.
Match the floor to the work
Paint and stains can be budget-friendly options. Epoxy-style coatings offer a tougher finish and a cleaner look when installed properly. Interlocking tiles are popular for garages that need easy installation and modular repair. Mats can work in targeted zones, especially where fatigue reduction matters near a bench. If you work on vehicles or messy equipment, avoid finishes that stain easily or become slippery when wet.
Ventilation and Air Quality: The Part Everyone Forgets Until the Fumes Arrive
Any serious garage workspace needs a plan for air quality. Sawdust, paint fumes, solvent vapors, exhaust, and even stored chemicals can turn an enclosed garage into a place your lungs would rather not visit.
Control sources first
Keep paints, solvents, and other chemicals tightly sealed when not in use. Store flammables responsibly. Never let a car idle inside a closed garage. If you sand, cut, or grind materials, capture dust at the source whenever possible.
Move air intelligently
A fan alone is not a complete strategy, but air movement helps. Cross-ventilation, local exhaust, and dust collection all improve the space depending on the kind of work you do. If your projects involve finishing products, adhesives, or automotive chemicals, ventilation becomes non-negotiable.
Separate the garage from the house
In attached garages, air sealing is just as much a health issue as an energy issue. A beautiful garage workspace is not worth much if the whole house smells like thinner and hot rubber.
Heat, Cool, and Protect the Space Safely
Comfort matters because a garage you hate being in will not get used. But comfort should never come at the expense of safety.
Use heating carefully
If you use a portable heater, keep it stable, away from combustibles, and plugged directly into a wall outlet when required by the manufacturer. Never leave it running unattended. In a garage shop, careless heating can create fire risks faster than you can say, “I was only stepping inside for a minute.”
Keep a fire extinguisher nearby
A garage workspace often combines wood dust, chemicals, electrical tools, and occasionally sparks. Mount an appropriate extinguisher where it is visible and easy to access. In a mixed-use garage, many homeowners keep an ABC-rated extinguisher because it covers ordinary combustibles, flammable liquids, and energized electrical equipment.
Small Upgrades That Make a Big Difference
- Add a rolling tool chest if you want flexibility without permanent built-ins.
- Use labeled bins instead of mystery cardboard boxes from 2019.
- Install a charging shelf for batteries, flashlights, and cordless tools.
- Use a dedicated wall for clamps, measuring tools, and safety gear.
- Add a stool, anti-fatigue mat, or music speaker if you want the room to feel inviting enough to actually use.
Common DIY Garage Reno Mistakes to Avoid
The biggest mistake is renovating for looks before workflow. Close behind that: too little lighting, too few outlets, no ventilation plan, oversized cabinets that eat floor space, and a bench that becomes a storage pile on day two. Another common mistake is forgetting the future. Your tool collection will grow. Your storage should allow for that. Nobody has ever finished a garage workshop and said, “Amazing, I accidentally created too much useful wall space.”
Final Thoughts
The best garage workspace is not necessarily the biggest or the most expensive. It is the one that makes your projects easier to start, safer to complete, and simpler to clean up. A successful DIY garage reno starts with planning, then builds outward through insulation, power, lighting, storage, flooring, and air quality. Get those fundamentals right, and your garage stops being a clutter cave and starts acting like the hardest-working room in the house.
So yes, build the shelves. Upgrade the lights. Add the bench. Seal the gaps. Organize the tools. But most importantly, build a space that matches the way you actually work. Because the perfect garage workshop is not the one that looks like a catalog. It is the one that helps you finish real projects without losing your screwdriver, your patience, or your shins.
Garage Workspace Experiences and Real-World Lessons
One of the most common experiences homeowners report during a garage renovation is realizing that the old setup was fighting them every step of the way. The first time you work in a garage with proper lighting, for example, the change feels almost ridiculous. Suddenly, you can see fasteners that used to vanish into shadow, pencil marks are visible without squinting, and paint colors stop looking like random variations of “gray-ish probably.” That is usually the moment people understand that a good garage workspace is not a luxury. It is a productivity tool.
Another real-world lesson shows up with storage. Many DIYers begin by thinking they need more square footage, but what they actually need is better use of vertical space. Once tools move onto pegboards, shelves, hooks, and cabinets, the floor opens up in a way that makes the entire garage feel twice as large. People often describe this stage of a DIY garage reno as the point where the room starts feeling less like storage and more like a workshop. It is also the point where family members stop asking, “Can you move this pile?” and start saying, “Wait, this is actually nice.”
Workbenches also teach important lessons. A lot of people build the biggest bench they can fit, only to realize later that they need room to move sheet goods, open drawers, or wheel tools around. Others go too small and quickly discover that a cramped bench becomes frustrating during assembly, sanding, repairs, or painting. The best experiences usually come from customizing the bench to actual habits: adding a lower shelf, using a sacrificial top, putting task lighting directly above it, and keeping the most-used tools within arm’s reach. A garage workspace works best when the bench supports your rhythm instead of interrupting it.
Temperature and comfort matter more than beginners expect. People who insulate the garage door, seal gaps, and improve airflow often say they use the room far more often afterward. Without those upgrades, a garage may technically function as a workshop, but in practice it gets avoided in extreme weather. Once comfort improves, short tasks become easier to start, and longer projects stop feeling like punishment. Even small changes, such as an anti-fatigue mat, better ventilation, or a fan aimed in the right direction, can shift the experience from “I guess I have to do this out here” to “I actually want to spend time in this shop.”
Safety upgrades tend to be the least glamorous but the most appreciated later. Better outlets, fewer extension cords, a visible fire extinguisher, and properly stored chemicals are not the sort of things people brag about first. But those details create peace of mind, especially when power tools, heaters, paints, or vehicles are involved. Homeowners often realize after the renovation that the garage feels calmer. Not just cleaner, but calmer. There is less tripping, less hunting, less mess, less risk, and less mental friction before starting a job.
Maybe the biggest experience tied to a garage workshop makeover is psychological. A finished workspace creates momentum. When the room is organized and ready, projects that once felt annoying become manageable. You are more likely to fix the loose hinge, build the planter box, service the bike, sharpen the blades, or finally assemble that thing that has been sitting in a box for six months. A good DIY garage reno does not just change the room. It changes your willingness to make, repair, and improve things. And honestly, that might be the best upgrade of all.