
Table of Contents >> Show >> Hide
- What You Need Before You Start
- Step 1: Plan the Opening and Decide How the Door Will Swing
- Step 2: Choose Your Hardware and Build Strategy
- Step 3: Build the Bookshelf Cabinet Like It Has to Survive Real Life
- Step 4: Install the Jamb and Mount the Pivot Hardware Carefully
- Step 5: Anchor, Balance, and Load the Bookshelf the Smart Way
- Step 6: Finish the Trim, Camouflage the Door, and Make It Look Intentional
- Common Mistakes to Avoid When Building a Hidden Door Bookshelf
- Final Thoughts
- What the Experience Is Actually Like: A 500-Word Reality Check
- SEO Tags
If you have ever looked at a plain wall and thought, “This room is missing one thing: a little mystery,” a hidden door bookshelf might be your next favorite project. It is practical, dramatic, and just nerdy enough to be charming. You get storage on the outside, a private passage on the inside, and the rare satisfaction of watching guests stare at your bookcase like it just told a lie.
The good news is that building a hidden bookshelf door is not magic. It is mostly carpentry, careful measuring, and resisting the urge to eyeball anything. The trick is to treat the project as both a bookshelf and a door. That means it has to look good, swing smoothly, support weight, and stay square over time. If one of those pieces is ignored, your secret entrance becomes a very public squeak machine.
In this guide, you will learn how to build a hidden door bookshelf in six clear steps, from planning the opening to finishing the trim. Along the way, we will cover tools, materials, load concerns, hardware choices, and the little mistakes that turn a dream project into a plywood-based personality test.
What You Need Before You Start
A hidden bookshelf door works best when you gather the right materials before making the first cut. For most DIY builds, that means 3/4-inch plywood for the cabinet box, solid wood or 1x material for the face frame, quality screws, wood glue, a back panel, trim, and a hidden pivot or bookcase-door hardware kit. You will also want a level, tape measure, stud finder, drill/driver, circular saw or table saw, clamps, square, sander, and finish supplies.
Do not skip the hardware decision. Standard visible hinges usually are not ideal for a full bookshelf door because the unit is deeper, heavier, and more awkward than a normal slab door. A proper hidden pivot system or bookcase-door kit helps distribute weight and gives the clean, seamless look you want.
Step 1: Plan the Opening and Decide How the Door Will Swing
Before you build anything, study the doorway like a detective studying a suspicious alibi. Measure the width, height, depth, casing clearance, and nearby wall space. Then decide whether the bookshelf will swing in or out, and whether it should hinge on the left or right.
This step matters more than people think. A hidden bookshelf door is deeper than a regular interior door, so you need enough room for the shelves, the trim, and the arc of the swing. If the unit opens into a hallway, make sure it will not clip a light fixture, smack a return vent, or introduce itself aggressively to nearby furniture. If the floor is uneven, plan for shimming and adjustment.
Questions to Answer Before Moving On
- Is the existing opening square, plumb, and level?
- Will the door swing without hitting adjacent walls, trim, or furniture?
- How deep can the shelves be without making the door too heavy?
- Will you build inside an existing doorway, or are you modifying framing?
If you are widening the opening or changing structural framing, stop and check local code and permit rules before you continue. Secret doors are fun. Unplanned structural work is a less delightful genre.
Step 2: Choose Your Hardware and Build Strategy
Now decide whether you are building from scratch or using a hidden-door hardware kit. Both approaches can work, but the right choice depends on your skill level and patience. A kit is faster and helps with alignment. A scratch build gives you more control over size, shelf layout, wood species, and styling.
For most homeowners, a pivot-hinge hidden door bookshelf is the smartest option. Pivot hardware is designed to carry weight more effectively than ordinary butt hinges. Some systems also allow adjustment after installation, which is extremely helpful when a bookshelf door settles slightly after loading it with books, baskets, or décor.
Best Build Options
- Prefab or hardware kit: Best for faster installs and fewer alignment headaches.
- Custom plywood cabinet on pivot hardware: Best for a tailored look and exact sizing.
- Bi-fold bookcase system: Helpful in tighter spaces where a full swing door is not practical.
Whichever route you choose, keep the design realistic. A shelf that is too deep or a cabinet that is too wide can quickly become heavy enough to stress the hardware and make the door hard to operate. In other words, yes, you can build a giant rotating library wall. No, your future self may not thank you.
Step 3: Build the Bookshelf Cabinet Like It Has to Survive Real Life
This is the heart of the project. Build the bookshelf cabinet square, rigid, and lighter than your imagination probably wants it to be. Use 3/4-inch plywood for the sides, top, bottom, and fixed shelves. Add a strong back panel to keep the box from racking, and reinforce the front with a face frame. A face frame does more than make the shelf look custom; it also adds stiffness and helps the unit resist twisting over time.
Fixed shelves are usually better than fully adjustable shelves for a hidden bookshelf door because they help lock the cabinet together. You can still include one adjustable shelf if you want flexibility, but the structure should not depend on shelf pins alone. Think sturdy, not wobbly. This is a secret passage, not a trust exercise.
Practical Shelf Design Tips
- Keep shelf depth modest so the door does not become unnecessarily heavy.
- Use a full or partial back panel to prevent racking.
- Add a face frame to stiffen the front edges and improve appearance.
- Use glue and screws, not hope and good vibes.
- Sand edges and ease corners before assembly for a cleaner finish.
If your design includes a false side panel, applied trim, or a discreet reveal to blend into surrounding millwork, mock it up before final assembly. Hidden doors look best when they feel intentional, not like a bookcase trying very hard to avoid eye contact.
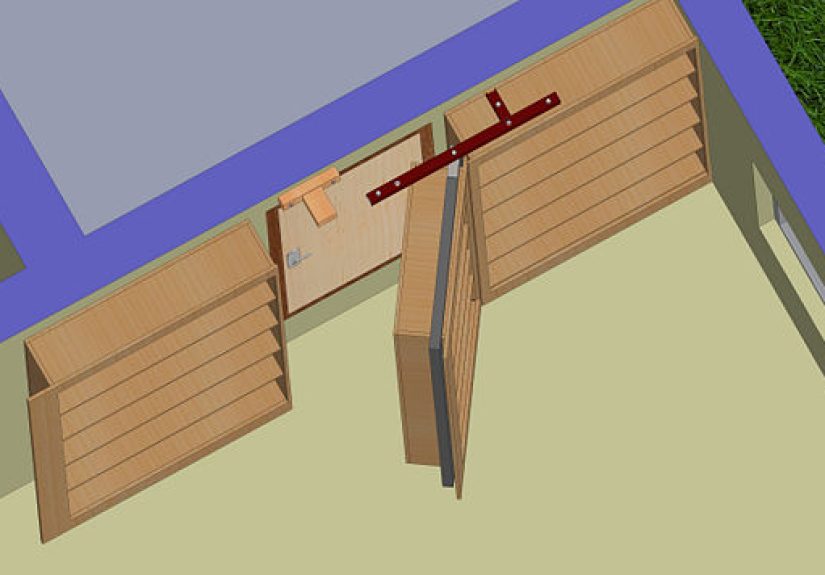
Step 4: Install the Jamb and Mount the Pivot Hardware Carefully
Here is where precision becomes non-negotiable. Whether you are using a kit or custom hardware, install the jamb and pivot system exactly as directed. The opening must be plumb, level, and solid. Shim where needed, verify the reveal, and fasten into framing securely.
If the jamb is even slightly out of square, the bookshelf may bind, drift open, or rub at the head or floor. And because a bookcase door is bulkier than a standard door, little errors become big annoyances fast. Check the opening at multiple points, use a level often, and do not assume old walls are honest. Older homes in particular have a rich tradition of pretending to be straight while doing the opposite.
Installation Checklist
- Dry-fit the jamb in the opening.
- Shim until the unit is plumb and level.
- Secure the jamb into framing, not just drywall.
- Install the pivot plates, pins, or hardware brackets.
- Hang the bookshelf door and test swing before finishing.
At this stage, operate the door repeatedly. Open it all the way. Close it gently. Close it a little less gently. Listen for rub points and check the gap around the perimeter. It is much easier to fix alignment before final trim and finish go on.
Step 5: Anchor, Balance, and Load the Bookshelf the Smart Way
A hidden bookshelf door can fail in sneaky ways. It may not collapse dramatically like in an action movie, but it can sag, drag, or twist if the weight distribution is poor. That is why balancing the unit matters. Heavier books should go low and near the hinge side when possible. Decorative pieces, lighter books, and display items belong higher up or farther from the pivot.
Think of the door as a lever. The farther weight sits from the pivot side, the more strain it creates. If every shelf is stuffed with hardcovers from edge to edge, the door will feel heavier, move differently, and stress the hardware over time. Build it to store books, yes, but not the entire printed history of Western civilization.
How to Keep the Door Working Smoothly
- Place the heaviest items on lower shelves.
- Avoid deep shelves filled with dense books from top to bottom.
- Recheck plumb after loading the door.
- Adjust pivots or catches if the door settles slightly.
- Install a stop, catch, or latch so the unit stays closed neatly.
If you want the hidden effect to feel extra polished, consider a concealed latch or a themed release, such as a disguised book latch. That is optional, of course, but it does make the whole project feel gloriously unnecessary in the best possible way.
Step 6: Finish the Trim, Camouflage the Door, and Make It Look Intentional
This is the step that transforms a clever build into a convincing hidden door bookshelf. Add trim, scribe where necessary, caulk small gaps, and finish the cabinet to match the room. Paint is great for a built-in look, while stain works well when the surrounding millwork already leans warm and traditional.
The best hidden bookshelf doors do not scream, “I am definitely hiding something.” They blend into the wall, line up with adjacent trim, and maintain consistent reveals. You can also style the shelves strategically. A few real books, some framed art, a plant, and one object that says “I have excellent taste and maybe a secret tunnel” usually do the trick.
Camouflage Ideas That Work
- Match the bookshelf color to nearby trim or walls.
- Repeat the same baseboard and casing profile around the opening.
- Use a face frame design that mirrors nearby built-ins.
- Keep shelf styling natural rather than overly staged.
- Hide the latch or pull so the opening method feels discreet.
Once the trim is on and the finish cures, test the door again. Sometimes paint thickness, new trim, or even an enthusiastic bead of caulk can subtly change clearances. This is your final chance to make the operation feel smooth and satisfying.
Common Mistakes to Avoid When Building a Hidden Door Bookshelf
A hidden bookshelf door is one of those projects where confidence is useful, but overconfidence is a trap wearing a tool belt. Here are the biggest mistakes DIYers make:
- Using standard door hinges: They often are not ideal for the weight and depth of a bookshelf door.
- Building too heavy: Thick materials, deep shelves, and overloading can create sag and poor swing.
- Ignoring the floor: An unlevel floor affects reveals, door swing, and bottom clearance.
- Skipping the back panel: Without it, the cabinet can rack and twist.
- Forgetting wall clearance: Trim, light switches, and furniture all matter.
- Rushing the finish: A hidden door that looks patched together is no longer very hidden.
Final Thoughts
If you want a project that combines storage, design, and a little theatrical nonsense, building a hidden door bookshelf is hard to beat. It is useful every day, impressive every time it opens, and surprisingly achievable when you break it into manageable steps. The key is respecting both sides of the equation: build a solid bookcase, install it like a door, and finish it like built-in furniture.
Take your time with the opening, choose the right hardware, and do not overload the shelves just because you finally have a place to display every book you have ever felt guilty about not finishing. If you build it carefully, your hidden bookshelf door can look seamless, operate smoothly, and become the most interesting thing in the room without shouting for attention.
What the Experience Is Actually Like: A 500-Word Reality Check
Building a hidden door bookshelf sounds wildly glamorous at the idea stage. You picture yourself stepping back, brushing sawdust off your shirt, and revealing a secret room with the calm confidence of someone in a mystery novel. The real experience is a little less cinematic and a lot more tape-measure-heavy, but that is part of the charm.
The first emotional phase is excitement. You sketch the project, browse hardware, and start imagining shelf styling before you have even confirmed whether the wall is straight. This is normal. So is the moment when you realize the doorway is not perfectly square, the floor slopes a bit, and suddenly your “simple weekend build” has picked up a supporting cast of shims, clamps, and muttered negotiations.
Then comes the surprisingly satisfying part: breaking down plywood and assembling the cabinet. Even if you are not a seasoned woodworker, there is something deeply rewarding about turning flat sheets into a rigid bookshelf box. The project begins to feel real fast. You stop seeing wood parts and start seeing the future reveal. That is also when you learn that squareness matters a lot. A hidden bookshelf door is deeply uninterested in your excuses. If the cabinet is off, the install will let you know.
Hanging the door is usually the moment of peak suspense. This is where you discover whether your careful planning has been brilliant or merely enthusiastic. The first test swing can be magical. It can also be a little terrifying. Maybe it clears perfectly. Maybe it kisses the trim a bit too affectionately. Maybe it closes like a dream but opens with the energy of a stubborn refrigerator door. All of that is common. Tiny adjustments make a big difference, and most builders learn patience very quickly right here.
Once the door swings properly, the experience shifts again. Now it becomes less about carpentry and more about illusion. You add trim. You caulk. You paint. You style shelves. You stand across the room and ask yourself whether it looks like a bookcase or a bookcase pretending to be innocent. This stage is unexpectedly fun because the project goes from “functional construction” to “secret architecture.” Every detail matters, from shelf symmetry to how visible the latch might be.
The best part happens when someone else sees it for the first time. They look at the room. They notice the bookshelf. Nothing unusual. Then you open it. That moment lands every single time. Adults become children for about five seconds, which may be the highest compliment any DIY project can receive. It is practical, yes, but it also creates delight, and that is rarer in home improvement than it should be.
The long-term experience is even better. A hidden door bookshelf becomes one of those features that keeps earning its keep. It stores books and décor, hides a home office, pantry, reading nook, or safe room, and turns an ordinary wall into a conversation piece. You will probably tweak shelf styling, adjust the latch once or twice, and maybe reorganize weight after living with it. That is normal. But once it is working, it feels less like a novelty and more like a clever part of the house that should have always been there.
So yes, the process includes careful measuring, dusty clothes, and at least one moment where you ask a level to explain itself. But the experience is worth it. Few DIY projects are this functional, this memorable, and this unapologetically fun.


