Table of Contents >> Show >> Hide
- What Is a Painted Block Table Top?
- Why Use Cheap 2x4s?
- Tools and Materials
- Step 1: Choose the Table Top Size
- Step 2: Prepare the 2×4 Lumber
- Step 3: Cut the Blocks
- Step 4: Dry-Fit the Pattern
- Step 5: Glue the Blocks to the Base
- Step 6: Trim and Square the Edges
- Step 7: Fill Gaps, Cracks, and Knots
- Step 8: Sand the Table Top Smooth
- Step 9: Prime the Wood
- Step 10: Paint the Block Pattern
- Step 11: Seal the Painted Top
- Step 12: Attach the Table Base
- Common Mistakes to Avoid
- Design Ideas for a Painted 2×4 Block Table Top
- Budget Breakdown
- Extra Experience: What Building a Painted Block Table Top Teaches You
- Conclusion
A great tabletop does not have to begin with expensive hardwood, a cabinet shop, or a bank account that quietly weeps in the corner. With a few straight 2x4s, basic tools, patience, and paint, you can build a bold painted block table top that looks custom, feels sturdy, and costs far less than buying a designer table. The secret is treating ordinary construction lumber like a creative material instead of “just framing wood.” Cut it into blocks, arrange the pieces with intention, glue everything securely, sand until the surface behaves itself, and finish it with paint and a protective clear coat.
This project is especially satisfying because cheap 2×4 lumber has personality. It has knots, grain lines, rounded corners, occasional dents, and sometimes the attitude of a board that has seen things. Instead of fighting every imperfection, this painted block table top uses them as part of the design. Once the blocks are trimmed, arranged, filled, primed, painted, and sealed, the result can look rustic, modern, farmhouse, industrial, or playfully colorful depending on your paint choices.
Below is a detailed, beginner-friendly guide to building a painted block table top from cheap 2x4s, including materials, sizing, layout tips, glue-up methods, sanding, painting, sealing, and real-world lessons learned from the kind of DIY project that teaches you things whether you asked politely or not.
What Is a Painted Block Table Top?
A painted block table top is a tabletop made from many smaller wood pieces arranged in a repeating or random pattern, then painted and sealed. In this version, the blocks are cut from inexpensive 2×4 boards. The finished surface can resemble a butcher-block pattern, a brick layout, a checkerboard, a mosaic, or a modern geometric design.
There are two common ways to build it. The first method is to glue the 2×4 blocks directly to a plywood base, which is easier for most DIYers and helps keep the top flat. The second method is to edge-glue the blocks into one solid slab, which can look beautiful but requires more clamps, better milling, and more careful flattening. For a painted table top made from budget lumber, the plywood-base method is the most forgiving and practical.
Why Use Cheap 2x4s?
Cheap 2x4s are available almost everywhere, and they are strong enough for furniture projects when selected carefully. Most construction 2x4s are softwood, often spruce, pine, or fir. They are not fancy, but they are easy to cut, easy to paint, and surprisingly attractive when arranged creatively.
The key is choosing boards that are as straight and dry as possible. Avoid lumber with major twists, deep cracks, wet patches, loose knots, or dramatic warping. A slightly imperfect board can be cut into usable blocks, but a board shaped like a banana is better left at the store unless you are building fruit-themed furniture.
Tools and Materials
Materials
- Several 2×4 boards, preferably kiln-dried and straight
- 3/4-inch plywood for the base
- Wood glue
- 1-1/4-inch brad nails or screws, optional
- Wood filler or paintable filler
- Primer made for wood surfaces
- Interior enamel paint, cabinet paint, or durable furniture paint
- Water-based polyurethane or polycrylic clear coat
- Sandpaper: 80, 120, 150, 180, 220, and 320 grit
- Tack cloth or clean microfiber cloth
- Painter’s tape
- Drop cloth
Tools
- Miter saw or circular saw with a straightedge guide
- Table saw, optional for ripping rounded edges
- Random orbital sander
- Clamps
- Measuring tape
- Carpenter’s square
- Pencil
- Paint roller, brush, or sprayer
- Drill, optional
- Safety glasses, hearing protection, and dust mask or respirator
Step 1: Choose the Table Top Size
Start by deciding the final size of your tabletop. A small coffee table might be 24 inches by 40 inches. A side table could be 20 inches by 20 inches. A dining table top could be 36 inches by 72 inches, though larger tops become heavy quickly when made with 2×4 blocks.
For your first attempt, choose a manageable size. A 24-by-36-inch top is big enough to look impressive but small enough that you can still move it without needing three neighbors and a motivational speech.
Cut your plywood base to the final tabletop size. The plywood acts as a stable foundation for the block pattern and makes the glue-up much easier. If you want a thicker, chunkier look, you can add a 2×4 frame or trim around the perimeter after the blocks are installed.
Step 2: Prepare the 2×4 Lumber
Standard 2×4 boards have rounded edges. You can leave those rounded edges for a rustic look, but the finished tabletop will have deeper grooves between pieces. For a cleaner painted block surface, rip a small amount from each rounded side using a table saw. This turns the 2×4 into a squarer board with sharper edges.
If you do not have a table saw, do not panic. You can still build the project with rounded 2×4 edges. Just understand that you may need more filler, more sanding, and a slightly more rustic finish. Rustic is not a flaw; it is DIY wearing boots.
Before cutting blocks, let the lumber sit indoors for a few days if possible. Wood responds to moisture and temperature changes, and letting it acclimate helps reduce movement after the table is built.
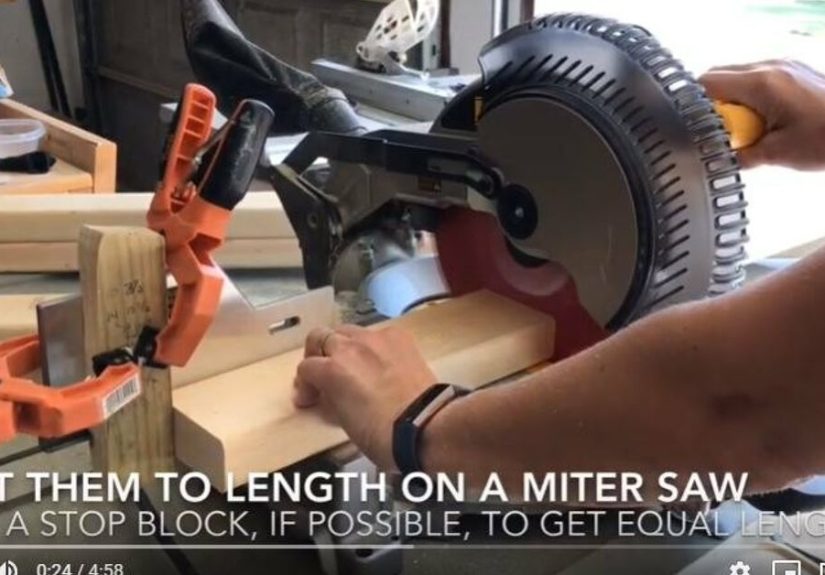
Step 3: Cut the Blocks
Decide on your block length. A simple option is to cut each block 3-1/2 inches long, matching the actual width of a 2×4. This creates chunky rectangular pieces that can be arranged in a brick, basket-weave, or checkerboard pattern. You can also cut blocks at 4 inches, 5 inches, or mixed lengths for a more organic layout.
Use a stop block on your miter saw setup so every piece is the same length. Consistency matters. If your blocks vary too much, the layout will develop gaps, uneven rows, and the emotional energy of a puzzle missing three pieces.
Cut more blocks than you think you need. Some will have ugly knots, chipped corners, or awkward grain. Extras give you design flexibility and save you from restarting the saw just when you thought you were done.
Step 4: Dry-Fit the Pattern
Lay the plywood base on a flat surface and arrange the 2×4 blocks on top without glue. This is called a dry fit, and it is where your tabletop design comes alive. Try a few patterns before committing.
Popular Pattern Ideas
- Brick pattern: Stagger each row like a brick wall for a classic look.
- Checkerboard pattern: Rotate every other block 90 degrees for visual movement.
- Random mosaic: Mix lengths and grain direction for a playful handmade style.
- Bordered design: Frame the outside with longer strips, then fill the center with blocks.
- Painted color-block layout: Use two to four paint colors to highlight individual blocks.
Once you like the layout, mark reference lines on the plywood with a pencil. You can also number rows or take a photo with your phone. This prevents the classic DIY tragedy known as “I had it perfect five minutes ago.”
Step 5: Glue the Blocks to the Base
Apply wood glue to the underside of each block and press it onto the plywood base. Work in small sections so the glue does not dry before the pieces are positioned. Keep the blocks tight against one another, but do not use so much pressure that the pattern shifts.
If you want extra holding power, add brad nails from the underside of the plywood into the blocks, or drive short screws from underneath. Be careful with screw length. You want strong attachment, not surprise metal volcanoes poking through the tabletop.
Clamp the assembly when possible. Long clamps across the rows can help tighten the pattern, while weight on top can keep the blocks seated flat against the plywood. Place scrap wood between clamps and the tabletop to avoid dents.
Let the glue cure fully before sanding or moving aggressively. Many wood glues grab quickly, but the strongest bond usually needs a longer cure period. When in doubt, give it overnight. Your table is not going anywhere. It does not have legs yet.
Step 6: Trim and Square the Edges
After the glue cures, inspect the edges. Some blocks may overhang the plywood slightly. Trim the edges with a circular saw and straightedge guide, table saw, or flush-trim router bit if you have one. The goal is a clean rectangle or square.
If you want a finished border, attach ripped 2×4 strips or 1×3 boards around the edges. A border hides the plywood layer and makes the table top look thicker and more intentional. Mitered corners look polished, while simple butt joints are easier and still attractive after paint.
Step 7: Fill Gaps, Cracks, and Knots
Cheap 2x4s will have small gaps and imperfections. For a painted top, fill these with paintable wood filler. Press filler into gaps between blocks, knot holes, and dents. Slightly overfill because filler often shrinks and sands down.
Let the filler dry according to the product directions, then sand it flat. For large gaps, you may need a second application. This step is not glamorous, but it is the difference between “custom handmade table” and “garage floor with ambitions.”
Step 8: Sand the Table Top Smooth
Sanding is where the project becomes furniture. Start with 80 grit if the blocks are uneven. Move to 120 grit, then 150 or 180 grit. For a painted finish, you do not need to polish the wood like glass, but the surface should feel even and comfortable to the touch.
Use a random orbital sander for the main surface and hand-sand edges or corners. Do not press too hard. Let the sander do the work. Pressing harder usually creates swirl marks, heat, and regret.
After the first sanding pass, vacuum the surface and wipe it down. Shine a light across the tabletop at a low angle to reveal ridges, glue spots, and scratches. Fix them now, because paint does not hide everything. Paint is helpful, not magical.
Step 9: Prime the Wood
Primer helps paint bond evenly and reduces blotchy absorption, especially on softwood. Apply one even coat of wood primer with a brush, fine-finish roller, or sprayer. Let it dry fully, then lightly sand with 220 grit to knock down raised grain and dust nibs.
Wipe away all sanding dust before painting. Dust trapped under paint creates roughness that you will feel every time you set down a coffee mug. And once you notice it, you will notice it forever.
Step 10: Paint the Block Pattern
Now comes the fun part. You can paint the entire top one solid color, but a block table top really shines when you use the block layout as part of the design. Try a soft neutral palette for farmhouse style, black and white for modern contrast, muted greens and blues for a vintage look, or warm earthy colors for a rustic feel.
Use painter’s tape to separate blocks if you want crisp color changes. For a more handmade look, paint freehand and embrace slight variation. Apply thin coats rather than one heavy coat. Thick paint can pool in seams, soften details, and take much longer to cure.
Most tabletops need two coats of paint. Let each coat dry thoroughly before adding the next. If the surface feels rough after the first coat, lightly sand with 220 grit, clean the dust, and continue.
Step 11: Seal the Painted Top
A tabletop needs protection from cups, plates, elbows, laptops, board games, and the occasional person who thinks coasters are decorative fiction. Once the paint is fully dry, apply a clear protective topcoat such as water-based polyurethane or polycrylic.
Use thin coats and avoid overbrushing. Let each coat dry according to the product directions, then lightly sand between coats with 320 grit if recommended. Remove dust before applying the next coat. For a hardworking table, three protective coats on the top surface is a smart choice.
Allow the final finish to cure before heavy use. Dry and cured are not the same thing. A finish may feel dry to the touch but still be soft underneath. Give it time before dragging dishes, decor, or your laptop across the surface.
Step 12: Attach the Table Base
You can attach your painted block table top to hairpin legs, a farmhouse base, metal pipe legs, a repurposed table frame, or a simple 2×4 base. Always attach from underneath so fasteners do not show on the painted top.
Because wood expands and contracts, avoid locking a large top so tightly that it cannot move at all. For smaller tops built on plywood, movement is less dramatic, but it is still wise to use proper fasteners and avoid overdriving screws. Pre-drill holes to reduce splitting.
Common Mistakes to Avoid
Using Wet or Twisted Lumber
Wet lumber can shrink after the table is built, opening gaps and causing movement. Twisted boards are difficult to cut into consistent blocks. Spend extra time selecting better 2x4s at the store.
Skipping the Dry Fit
Dry-fitting reveals pattern problems before glue makes them permanent. Always lay out the full design first.
Applying Too Much Glue
Glue squeeze-out can interfere with paint if not cleaned properly. Use enough glue for a strong bond, but not so much that every seam becomes a tiny glue volcano.
Rushing the Finish
Paint and clear coat need drying time. Rushing leads to fingerprints, tackiness, dents, and dramatic sighing.
Forgetting Safety Gear
Cutting and sanding 2x4s creates dust and noise. Wear eye protection, hearing protection, and a dust mask or respirator. Work in a ventilated area, and use dust collection when possible.
Design Ideas for a Painted 2×4 Block Table Top
For a modern look, paint the blocks in shades of white, charcoal, and soft gray. Add a satin clear coat for a smooth, low-sheen finish. For farmhouse style, use creamy white, sage green, dusty blue, or warm beige. Lightly distress the edges before sealing if you want an aged look.
For a kids’ play table, choose bright color blocks and seal the top with a durable water-based clear coat. For a workshop or craft table, use darker paint colors that hide marks better. For a patio-style table, choose exterior-rated paint and finish, and make sure your base and fasteners are suitable for outdoor conditions.
Budget Breakdown
The cost depends on tabletop size and what supplies you already own. A small table top may require only two or three 2x4s, a plywood panel, glue, primer, paint, and clear coat. If you already have tools and leftover paint, this can be a very budget-friendly project. If you need to buy every tool, the first project costs more, but those tools can be reused for future builds.
To save money, check the scrap bin at home centers, use leftover paint from previous projects, or build a smaller table first. Just do not save money by buying terrible lumber. A cheap board is useful. A twisted cheap board is a wrestling match disguised as a bargain.
Extra Experience: What Building a Painted Block Table Top Teaches You
The first thing this project teaches you is that “cheap” does not have to mean flimsy. A 2×4 block table top can feel surprisingly substantial, especially once all the pieces are glued to a plywood base and sealed. The weight gives the table a sturdy, grounded feeling. It also teaches you to plan ahead, because once the top becomes heavy, flipping it over casually is no longer a one-person ballet.
The second lesson is that lumber selection matters more than beginners expect. At the store, every 2×4 may look similar at first glance. Then you place one end on the floor, sight down the length, and discover that some boards have the posture of a question mark. Taking ten extra minutes to choose straight, dry boards saves hours later. Look down the edge, check for twist, inspect knots, and reject anything that feels damp or unusually heavy.
Another useful experience is learning how much small measurement errors multiply. One block cut slightly long is not a disaster. Twenty blocks cut slightly long can push an entire row out of alignment. A stop block on the saw is one of the best tricks for this project because it turns repetitive cutting into a consistent process. It also saves time and reduces mental math, which is important because mental math in a dusty garage has a way of becoming creative fiction.
Painting the blocks also teaches restraint. It is tempting to use every color available, especially if you have leftover cans from other rooms. But a limited palette usually looks more intentional. Two or three colors can create rhythm without making the tabletop look like a paint store had a parade. If you want a bold design, test the colors on scrap blocks first and arrange them beside the room where the table will live.
The biggest finishing lesson is that clear coat changes everything. Paint alone may look great at first, but a table is a working surface. Coffee cups, plates, books, keys, and cleaning cloths all wear on paint. A protective topcoat adds durability and makes the surface easier to wipe clean. Thin coats are better than thick ones. Sanding lightly between coats feels fussy, but it creates a smoother final surface.
Finally, this project reminds you that handmade furniture does not need to be perfect to be beautiful. A tiny seam, a visible knot, or a slightly varied brush mark can make the piece feel human. The goal is not to make cheap 2x4s pretend they are luxury walnut. The goal is to turn ordinary lumber into a useful, personal, good-looking table top with character. That is the fun of DIY: you start with basic boards, make a little sawdust, question your choices once or twice, and end up with something you can actually use.
Conclusion
Building a painted block table top from cheap 2x4s is a smart DIY project for anyone who wants custom furniture without custom-furniture prices. The process is simple in concept: choose straight lumber, cut consistent blocks, arrange a strong pattern, glue everything to a stable base, sand carefully, paint creatively, and seal thoroughly. The details matter, but none of them are impossible for a patient beginner.
This project works because it combines affordability with creativity. Construction lumber becomes a design feature. Paint turns basic blocks into a pattern. Clear coat turns the painted surface into something practical for daily life. Whether you build a coffee table, side table, desk top, craft table, or statement dining surface, the finished piece will have a story behind itand probably a little sawdust in that story too.