
Table of Contents >> Show >> Hide
- Golden Rules for Getting Stains Out of a White Shirt
- How to Get Specific Stains Out of a White Shirt
- Natural and Gentle Ways to Brighten White Shirts
- What If the Stain Has Already Been Washed and Dried?
- Simple White Shirt Stain-Removal Routine
- Conclusion
- Real-Life Experiences and Extra Tips for Keeping White Shirts Stain-Free
- Keep a mini stain-removal kit handy
- Practice “prevention by routine”
- Collar and cuff care: the quiet heroes
- Understand your fabric type
- Don’t underestimate oxygen bleach soaks
- Repeat treatments are normal, not a failure
- Know when “good enough” is truly good enough
- Build a “tier system” for white shirts
- Make peace with the occasional retirement
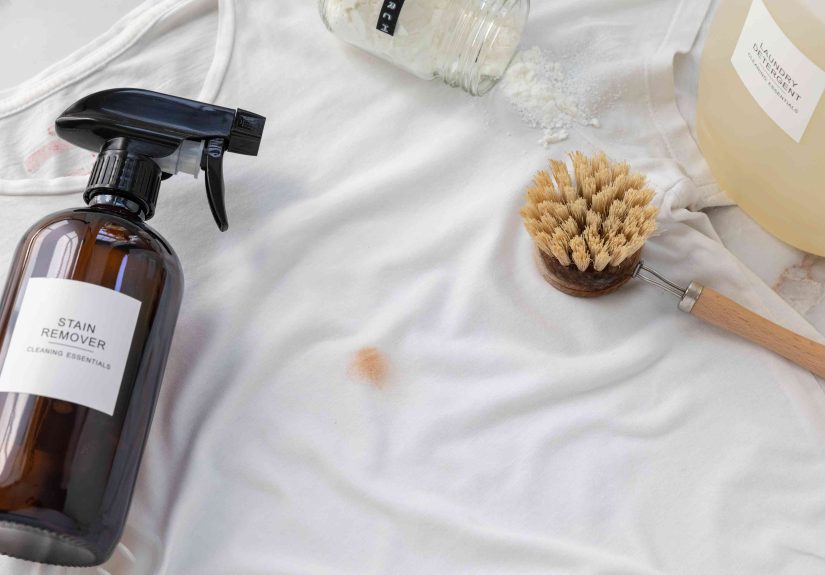
If you’ve ever spilled coffee on a crisp white shirt two minutes before a meeting, you know that special mix of panic and regret. The good news: most stains look dramatic but are totally fixable if you act quickly and use the right method. In this guide, we’ll walk through how to get stains out of a white shirt easily, using simple products you already have at homeand a few tricks laundry pros swear by.
We’ll cover everyday disasters like coffee, red wine, sweat, makeup, oil, and mystery marks. You’ll learn when to reach for cold water versus hot, when bleach is your friend (and when it’s absolutely not), and how to rescue a white shirt even if the stain has already gone through the wash.
Golden Rules for Getting Stains Out of a White Shirt
1. Act fast (but don’t freak out)
The sooner you treat a stain, the better your chances of removing it completely. Fresh stains are still sitting on the surface of the fabric; older ones have already started to set into the fibers. Blot or scrape off any excess as soon as you can, then move on to treating the spot. Think “calm and quick,” not “rub it like you’re trying to erase it from history.”
2. Blot, don’t scrub like crazy
When dealing with liquid stains, always blot with a clean, white cloth or paper towel. Scrubbing aggressively can push pigment deeper into the fibers and can rough up the fabric, especially on delicate cotton or linen. Blot from the outside edge of the stain inward to avoid spreading it into a bigger, sadder circle.
3. Check the care label first
Before you do anything dramatic to a white shirt, check the care tag. If it says “dry clean only,” spot-treating at home is possible in some cases, but strong products like chlorine bleach might damage the fabric or trims. For washable cotton, polyester, and blends, you have more freedom to use detergents, oxygen bleach, or stain removers.
4. Use cold water for most fresh stains
Cold water is usually the safest starting point for white shirt stains. Hot water can “cook” certain stainsespecially protein-based ones like blood, sweat, dairy, or eggmaking them much harder to remove. Rinse from the back of the fabric toward the front so you’re pushing the stain out, not further in.
5. Pre-treat before washing
Instead of tossing your stained white shirt straight in the washer and hoping for the best, treat the spot first. A few options:
- Liquid laundry detergent: Rub a small amount directly into the stain and let it sit for 5–10 minutes before washing.
- Dish soap: Great for oily and greasy stains, especially around collars or food splatters.
- Stain remover spray or gel: Ideal for set-in or tough stainsfollow the label directions for soak time.
6. Air-dry until you’re sure it’s gone
Never put a stained white shirt into the dryer until you’ve confirmed the stain is gone. Heat can permanently set any remaining mark. After washing, air-dry and check the fabric in good light. Still see a faint shadow? Treat and wash again before using the dryer.
How to Get Specific Stains Out of a White Shirt
Coffee and tea stains
Morning coffee + white shirt = classic combo. To remove coffee or tea stains:
- Rinse immediately with cold water from the back of the stain.
- Pre-treat with a few drops of liquid detergent or a mix of mild dish soap and water. Gently work it in with your fingers or a soft toothbrush.
- Soak in cool water for 15–30 minutes if the stain is stubborn.
- Wash on the warmest water temperature safe for the fabric with your usual detergent.
If there’s still a light brown halo, apply a paste of baking soda and water, let it sit for 15–20 minutes, rinse, and rewash.
Red wine stains
Red wine on a white shirt looks like the end of the world, but it’s usually fixable:
- Blot the stain gently to absorb as much wine as possibledon’t rub.
- Rinse with cold water from the back of the fabric.
- Sprinkle salt or baking soda over the damp stain to help draw out pigment. Let it sit for 5–10 minutes.
- Rinse again and pre-treat with liquid detergent or a stain remover.
- Wash on warm (or hot if the fabric care label allows) with a good quality detergent.
For really stubborn wine stains on a white cotton shirt, an oxygen bleach soak (not chlorine, unless the care label says it’s safe) can help lift remaining color.
Tomato, ketchup, and sauce stains
Tomato-based stains are a two-part problem: the red pigment and the oil. To remove them from a white shirt:
- Scrape off any excess sauce with a spoon or blunt knife.
- Rinse with cold water from the back of the stain.
- Apply a bit of liquid detergent or dish soap directly. Gently work it in and let sit 5–10 minutes.
- Wash in warm water with detergent. If the shirt is bleach-safe, you can add non-chlorine oxygen bleach or follow the garment instructions for chlorine bleach on whites.
A second wash or a short soak in an oxygen-bleach solution may be needed for older or deeply colored tomato stains.
Oil and grease stains
Salad dressing, pizza grease, and that mysterious spot on your white shirt that appeared out of nowhere are usually oil-based. Here’s how to deal with them:
- Blot any excess oil with a paper toweldon’t smear.
- Sprinkle baking soda, cornstarch, or baby powder on the stain to absorb oil. Let it sit 10–15 minutes, then brush off.
- Pre-treat with dish soap (which is designed to cut grease). Gently work it into the stain with your fingers or a soft brush.
- Rinse with warm water, then wash in the hottest water safe for the fabric.
Grease stains often look gone when they’re wet but show up again when dry. Always double-check in good light after air-drying.
Makeup and foundation stains
Makeup on a white collar is incredibly common. To remove liquid foundation, concealer, or powder:
- Gently scrape off any thick makeup with a clean edge (like a spoon).
- Pre-treat with a small amount of dish soap or liquid detergent. Gently massage it into the stain.
- For long-wear makeup, a small amount of micellar water or alcohol-based makeup remover on a cotton pad can help break down the pigment. Test in a hidden area first.
- Rinse and wash as usual in warm water.
If the stain lingers, repeat the pre-treatment before drying. Avoid rubbing too hard on delicate fabric around the collar to prevent fraying.
Deodorant and sweat stains
White shirts often develop yellowish underarm stains over time, caused by the reaction between aluminum-based deodorants, sweat, and detergent. To tackle these:
- Mix a paste of equal parts baking soda and water, or baking soda, hydrogen peroxide, and water for heavier stains.
- Apply the paste to the stained area and gently scrub with a soft toothbrush.
- Let it sit for 20–30 minutes.
- Rinse with cool water, then wash in warm water with your usual detergent.
For older, deep yellow stains on white cotton shirts, a soak in an oxygen-bleach solution is often more fabric-friendly than harsh chlorine bleach, while still brightening the fabric.
Ink stains
Ink stains vary by type (ballpoint, gel, or permanent), but a few tricks often work on a white shirt:
- Place an old towel behind the stain to catch the ink.
- Dab with rubbing alcohol or a hand sanitizer that contains alcohol using a cotton ball. You should see the ink transferring onto the cotton or towel.
- Blot, don’t rub, and move to a clean area of the towel as the ink lifts.
- Rinse thoroughly and then pre-treat with detergent before washing.
Permanent marker is tougher, but alcohol-based products or specialized ink removers sometimes lighten the stain enough that it’s barely noticeable on a casual shirt.
Natural and Gentle Ways to Brighten White Shirts
Vinegar and baking soda
Distilled white vinegar and baking soda are laundry all-stars. To freshen and gently whiten white shirts:
- Add 1/2 to 1 cup of white vinegar to the rinse cycle to help remove detergent residue and brighten whites.
- Make a baking soda paste (three parts baking soda to one part water) and apply to dingy areas like collars or cuffs. Let sit for 15–20 minutes before washing.
- For heavier discoloration, soak white shirts in warm water with a mix of detergent and a few tablespoons of baking soda, then wash as usual.
Lemon juice and sunshine
If you like a more “sun-powered” approach, lemon juice plus sunlight can work as a very mild natural bleach for some stains on white cotton:
- Mix lemon juice and water, apply to the stained area, and lay the shirt in direct sunlight for a short time.
- Keep an eye on the shirt to avoid over-drying or weakening delicate fibers.
- Rinse thoroughly afterward and wash as usual.
This trick is especially nice for mild yellowing or general dullness, but avoid using it repeatedly on very delicate fabrics.
When to use bleachand when not to
Chlorine bleach is powerful but can be harsh. Before using it, make sure your white shirt’s care label says it’s safe for bleach. Never use chlorine bleach on:
- Wool or silk
- Items labeled “no bleach”
- Items with certain trims, logos, or contrasting stitching
Oxygen-based bleach (often labeled “color-safe” or “non-chlorine”) is gentler and usually safe for most washable whites. It’s excellent for soaking dingy shirts and lifting general discoloration.
What If the Stain Has Already Been Washed and Dried?
Set-in stains are more stubborn, but not always hopeless. Try this rescue plan for a white shirt that’s already been through the laundry:
- Soak the shirt in warm water with a bit of liquid detergent for 30–60 minutes.
- Apply a concentrated stain remover or a paste of baking soda and water to the mark.
- Let it sit again for 20–30 minutes.
- Wash with oxygen bleach added (if safe for the fabric).
You may not always get a set-in stain 100% perfect, but many can be lightened enough that no one but you knows it’s there.
Simple White Shirt Stain-Removal Routine
If you want a quick mental checklist, here’s a simple routine for how to get stains out of a white shirt easily, no matter what caused it:
- Act fast: Blot or scrape off excess, don’t rub.
- Rinse with cold water: Especially for fresh stains.
- Pre-treat: Use detergent, dish soap, or stain remover suited to the stain type.
- Soak if needed: For 20–30 minutes if the stain is stubborn.
- Wash correctly: Follow the care label and choose water temperature based on stain type.
- Air-dry and re-check: Don’t use the dryer until you’re sure the stain is gone.
Conclusion
White shirts and stains are a lifelong pairing, but that doesn’t mean you have to keep buying new shirts every time life gets messy. With a little know-how, some basic products like detergent, dish soap, baking soda, vinegar, and stain remover, and a few smart habits, you can confidently rescue most spills, splatters, and streaks.
Remember: act fast, be gentle, treat before you wash, and wait to use the dryer until you’re sure the stain has disappeared. Do that, and your favorite white shirt can survive coffee runs, office lunches, date nights, and family parties looking fresh and bright for a long time.
sapo: White shirt + stain = instant panic… but it doesn’t have to equal instant trash. This in-depth guide shows you exactly how to get stains out of a white shirt easily using products you already ownlike detergent, dish soap, baking soda, vinegar, and stain removers. From coffee and red wine to sweat, oil, makeup, and mystery marks, you’ll learn step-by-step methods, fabric-safe tricks, and smart habits that keep your favorite white shirt looking clean, bright, and absolutely wearable again.
Real-Life Experiences and Extra Tips for Keeping White Shirts Stain-Free
Knowing the “rules” of stain removal is greatbut seeing how they work in real life makes them easier to remember. Here are some practical experiences and insights that can help you handle stains on a white shirt with a lot less stress.
Keep a mini stain-removal kit handy
One simple habit that pays off: keep a tiny kit in your bag, car, or desk drawer. It doesn’t have to be fancy. A few stain-removal wipes or pens, a small resealable bag with cotton pads, and a travel-size detergent or dish soap sample can save your favorite shirt on the spot. When you treat stains earlylike right after spilling salad dressing at lunchyou’re stacking the odds in your favor before the stain dries and sets.
Practice “prevention by routine”
If you wear white shirts often for work or school, build a quick check into your evening routine. Before tossing clothes in the hamper, scan underarms, collars, and fronts for any spots. If you catch a stain early, dab it with a bit of water and detergent or stain remover, then let it sit until laundry day. This takes less than a minute but makes a big difference over time.
Collar and cuff care: the quiet heroes
Even when you don’t obviously “stain” a white shirt, grime builds up on collars and cuffs from skin oils, hair products, and daily wear. Many people think their shirts are “worn out” when they’re just dirty in the same places every time. Rubbing a little dish soap or detergent into those areas before every wash keeps them from turning permanently gray or yellow, and it extends the life of your shirts significantly.
Understand your fabric type
Not all white shirts behave the same in the laundry. A thick cotton Oxford can usually handle stronger stain removers and warmer water, while a lightweight, silky white blouse might be more delicate. When you know whether your shirt is mostly cotton, polyester, linen, or a blend, you can pick the safest approach. Cotton is usually the easiest to rescue; delicate fabrics may need more gentle products and shorter soak times.
Don’t underestimate oxygen bleach soaks
Oxygen-based bleach (often in powder form) is a quiet superstar for white shirts. If you have several shirts that look a bit tiredlight yellow patches, dingy cuffs, or old stains that never fully disappearedsoak them together according to the package directions. Many people are surprised by how much brighter their shirts look after a good soak followed by a regular wash cycle. It’s especially handy if you want whitening power without the harshness and risks of chlorine bleach.
Repeat treatments are normal, not a failure
It’s easy to get discouraged if a stain doesn’t vanish after the first try, but tough stains often need two or three rounds of pre-treating and washing. That doesn’t mean your technique failed; it just means the stain was stubborn. As long as you’re air-drying between attempts and avoiding high heat, you can safely retreat again. Patience usually wins.
Know when “good enough” is truly good enough
Some stains may leave the faintest ghost image even after you’ve done everything right. For an everyday white T-shirt, a nearly invisible mark is often completely fineno one is staring at your shoulder from three inches away. Save perfectionism for special pieces like dress shirts you wear to interviews, weddings, or important events. For those, you can be more selective about which shirts stay in rotation.
Build a “tier system” for white shirts
A smart strategy many people use is to create levels for their white shirts. Brand-new and very clean shirts are “Level 1”for important meetings, photos, or special outings. Shirts with minor wear or light fading become “Level 2”perfect for casual days. Anything with a tiny, almost invisible stain that won’t fully budge becomes “Level 3”great for at-home chores, painting projects, or messy cooking. This way, you get the maximum life out of each shirt, and small imperfections stop feeling like a crisis.
Make peace with the occasional retirement
Even with all the right tricks, some white shirts will eventually reach the end of their life in your main wardrobe. That’s not a failureit’s normal. Cotton breaks down, fibers thin, and repeated stains leave subtle traces. When a shirt no longer makes you feel put-together, demote it to “home wear” or repurpose it as cleaning rags. Then, use everything you’ve learned about stain prevention and removal to treat your next white shirt even better from day one.
With these real-life habits and experiences, “how to get stains out of a white shirt easily” becomes less of a question and more of a routine. A spill or smear doesn’t have to ruin your dayor your clotheswhen you know exactly what to do next.


