Table of Contents >> Show >> Hide
- What Does “Curtains with Hooks” Actually Mean?
- Why Use Curtain Hooks Instead of Just Sliding Curtains on a Rod?
- What You Will Need
- Step 1: Measure the Window Like You Mean It
- Step 2: Choose the Right Rod, Rings, or Track
- Step 3: Mark Bracket Placement on the Wall
- Step 4: Install Anchors and Brackets Securely
- Step 5: Insert the Hooks into the Curtain Correctly
- Step 6: Attach Hooks to Rings, Carriers, or the Track
- Step 7: Hang the Rod and Adjust the Panels
- Step 8: Train the Curtains for a Better Drape
- Common Mistakes to Avoid
- Best Rooms for Curtains with Hooks
- Final Thoughts
- Real-World Experiences and Lessons Learned from Hanging Curtains with Hooks
Hanging curtains with hooks sounds like one of those home projects that should take 20 minutes, two screws, and one triumphant sip of coffee. In reality, it often becomes a small emotional journey involving a tape measure, a ladder, and the sudden realization that your “quick fix” is now a full-scale design decision. The good news? Once you understand how curtain hooks work, the whole process gets much easier.
Whether you are working with drapery pin hooks, pleater hooks, ring hooks, or a track-style system, the basic goal is the same: create a clean, balanced, polished look while making sure your curtains actually slide, cover the window properly, and do not look like they gave up halfway to the floor. This guide walks you through the full process, from choosing the right hook setup to installing the rod and styling the final folds like you definitely know what you are doing.
What Does “Curtains with Hooks” Actually Mean?
Before you start drilling anything into the wall, it helps to know what kind of hook setup you have. “Curtains with hooks” is a broad phrase, and that is where a lot of DIY confusion begins.
In most homes, curtain hooks fall into a few common categories. Drapery pin hooks are the sharp metal hooks inserted into the back of the curtain header, usually into a pleat, buckram, or header tape. Pleater hooks are similar, but they are often designed to create evenly spaced pleats for a more tailored, formal look. Ring hooks attach the curtain to decorative rings on a rod, while track or traverse hooks connect to gliders that move along a rail or traverse rod.
If your curtain has pleating tape or stitched pleats on the back, congratulations: you are in hook territory. If your curtain is a rod-pocket or grommet panel, hooks may still work, but only if the curtain is designed with a back tab, hook belt, or reinforced header area. In plain English, do not stab a hook randomly into flimsy fabric and hope for the best. That is not design. That is chaos with hardware.
Why Use Curtain Hooks Instead of Just Sliding Curtains on a Rod?
Hooks are popular because they create a more structured and expensive-looking finish. Curtains hung with hooks tend to drape more neatly, move more smoothly, and look more intentional than panels bunched directly on the rod. They are also a smart solution for heavier drapes, pleated panels, and rooms where you open and close curtains often.
Another bonus: hooks give you flexibility. You can adjust the drop slightly, space pleats more evenly, and create that crisp hotel-style look that makes a room feel taller and more finished. In other words, hooks are the grown-up version of curtain hanging.
What You Will Need
- Curtain panels with pleats, header tape, hook belt, or reinforced header
- Drapery pin hooks or pleater hooks
- Curtain rod, rings, or traverse/track system
- Brackets and mounting hardware
- Tape measure
- Pencil
- Level
- Drill or screwdriver
- Wall anchors if you are not drilling into studs
- Step ladder
- Steamer or iron for wrinkles
Step 1: Measure the Window Like You Mean It
The first step is not hanging the curtains. It is measuring the window properly. Skip this and you may end up with curtain panels that look like they belong to a completely different apartment.
Measure the width of the window from the outside edge of the trim on one side to the outside edge on the other. Then measure the height from the floor to the top of the window trim. This gives you your baseline.
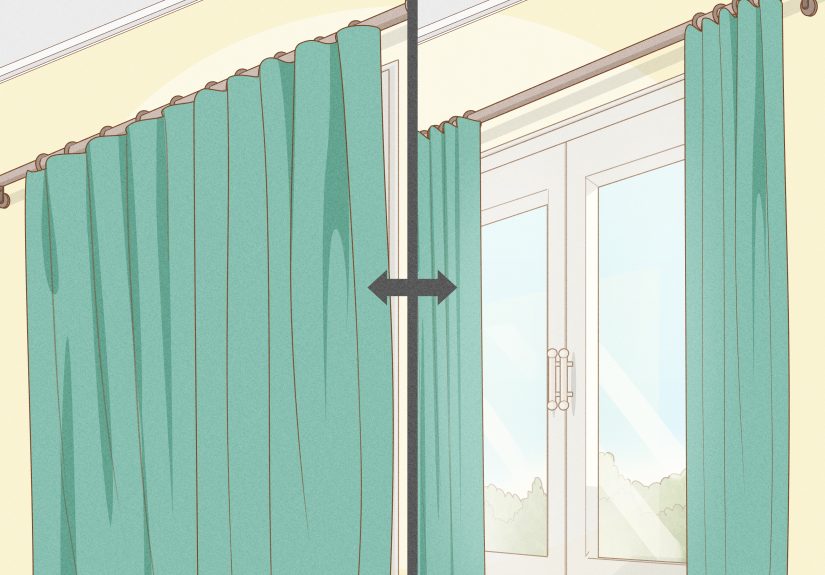
For most rooms, the rod should sit about 4 to 6 inches above the window frame, though you can go closer to the ceiling if you want the room to look taller. The rod should also extend beyond the window frame on each side so the curtains can stack off the glass when open. A common sweet spot is several inches past each side, which helps the window appear wider and lets in more light.
As for curtain width, do not go skimpy. Full-looking curtains usually need total fabric width that is about two times the width of the window. If you want a richer, more luxurious look, go fuller. Sad, skinny curtains are the visual equivalent of a handshake with no confidence.
Step 2: Choose the Right Rod, Rings, or Track
Your hardware has to match both the curtain style and the curtain weight. Lightweight sheers can get away with simpler rods and small hooks. Heavier lined drapes, velvet panels, or blackout curtains need stronger rods, sturdy brackets, and sometimes center support brackets to prevent sagging.
If you are using decorative rings, make sure the hooks fit your rings properly and hang at an even drop. If you are using a traverse rod or ceiling track, confirm that your hook type matches the gliders or carriers. Not all hooks are universal, and hardware incompatibility is a fantastic way to spend an afternoon saying things the curtains do not deserve to hear.
Step 3: Mark Bracket Placement on the Wall
Once you know where the rod should go, mark the bracket locations with a pencil. Use a level. Then use the level again, because walls have a funny way of making your eyes overconfident.
Position the brackets so the rod sits high enough for the curtains to either kiss the floor or hover just above it. That slight hover is practical if you open and close curtains often. A tiny break or puddle can look dramatic, but it also collects dust and may not be ideal in busy rooms, homes with pets, or places where people regularly trip over their own socks.
If your window is wide, install a center bracket for support. This is especially important for heavier curtains. A bowed curtain rod is not “soft modern.” It is just tired.
Step 4: Install Anchors and Brackets Securely
If you can drill into a stud, that is ideal. If not, use the proper wall anchors for your wall type. Drywall alone is not a magical force field. Heavy curtains need actual support.
Drill pilot holes where needed, insert the anchors, and install the brackets firmly. Check again with the level before fully tightening everything. This step is not glamorous, but it is what keeps your curtain setup from making an unexpected entrance onto the floor at 2 a.m.
Step 5: Insert the Hooks into the Curtain Correctly
This is the step that makes people nervous, but it is simpler than it looks. Turn the curtain panel around so you can see the back. If you have pleater tape, insert the hooks into the woven pockets or stitched channels. If you have pleated drapes, slide the pin into the base of each pleat or into the reinforced area behind the pleat.
The important rule is this: insert the pin through the back structure of the curtain, not through the front face of the fabric. You want the hook secure, but invisible from the front. If the sharp end pokes through the visible side, back up and try again. Your goal is “tailored elegance,” not “metal surprise.”
Space the hooks evenly. If you are using pleater hooks with multiple prongs, follow the spacing built into the pleating tape to keep folds uniform. Closer hook placement creates tighter pleats; wider spacing creates a softer, more relaxed wave.
Step 6: Attach Hooks to Rings, Carriers, or the Track
Once the hooks are in, attach each one to a curtain ring, traverse carrier, or track glider. Work from one side to the other so you do not lose your spacing. If you are using decorative rings on a rod, hang all the rings first and then connect the hooks, or thread the rings in the right order before the rod goes fully onto the brackets.
This step is where the curtain starts to look like an actual window treatment instead of an ambitious textile experiment. Make sure each hook sits at the same depth and height. Uneven hooks can make the hemline wobble, and once you notice that wobble, your brain will never let it go.
Step 7: Hang the Rod and Adjust the Panels
With the curtains connected, place the rod onto the brackets or secure the carriers into the track system. Step back and check the overall look. Do the curtains hang evenly? Are the pleats lined up? Is the hem level? Is one side mysteriously shorter even though you measured six times? Welcome to home improvement.
Adjust the hook positions as needed. One benefit of drapery hooks is that you can often raise or lower the panel slightly by changing where the pin sits in the header. This can save you from having to hem a panel that is just a little too long or too short.
Step 8: Train the Curtains for a Better Drape
New curtains, especially pleated or lined ones, may need a little help settling into beautiful folds. Gently arrange the pleats by hand and use soft ties or fabric strips to loosely hold them in place for a day or two. This “training” encourages the curtains to fall neatly instead of puffing out like they are preparing for a Broadway solo.
Steam or iron the panels first if needed. Wrinkled curtains can make even a perfectly installed setup look unfinished. Good drapery should look relaxed, not rumpled.
Common Mistakes to Avoid
Hanging the Rod Too Low
One of the most common mistakes is placing the rod right on top of the window frame. This makes the room feel shorter and the window feel smaller. A little extra height goes a long way.
Choosing Curtains That Are Too Narrow
Curtains need fullness to look intentional. Flat, stretched panels rarely look polished. If the curtains barely cover the glass, they are probably too narrow.
Ignoring Curtain Weight
Heavy drapes need stronger hooks, sturdier rods, and proper anchors. Do not treat blackout velvet like it is a sheer café curtain.
Piercing the Front Fabric with the Hook
This is the classic hook mistake. Insert pins into the back reinforcement only, so the front remains clean and smooth.
Forgetting Function
If you open and close the curtains daily, choose a setup that slides smoothly. Hooked rings or track systems are usually better for frequent use than rod pockets.
Best Rooms for Curtains with Hooks
Hook-hung curtains work especially well in living rooms, dining rooms, bedrooms, and anywhere you want a more tailored appearance. In bedrooms, hooks pair beautifully with blackout drapes because they support weight and help the fabric hang evenly. In formal spaces, pleater hooks create a polished, designer-style line. In living rooms, ring-and-hook combinations strike a nice balance between function and style.
They are also useful for wide windows, French doors, or layered window treatments where you want drapes to move cleanly over sheers or shades. Basically, if the room deserves more than a sad panel from the clearance aisle, hooks are worth considering.
Final Thoughts
Learning how to hang curtains with hooks is one of those deceptively small skills that can dramatically improve a room. The right height makes ceilings feel taller. The right width makes windows feel grander. The right hook placement makes curtains drape beautifully instead of hanging there like confused fabric rectangles.
Take your time with measuring, use the right hardware for the curtain weight, and insert hooks carefully into the reinforced back of the panel. Once everything is level, secure, and properly pleated, your curtains will look cleaner, move better, and make the entire room feel more finished. Not bad for a project that starts with a rod and a little bravery.
Real-World Experiences and Lessons Learned from Hanging Curtains with Hooks
One of the most common real-life experiences people have with curtain hooks is realizing that the curtains looked fine in the package but completely different once they were on the wall. That usually happens because store displays do a lot of heavy lifting. The curtains are steamed, styled, and hung with the exact right spacing. At home, most people open the package, attach a few hooks, and expect immediate magazine magic. The reality is that hooked curtains often need adjustment before they look their best.
A frequent lesson learned is that hook placement matters just as much as rod placement. Many homeowners discover that even when the rod is perfectly level, uneven hook insertion can make the curtain hem look crooked. One pin set a little higher than the rest can throw off the entire panel. It is a small detail, but it changes the final look fast. The easiest fix is to lay the panel flat, insert all hooks at the same depth, and double-check the drop before hanging everything permanently.
Another common experience involves fabric weight. Lightweight linen-look curtains are forgiving. Heavy blackout drapes are not. People often assume any hook will do, then learn the hard way that flimsy hardware and heavy panels are a bad combination. Stronger drapery pins, better anchors, and an extra center bracket can make the difference between a smooth installation and a rod that starts sagging by the weekend.
There is also the very relatable discovery that new curtains rarely drape perfectly on day one. They may flare at the bottom, puff in odd places, or bunch awkwardly near the top. This does not mean you failed. It usually means the curtains need steaming and training. Folding the pleats neatly and loosely tying them for a day or two can dramatically improve the shape. It feels a bit fussy at first, but the before-and-after difference is real.
People who switch from rod-pocket panels to hook-hung curtains often notice something else right away: the curtains are easier to move. That is a big win in bedrooms and living rooms where light control matters. Instead of fighting the fabric across the rod every morning, the panels glide more smoothly and stack more neatly. It is one of those upgrades that seems minor until you live with it.
Finally, many DIYers come away from the project with the same conclusion: curtains have way more visual power than expected. A correctly hung panel can make a low ceiling feel taller, a narrow window feel wider, and an ordinary room feel more finished. That is why the effort pays off. Once the hooks are placed well, the hardware is secure, and the pleats fall correctly, the whole room looks calmer, cleaner, and more deliberate. In the end, hanging curtains with hooks is not just about covering a window. It is about giving the room a better frame.