
Table of Contents >> Show >> Hide
- The Golden Rule: Excel Inserts Rows Above Your Selection
- Method 1: Right-Click Insert (Fast, Simple, Hard to Mess Up)
- Method 2: Ribbon Insert (When Your Mouse Is Already Up There)
- Method 3: Keyboard Shortcuts (For People Who Don’t Like Lifting Their Hands)
- How to Insert Multiple Rows in Excel (Without Doing It One Row at a Time)
- How to Insert Rows Inside an Excel Table (The Fancy, Filterable Kind)
- Real-World Examples (Because “Insert Row” Is Usually Part of a Bigger Problem)
- Common Gotchas (AKA: Why Excel Sometimes Says “No”)
- Troubleshooting Checklist: “Why Can’t I Insert a Row in Excel?”
- Quick Tips to Insert Rows Faster (and Look Cool Doing It)
- Conclusion: The Easiest Way to Insert a New Row in Excel
- of Relatable Row-Inserting Experiences (So You Feel Less Alone)
Inserting a new row in Excel sounds like it should be as simple as “Row, meet spreadsheet. Spreadsheet, meet row.” And most days, it is. But every now and then Excel decides to be… Excelsuddenly your table doesn’t expand, your formulas get spicy, and your carefully aligned sheet looks like it got hit by a small earthquake.
This guide walks you through the quickest ways to insert a new row in Excel (Windows, Mac, and Excel for the web), plus how to add multiple rows, how it works inside Excel Tables, and what to do when Excel refuses to cooperate like a toddler in a tuxedo.
The Golden Rule: Excel Inserts Rows Above Your Selection
Before we start clicking and shortcutting: Excel’s default behavior is consistentwhen you insert a row, it appears above the selected row (or above the row containing your active cell). If you want a row “below,” select the row below the spot where you want the new one to land.
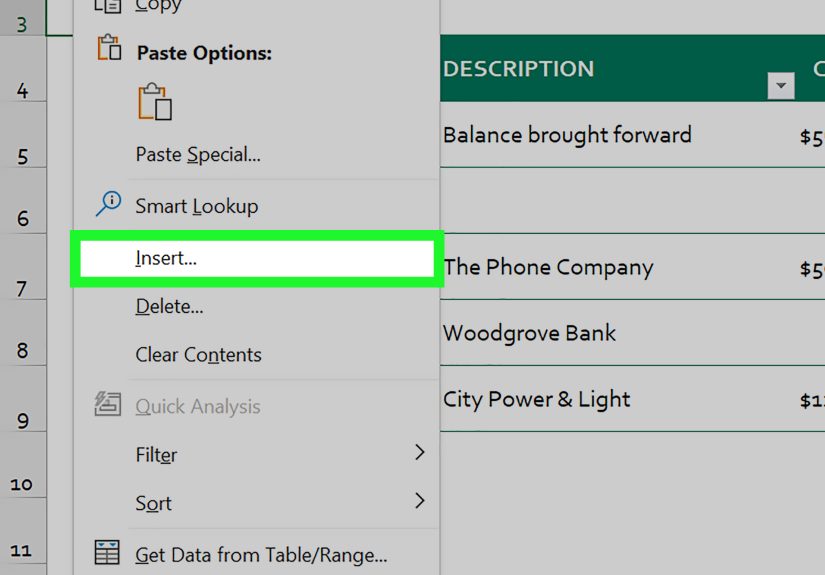
Method 1: Right-Click Insert (Fast, Simple, Hard to Mess Up)
Insert a single new row
- Click the row number on the left (for example, click 7 to select Row 7).
- Right-click the selected row number.
- Choose Insert.
Excel inserts a blank row above the row you selected, pushing everything down like a polite crowd making space.
Insert a row from a single cell (no need to select the whole row)
- Click any cell in the row near where you want the new row.
- Right-click and choose Insert.
- If prompted, choose Entire row.
Method 2: Ribbon Insert (When Your Mouse Is Already Up There)
If you prefer the Ribbon (or you’re teaching someone and want a “visible” method), here’s the clean path:
- Select a cell in the row where you want the new row inserted above.
- Go to Home → in the Cells group, click Insert.
- Choose Insert Sheet Rows.
Bonus: the Ribbon method is great when you’re also formatting, adjusting widths, or generally living your best spreadsheet life.
Method 3: Keyboard Shortcuts (For People Who Don’t Like Lifting Their Hands)
Keyboard shortcuts are the speed-run route to adding a row in Excel. Once you get the muscle memory, you’ll feel like a spreadsheet wizardminus the robe, unless that’s your vibe.
Windows shortcut: Insert a new row with Ctrl + Shift + +
- Select the row (click the row number) or place your cursor in the row.
- Press Ctrl + Shift + + (plus sign).
Practical note: on many keyboards, the plus sign is the shifted version of =. So you may actually press: Ctrl + Shift + = and Excel still understands you meant “plus.”
Mac shortcut: Insert a new row with Command + Shift + +
- Select the row (or click a cell in it).
- Press Command + Shift + +.
Old-school (still works): Alt, then I, then R (Windows)
If you’ve ever met someone who still calls the Ribbon “the new menu,” this is their favorite: press Alt, then I, then R to insert a row. It’s surprisingly handy on laptops where the plus shortcut is awkward.
Speed tip: Select the whole row instantly
- Shift + Space selects the entire row of the active cell.
- Then use your insert shortcut (Ctrl + Shift + + on Windows, Command + Shift + + on Mac).
How to Insert Multiple Rows in Excel (Without Doing It One Row at a Time)
Inserting multiple rows is delightfully logical: Excel inserts the same number of new rows as the number of rows you select. So if you want 5 new rows, select 5 rows. Excel is many things, but it is not subtle about this one.
Insert multiple blank rows above a spot
- Select the same number of existing rows where you want the blanks inserted above.
- Right-click the selection and choose Insert (or use the Ribbon).
Example: You want 3 new rows above Row 10. Select Rows 10–12, right-click, and choose Insert. Excel adds 3 new blank rows above Row 10.
Insert multiple rows with a shortcut
- Select the number of rows you want to add.
- Use Ctrl + Shift + + (Windows) or Command + Shift + + (Mac).
If Excel opens an “Insert” dialog box (depending on selection), choose Entire row.
Pro move: Jump-select a huge row range using the Name Box
Need to insert, say, 200 rows? Scrolling and dragging is a great way to develop a deep personal grudge against your mouse. Instead, use the Name Box (left of the formula bar) to select a range like 20:219, then insert. Excel will add the full number of rows in one shot.
How to Insert Rows Inside an Excel Table (The Fancy, Filterable Kind)
Excel Tables (created via Insert → Table or Ctrl + T) behave differentlyin a good way. They auto-expand, carry formulas down, and keep formatting consistent… most of the time.
Add a new row at the end of a table with the Tab key
- Click the last cell in the last row of the table (usually bottom-right).
- Press Tab.
Excel creates a new table row and keeps the table style and calculated columns going. It’s one of the cleanest “add a row” experiences in the entire Microsoft universe.
Add a table row above or below
- Click a cell in the table near where you want the row.
- Go to the Table (or Table Layout) tab.
- Choose Insert Above or Insert Below.
Quick-add by typing below the table
If you start typing directly below a table, Excel often expands the table to include the new row automatically. It’s like Excel seeing you work and deciding, for once, to be helpful.
Real-World Examples (Because “Insert Row” Is Usually Part of a Bigger Problem)
Example 1: Adding a new customer to a sales tracker
You have a sales sheet with headers in Row 1 and customer records starting in Row 2. A new customer needs to be added between two existing records (because the list is sorted by region, name, or “who yelled the loudest in the meeting”).
- Click the row number where the new customer should appear above.
- Right-click → Insert.
- Enter the new customer details.
- If your sheet uses formulas (like totals), confirm they expanded or copy them down if needed.
Example 2: Keeping formulas and formatting intact in a budget template
In templates, formulas often reference ranges like A2:A20. When you insert a row inside that range, Excel typically adjusts references automatically. But if your sheet uses hard-coded ranges or stitched-together logic (we’ve all inherited one), sanity-check totals after inserting.
Tip: If you insert within an Excel Table, “calculated columns” usually fill down automatically, which is exactly the kind of magic we want from software.
Common Gotchas (AKA: Why Excel Sometimes Says “No”)
1) The worksheet is protected
If the sheet is protected (often in shared templates), Excel may block inserting rows. Look for protection settings under Review and remove protection if you’re allowed to. If you’re not allowed… congratulations, you’ve discovered governance.
2) Merged cells are in the way
Merged cells can interfere with inserting rows cleanly, especially if merges cross multiple columns in the insert area. If inserts behave weirdly, check for merges nearby and consider unmerging in the working section.
3) You’re inserting in a filtered range
In filtered data, inserted rows can appear but may be hidden immediately if they don’t match the filter criteria. If you insert a row and it “vanishes,” clear or adjust the filter to confirm where it went.
4) Your table formatting doesn’t extend the way you expect
Sometimes a table stops auto-formatting new rows the way you want (for example, a column suddenly becomes “General” instead of Currency). When that happens, check table styles, clear inconsistent formatting in the last rows, and verify the column formatting rules.
5) You meant “Insert a row,” but Excel thinks you meant “Insert cells”
If you insert from a cell selection instead of selecting the full row, Excel may ask whether to shift cells down or insert an entire row. When in doubt and you truly want a new row, choose Entire row.
Troubleshooting Checklist: “Why Can’t I Insert a Row in Excel?”
- Check protection: Is the sheet protected or workbook restricted?
- Look for merges: Merged cells near the insertion area can block or distort inserts.
- Confirm filters: The row might be inserted but hidden by current filters.
- Table boundaries: Are you working inside an Excel Table with special rules?
- Try selecting the entire row: Click the row number, then insert again.
- Use the Ribbon: Home → Insert → Insert Sheet Rows (helps avoid ambiguous “insert cells”).
Quick Tips to Insert Rows Faster (and Look Cool Doing It)
- Keyboard power combo: Shift + Space (select row) then Ctrl + Shift + + (insert) on Windows.
- Insert multiple rows: Select 10 rows, insert once, get 10 new rows. Excel is generous when you’re specific.
- Tables are your friend: Convert ranges to a Table (Ctrl + T) for easier row adds, consistent formatting, and auto-fill formulas.
- Don’t fight the “above” rule: Select the row below where you want space, then insert.
Conclusion: The Easiest Way to Insert a New Row in Excel
For most people, the fastest method is: select the row number, then right-click → Insert. If you want maximum speed, use shortcuts: Ctrl + Shift + + on Windows or Command + Shift + + on Mac. And if you’re working with structured data, consider using an Excel Table so adding a row feels more like “done” and less like “why is my formatting mad at me.”
of Relatable Row-Inserting Experiences (So You Feel Less Alone)
There’s a special kind of confidence that comes from thinking, “I’ll just insert one quick row,” and then watching your spreadsheet react like you pulled a Jenga block from the bottom. If you’ve ever inserted a row and immediately whispered, “Oh no,” you’re in excellent company.
One common experience: you’re updating a tracker five minutes before a meeting. Someone pings you, “Can you add two new items between these rows?” Easy. You select one row, insert, repeat, insert againonly to realize Excel politely inserted both rows above the selection each time, so your new items are now out of order. The fix is simple (select the row below where you want space, then insert), but the emotional damage is real.
Another classic moment happens with filters. You insert a row, type your data, and it disappears. You stare at the sheet like it just performed a magic trick. In reality, the row is thereit just doesn’t match your filter criteria, so Excel hides it instantly. The “Aha!” comes when you clear the filter and your “missing” row reappears, sitting there innocently, as if it didn’t just cause you to question reality.
Then there’s the “template trap.” Templates are great until they aren’t. You insert a row into a budget sheet and your totals don’t update because the formula range stopped at Row 20 back in 2019, when someone decided that was plenty of future-proofing. You add a line item in Row 21 and the grand total ignores it like it’s an unsolicited group chat. This is where Excel Tables shine: when your data lives in a Table, formulas and formatting usually expand automatically, and your totals are less likely to betray you in public.
Formatting can also get weird in the most passive-aggressive way possible. You insert a row and suddenly one column is no longer Currency, your borders go missing, or your conditional formatting highlights the wrong range like it’s trying to start drama. The experience teaches a valuable lesson: inserting rows is easy; keeping the sheet consistent is the real sport. When you’re working in a formatted table, using Tab to add rows often keeps everything tidy. When you’re not, it helps to copy a “good” row’s formatting (or use Format Painter) so the new row doesn’t show up dressed for a different party.
The best part? Once you’ve lived through these moments, inserting rows becomes less of a “task” and more of a small ritual: select wisely, insert confidently, and alwaysalwaysglance at your totals afterward. Excel may not clap, but your future self will.


