Table of Contents >> Show >> Hide
- Before You Touch Anything: Safety (and a Little Code Reality)
- Tools and Materials You’ll Actually Use
- Step 1: Inspect What’s in Your Ceiling
- Step 2: Choose Your Support Method
- Step 3: Turn Off Power and Remove the Existing Fixture
- Step 4: Remove the Old Box (If It’s Not Fan-Rated)
- Step 5: Install a Fan-Rated Box or Retrofit Brace
- Step 6: Install the Ceiling Fan Mounting Bracket
- Step 7: Prep the Fan (Downrod vs. Flush Mount)
- Step 8: Hang the Fan on the Bracket
- Step 9: Wire It Up (Neat and Correct)
- Step 10: Secure the Canopy and Finish Assembly
- Step 11: Restore Power and Test Like a Pro
- Common Problems and Quick Fixes
- When You Should Call an Electrician
- Final Checklist (A.K.A. “Did We Actually Tighten Everything?”)
- of Real-World Experience: What Actually Happens Up There
A ceiling fan mounting bracket is one of those humble pieces of hardware that does not look impressive… right up until it fails.
And when it fails, it fails loudly, wobbly, and with the kind of drama that makes pets suspicious of ceilings forever.
The good news: installing a fan mounting bracket correctly is very doable for a careful DIYer.
The better news: doing it right usually means your fan runs quieter, steadier, and doesn’t try to moonwalk across the ceiling at high speed.
This guide walks you through the real-world process: choosing the right support method, swapping in a fan-rated box/brace if needed,
mounting the bracket properly, and avoiding the classic mistakes (like “tighten into drywall and hope for the best,” a strategy favored by raccoons and nobody else).
Before You Touch Anything: Safety (and a Little Code Reality)
- Turn off the breaker that feeds the ceiling box. Don’t rely on the wall switch.
- Confirm power is off with a non-contact tester and/or a multimeter at the box.
- Use a fan-rated outlet box or a system designed for fan support. A typical light-fixture box is often not designed for the weight and vibration of a fan.
- If you see brittle insulation, aluminum wiring, scorched wires, or mystery splices, pause and call a pro.
Tools and Materials You’ll Actually Use
Tools
- Non-contact voltage tester (and ideally a multimeter)
- Phillips and flathead screwdrivers
- Drill/driver with bits (including a small pilot bit)
- Wire strippers/cutters
- Needle-nose pliers
- Drywall saw or keyhole saw (if the hole needs resizing)
- Step ladder (tall enough that you’re not installing a fan while doing a calf workout)
Materials
- Ceiling fan mounting bracket (usually included with the fan)
- Fan-rated electrical box and/or retrofit fan brace system (as needed)
- Wire connectors (wire nuts) and electrical tape
- Correct mounting screws (machine screws for the box; wood screws only into framing when allowed by the manufacturer)
- Optional: fan balancing kit (cheap insurance against wobble)
Step 1: Inspect What’s in Your Ceiling
Start by removing the existing light fixture (after confirming the power is off).
Once the fixture is down, look at the box and how it’s mounted. Your goal is to answer one question:
Is this box and support system rated to carry a ceiling fan?
What you’re looking for
- Fan-rated marking on the box or packaging (often “Ceiling Fan Support,” “Fan Rated,” or a weight rating).
- Solid attachment to framing (a joist or an approved brace between joists).
- Machine-screw mounting holes that accept the bracket screws snugly (no stripped-out threads).
If the box is thin plastic, loosely mounted, or only attached to drywall, treat it as a “no.”
Ceiling fans don’t just hang there; they vibrate, start, stop, and amplify small looseness into big wobble.
Step 2: Choose Your Support Method
The bracket is only as good as what it’s fastened to. Here are the most common “right ways” to support a fan:
Option A: Fan-rated box mounted directly to a ceiling joist
This is the simplest and strongest scenario. A fan-rated metal (or heavy-duty listed) box is screwed to the joist.
Your mounting bracket then attaches to that box using the proper machine screws.
Option B: Retrofit fan brace between joists (old-work support)
No attic access? Finished ceiling? Joists not conveniently located where the fan goes?
A retrofit fan brace is designed for exactly that: it expands between joists and provides a fan-rated box or mounting point.
This avoids opening up the ceiling like you’re auditioning for a demolition show.
Option C: Added framing (attic access or open ceiling)
If you can get above the ceiling or you’re renovating, you can add blocking between joists (wood framing)
so the fan-rated box and bracket can be fastened directly into solid structure.
Step 3: Turn Off Power and Remove the Existing Fixture
- Shut off the breaker.
- Confirm power is off at the ceiling wires.
- Remove the fixture canopy and mounting screws.
- Support the fixture while you disconnect wire connectors.
- Take a quick photo of the wiring before you separate everything. Future You will be grateful.
Step 4: Remove the Old Box (If It’s Not Fan-Rated)
Boxes are attached in different ways: nails to a joist, a side-mount bracket, or an old-work clamp style.
Remove it carefully, keeping wires intact and not yanking on cable sheathing.
Tip that saves drywall repair time
If the hole needs to be enlarged for a new fan-rated box, trace the new box outline and cut slowly.
A tight, clean hole makes the final canopy look intentional (instead of “we fought the ceiling and the ceiling won”).
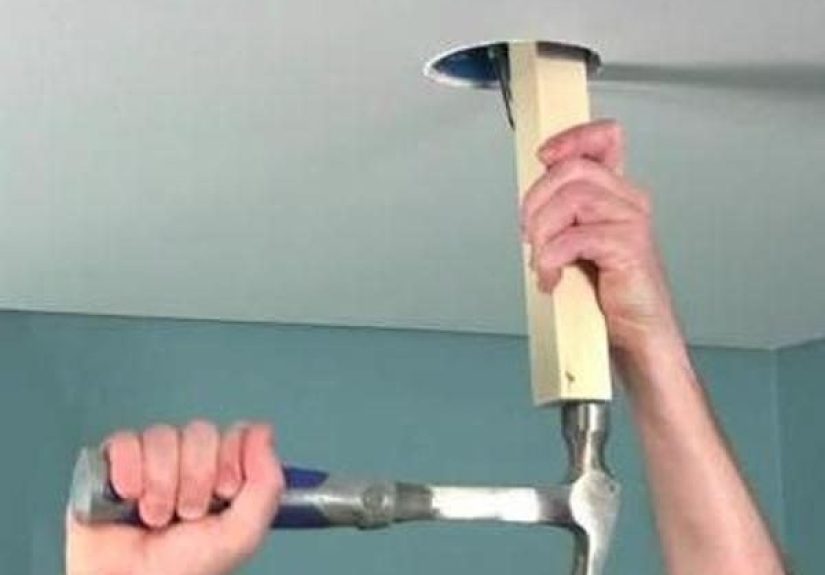
Step 5: Install a Fan-Rated Box or Retrofit Brace
If you’re mounting to a joist
- Hold the fan-rated box in position centered on the joist.
- Feed the cable through a knockout using an appropriate connector/clamp.
- Fasten the box to the joist with the manufacturer-approved screws.
- Confirm the box is snug, square, and does not wiggle.
If you’re using a retrofit brace between joists
- Insert the brace through the ceiling hole.
- Position it so the ends land on solid joists.
- Expand/tighten the brace per the kit design until it bites firmly into the wood.
- Attach the fan-rated box to the brace (or slide it into the brace saddle, depending on the system).
- Pull the cable into the new box and secure it with the included connector/clamp.
After this step, grab the box and try to move it. You want “rock solid,” not “mostly confident.”
If there’s any movement, fix it now. Wobble later is harder to diagnose and more annoying.
Step 6: Install the Ceiling Fan Mounting Bracket
Now we’re at the star of the show: the mounting bracket (also called a hanger bracket or ceiling plate).
Most fans include a bracket designed for their specific downrod/ball system or low-profile mount.
Use the bracket that came with your fan.
How to fasten it correctly
- Hold the bracket against the box so it’s oriented correctly (many have an arrow or “UP” marking).
- Use the correct machine screws in the threaded holes of the fan-rated box.
- Tighten evenly. If the bracket uses a slotted design, keep it centered so the canopy sits neatly.
- If the manufacturer calls for pilot holes into framing (some do when wood screws are used into structure),
drill the recommended pilot size rather than forcing screws and splitting wood.
Bracket alignment reality check
A slightly crooked bracket can turn into a visibly crooked canopy once the fan is hanging.
Use the edges of the box and ceiling opening as reference points. If you have a small torpedo level, this is its moment.
Step 7: Prep the Fan (Downrod vs. Flush Mount)
Downrod-mounted fans
- Slide the canopy and trim ring onto the downrod first (everyone forgets once).
- Feed the wires through the downrod.
- Secure the downrod to the motor housing using the locking pin/screw method specified by the manufacturer.
Low-profile (hugger) fans
- These often mount the motor directly to a special bracket.
- Space is tighter, so plan wiring neatly and keep connectors compact.
Step 8: Hang the Fan on the Bracket
Many brackets include a temporary hook or a “hanging cradle” so you can rest the fan while wiring.
Use it. This is the difference between a calm install and doing overhead deadlifts with a motor housing.
- Lift the fan assembly and seat the downrod ball (or mounting tabs) into the bracket.
- Confirm it’s fully engaged in the bracket slot and cannot slip out.
- Make sure the canopy can slide up later without being blocked by wiring.
Step 9: Wire It Up (Neat and Correct)
Wiring varies by fan and by what your ceiling provides (single switch, separate fan/light switches, remote receiver, etc.).
Always follow the fan’s manual, but these are common pairings:
- Ground: bare/green from house to green from fan (and to the metal box ground screw if present)
- Neutral: white to white
- Fan motor hot: typically black fan wire to house hot
- Light kit hot: often blue fan wire to switched hot (or combined hot, depending on setup)
Wiring tips that prevent future misery
- Make solid splices: twist conductors neatly, then install wire connectors firmly.
- Tuck wires so the canopy won’t pinch them. Pinched wires can cause flicker, shorts, or breaker trips.
- If using a remote receiver, plan space: place it where the manufacturer recommends, usually above the bracket in the canopy area.
Step 10: Secure the Canopy and Finish Assembly
- Slide the canopy up to the ceiling and align it with the bracket screws.
- Install canopy screws and tighten until snug (do not overtighten and strip threads).
- Attach blade brackets (blade irons) to the motor, then blades to the irons.
- If your fan includes a light kit, install it per instructions and add bulbs/shades.
Step 11: Restore Power and Test Like a Pro
- Turn the breaker back on.
- Test the fan on low speed first, then medium, then high.
- Listen for rubbing, clicking, or grinding (those are not “break-in sounds,” they are “fix me” sounds).
- Check for wobble. If it wobbles, confirm blades are tight and seated evenly, then use a balancing kit if needed.
Common Problems and Quick Fixes
The canopy won’t sit flush
- Wires are bunched in the wrong spot (re-tuck them).
- The bracket is crooked or not fully seated (re-align and retighten).
- A remote receiver is blocking the canopy (reposition it per the manual).
The fan wobbles on high
- Confirm all blade screws are tight.
- Check that blade irons are fully seated and not bent.
- Use the balancing kit: move the weight until wobble improves, then stick it permanently.
- Verify the box and bracket are solid. No bracket can “balance out” a loose ceiling box.
There’s a clicking sound
- A wire connector may be tapping the canopy.
- A blade screw may be slightly loose.
- The downrod ball may not be fully seated in the bracket slot.
When You Should Call an Electrician
- You find aluminum wiring or damaged insulation.
- The ceiling box has multiple circuits and unclear splices.
- You can’t secure a fan-rated box/brace to structural framing.
- Your breaker trips immediately after wiring.
Final Checklist (A.K.A. “Did We Actually Tighten Everything?”)
- Fan-rated support installed and solid
- Bracket fastened with correct screws
- Downrod/flush mount fully seated and locked
- Wire connectors tight, wires tucked safely
- Canopy secured, no pinched wires
- Blades tight and evenly installed
- Tested on low/medium/high with no excessive wobble
of Real-World Experience: What Actually Happens Up There
I’ve learned that the hardest part of installing a ceiling fan mounting bracket is not the bracket.
It’s the ceiling’s personality. Ceilings come in at least three emotional types: “helpful,” “neutral,” and “this house was built during a jazz era and nothing is standard.”
Here are a few real-world lessons that don’t always show up in tidy instruction diagrams.
Experience #1: The “Surprise Box” that looked sturdy (until it wasn’t)
A common trap is assuming a metal box is automatically fan-rated. I once opened up a ceiling fixture and felt optimistic:
metal box, decent screws, no wobble. Then I looked closer and realized the box was mounted with a flimsy bracket meant for a light,
not a fan. It wasn’t loose yetbecause it hadn’t been challenged yet. The moment you add a fan, vibration becomes a daily stress test.
The fix was straightforward: swap in a retrofit fan brace and fan-rated box. The lesson: don’t judge a box by its material; judge it by its rating and how it’s fastened.
Experience #2: The canopy “refused” to sit flush (because my wiring was a burrito)
The first time you install a bracket and hang a fan, you think: “I will neatly tuck these wires.”
Then you discover that gravity, short conductors, and a remote receiver have teamed up against you.
The canopy wouldn’t seat, and I kept blaming the bracket alignmentuntil I opened it back up and saw the real issue:
wire connectors stacked like a pile of marbles right where the canopy needed to go.
What worked was treating the box like a tiny closet: put bulky items (connectors) deeper in the box,
route the ground neatly, and keep the receiver in the position the manufacturer intended.
After that, the canopy slid up like it belonged there all along. The lesson: canopy fit is often a wiring management problem, not a bracket problem.
Experience #3: The “high-speed wobble” that was actually a bracket problem
People love to blame blades for wobbleand yes, blades matterbut one install taught me to check the bracket first.
The fan looked fine on low and medium, but on high it developed a wobble that made the light kit look like it was waving hello.
A balancing kit helped a little, but not enough. The real culprit was that one bracket screw was fully tight,
and the other was tight-ish… into slightly compromised threads. So the bracket had a tiny amount of play.
I replaced the box (since fan-rated boxes have proper threaded holes for the bracket), re-mounted the bracket with correct machine screws,
and the wobble disappeared without any balancing weights at all. The lesson: before you chase blade balance for an hour, confirm the bracket and box are absolutely solid.
If there’s one “experienced DIYer” mindset to adopt, it’s this: ceiling fans are forgiving about cosmetics and unforgiving about structure.
Spend your patience on the box and bracket, and the rest of the install becomes a victory lap.