
Table of Contents >> Show >> Hide
- Why Cork Flooring Is Worth the Effort
- Step 1: Decide Which Type of Cork Floor You Are Installing
- Step 2: Make Sure Cork Is a Good Match for the Room
- Step 3: Gather Tools and Materials Before the First Box Gets Opened
- Step 4: Let the Cork Acclimate
- Step 5: Prep the Subfloor Like a Perfectionist With a Tape Measure
- Step 6: Install the Moisture Barrier or Underlayment If Required
- Step 7: Remove Baseboards and Undercut Door Jambs
- Step 8: Plan the Layout Before You Install a Single Piece
- Step 9A: Install Floating Cork Planks
- Step 9B: Install Glue-Down Cork Tiles
- Step 10: Install Transitions, Reinstall Trim, and Let the Floor Rest
- Common Mistakes to Avoid
- What Cork Floor Installation Usually Costs
- How To Care for a Newly Installed Cork Floor
- Real-World Experience: What Installing a Cork Floor Actually Feels Like
- Conclusion
Installing a cork floor is one of those home projects that looks suspiciously easy in the brochure and mildly character-building in real life. The good news is that it really can be a smart DIY job, especially if you choose floating click-lock cork planks instead of old-school glue-down tiles. Cork flooring is warm, quiet, comfortable underfoot, and easier on your knees than tile. It also brings natural texture and a softer feel that makes a room feel less like a showroom and more like a home where humans actually walk around in socks.
But cork has one very honest personality trait: it refuses to hide a bad subfloor. If the floor underneath is damp, wavy, dirty, or uneven, cork will absolutely let everyone know. So the real secret to installing a cork floor is not brute force or fancy tools. It is preparation. Get the prep right, and the install feels smooth. Rush the prep, and your floor may squeak, gap, buckle, or generally behave like it is holding a grudge.
This guide walks you through the full process step by step, including how to choose the right type of cork, prep the subfloor, install floating planks or glue-down tiles, and avoid the mistakes that turn a relaxing weekend project into a dramatic monologue in the hardware aisle.
Why Cork Flooring Is Worth the Effort
Before getting into sawdust and spacers, it helps to understand why cork flooring has such loyal fans. Cork is made from the bark of the cork oak tree, so it is a renewable material. It naturally provides insulation for both sound and temperature, which means rooms feel quieter and a little warmer underfoot than they do with many other hard-surface floors. It is also softer than hardwood, which is wonderful for standing but less wonderful if you drag a piano across it like you are in a music video.
That softness is both a selling point and a caution sign. Cork is comfortable, but it is not indestructible. Heavy furniture, pet nails, standing water, and high humidity can all create problems if the floor is poorly installed or poorly maintained. In other words, cork is lovely, but it appreciates being treated like flooring and not a battlefield.
Step 1: Decide Which Type of Cork Floor You Are Installing
Floating Cork Planks
Floating cork floors click together and rest over the subfloor rather than being glued directly to it. This is the more DIY-friendly option. It is faster, cleaner, and usually better for homeowners who want a simpler installation. It also works well over many existing hard surfaces as long as the floor below is flat, dry, and solid.
Glue-Down Cork Tiles
Glue-down cork tiles are installed directly to the subfloor with a manufacturer-approved adhesive. They give a more custom, seamless look and can be an excellent choice in the right room, but they demand more precision. The subfloor has to be extremely smooth and dry, and the adhesive process is much less forgiving. If floating cork is a friendly weekend project, glue-down cork is the version that expects you to read the instructions twice and mean it.
Step 2: Make Sure Cork Is a Good Match for the Room
Cork works beautifully in bedrooms, living rooms, home offices, finished basements that are dry and properly protected, and many kitchens if spills are cleaned up quickly. It is usually a poor choice for rooms that stay wet, deal with frequent standing water, or live a rough, splashy life. Full bathrooms, laundry rooms, and muddy entry areas are not ideal unless the specific product is rated for that use and you are managing moisture very carefully.
That matters because cork is water-resistant when sealed, not waterproof in the magical, superhero sense. If you want a floor that can shrug off repeated soaking, cork is probably not auditioning for that role.
Step 3: Gather Tools and Materials Before the First Box Gets Opened
Your exact tool list depends on the product, but most cork flooring jobs need:
- Measuring tape
- Chalk line or pencil
- Level or straightedge
- Utility knife, jigsaw, miter saw, or circular saw depending on the product
- Spacers
- Tapping block and rubber mallet for floating floors
- Moisture barrier for concrete when required
- Underlayment if your product calls for it
- Adhesive and roller for glue-down tiles
- Vacuum, broom, and cleaning cloths
- Transition strips and trim pieces
Also buy a little extra flooring. A small waste allowance covers bad cuts, damaged pieces, and future repairs. It is much nicer to have one extra carton in the closet than to discover your exact style disappeared from the planet three months later.
Step 4: Let the Cork Acclimate
This step is easy to ignore and surprisingly expensive to ignore. Cork needs time to adjust to the room where it will be installed. Many manufacturers recommend acclimating the flooring for at least 48 to 72 hours, while some products and climates call for more. Keep the room at normal living conditions, not “renovation cave” conditions. That means stable indoor temperature and humidity, not blazing heat one day and tropical dampness the next.
For floating planks, leave the material in the room and follow the product instructions about whether boxes stay sealed or opened. For glue-down tiles, read the manufacturer directions closely because some brands want outer cartons opened while interior packaging stays in place until installation day. The point is simple: let the material settle before you lock, glue, cut, or panic.
Step 5: Prep the Subfloor Like a Perfectionist With a Tape Measure
If there is one part of the project that determines whether your floor looks professional, this is it. The subfloor must be clean, dry, structurally sound, and flat. Not “looks fine from the doorway” flat. Actually flat. Cork can telegraph imperfections, meaning every dip, hump, seam, and crusty mystery bump may show up in the finished floor.
Remove old carpet. Pull staples. Scrape away residue. Fix squeaks. Replace water-damaged subflooring. Sand high spots and fill low spots with the appropriate leveling compound. Many cork installation guides call for flatness within about 3/16 inch over 10 feet or 1/8 inch over 6 feet. That is your cue to stop eyeballing and start measuring.
If you are installing over concrete, pay extra attention to moisture. New slabs may need substantial cure time before cork goes down, and most manufacturers want documented moisture testing. A concrete floor can look bone dry while secretly plotting your flooring’s downfall. Test first. Regret less.
Step 6: Install the Moisture Barrier or Underlayment If Required
For floating cork over concrete, many manufacturers require a 6-mil polyethylene vapor barrier. Typically, the plastic runs wall to wall, overlaps at the seams, and gets taped together. Some systems also call for the plastic to run slightly up the wall behind the baseboard. Do not skip this step because the floor “seems dry.” Moisture is sneaky, patient, and annoying.
Use only the underlayment specified for your flooring. Some cork products include an attached backing, while others do not want soft foam underneath at all. This is not the moment to improvise with leftover mystery padding from a different project in the garage.
Step 7: Remove Baseboards and Undercut Door Jambs
Take off baseboards if possible for a cleaner finish. You can reuse them later. Undercut door casings and jambs so the cork can slide underneath instead of leaving awkward little trim puzzles for your future self to solve. The easiest trick is to place a scrap of flooring and underlayment next to the casing and use it as a height guide while trimming.
Step 8: Plan the Layout Before You Install a Single Piece
For floating planks, start along the longest, straightest uninterrupted wall in the room. Measure the room and do a quick layout check so you do not end up with a final row that is comically tiny. If the last row would be too narrow, trim the first row so the layout looks balanced.
For glue-down tiles, mark the center of the room and snap chalk lines to create square layout sections. Dry-lay a few tiles first to see how the pattern looks and to avoid ending with ugly little slivers at the walls. Mix pieces from different cartons as you work so the floor looks natural rather than striped like it was assigned seating.
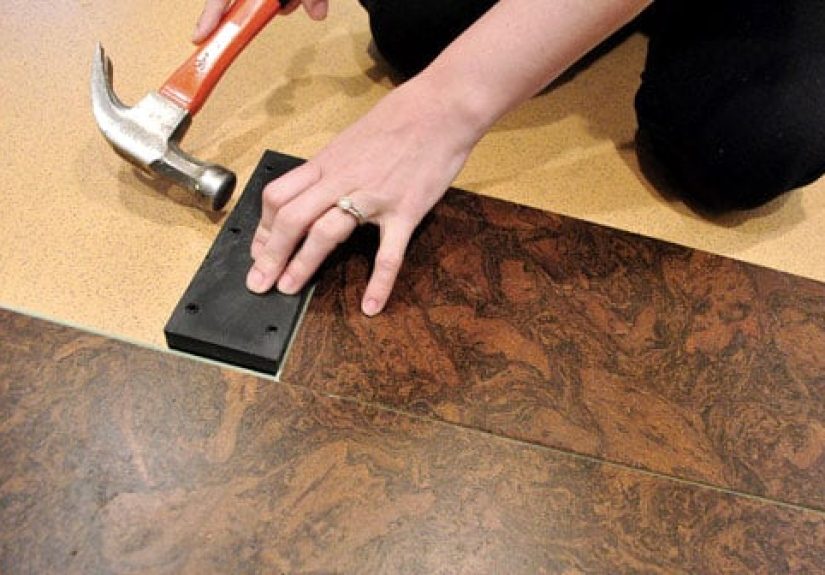
Step 9A: Install Floating Cork Planks
- Place spacers around the perimeter to maintain the expansion gap. Many floating cork products call for about 3/8 inch, but always follow your flooring instructions.
- Lay the first row with the tongue or groove oriented according to the manufacturer directions. Keep that first row straight, because every row after it will faithfully copy its behavior.
- Click the planks together end to end and row by row. Use a tapping block and mallet gently if needed. Gently is important here. You are installing flooring, not tenderizing meat.
- Stagger end joints from row to row for strength and appearance. Avoid obvious repeating patterns.
- Cut the last plank in each row to fit, remembering to leave the expansion gap at the wall.
- Continue across the room, checking often that the rows stay tight and aligned.
- Install the final row by ripping planks to width if needed. A pull bar can help in tight spaces near the wall.
Do not fasten cabinetry, islands, or heavy permanent fixtures through a typical floating floor unless the manufacturer specifically allows it. Floating floors need room to move as one unit.
Step 9B: Install Glue-Down Cork Tiles
Glue-down cork is more precise and less forgiving, so slow is smooth and smooth is smart.
- Confirm again that the subfloor is clean, dry, smooth, and approved for the adhesive system.
- Use only the adhesive recommended by the flooring manufacturer. Cork tile systems vary, and some require a contact-style method with adhesive on both the floor and the tile, while others use a user-friendlier adhesive directly on the tile.
- Apply adhesive exactly as directed. Some systems use a roller, not a trowel. This detail matters more than your confidence level.
- Allow the adhesive to flash or set up if required before placing the tile.
- Set tiles carefully along your layout lines, keeping joints tight and staggered where appropriate.
- Tap tiles into place with a rubber mallet if recommended.
- Clean excess adhesive immediately before it dries and becomes a permanent design choice.
- Roll the floor if your system calls for it so the tiles bond evenly.
Glue-down cork often needs finishing or recoating after installation, especially if you want better joint protection in kitchens or other spill-prone rooms. Follow the finish schedule exactly. Cork is patient, but wet finish is not.
Step 10: Install Transitions, Reinstall Trim, and Let the Floor Rest
Once the floor is installed, add transitions at doorways and where cork meets tile, wood, or other flooring. Reinstall baseboards or quarter-round without pinning the floating floor itself. Then respect the curing and wait times. Depending on the system, light foot traffic may be allowed fairly soon, while furniture, rugs, and pet zoomies may need to wait longer.
Check the product instructions for exactly how long to wait before heavy traffic, furniture placement, and cleaning. This is not the time for improvisation. A beautiful new cork floor deserves at least one day without a refrigerator moonwalking across it.
Common Mistakes to Avoid
- Skipping moisture testing: This is the classic “it looked dry to me” mistake.
- Ignoring acclimation: Cork moves with environmental changes. Let it settle first.
- Installing over an uneven subfloor: Cork will not hide flaws. It will introduce them to your guests.
- Using the wrong adhesive or underlayment: Manufacturer instructions exist for a reason.
- Forgetting expansion gaps: Floors need breathing room.
- Using cork in very wet spaces without a proper system: Water always wins long arguments.
- Dragging heavy furniture across the surface: Felt pads are cheaper than regret.
What Cork Floor Installation Usually Costs
Cork flooring commonly falls in the mid-range price bracket. Material prices often land around the cost of good-quality specialty flooring rather than bargain-bin vinyl. Labor for floating cork is typically lower than glue-down installation because it is faster and cleaner. Glue-down cork usually costs more to install because it demands more prep, more precision, and more time.
If you are handy and choose floating planks, DIY installation can save a meaningful amount of money. Just remember that your savings disappear quickly if you skip the boring prep steps and have to redo the floor. That is not a bargain. That is a tuition payment.
How To Care for a Newly Installed Cork Floor
Once installed, cork is fairly low maintenance. Sweep or vacuum regularly so grit does not scratch the finish. Use felt pads under furniture. Clean spills quickly. Damp mop when needed, but never soak the floor. Keep indoor humidity reasonably stable, because cork responds to seasonal changes more than some harder flooring materials do.
If your cork floor needs periodic recoating or resealing, do not treat that as optional forever. A good finish layer helps protect the surface from stains, wear, and moisture. Cork is at its happiest when it is sealed, clean, and not hosting puddles.
Real-World Experience: What Installing a Cork Floor Actually Feels Like
In real homes, installing a cork floor usually teaches people the same lesson: the install itself is not the hard part. The prep is. Most first-time DIYers expect the “flooring” part to be the challenge, but the real work tends to happen before the first plank clicks together. You spend time pulling trim, scraping residue, hunting down squeaks, checking the slab, vacuuming again, measuring again, and discovering that a room that looked level from six feet away has a dramatic dip exactly where you hoped it would not.
Then something funny happens. Once the prep is done correctly, cork often goes down faster than expected. Floating planks especially can feel satisfyingly efficient. One row becomes three rows, then half the room is covered, and suddenly the space looks finished enough to make you overly confident. That is usually the moment when a doorway cut humbles you, or you realize the last row needs careful trimming, or you remember that walls are apparently allergic to being perfectly straight.
Another common experience is how much homeowners like the floor once it is actually underfoot. Cork does not just look different from other hard-surface floors; it feels different. People notice the slight softness right away. A home office feels quieter. A bedroom feels warmer. A kitchen feels less punishing during long stretches of standing. It is one of the rare flooring materials that changes the mood of a room as much as the appearance of it.
There is also a very specific cork-flooring moment that many DIYers describe: the point where they realize cleanliness matters more than they thought. Tiny debris under the floor, dried adhesive, grit in the seams, or dust left on the subfloor can all affect the final result. Cork teaches patience in a way that many other materials do not. It politely suggests that the person with the vacuum is often the real hero of the renovation.
People who install glue-down cork almost always come away with the same review: beautiful result, serious respect for the instructions. Layout matters. Adhesive timing matters. Smoothness matters. The floor can look fantastic, but glue-down systems do not reward improvisation. They reward reading, measuring, staging, and working methodically. Floating cork is more forgiving. Glue-down cork is more like baking than cooking; ignore the method and the recipe notices.
Long term, the experience most owners share is that cork feels livable. It is not trying to be flashy. It is trying to be pleasant. It softens footsteps, cuts noise, and gives rooms a calm, warm look that does not scream for attention. At the same time, owners learn quickly to use felt pads, clean spills fast, and stop treating chair legs like demolition equipment. Cork rewards normal care and punishes neglect in a very straightforward way.
So if you are wondering what it is really like to install a cork floor, here is the honest answer: it is part measuring, part patience, part vacuuming, and part deeply satisfying transformation. You will probably mutter at least once. You may crawl around the room more than expected. You will almost certainly become weirdly invested in expansion gaps. But when the last board is in, the trim is back on, and the floor feels warm and quiet beneath your feet, the whole project starts to feel less like work and more like one of those rare DIY wins that was actually worth the trouble.
Conclusion
If you want a floor that is comfortable, attractive, quiet, and realistic for a skilled DIY installation, cork is an excellent option. The biggest keys to success are choosing the right product for the room, controlling moisture, acclimating the material, and preparing the subfloor with almost unreasonable care. Floating cork planks are the easiest route for most homeowners, while glue-down tiles reward patience and precision with a more custom finished look.
In the end, learning how to install a cork floor is less about brute construction skill and more about respecting the details. Measure carefully, follow the manufacturer instructions, leave room for expansion, and do not pretend moisture is someone else’s problem. Do that, and you can end up with a floor that looks polished, feels fantastic, and makes every step across the room just a little quieter.


