
Table of Contents >> Show >> Hide
- What Are Serum Banks?
- Before You Install Serum Banks
- The Easiest Way to Install Serum 2 Banks
- How to Install Traditional Serum Banks Manually
- Common Serum Preset Folder Locations
- Where to Put Wavetables, Noises, and Extra Files
- How to Load Presets After Installation
- Why Your Serum Banks Are Not Showing Up
- Best Organization Tips for Serum Banks
- Serum Bank Installation Example
- Extra Experience: What Installing Serum Banks Teaches You Over Time
- Conclusion
- SEO Tags
Installing Serum banks should not feel like defusing a tiny digital bomb. Yet for many producers, the moment a fresh preset pack lands in the Downloads folder, confusion arrives right behind it wearing headphones and asking, “Where exactly do I put this?” The good news: loading Xfer Serum presets is usually simple once you understand the difference between a traditional preset folder and the newer Serum 2 preset pack workflow.
This guide walks you through the easiest way to install Serum banks, load presets, organize sound packs, fix missing presets, and avoid the classic “I swear I installed this yesterday” studio mystery. Whether you are using Serum, Serum 2, Ableton Live, FL Studio, Logic Pro, Studio One, or another DAW, the basic idea is the same: place the preset bank where Serum expects to find it, refresh the browser, and start making sounds that scare your laptop fan.
What Are Serum Banks?
A Serum bank is a collection of presets designed for Xfer Records Serum, one of the most popular wavetable synthesizers in modern electronic music production. These banks may include basses, leads, pads, plucks, arps, FX, risers, sequences, or genre-specific sounds for EDM, hip-hop, trap, pop, house, techno, dubstep, cinematic scoring, and more.
Most Serum preset banks arrive as one of the following:
- A zipped folder containing individual preset files
- A folder of Serum presets, often using the
.fxpformat for classic Serum - A Serum 2 preset pack using the newer
.SerumPackformat - A bundle that includes presets plus wavetables, noises, samples, MIDI, or documentation
The installation method depends on what type of file you downloaded. If you have a .SerumPack, Serum 2 can import it directly. If you have a normal folder of presets, you will copy it into the correct Serum preset folder manually. Neither method requires wizardry, although a snack nearby never hurts.
Before You Install Serum Banks
Before dragging files around like a caffeinated raccoon, take a minute to prepare your download. This prevents most installation problems before they happen.
1. Make Sure the Bank Is Unzipped
Preset banks often arrive as .zip or .rar archives. Serum cannot reliably read presets while they are still trapped inside a compressed archive. On Windows, right-click the file and choose Extract All. On macOS, double-click the zip file to unpack it. If it is a .rar file, you may need an extraction tool.
2. Check Which Version of Serum You Are Using
Serum and Serum 2 do not always use the same installation workflow. Classic Serum uses the familiar preset folder method. Serum 2 supports that folder method too, but it also introduces .SerumPack imports, which are faster and cleaner for complete modern sound banks.
If a bank specifically says it requires Serum 2, do not expect it to work in older Serum. If a bank was made for classic Serum and includes regular preset files, Serum 2 will usually be the easier environment for browsing and organizing, but always check the creator’s instructions.
3. Open Serum Inside Your DAW
Load Serum on a MIDI or instrument track inside your DAW. The DAW itself does not matter much for preset installation. Ableton Live, FL Studio, Logic Pro, Cubase, Reaper, Studio One, and Bitwig may have different plugin windows, but Serum’s internal menu is the important part.
The Easiest Way to Install Serum 2 Banks
If your preset bank includes a .SerumPack file, congratulations. You have the easy route. This format is designed to install a complete Serum 2 preset pack without forcing you to manually place presets, wavetables, noises, and other content into separate folders.
Method 1: Drag and Drop the .SerumPack File
- Extract the downloaded preset bank.
- Find the file ending in
.SerumPack. - Open Serum 2 in your DAW.
- Drag the
.SerumPackfile directly onto the Serum 2 window. - Wait for Serum 2 to confirm the installation.
- Open the preset browser and look for the new bank under the relevant pack or user section.
This is the cleanest method because Serum 2 handles the file placement for you. It is especially helpful when a bank includes more than just presets, such as custom wavetables or noise sources. Instead of playing folder detective, you let Serum do the boring part while you focus on turning one MIDI note into a festival-sized bass patch.
Method 2: Import the Pack from the Serum 2 Menu
If drag and drop does not work, use the menu method. Some DAWs handle drag-and-drop behavior differently, and occasionally the plugin window simply refuses to cooperate. Very rude, but fixable.
- Open Serum 2.
- Click Menu in the top-right area of the plugin.
- Select Import Preset Pack.
- Locate your extracted
.SerumPackfile. - Click Open.
- After installation, open the preset browser and check the pack section.
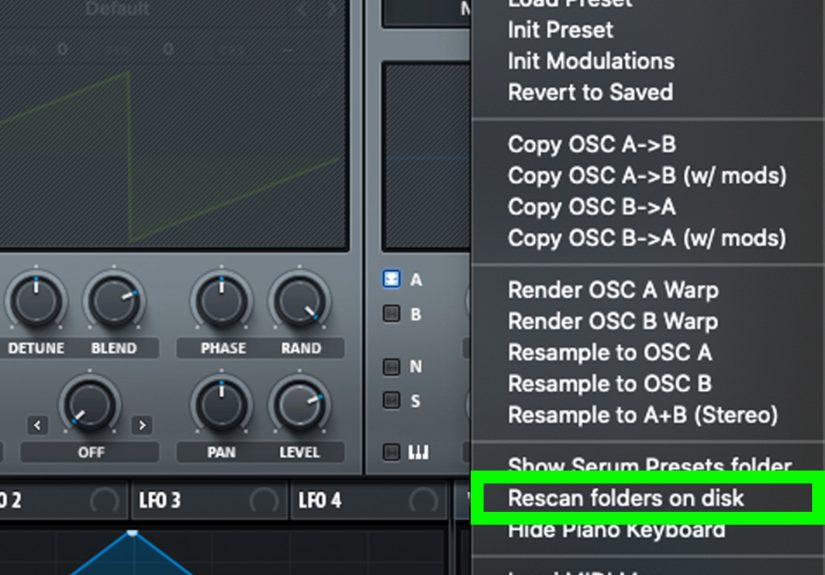
If the presets do not appear immediately, choose Rescan Folders on Disk from Serum’s menu, then close and reopen the plugin. In stubborn cases, restart the DAW. Yes, “turn it off and on again” remains undefeated in music production.
How to Install Traditional Serum Banks Manually
If your Serum bank is a normal folder of presets rather than a .SerumPack, install it by placing the folder inside Serum’s preset directory. The safest way to find that directory is from inside Serum itself.
Step 1: Open the Serum Presets Folder
- Open Serum in your DAW.
- Click Menu in the top-right corner.
- Select Show Serum Presets Folder or Open Serum Presets Folder, depending on your version.
- Your computer will open the folder Serum uses for its sound content.
This menu option is better than guessing the folder path manually. Serum knows where Serum is looking. Your operating system may think it knows, your friend on a forum may think they know, but Serum is the one actually loading the presets. Trust the synth.
Step 2: Open the Presets Subfolder
Inside the Serum folder, look for a subfolder named Presets. This is where preset banks belong. You may see other folders such as Tables, Noises, Skins, or related content folders. Do not throw everything into one folder unless you enjoy future chaos.
Step 3: Create or Use a User Folder
Many producers place third-party banks inside a User folder within the Presets directory. This keeps factory presets separate from downloaded banks. A clean structure might look like this:
You can organize by genre, sound designer, label, project, or sound type. The goal is simple: when inspiration hits, you should not need a search party to find your plucks.
Step 4: Copy the Preset Bank Folder
Drag the unzipped preset bank folder into Presets > User, or directly into the Presets folder if you prefer seeing the bank at the top level. Avoid copying only random individual files unless the bank instructions specifically say to do that. Keeping the original folder structure intact helps Serum display the sounds in a way that makes sense.
Step 5: Rescan Serum
Return to Serum, open the menu, and choose Rescan Folders on Disk. In some versions, you may see a similar refresh or rescan option. After rescanning, open the preset browser and look for your new bank.
If the bank still does not appear, close and reopen Serum. If it remains missing, restart your DAW. If it still refuses to show up, do not panic. The presets are probably not haunted. They are usually in the wrong folder, still zipped, incompatible, or hidden one folder too deep.
Common Serum Preset Folder Locations
The exact folder can vary depending on your operating system, installation history, and Serum version. That is why opening the folder from inside Serum is the best method. Still, these common paths can help when troubleshooting.
Windows
macOS
Some systems may use a user-level Documents or Library path instead. If your folder path looks different, that does not automatically mean something is wrong. The golden rule remains: use Serum’s own Show Serum Presets Folder option whenever possible.
Where to Put Wavetables, Noises, and Extra Files
Some Serum banks include more than presets. A sound designer may add custom wavetables, noise samples, LFO shapes, or documentation. If you install only the preset files and ignore the supporting content, some patches may load incorrectly or sound incomplete.
Use this basic map:
- Presets: Put Serum preset files and preset bank folders here.
- Tables: Put custom wavetable files here.
- Noises: Put noise samples and oscillator noise files here.
- Skins: Put Serum skin folders here, if included.
- Documentation: Keep PDF guides wherever you can find them later.
If the bank includes an installation PDF, read it. Yes, reading instructions feels emotionally risky, but it can save you twenty minutes of clicking folders while muttering at your monitor.
How to Load Presets After Installation
Once the bank is installed, loading presets is easy:
- Open Serum or Serum 2 in your DAW.
- Click the preset name or preset browser area near the top of the plugin.
- Navigate to the bank folder, User section, or Packs area.
- Click a preset to load it.
- Play MIDI notes and adjust macros, filters, envelopes, or effects as needed.
A good preset is not the finish line; it is the starting point. Try changing the wavetable position, filter cutoff, envelope decay, unison amount, or effects mix. Even a small tweak can turn a common bass into something that feels custom.
Why Your Serum Banks Are Not Showing Up
If your Serum presets are missing, start with the obvious checks. Most problems are not dramatic. They are tiny file-location mistakes wearing a trench coat.
The Bank Is Still Zipped
Serum needs access to the extracted files. If your preset pack is still in a zip archive, unzip it first.
The Folder Is One Level Too Deep
Sometimes a downloaded bank extracts into a folder inside another folder. For example:
If Serum shows the folder but not the presets, open the folders and check whether the actual preset files are buried too deeply. Move the correct inner folder into your User folder.
You Installed Presets in the Wrong Xfer Folder
Some users have multiple Serum-related folders after updates, reinstallations, or moving systems. Open the folder directly from Serum’s menu, then place the bank there. Do not rely on old shortcuts unless you know they point to the active folder.
You Need to Rescan or Restart
After copying new files, use Menu > Rescan Folders on Disk. If that fails, close and reopen Serum. If that still fails, restart the DAW.
The Bank Requires Serum 2
A .SerumPack file is intended for Serum 2. If you try to load it in classic Serum, it will not install correctly. Use Serum 2 for that format.
Splice Presets Saved to the Wrong Folder
If you download Serum presets through Splice and they do not appear in Serum, check where the Splice app saved them. In some setups, presets may land in the Splice folder instead of the Xfer Serum presets folder. Move the preset folder manually into Serum’s active preset location, then rescan.
Best Organization Tips for Serum Banks
Once you start collecting sound banks, organization becomes important. Today it is one free preset pack. Tomorrow it is 9,000 basses, 400 plucks, and a folder named “new new final actually use this.” Future you deserves better.
Organize by Sound Type
Create folders such as Bass, Lead, Pad, Pluck, Keys, FX, Arp, and Drums. This works well if you browse by production need. When the chorus needs a lead, you know exactly where to go.
Organize by Genre
If you produce multiple styles, use folders like House, Techno, Trap, Dubstep, Pop, Cinematic, Ambient, and Drum and Bass. This keeps sound selection tied to creative context.
Organize by Sound Designer or Brand
If you buy premium Serum banks from different labels or creators, keep each bank in its original folder. This makes updates, backups, and license tracking easier.
Keep a Backup
Back up your Serum Presets folder to an external drive or cloud storage. Preset libraries can take years to build. Losing them is the producer version of stepping on a LEGO in the dark.
Serum Bank Installation Example
Imagine you downloaded a bank called Neon Bass Vol. 1. After extracting it, you see a folder containing .fxp preset files and a folder of wavetables. Here is a clean installation process:
- Open Serum in your DAW.
- Click Menu > Show Serum Presets Folder.
- Open the Presets folder.
- Open or create User.
- Copy the Neon Bass Vol. 1 preset folder into User.
- Go back to the main Serum Presets folder.
- Open Tables and copy the included wavetables there.
- Return to Serum and choose Rescan Folders on Disk.
- Open the preset browser and select the new bank.
That is the entire workflow. Once you have done it twice, it becomes muscle memory. The hardest part becomes choosing which preset not to use.
Extra Experience: What Installing Serum Banks Teaches You Over Time
After installing enough Serum banks, you learn that preset management is part technical skill and part studio hygiene. The first lesson is that speed matters, but structure matters more. It is tempting to dump every new sound bank into the nearest folder and get back to making music. That works for a week. Then one day you want “that one warm Reese bass from that one pack with the purple cover,” and suddenly your session turns into digital archaeology.
The best experience-based advice is to build a system before your library gets huge. Create a main User folder, then decide whether you prefer sorting by genre, sound type, or creator. There is no universal perfect method. The best method is the one you will actually maintain when you are tired, inspired, and 47 minutes into a loop that may or may not be genius.
Another thing you learn quickly: always test a bank after installing it. Do not wait until a client session, livestream, collaboration, or deadline to discover that half the presets are missing custom wavetables. Install the bank, rescan Serum, load five or six patches, and listen for errors. If a preset sounds strangely thin, silent, or different from the demo, check whether the bank included Tables or Noises folders that also need to be installed.
It also helps to keep your downloads folder clean. Many producers install the same bank multiple times because the original zip, extracted folder, copied folder, and backup folder all have nearly identical names. Rename your installed folders clearly. For example, use Brand – Bank Name – Serum or Genre – Creator – Pack Name. Clear names reduce duplicates and make browsing easier inside Serum.
One practical habit is to create a temporary folder called To Install. Drop new Serum banks there first. Extract them, inspect their contents, read any included instructions, then move the files into the correct Serum folders. After testing, move the original download to an archive folder. This tiny workflow keeps your system neat and prevents the classic producer problem of having six folders called “Presets” scattered across the desktop like confetti after a very nerdy parade.
Finally, remember that presets are tools, not rules. Installing Serum banks gives you instant access to polished sounds, but the real value comes when you customize them. Assign macros, change filters, swap wavetables, adjust envelopes, automate effects, and save your own versions. The easiest way to load presets is useful; the smartest way to use presets is to make them yours.
Conclusion
Installing Serum banks is easy once you know which workflow applies. For Serum 2 .SerumPack files, drag the pack into Serum 2 or use Menu > Import Preset Pack. For traditional Serum preset folders, open Menu > Show Serum Presets Folder, place the bank inside the Presets folder, preferably under User, then rescan folders on disk.
The most common problems come from zipped files, wrong folders, missing wavetables, compatibility issues, or forgetting to rescan. Once your bank appears in the browser, you can load presets, tweak sounds, organize favorites, and get back to the fun part: making music that makes your speakers feel employed.


