Table of Contents >> Show >> Hide
- What Mold Needs to Grow
- Before You Start: Safety First
- The Golden Rule: Fix the Moisture Problem First
- Can You Clean Mold Yourself?
- Best Products That Kill Mold
- How to Kill Mold on Hard Surfaces
- How to Remove Mold from Grout and Caulk
- How to Kill Mold on Wood
- What to Throw Away
- How to Prevent Mold from Coming Back
- Common Mold Cleaning Mistakes
- When Mold May Affect Health
- Experience Notes: What Mold Cleanup Teaches You in Real Life
- Conclusion
Mold is the uninvited houseguest that never brings snacks, never pays rent, and somehow always finds the dampest corner of your bathroom. It may start as a few suspicious dots near the shower, a fuzzy patch behind a storage box, or that unmistakable musty smell that whispers, “Something is definitely alive in here.” The good news? Small mold problems can often be handled safely at home. The less-fun news? Killing mold is not just about spraying it with something dramatic and walking away like a cleaning-show hero.
To truly get rid of mold, you need to remove the mold growth, clean the surface correctly, dry the area completely, and fix the moisture problem that allowed it to grow in the first place. Otherwise, mold will come back like a sequel nobody asked for.
This guide explains how to kill mold on common household surfaces, when to use bleach, vinegar, hydrogen peroxide, or detergent, what safety gear matters, and when it is smarter to call a professional instead of turning your weekend into a science experiment.
What Mold Needs to Grow
Mold is a type of fungus that spreads by tiny spores. These spores are naturally present indoors and outdoors, so the goal is not to create a perfectly sterile home. That would be impossible unless you live inside a laboratory, and even then, someone would probably leave a wet towel somewhere.
Mold needs three main things to grow: moisture, a food source, and time. Homes provide plenty of food sources, including drywall, wood, paper, dust, fabric, carpet backing, cardboard, and ceiling tiles. Moisture is the real trigger. Leaky pipes, roof leaks, poor ventilation, condensation, flooding, damp basements, and high indoor humidity can all create the perfect mold buffet.
Before You Start: Safety First
Before cleaning mold, protect yourself. Mold exposure can irritate the eyes, skin, nose, throat, and lungs. People with asthma, allergies, chronic lung conditions, weakened immune systems, or mold sensitivity should avoid doing mold cleanup whenever possible.
Wear the Right Protective Gear
For small household mold cleanup, use:
- N95 respirator or better
- Rubber gloves
- Safety goggles without ventilation holes
- Long sleeves and long pants
- Old clothes you can wash immediately afterward
Open windows and doors if weather allows. Use bathroom exhaust fans or portable fans to move air outdoors, not deeper into the house. Never aim a fan directly at dry mold before cleaning, because that can spread spores around the room like confetti at the world’s worst party.
The Golden Rule: Fix the Moisture Problem First
If you remember only one thing about how to kill mold, make it this: mold removal fails when moisture remains. You can scrub, spray, wipe, rinse, and mutter threats at the wall, but if the leak continues or humidity stays high, mold can return.
Before cleaning, identify the moisture source. Check for dripping pipes under sinks, cracked caulk around tubs, roof leaks, damp crawl spaces, clogged gutters, condensation on windows, or laundry areas with poor ventilation. After water damage, dry wet materials as quickly as possible. Many building materials need to be dried within 24 to 48 hours to reduce the chance of mold growth.
Can You Clean Mold Yourself?
In many cases, yes. If the moldy area is small, roughly less than 10 square feet, and it is growing on a hard surface such as tile, glass, metal, sealed countertops, or hard plastic, a careful DIY cleaning may be reasonable.
However, call a qualified mold remediation professional if:
- The mold covers more than about 10 square feet
- Mold is growing after major flooding
- Water damage involved sewage or contaminated water
- Mold is inside HVAC ducts or air-conditioning systems
- You smell mold but cannot find the source
- Mold keeps returning after cleaning
- Someone in the home has asthma, serious allergies, or a weakened immune system
Large mold jobs require containment, careful removal, proper protective equipment, and sometimes specialized filtration. In other words, this is not the moment to prove your bravery with a sponge and a playlist.
Best Products That Kill Mold
Different surfaces need different cleaning approaches. The best mold killer depends on whether the surface is porous or non-porous, whether staining matters, and whether the material can be safely saved.
1. Soap and Water
For many hard surfaces, detergent and water are the first step. Mold must be physically removed, not merely sprayed. Scrubbing breaks up the growth and removes residue that may continue to cause irritation.
Use warm water with dish detergent or a mild household cleaner. Scrub the area thoroughly, rinse if appropriate, and dry completely. This method is especially useful on tile, sealed countertops, glass, metal, and other washable surfaces.
2. White Vinegar
White vinegar is a popular mold cleaner because it is inexpensive, widely available, and less harsh than bleach. It works best on small areas and non-porous or semi-porous surfaces. Spray undiluted white vinegar on the moldy area, let it sit for about an hour, scrub, wipe, and dry.
Do not mix vinegar with bleach. That combination can create dangerous chlorine gas. Mold may be annoying, but toxic gas is not the upgrade anyone needs.
3. Hydrogen Peroxide
Hydrogen peroxide can help remove mold on hard surfaces and may be useful on bathroom fixtures, tile, grout, and some sealed surfaces. Use common 3% hydrogen peroxide, apply it to the surface, let it sit for several minutes, scrub, and wipe clean.
Hydrogen peroxide can lighten or discolor some materials, so test it in a hidden spot first. Do not mix hydrogen peroxide with vinegar in the same container or cleaning session.
4. Bleach Solution
Bleach can kill mold on hard, non-porous surfaces such as tile, tubs, toilets, and glass. It is not the best choice for every mold problem, especially on porous materials like drywall or wood, where mold can grow below the surface.
If you use bleach, use no more than 1 cup of household bleach per 1 gallon of water. Keep windows open, wear gloves and goggles, and never mix bleach with ammonia, vinegar, toilet bowl cleaner, drain cleaner, or other household cleaners. Mixing bleach with the wrong product can produce toxic fumes.
5. Commercial Mold Cleaners
EPA-registered mold and mildew cleaners can be effective when used according to the label. Follow the product directions exactly, including ventilation, contact time, surface compatibility, and rinsing instructions. More product does not mean better results; it just means more chemical exposure and a bigger cleaning bill.
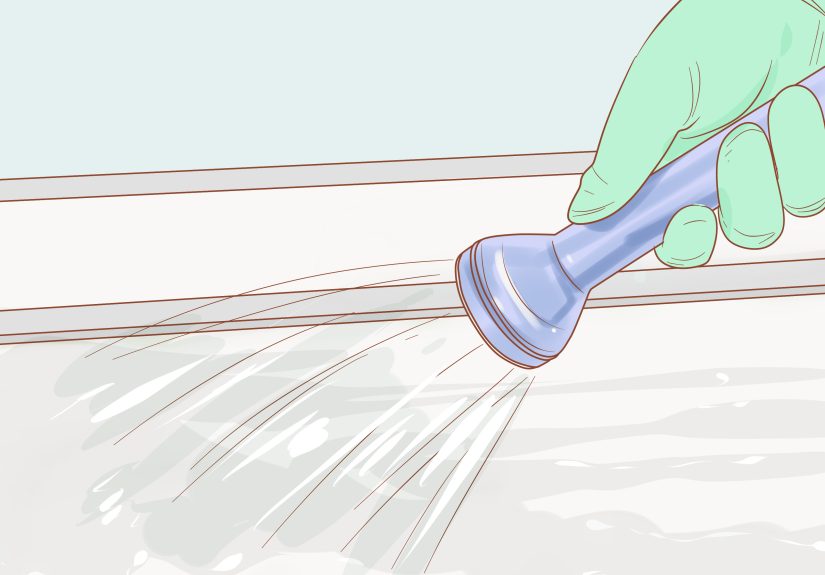
How to Kill Mold on Hard Surfaces
Hard surfaces are the easiest to clean because mold usually sits on top instead of growing deep into the material. Examples include tile, porcelain, glass, metal, sealed stone, laminate, hard plastic, and painted surfaces in good condition.
Step-by-Step Mold Cleaning Method
- Put on gloves, goggles, and an N95 respirator.
- Open windows or improve ventilation.
- Lightly dampen the moldy area to reduce airborne spores.
- Scrub with detergent and warm water.
- Apply vinegar, hydrogen peroxide, diluted bleach, or a mold cleaner if needed.
- Allow the cleaner to sit for the recommended contact time.
- Scrub again, then wipe with a clean damp cloth.
- Dry the surface completely with towels and airflow.
- Wash cleaning cloths in hot water or discard them in a sealed bag.
Drying is not optional. A clean but damp surface is basically a welcome mat for Mold: The Return.
How to Remove Mold from Grout and Caulk
Bathroom grout and caulk are mold magnets because they live in a humid splash zone. For grout, scrub with a brush and a cleaner such as hydrogen peroxide, vinegar, oxygen bleach, or a commercial grout-safe mold remover. Let the product sit long enough to work, then scrub and rinse.
Caulk is trickier. If mold is only on the surface, cleaning may work. But if mold has grown behind or into the caulk, removal is usually better. Cut away the old caulk, clean and dry the joint thoroughly, then apply new mold-resistant bathroom caulk. Give it proper curing time before using the shower again.
How to Kill Mold on Wood
Wood is semi-porous, so mold can be harder to remove than on tile. For lightly affected sealed wood, scrub with detergent and water, then dry thoroughly. For unfinished wood, use minimal moisture while cleaning. A soft brush, mild detergent, and careful drying can help.
If mold has penetrated deeply, sanding may be needed after the wood is dry. Wear respiratory protection and capture dust carefully, because sanding can release spores. Structural wood that is soft, crumbling, or repeatedly wet should be inspected by a professional.
What to Throw Away
Some moldy items are not worth saving. Porous materials can trap mold roots, spores, and moisture deep inside. Even if the surface looks cleaner, the problem may remain hidden.
Discard moldy:
- Drywall
- Carpet and carpet padding
- Insulation
- Ceiling tiles
- Paper products
- Cardboard boxes
- Heavily contaminated fabric furniture
Bag moldy materials before carrying them through the house. Seal bags tightly and avoid dragging contaminated items across clean rooms. If drywall is moldy, professionals often cut beyond the visibly damaged area because mold and moisture can extend past what you can see.
How to Prevent Mold from Coming Back
After cleaning, prevention is the real victory lap. Keep indoor humidity low, ideally around 30% to 50%. Use a hygrometer to measure humidity because guessing moisture levels by vibes is not a reliable building-science method.
Practical Mold Prevention Tips
- Repair plumbing leaks quickly.
- Use exhaust fans during and after showers.
- Vent clothes dryers outdoors.
- Run a dehumidifier in damp basements.
- Clean and maintain gutters.
- Keep furniture slightly away from cold exterior walls.
- Insulate areas where condensation forms.
- Dry wet rugs, walls, and floors within 24 to 48 hours.
- Do not store cardboard directly on basement floors.
- Use mold-resistant paint in bathrooms only after cleaning and drying the surface.
Mold-resistant paint is not magic paint. It helps prevent growth on clean, dry surfaces, but painting over active mold is like putting a tuxedo on a raccoon. The problem is still there, just slightly more formal.
Common Mold Cleaning Mistakes
Using Bleach on Everything
Bleach has a place, but it is not a universal mold solution. It works best on hard, non-porous surfaces. On porous materials, it may lighten stains without removing mold hidden below the surface.
Mixing Cleaners
Never mix cleaning products. Bleach plus ammonia, vinegar, acids, or other cleaners can produce dangerous fumes. Use one cleaner at a time, rinse when appropriate, and let the area dry before switching products.
Ignoring the Leak
If you clean mold but ignore the leak, the mold will return. The moisture source is the villain. The mold is just the villain’s weird fuzzy sidekick.
Cleaning Large Mold Areas Without Containment
Large mold jobs can spread spores through the home if handled casually. If the affected area is bigger than a small patch, or if mold is hidden in walls, insulation, or HVAC systems, call a professional.
When Mold May Affect Health
Mold affects people differently. Some people have no symptoms, while others experience sneezing, coughing, itchy eyes, runny nose, congestion, skin irritation, wheezing, or asthma flare-ups. Damp indoor environments can also worsen respiratory problems even when visible mold is not obvious.
Seek medical advice if symptoms appear after mold exposure, especially if someone has asthma, chronic lung disease, immune system problems, or persistent breathing issues. Cleaning the mold is important, but protecting health comes first.
Experience Notes: What Mold Cleanup Teaches You in Real Life
The first lesson from dealing with household mold is that it is rarely just a cleaning problem. It is usually a detective story wearing rubber gloves. You may notice a dark patch near a window and think, “Easy, I’ll wipe that.” Then you realize the window sweats every cold morning, the curtain blocks airflow, and the wall behind the furniture has been quietly hosting a tiny fungus conference.
A practical mold cleanup experience often starts with smell. Musty odor is a clue many homeowners ignore because there is no dramatic stain yet. In basements, closets, laundry rooms, and bathrooms, that smell usually means moisture is hanging around too long. The smartest move is to search slowly: behind stored boxes, under sinks, around toilet bases, near washing machine hoses, under bath mats, and along exterior walls.
Another lesson is that cheap tools help a lot. A humidity meter can tell you whether a room is staying above a safe humidity range. A dehumidifier can make a damp basement feel less like a cave. A good scrub brush, microfiber cloths, contractor bags, gloves, and an N95 respirator can turn a small mold job from chaotic to controlled. You do not need a garage full of gadgets; you need the right basics and a plan.
The most frustrating part is deciding what to save. Hard plastic bins can usually be cleaned. Cardboard boxes? Usually not. Moldy carpet padding after a leak? Say goodbye. Water-damaged drywall that smells musty? It may need removal. This is where many people hesitate because throwing things away feels wasteful. But keeping moldy porous materials can keep the problem alive, especially when spores and moisture are trapped inside.
Bathrooms offer the most common mold lessons. If black spots return on caulk every month, the problem may not be your cleaning effort. It may be poor ventilation, failed caulk, a shower that never dries, or grout that needs sealing. Running the exhaust fan during showers and for 20 to 30 minutes afterward can make a major difference. So can wiping wet walls, washing shower curtains, and replacing old caulk instead of scrubbing it forever like it owes you money.
Kitchen mold is often sneaky. It may appear under the sink after a slow drip, behind the refrigerator, around a dishwasher leak, or under a trash can liner. The experience teaches one simple habit: check hidden plumbing areas every few weeks. A slow leak caught early is a towel-and-wrench problem. A slow leak ignored for months becomes a cabinet-removal problem, and nobody wants their weekend to involve surprise carpentry.
The final lesson is patience. Mold cleanup is not just spray, wipe, done. It is clean, dry, monitor, and prevent. After cleaning, revisit the area for the next few weeks. If the stain returns, the moisture source is still active or the material was too porous to save. Mold is persistent, but it is not mysterious. Control moisture, remove contaminated material, clean safely, and keep air moving. That combination works far better than panic-cleaning with five products and a heroic amount of denial.
Conclusion
Learning how to kill mold is really learning how to remove mold safely and stop it from returning. For small patches on hard surfaces, detergent, vinegar, hydrogen peroxide, diluted bleach, or a commercial mold cleaner may work when used correctly. But the real fix is moisture control. Repair leaks, dry wet materials quickly, keep humidity under control, improve ventilation, and discard porous items that cannot be cleaned safely.
For large mold growth, sewage-related water damage, HVAC contamination, hidden mold, or recurring problems, professional remediation is the safer choice. Mold cleanup is not about winning a battle with the strongest chemical in the cabinet. It is about removing the growth, protecting your lungs, drying the space, and making your home a place where mold cannot comfortably move back in with luggage.