
Table of Contents >> Show >> Hide
- Why Make Your Own Toilet Bowl Cleaner?
- Safety First: Smart Cleaning Habits for the Bathroom
- The 10-Minute DIY Toilet Bowl Cleaner Recipe
- Variations for Different Toilet Troubles
- How Often Should You Use DIY Toilet Bowl Cleaner?
- Troubleshooting: When Your DIY Cleaner Isn’t Enough
- Quick FAQ About DIY Toilet Bowl Cleaners
- Real-Life Tips and Experiences with DIY Toilet Bowl Cleaners
Scrubbing the toilet is nobody’s idea of a dream Saturday, but it gets a lot easier
(and cheaper) when you have a simple DIY toilet bowl cleaner that actually works.
In under 10 minutes, you can mix up a non-toxic cleaner with pantry ingredients,
tackle stains, and walk away from the bathroom feeling like a budget-conscious,
eco-friendly superhero… with very clean porcelain.
This guide walks you through a Bob Vila–inspired DIY toilet bowl cleaner recipe,
explains why these ingredients work, and shows you how to tweak the formula for
tough stains, septic systems, and sensitive noses. No harsh fumes, no mystery
chemicalsjust science, suds, and a little elbow grease.
Why Make Your Own Toilet Bowl Cleaner?
Store-bought toilet bowl cleaners often rely on strong acids and disinfectants.
They can be fantastic at blasting away grime, but they also come with trade-offs:
harsh fumes, skin irritation, and ingredients that are tough on septic systems
and the environment. Many conventional formulas contain chlorine bleach or
hydrochloric acid, both of which require careful ventilation and handling.
By contrast, many DIY toilet bowl cleaner recipes use milder ingredients like:
- Baking soda (sodium bicarbonate): mildly abrasive, deodorizes, and helps loosen grime.
- Vinegar (acetic acid): dissolves mineral deposits and soap scum and helps with light disinfecting.
- Citric acid: a plant-derived acid that’s excellent for hard-water stains and rust rings.
- Hydrogen peroxide: a gentler oxidizing agent than chlorine bleach that can brighten and sanitize surfaces.
- Essential oils: add scent and may provide mild antimicrobial properties, depending on the oil.
Eco-focused product guides often highlight these ingredients as safer alternatives to
bleach-heavy formulas, especially when paired with smart cleaning habits like regular
scrubbing and good ventilation. You’re basically taking the same cleaning principles
used in greener commercial products and recreating them in your own kitchenwithout
paying for bottles, branding, and marketing.
And the best part? You can adjust the recipe to match your bathroom’s reality:
kids, pets, hard water, or that mysterious ring that shows up no matter how
often you clean.
Safety First: Smart Cleaning Habits for the Bathroom
Even when you’re mixing a “natural” toilet bowl cleaner, safety matters. A few simple
rules will keep you and your bathroom on the right side of clean:
- Never mix vinegar with bleach or bleach-based products. This combo releases chlorine gas, which is dangerous to breathe.
- Don’t mix multiple commercial cleaners together. Stick to one product at a time or rinse thoroughly between products.
- Use gloves if you have sensitive skin. Mild acids and alkaline ingredients can still cause dryness or irritation.
- Keep the bathroom ventilated. Turn on the exhaust fan or crack a window while you clean.
- Remember: clean first, disinfect when needed. Regular scrubbing removes most germs; heavy disinfection is more important if someone at home is sick or immunocompromised.
DIY recipes are not meant to replace hospital-grade disinfectants in high-risk situations,
but for the average healthy household, a well-formulated toilet bowl cleaner plus
regular cleaning is usually more than enough.
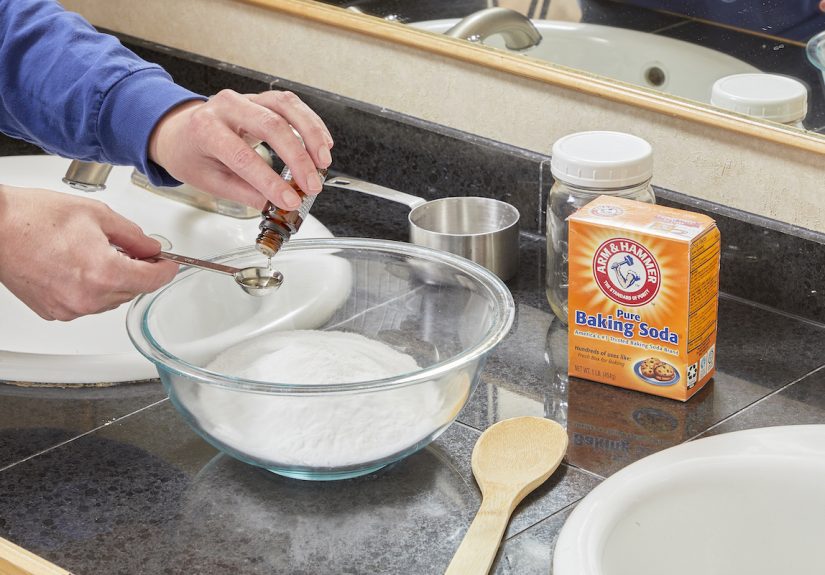
The 10-Minute DIY Toilet Bowl Cleaner Recipe
This fast, Bob Vila–style recipe relies on baking soda and vinegar, with optional
essential oils for a fresh scent. It comes together in just a few minutes of hands-on
time and uses ingredients you probably already have in your pantry.
Core Ingredients
- 1/2 cup baking soda
- 1/4 cup white distilled vinegar
- 10 drops tea tree (melaleuca) essential oil (optional, for odor control)
- 5–10 drops lemon or orange essential oil (optional, for fresh scent)
- Hot water (for a quick pre-rinse, if needed)
This combination creates a bubbly, mildly acidic solution that helps loosen mineral
buildup and organic grime while deodorizing the bowl.
Tools You’ll Need
- Toilet brush with reasonably stiff bristles
- Measuring cups or a small kitchen scoop
- Small container or cup for mixing (optional)
- Cleaning gloves (recommended)
Step-by-Step: Clean Your Toilet in Under 10 Minutes
-
Do a quick flush. Flush the toilet once to wet the sides of the bowl and
remove any loose debris. If the water level is very high, you can wait for it to go down
slightly so more of the bowl surface is exposed. -
Sprinkle in the baking soda. Measure about 1/2 cup of baking soda and
sprinkle it generously around the inside of the bowl, focusing on stained areas and
under the rim. Let it sit for 1–2 minutes while you prep the next step. -
Add the vinegar. Slowly pour in 1/4 cup of white vinegar, moving
around the bowl so it reaches as many surfaces as possible. The mixture will fizz
that’s normal and helps lift grime. -
Optional: add essential oils. If you’re using tea tree or lemon
essential oil, add 10–15 total drops directly into the bowl after the fizzing settles slightly.
This boosts deodorizing and adds a clean, spa-like scent to the bathroom. -
Let it sit. Allow the mixture to work for 5–10 minutes. For a “less than
10 minutes” routine, you can start scrubbing after about 5 minutes, but the longer end
of that range is better for mineral deposits. -
Scrub thoroughly. Using your toilet brush, scrub:
- Under the rim (where buildup loves to hide)
- Around the waterline (the usual stain ring)
- Down into the trap (for odor control)
Spend extra time on any stained or discolored areas.
-
Flush and inspect. Flush the toilet and take a look. If a faint ring
or stain remains, repeat the baking-soda-and-vinegar step and let it sit a bit longer,
up to 20–30 minutes, before scrubbing again.
That’s itno fumes, no eye-watering chemical cloud, and no special trip to the store.
Once you’ve made this cleaner once or twice, you can practically do it on autopilot
while your coffee brews.
Variations for Different Toilet Troubles
Not every toilet is dealing with the same issues. Some have hard-water minerals,
others are connected to sensitive septic systems, and some just need a quick refresh
between deeper cleans. Here are a few smart variations on the base recipe.
For Tough Stains and Hard Water Rings
Hard water and rust can leave stubborn brown or orange rings that regular cleaning
barely touches. For these, you can slightly upgrade the acidity and abrasion:
- Sprinkle 1/2–2/3 cup baking soda around the bowl.
- Add 1–2 tablespoons of citric acid on top of the baking soda.
- Slowly pour in 1/4 cup vinegar to activate the fizzing reaction.
- Let it sit for 15–30 minutes before scrubbing.
Citric acid is especially good at dissolving mineral deposits and rust stains and is
commonly used in many “eco” toilet cleaners. For very stubborn stains, you can turn off
the water supply, flush once to empty most of the bowl, and then apply this mixture so it
clings directly to the stains without being diluted.
For Septic Systems
If you’re on a septic system, you want ingredients that won’t damage the healthy bacteria
in your tank. A gentle, septic-aware formula might look like this:
- 1/2 cup baking soda
- 2–3 tablespoons citric acid
- 10 drops of essential oil (like lemon or eucalyptus), optional
- Hot water to help dissolve and activate the mixture
Skip repeated, heavy use of harsh bleach-based products and avoid antibacterial cleaners
unless specifically recommended by a septic professional. Gentle acids like citric acid
and mild abrasives like baking soda are generally considered more septic-friendly than
strong disinfectants or quats (quaternary ammonium compounds).
For Fragrance-Sensitive Households
Essential oils may be “natural,” but they’re still potent and can trigger headaches or
allergies in some people. If anyone in your home is sensitive to fragrances:
- Simply omit essential oils from the recipe.
- Increase ventilation by running the fan before and after cleaning.
- Wipe down exterior toilet surfaces with a fragrance-free dish soap solution.
Baking soda and vinegar alone do a good job of neutralizing odors without adding extra scent,
which can be a big win if you’re sensitive to smells.
How Often Should You Use DIY Toilet Bowl Cleaner?
Frequency depends on how busy your bathroom is, but here’s a simple guideline:
- High-traffic bathroom (family, guests, kids): Quick clean 2–3 times per week; deeper descaling every 1–2 weeks.
- Average household bathroom: Full scrub once per week, plus quick spot cleaning as needed.
- Rarely used guest bathroom: Deep clean before and after guests, and at least once a month to prevent stagnation and rings.
Regular cleaningrather than occasional “panic scrubbing” before company arrivesis
what keeps mineral rings and odors under control. Your DIY toilet bowl cleaner is most
effective when it’s part of a simple routine instead of a once-in-a-while rescue mission.
Troubleshooting: When Your DIY Cleaner Isn’t Enough
Sometimes a toilet has been neglected so long that gentle DIY methods don’t erase every trace
of staining on the first pass. If that’s your situation, don’t panic. Try this progression:
-
Repeat the DIY method. A second round of baking soda, vinegar, and citric acid
often removes what the first round loosened. -
Use a pumice stone (carefully). A toilet-safe pumice stone can help with stubborn
hard-water rings. Make sure both the stone and the porcelain are wet, and use gentle pressure
to avoid scratches. -
Call in a stronger cleaner if necessary. For deeply etched or old mineral deposits,
you may need a commercial descaling product. Use it according to the label, with gloves and good
ventilation, then return to your gentler DIY routine once the major buildup is gone.
The goal isn’t to outlaw heavy-duty cleaners foreverit’s to use them sparingly and rely
on safer, everyday methods the rest of the time.
Quick FAQ About DIY Toilet Bowl Cleaners
Does vinegar disinfect the toilet?
Vinegar has mild antimicrobial properties, but it’s not a hospital-grade disinfectant.
For routine cleaning in a healthy household, it’s usually sufficient when combined with
scrubbing. If you need stronger disinfectionlike after stomach fluuse an EPA-registered
disinfectant according to the label, and make sure all vinegar or DIY mixtures are rinsed
away first.
Is hydrogen peroxide safe to use in the toilet?
Used correctly, yes. Hydrogen peroxide can help brighten stains and offers stronger
antimicrobial action than vinegar. A common approach is to:
- Sprinkle baking soda into the bowl.
- Add about 1/2 cup of 3% hydrogen peroxide.
- Let it sit 10–15 minutes, then scrub and flush.
Just don’t mix hydrogen peroxide with vinegar in the same container; together they form
peracetic acid, which is more irritating and should only be used with caution and
proper knowledge.
Can I pre-mix this cleaner and store it?
It’s best not to store a vinegar-and-baking-soda mixture after it’s reacted.
The fizzing you see is carbon dioxide escaping; once that’s done, you’re left with a mostly
neutral solution that doesn’t clean as effectively. Instead, keep the dry ingredients on hand
and mix them in the bowl right before cleaning. If you want something pre-made, you can store
a jar of dry baking soda and citric acid blend and add liquid (vinegar or hot water) at use time.
Real-Life Tips and Experiences with DIY Toilet Bowl Cleaners
Once you start using a homemade toilet bowl cleaner, a funny thing happens: you stop
dreading bathroom cleaning quite so much. It becomes less of a “chemical warfare”
situation and more like a quick kitchen science experiment that happens to leave your
toilet sparkling.
One common experience people share is the “wow, that was it?” moment. They’d been
convinced that only neon-blue liquid with a skull on the label could tackle the ring
in the bowl, but a couple of rounds of baking soda and vinegar, a bit of citric acid,
and a determined scrub made an obvious difference. Often, the stains vanish over two
or three weekly cleanings rather than in one dramatic sessionand that’s okay.
Another frequent story: the “kid-safe cleaning” upgrade. Parents often feel uneasy
about strong chemicals in small bathrooms where toddlers touch everything. Switching
to a simple DIY cleaner means that if a curious little one wanders in mid-cleaning,
the risk is lowerespecially if you’ve skipped essential oils and strong disinfectants
that could irritate skin or lungs. Of course, all cleaners should still be kept out of
reach, but there’s peace of mind in knowing you’re working with milder ingredients.
People with sensitive lungs or allergies also tend to appreciate the change. Ventilation
is still important, but you’re not battling an overpowering scent every time you lift
the toilet lid to scrub. If you’ve ever had to step out of the bathroom mid-cleaning
just to catch your breath, a more gentle DIY formula can feel like a small miracle.
If you live with hard water, you might notice another long-term benefit: consistency
pays off. Hard-water minerals, iron, and calcium love to cling to porcelain. When you
clean only before guests arrive, those deposits have weeks to build up. Many people
report that once they commit to a quick weekly scrub with a baking-soda-and-citric-acid
combo, the stains show up less, the ring is easier to remove, and the toilet never quite
gets to that “uh-oh” stage.
DIY toilet bowl cleaners also appeal to anyone trying to simplify their cleaning
cabinet. Instead of juggling a specialized product for every surface in the house,
you’re using a small set of versatile ingredients: baking soda, vinegar, citric acid,
hydrogen peroxide, and maybe a couple of essential oils. The same items that brighten
your toilet can help with sinks, tubs, and even kitchen messesused appropriately,
of course. That means fewer bottles, less plastic, and fewer labels to read.
There’s also a budget story here. While each bottle of toilet cleaner might not seem
very expensive, regular use in multiple bathrooms adds up over the year. A large bag
of baking soda and a container of citric acid can last months, if not longer, and they
often cost less than a few high-end “green” toilet cleaners. Many people find that
once they’ve made the switch, they simply stop putting “toilet bowl cleaner” on the
shopping list altogether.
Over time, you’ll probably customize the recipe to match your cleaning style. Some
people swear by adding a bit more citric acid for very hard water. Others prefer a
lighter, once-a-week clean with just baking soda and vinegar, saving the stronger
citric-acid version for monthly maintenance. A few people love the scent of lemon
or eucalyptus in the bathroom; others skip fragrance entirely. That flexibility is
part of the appealyour toilet cleaner becomes something you can tweak, not just
tolerate.
The big takeaway from all these experiences: you don’t need a complicated or
intimidating routine to keep your toilet fresh. A simple, DIY formula you can mix in
under 10 minutes, paired with consistent habits, does the heavy lifting. Whether your
motivation is saving money, protecting your septic system, reducing chemical exposure,
or just avoiding another last-minute run to the store, a pantry-based toilet bowl
cleaner can quietly transform the way you feel about this least-glamorous of chores.


