
Table of Contents >> Show >> Hide
- Why the Face Matters So Much
- Choose Your Doll Face Style First
- Basic Supplies You May Need
- How to Make a Doll Face Step by Step
- How to Make a Doll Face for Different Doll Types
- Common Mistakes to Avoid
- Tips for Making Your Doll Face Look More Professional
- What Making a Doll Face Feels Like in Real Life
- Final Thoughts
- SEO Tags
Making a doll face sounds simple right up until you realize one eyebrow can turn your sweet handmade treasure into a tiny, judgmental accountant. That is the magic of doll making: a millimeter matters, a smile changes everything, and suddenly you are emotionally invested in whether a stitched nose leans left.
If you want to learn how to make a doll face, the good news is that you do not need a fine-art degree, a studio full of mysterious tools, or the patience of a monk who only sculpts cheekbones. You do need a plan. The best doll faces look charming because the maker made smart choices about proportion, materials, and expression before adding the eyes and mouth.
This guide walks you through the full process in a way that works for beginners and still offers enough detail for experienced crafters who want better results. We will cover how to make a doll face for cloth dolls, felt dolls, peg dolls, and clay dolls, plus how to place features, avoid common mistakes, and give your doll an expression that feels warm instead of weird. Because yes, there is a difference. A big one.
Why the Face Matters So Much
The face is where personality lives. Clothing can tell you the doll is a ballerina, a woodland fairy, or a tiny queen with excellent posture. But the face tells you whether she is shy, cheerful, dreamy, mischievous, sleepy, brave, or one bad paint stroke away from starring in a haunted attic story.
When you make a doll face well, three things happen. First, the doll instantly feels more polished. Second, the style becomes consistent from head to toe. Third, even simple materials look elevated. A plain peg, a scrap of muslin, or a basic piece of clay can suddenly feel custom and collectible once the face is done right.
Choose Your Doll Face Style First
Before you thread a needle or open a paint bottle, decide what kind of doll face you want to make. This step saves time and prevents the classic crafter’s mistake of creating elegant hair, a gorgeous outfit, and then giving the doll a face that looks like it was added during a power outage.
Soft and Simple
This style is perfect for cloth dolls, rag dolls, and felt dolls. Features are usually embroidered or lightly painted. The look is gentle, child-friendly, and cozy. Think small eyes, rosy cheeks, and a tiny mouth.
Painted and Whimsical
This style works beautifully on peg dolls, wooden beads, paper mache, and some fabric dolls. Painted faces let you add lashes, brows, blush, and tiny details without heavy sculpting.
Sculpted and Detailed
If you are working with polymer clay or air-dry clay, you can shape the nose, cheeks, lips, and eye sockets directly into the face. This is the most realistic option, but it also demands the most patience.
Minimalist and Modern
Sometimes less really is more. Two closed eyes, a tiny smile, and soft blush can create a beautiful handmade doll face that feels calm and stylish. This approach is especially good for beginners.
Basic Supplies You May Need
The exact tools depend on your material, but here is a practical starter list:
- Fabric, felt, wood bead, or clay head base
- Fine-tip fabric marker or pencil for guidelines
- Embroidery floss and needle
- Fine paintbrushes
- Water-based acrylic paint or paint pens
- Blush, soft pastel, or tinted wax for cheeks
- Cotton swabs and clean cloth for corrections
- Small sculpting tools for clay faces
- Sandpaper or nail buffer for smoothing cured surfaces
- Clear matte sealer or varnish when appropriate
If your doll is meant for a very young child, stitched details are usually the safest and smartest route. Plastic eyes may look cute in the package, but they are less cute when safety is the conversation.
How to Make a Doll Face Step by Step
1. Start With the Head Shape
A great doll face begins before the face itself. If the head is lumpy, uneven, too flat, or too narrow at the chin, your features will fight the shape the whole way through.
For cloth dolls, stuff the head firmly and evenly so the front is smooth. For felt dolls, decide whether the face will be flat, lightly padded, or attached over a stuffed head. For peg dolls, sand rough edges and prime if needed. For clay dolls, smooth the surface and define the head volume before adding details.
Tip: if the head looks odd from the side, the face probably will too. Turn it often. Doll faces are not just a front-view problem.
2. Lightly Mark Guidelines
This is the step beginners skip and then immediately regret. Draw a light vertical center line down the face and a horizontal eye line across it. These lines help keep features symmetrical and stop one eye from drifting into a solo career.
For front-facing dolls, the eyes usually sit lower than people expect. Many beginners place them too high, leaving a large empty lower face and a tiny forehead. If your doll looks alarmed, this is often the reason.
Keep your guidelines faint. You want a map, not a tattoo.
3. Decide on the Expression Before Adding Features
Do you want sleepy eyes, a cheerful smile, a neutral expression, or a more realistic gaze? Pick one mood and stay loyal to it. A sleepy eye with arched dramatic brows and a giant grin sends mixed signals. Your doll should look intentional, not emotionally overbooked.
Helpful rule: the simpler the doll, the simpler the expression. A minimalist felt doll face usually looks best with stitched closed eyes or dots for eyes, a tiny nose, and a small curved mouth.
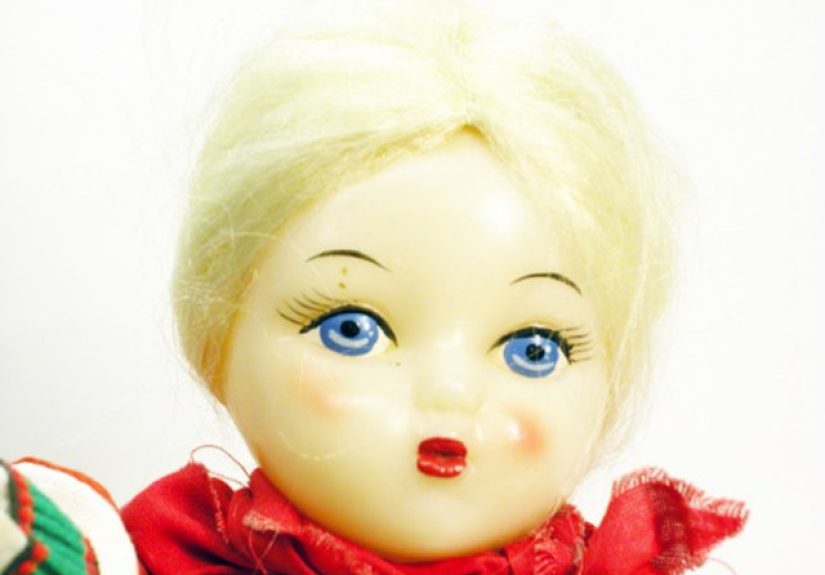
4. Add the Eyes First
The eyes anchor the entire doll face. Once they are in place, the rest becomes much easier.
For cloth or felt dolls: embroider the eyes before assembling the full head whenever possible. It is easier to keep stitches neat on a flatter surface. Small straight stitches, satin-style stitches, French knots, or simple curved lashes all work well.
For peg dolls or wooden heads: use a very fine brush or paint pen. Start with tiny marks. You can always make a line slightly thicker, but you cannot easily make it less dramatic once your doll suddenly has stage makeup.
For clay dolls: define the eye area first with shallow sockets, then paint or sculpt the lids depending on your style. Keep checking both sides from multiple angles.
Spacing matters. Eyes that are too close together can feel cramped. Eyes that are too far apart can look disconnected. Aim for balance with the rest of the face rather than copying a single formula blindly.
5. Shape or Suggest the Nose
A doll nose does not need to be complicated. In fact, overworking the nose is one of the easiest ways to age a soft, sweet doll face into something unexpectedly stern.
For soft dolls, a single vertical stitch, a tiny V-shape, or even no nose at all can work. For peg dolls, a dot or the gentlest shadow may be enough. For clay dolls, start with a small amount of material and build gradually. The best sculpted noses usually begin understated.
When in doubt, make the nose smaller. A tiny nose reads charming. A giant nose reads “This doll has opinions about your life choices.”
6. Add the Mouth Carefully
The mouth is where personality shows up loud and clear. A tiny upward curve creates warmth. A straight line creates calm or seriousness. A small open mouth can look adorable on baby dolls, while fuller sculpted lips suit more realistic art dolls.
Keep the mouth proportionate to the eyes and positioned below the nose with enough breathing room. If the mouth sits too close to the nose, the face can feel crowded. If it sits too low, the doll may look unexpectedly long-faced.
On fabric dolls, backstitch or stem stitch gives you control. On wooden dolls, a thin curved line is usually enough. On clay dolls, define the mouth line softly before deepening the corners.
7. Add Cheeks, Brows, and Tiny Details
This is the stage where the doll face wakes up. A little blush can add life instantly. Soft brows create mood. Tiny freckles can make a simple doll feel unique.
Use a light hand. Seriously. Doll cheeks should whisper, not shout. A little tinted pastel, blush, or diluted paint goes a long way. Build color slowly and step back often.
Eyebrows deserve special caution. Too high and your doll looks permanently shocked. Too angled and she looks like she is solving a mystery. Too dark and suddenly she has a stronger personality than everyone in the room.
8. Finish With Hair and Face Framing
Hair changes how the face reads. Yarn, embroidery floss, wool roving, felt, mohair, raffia, and sculpted clay hair all create different moods. Before gluing or stitching all of it in place, test a few strands or sections around the face.
Bangs can soften a large forehead. Side curls can make the cheeks feel rounder. A high bun creates a different personality than loose braids. Doll making is part construction, part styling, and part tiny-scale casting decision.
How to Make a Doll Face for Different Doll Types
Cloth Doll Face
Cloth doll faces are usually the most forgiving for beginners. Use a smooth fabric in a skin-tone shade you like, stuff the head evenly, transfer the facial placement lightly, and embroider features with a steady hand. Closed eyes, a small stitched nose, and a tiny smile are a great beginner combination.
If you want more dimension, you can add needle sculpting around the eye area, cheeks, or nose before finishing the face. Just do it sparingly. Too much sculpting can overpower a soft doll.
Felt Doll Face
Felt is ideal for cute, graphic faces. It holds stitches well and looks polished with simple embroidery. Use French knots for eyes if you want dots, or small stitched curves for sleepy eyes. Layered felt hair and tiny stitched mouths pair beautifully with this style.
The trick with felt is restraint. It already has visual texture, so you do not need many facial lines to make it expressive.
Peg Doll Face
Peg dolls are tiny charm factories. Their faces are small, so every mark needs confidence and control. Start with pencil guidelines, then paint in stages. Add the eyes first, then the mouth, then details like blush or lashes. Let each layer dry before adding another.
If you are nervous, practice on paper circles or spare wood pieces first. A few minutes of practice can save you from repainting a doll who accidentally looks like she has seen the end of civilization.
Clay Doll Face
Clay doll faces reward patience. Begin with the basic head form, then build subtle planes: brow, cheeks, nose bridge, chin, and lips. Use tiny amounts of clay and smooth constantly. You are shaping relationships between features, not just features themselves.
Once cured or fully dry, sand lightly if needed, paint in thin layers, and seal only if the material calls for it. Follow the product directions for drying, baking, and finishing. That part is not glamorous, but it is what keeps your beautiful doll from cracking, smudging, or looking like it went through a weather event.
Common Mistakes to Avoid
- Placing the eyes too high. This is the classic beginner move.
- Making features too large. Small details usually look more refined.
- Skipping guidelines. Symmetry is easier with a map.
- Adding too much blush. Rosy is lovely. Tomato is a different genre.
- Using thick paint. Thin layers create cleaner faces.
- Rushing the expression. Test the look before committing.
- Ignoring the hairstyle. Hair and face should work together.
Tips for Making Your Doll Face Look More Professional
Use reference sketches. Even a simple doodle helps. Work in good light. Put the doll down and look at it from a distance every few minutes. Photograph it with your phone because cameras reveal asymmetry in rude but useful ways. Practice eyes and mouths on scraps before working on the final head. And most importantly, stop before the face is overworked.
Professional-looking doll faces are often the ones with the fewest unnecessary details. They feel balanced, intentional, and clean. Handmade charm is not about perfection. It is about control, character, and knowing when to leave the poor little face alone.
What Making a Doll Face Feels Like in Real Life
Anyone can read instructions for how to make a doll face, but the real learning happens in those funny, slightly chaotic moments at the craft table. The first experience most makers have is surprise. You think the face will be the easy part because it is small. Then you discover small does not mean simple. Small means every decision is magnified. A one-millimeter eyebrow shift can change your doll from sweet to suspicious in under ten seconds. That sounds dramatic, but spend one weekend painting peg dolls and you will see the truth.
Another common experience is learning patience the stubborn way. Most people begin with confidence, place one eye, place the second eye, and then spend twenty minutes whispering, “Why are you over there?” as if the doll moved by itself. This is when you learn the value of guidelines, test sketches, and walking away for a minute before “fixing” the face into a worse situation. Doll faces teach restraint better than almost any craft I know.
There is also a strange and wonderful moment when the doll suddenly becomes someone. It usually happens with the mouth or the blush. Up until then, you are working on materials: thread, paint, wood, clay, stuffing. Then you add one tiny curve, one soft cheek, one eyelash, and the project develops a personality. It is still a doll, of course, but it no longer feels like a pile of supplies pretending to be a doll. It feels finished, or at least emotionally convincing, which is close enough for most crafters.
Many makers also discover that their favorite style is not the one they expected. Some think they want realistic clay faces and end up loving minimalist stitched features. Others start with simple felt dolls and gradually become the kind of person who debates lip shape with full artistic seriousness. That is part of the fun. The craft grows with you. A beginner might make closed eyes and a tiny smile. A year later, that same person may be shading eyelids, sculpting cheeks, and giving handmade dolls hair that deserves its own tiny conditioner commercial.
Most of all, making a doll face is a lesson in charm over perfection. The faces people remember are not always technically flawless. They are the ones with warmth. The sleepy baby doll with the crooked grin. The peg doll bride with rosy cheeks. The cloth doll with hand-stitched eyes that look calm and kind. Handmade faces carry evidence of the maker’s choices, and that is exactly what makes them lovable. So yes, practice matters. Technique matters. But heart matters too. A doll face does not need to look factory-perfect to be beautiful. Sometimes the tiny irregularities are what make it feel alive.
Final Thoughts
If you want to know how to make a doll face that looks beautiful, memorable, and handmade in the best possible way, focus on the basics: choose the right style, build a smooth head, mark guidelines, keep features small, and work slowly. Whether you embroider a soft rag doll, paint a peg doll, or sculpt a clay art doll, the goal is the same. You are not just adding eyes and a mouth. You are giving the doll a mood, a story, and a reason for someone to pick it up and smile.
Start simple. Practice often. Laugh when the first attempt looks a little dramatic. Then try again. Doll making has a generous learning curve, and every face teaches you something new. Before long, you will be making doll faces that look sweet, balanced, and unmistakably your own.


