
Table of Contents >> Show >> Hide
- Before You Start: Safety, Ethics, and “Please Don’t Surprise the Horse”
- Materials and Tools
- How Much Hair Do You Need?
- How to Make a Horse Hair Bracelet: 8 Steps
- Step 1: Collect the horsehair (the polite way)
- Step 2: Wash, rinse, and dry thoroughly
- Step 3: Sort and align your strands
- Step 4: Divide into four bundles and secure the top
- Step 5: Braid a square (four-strand) braid
- Step 6: Bind and seal the ends
- Step 7: Attach end caps (crimp or glue-in) the clean way
- Step 8: Add jump rings and clasp, then test like a skeptical engineer
- Troubleshooting: Common Problems (and the Fix)
- Style Variations: Make It Yours
- Care Tips: Keep Your Horsehair Bracelet Looking Good
- A Little Backstory: Why Hair Jewelry Feels So Meaningful
- FAQ
- Experience Notes: What Makers Learn After a Few Bracelets (Extra Tips)
- Conclusion
A horsehair bracelet is part craft project, part keepsake, part “I swear this will make sense once you see it.”
Whether you’re honoring a beloved horse, making a barn-bestie gift, or just curious how tail hair turns into
wearable art, you can absolutely DIY a braided horse hair bracelet at homewith a little patience and a lot of
tiny hairs that will try to escape like they’re late for turnout.
This guide walks you through a practical, beginner-friendly method (no fancy studio required), plus tips on
choosing hair, keeping your braid tidy, attaching end caps and clasps, and making the finished bracelet last.
Before You Start: Safety, Ethics, and “Please Don’t Surprise the Horse”
Horsehair jewelry is meaningful because it’s personalbut it should also be kind. Only use hair you’re allowed
to collect. If the horse isn’t yours, ask first. If you’re under 18, get an experienced adult to help with
cutting hair and handling adhesives and tools.
- Comfort first: Never collect hair in a way that stresses or startles the horse.
- Small is fine: You only need a modest bundle (and cutting too much looks… noticeable).
- Clean workspace: Hair + glue + jewelry findings = tiny chaos if you’re not organized.
- Ventilation: Many craft glues are strong; work in a well-ventilated area and avoid skin/eye contact.
Materials and Tools
You can make a horse hair bracelet a few different ways. This tutorial uses a sturdy braid and simple jewelry
findings (end caps + jump rings + clasp). It’s reliable, beginner-friendly, and doesn’t require metalworking.
Horsehair + prep
- Tail hair (recommended): longer, stronger, and easier to braid than mane hair
- Elastic bands or small hair ties
- Mild shampoo or gentle soap
- Towel and comb/brush for detangling
Bracelet hardware
- 2 cord end caps (crimp ends or glue-in ends) sized to your finished braid
- 2 jump rings
- 1 clasp (lobster clasp is easiest; toggle clasps look great too)
Tools
- Sharp scissors
- Flat-nose or chain-nose pliers (two pairs helps)
- Ruler or measuring tape
- Clips (binder clip, bulldog clip, or tape) to hold hair while you braid
- Adhesive (a strong craft/jewelry glue or epoxy made for jewelry use)
- Optional: masking tape, wax paper, and a small disposable surface for glue
Pro tip: Put a towel or sheet under your workspace. Horsehair is basically glitter with ambitionsit
travels.
How Much Hair Do You Need?
For most adult bracelets, you want hair that’s long enough to braid comfortably and still have extra length for
finishing. As a practical rule, choose hair that’s several inches longer than your intended bracelet length.
For thickness, aim for a small bundle that, when gathered together, feels like a slim pencil or a little less.
You can always braid again for a thicker look, but it’s frustrating to run short mid-braid and realize your
bracelet is turning into… a horsehair shoelace.
Example sizing
If your wrist measures 6.5 inches, a comfortable bracelet usually needs about 7.0–7.5 inches
total inside circumference depending on fit preference. Your clasp and end caps add length, so your braided
section might only need to be around 5.5–6.5 inches depending on the hardware.
How to Make a Horse Hair Bracelet: 8 Steps
This method uses a four-bundle square braid. It creates a neat, rope-like bracelet and looks
“way harder than it is,” which is the best kind of craft.
-
Step 1: Collect the horsehair (the polite way)
The easiest and least dramatic option is to collect hair from brushing or combing, but you may need to save
up for a while. If you’re cutting, choose a small section of tail hair from the underside
of the tail where it’s less visible.Tie an elastic band around the section before cutting so it stays bundled. Cut cleanly below the band with
sharp scissors. Place the bundle in a clean bag or container until you’re ready. -
Step 2: Wash, rinse, and dry thoroughly
Clean hair is easier to braid and helps your bracelet last. Wash the bundle gently with mild shampoo or soap.
Rinse extremely wellleftover product can make the hair slippery, sticky, or dull.Lay the hair flat on a towel and let it air dry completely. Avoid heat drying (it can make hair brittle or
flyaway, and it’s just not worth the drama). -
Step 3: Sort and align your strands
Spread the hair out and remove very short, broken, or uneven hairs. You don’t need perfection, but you do
want most hairs roughly the same length so the braid doesn’t thin out dramatically.Align the cut ends together and comb gently to remove tangles. Think “spa day,” not “barn aisle windstorm.”
-
Step 4: Divide into four bundles and secure the top
Divide the hair into four equal bundles. Use tiny elastics or thread to lightly bind each
bundle near the top so they don’t mingle like excited puppies.Gather the four bundles together at the top and secure them to your workspace. A binder clip on a clipboard,
tape on a table, or a safety pin pinned to a thick towel all work. The goal is tension and control. -
Step 5: Braid a square (four-strand) braid
Here’s the pattern. Name your bundles from left to right: A, B, C, D.
- Move A (far left) over B (so it’s between B and C).
- Move D (far right) over C (so it’s between B and C).
- Now move the new leftmost bundle over the next bundle, then move the new rightmost bundle over the next.
Repeat with steady tension. Every few passes, gently smooth the braid between your fingers. If hairs start
sticking out, don’t panicjust tuck them back into their bundle and keep going. Horsehair likes to test your
leadership skills.Continue braiding until the braided section is the length you need (remember: end caps + clasp add length).
-
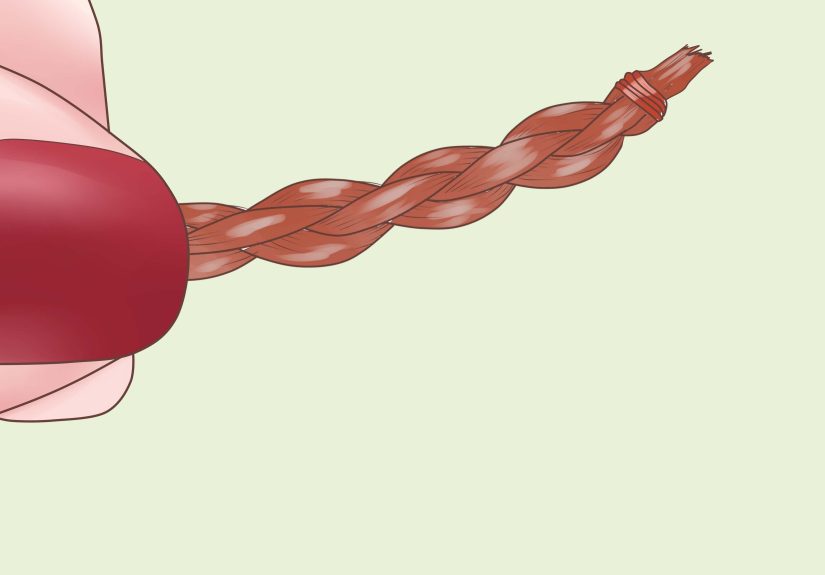
Step 6: Bind and seal the ends
When you reach the desired braid length, bind the end tightly with strong thread (or a tiny elastic) about
1/4–1/2 inch from the end. Then add a small amount of jewelry/craft adhesive to the bound area to keep the
braid from unraveling.Let the glue set enough that the braid holds its shape before you trim. Don’t rush this step. “Impatience”
is how crafts turn into modern art. -
Step 7: Attach end caps (crimp or glue-in) the clean way
Choose end caps that fit snugly over your braided hair. If you’re using glue-in ends, add a
small amount of adhesive inside the cap, insert the braid end, wipe away excess, and let cure fully.If you’re using crimp ends, slide the braid into the crimp finding, then use flat-nose
pliers to crimp firmly and evenly. Many makers still add a tiny bit of adhesive for extra securityespecially
if the braid is smooth.Repeat for the other end, making sure the bracelet length is correct before final curing. This is your last
best moment to avoid making a bracelet that fits your wrist and also your forearm. -
Step 8: Add jump rings and clasp, then test like a skeptical engineer
Use pliers to open a jump ring by twisting it sideways (not pulling it apart). Attach the clasp to one end
and a jump ring (or the other half of a toggle clasp) to the other end. Twist the jump ring closed until the
seam is tight.Now test: gently tug the bracelet ends, open/close the clasp several times, and check for loose hairs near
the caps. If something slips, fix it nowyour future self will thank you.
Troubleshooting: Common Problems (and the Fix)
My braid gets thinner as I go
You likely have a lot of short hairs hiding in your bundles. Next time, sort more aggressively before braiding.
For this bracelet, you can sometimes “feed in” a few longer hairs into the thinning bundle and keep going,
smoothing them into place.
Hair is sticking out everywhere
Lightly dampen your fingers (not the braid) and smooth the surface as you work. Keep steady tension and don’t
let the bundles twist. Stray hairs are normal; your goal is “tidy,” not “photoshopped.”
End cap won’t fit
The braid may be too thick, or the cap too small. You can either:
- Switch to a larger end cap, or
- Trim and re-braid slightly tighter so the diameter is smaller, or
- Use a different finishing style (like a cone end or different crimp finding).
Glue oozed out and looks messy
Use less glue than you think you need. For now, let it cure fully, then carefully remove any dried excess with a
craft knife (adult help recommended) and polish the hardware with a soft cloth.
Style Variations: Make It Yours
Two-horse (or two-tone) braid
If you have hair from two horses, split your bundles so two are color A and two are color B. The square braid can
create a subtle spiral pattern depending on hair shades.
Add a charm
Add a small charm to a jump ring near the clasp. Keep it lightweight so it doesn’t pull or fray the hair.
Go flat instead of round
A flat braid (or kumihimo flat braid) gives a wider bracelet. It can look more like a cuff and shows off color
patterns nicelygreat for multi-horse designs.
Care Tips: Keep Your Horsehair Bracelet Looking Good
Horsehair is strong, but it’s still natural fiber. Treat it like hair (because… it is). Most wear-and-tear comes
from water exposure, chemicals, friction against metal watches/bracelets, and rough storage.
- Avoid long water exposure: Remove it for swimming, showering, and heavy washing.
- Clean gently: If needed, wash with mild soap/shampoo and air dry completely.
- Store smart: Keep it dry, out of direct sunlight, and away from snaggy jewelry.
- Don’t crush it: Store flat or loosely coiled so the braid keeps its shape.
A Little Backstory: Why Hair Jewelry Feels So Meaningful
Hair jewelry isn’t new. For centuries, people have woven hair into keepsakes as a way to remember someone (or
something) important. In the Victorian era, hairwork was especially popularsometimes as mourning jewelry, and
sometimes simply as sentimental “I’m keeping you close” craftsmanship.
Horsehair bracelets fit right into that tradition: a small, wearable reminder of a partnership that’s often
bigger than words. Also, unlike a framed photo, it won’t fall off the wall the first time someone slams a door.
FAQ
Can I use mane hair instead of tail hair?
You can, but mane hair is often shorter and can be harder to braid into a consistent, durable bracelet. Tail
hair is usually the better choice for strength and length.
How long does it take?
Plan for 1–2 hours for prep and braiding if you’re new, plus curing time for adhesive (often several hours or
overnight depending on the product).
Will it smell like a horse?
If the hair is properly washed and dried, it should not smell. If it does, it probably needs a better rinseor
you stored it damp, which is a universal craft tragedy.
What if I mess up the braid?
Unbraid and restart. Horsehair is forgiving as long as you haven’t glued the ends yet. Consider it “practice
reps,” like braiding at the barn while someone tells a story you’ve heard 14 times and will still laugh at.
Experience Notes: What Makers Learn After a Few Bracelets (Extra Tips)
The first horsehair bracelet you make is mostly about learning what horsehair wants to do. The second one is
where you start negotiating. By the third, you realize it’s basically a relationship: if you show up calm and
consistent, it behaves; if you rush, it punishes you with flyaways and uneven tension.
A common “aha” moment is that prep matters more than braiding. People think the braid is the hard
part, but the real secret is sorting and aligning your bundles. When you remove short hairs early and comb
everything smooth, the braid almost makes itself. When you don’t… the braid still happens, but it slowly turns
into a tapering rope of regret. If your bracelet looks thinner near the end, it’s usually not your technique
it’s the hidden army of short hairs that ran out halfway through.
Makers also discover that tension is a skill, not a personality trait. Your hands will naturally
tighten or loosen as you work, especially if you pause to answer a text, grab a snack, or dramatically explain
to someone why you’re “making jewelry out of hair” like it’s totally normal (it is). The fix is simple: anchor
your work, check your braid every few passes, and gently smooth it. Some people clip a small weight below the
braid (a binder clip can do it) to help keep tension consistent. It feels a little like you’re building a tiny
suspension bridge, but it works.
Another experience-based lesson: hardware sizing is everything. Many beginners buy end caps first
and then try to braid to match the cap. That’s like buying shoes before you know your size. If your cap is too
small, you’ll crush the braid and fray the hairs. Too big, and you’ll rely on glue alone, which can loosen over
time. The sweet spot is a cap that fits snugly when the braid is neatly trimmed and boundsecure without
violence.
Finally, experienced crafters tend to become glue minimalists. The first time, it’s tempting to
use enough adhesive to qualify as a structural material. But neat finishes usually come from using a tiny amount
inside the cap (or on the bound area), wiping away excess, and letting it cure fully. Most “messy cap” issues
come from impatience, not from bad glue. Give it time to set, keep it still, and don’t “test” it every two
minutes like a kid checking cookies in the oven.
The best part, though, is the emotional payoff. People who make horsehair bracelets often describe the process
as calming and meaningfullike turning a memory into something useful. It’s a small, wearable way to carry a bond
with you, whether the horse is still nickering at feed time or living in your favorite stories. And if a few
stray hairs escape onto your shirt mid-project? Congratulations: you’ve made the most authentic equestrian craft
possible.
Conclusion
Making a horse hair bracelet is equal parts technique and tenderness: you clean and sort the hair, braid it with
steady tension, finish it with secure end caps, and treat it like the keepsake it is. Take your time, aim for a
neat braid rather than perfection, and rememberif your first attempt looks a little “rustic,” that just means
it’s handmade. (And if anyone asks, you can call it “barn-chic.”)


