Table of Contents >> Show >> Hide
- Why Make a Jewelry Holder Instead of Buying One?
- Before You Start: Sort Your Jewelry Like a Reasonable Human
- How to Make a Jewelry Holder: 7 Easy Organization Ideas
- Step-by-Step: Make a Simple Framed Jewelry Holder
- Design Tips That Make a DIY Jewelry Holder Work Better
- Common Jewelry Holder Mistakes to Avoid
- Best DIY Jewelry Holder Ideas for Small Spaces
- How to Match the Holder to Your Style
- Experience and Real-Life Lessons From Making Jewelry Holders at Home
- Conclusion
If your jewelry currently lives in one mysterious bowl where necklaces go to tangle and earrings go to disappear, congratulations: you are extremely normal. A messy jewelry pile is basically a tiny glitter-covered black hole. The good news is that you do not need a custom closet, a luxury armoire, or the patience of a museum curator to fix it. You just need a smart jewelry holder that fits your space, your routine, and your actual collection.
Learning how to make a jewelry holder is one of those rare DIY wins that checks every box. It is practical, affordable, customizable, and weirdly satisfying. You get better organization, easier mornings, and a prettier bedroom or closet at the same time. Not bad for a project that can start with a thrifted frame, a corkboard, a few hooks, or even a paper towel holder that has retired from kitchen duty.
In this guide, you will learn easy DIY jewelry holder ideas for necklaces, earrings, bracelets, rings, and everyday accessories. You will also learn how to choose the right design, what materials work best, how to protect delicate pieces, and how to avoid building a beautiful organizer that turns into a future tangle festival. Yes, that is a technical term now.
Why Make a Jewelry Holder Instead of Buying One?
A store-bought jewelry organizer can work, but a homemade jewelry holder gives you more control. That matters because jewelry collections are never truly one-size-fits-all. Some people wear mostly hoops and studs. Some have a dramatic necklace collection that deserves its own zip code. Others need a tidy place for rings, watches, and the bracelet stack they swear they will untangle on Sunday.
When you make your own jewelry holder, you can:
- Build around the pieces you wear most often
- Match the organizer to your room style
- Use wall space instead of taking over your dresser
- Repurpose budget-friendly household items
- Create separate storage for delicate or sentimental jewelry
- Prevent scratching, tangling, and that daily “Where is the other earring?” crisis
A DIY jewelry holder also helps you see your collection more clearly. That sounds simple, but it is huge. When everything has a home, you stop rebuying basics you already own, you wear more of what you have, and your accessories become part of your decor instead of a chaotic side quest.
Before You Start: Sort Your Jewelry Like a Reasonable Human
Before grabbing glue, hooks, or spray paint, sort your jewelry first. This step saves time and helps you build the right kind of holder instead of a cute but completely useless one.
Group Jewelry by Type
Separate your collection into categories such as:
- Necklaces
- Earrings
- Bracelets and bangles
- Rings
- Watches
- Special-occasion or delicate pieces
Choose What Should Be Displayed
Everyday jewelry works well in open storage because it stays visible and easy to reach. Fine jewelry, heirlooms, or delicate pieces often do better in lined trays, small boxes, or enclosed storage where they are less exposed to dust, friction, and accidental knocks.
Be Honest About Your Space
If your vanity is already crowded with skincare, makeup, chargers, hair clips, and one cup that definitely should not still be there, a wall-mounted jewelry holder is probably smarter than a tabletop one. If you have shallow drawers, tray-style organizers may be the better fit. Let your space make some decisions for you.
How to Make a Jewelry Holder: 7 Easy Organization Ideas
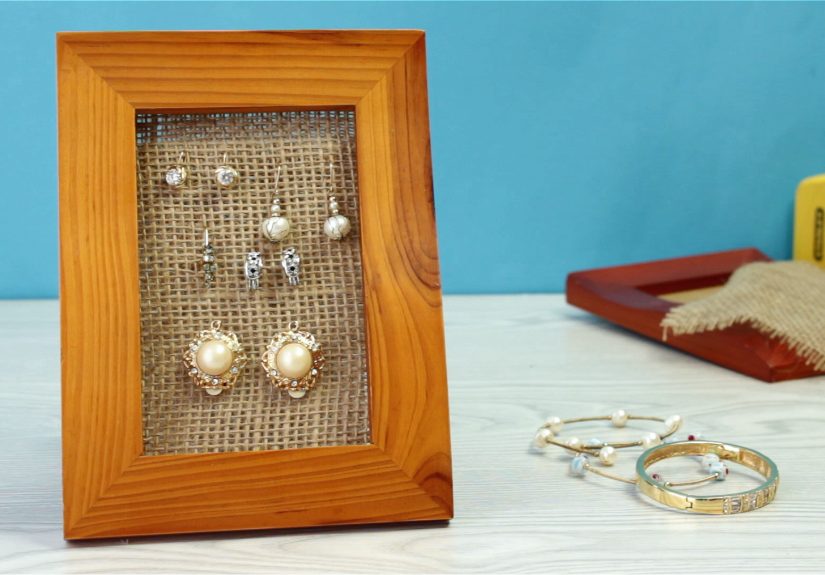
1. Framed Wall Jewelry Holder
This is one of the best DIY jewelry holder ideas because it looks polished without being difficult. Start with an old picture frame, remove the glass, and attach metal mesh, decorative wire, cane webbing, or a fabric-covered backing inside. Add small cup hooks along the bottom or sides for necklaces and bracelets. Earrings can hang directly through the mesh.
Why it works: it uses vertical space, keeps necklaces visible, and turns jewelry into wall art. If you paint the frame or choose one with character from a thrift store, it looks much more expensive than it is.
2. Corkboard or Pegboard Jewelry Station
If you want a flexible jewelry organization system, this one is hard to beat. Cover a corkboard with linen, velvet, or patterned fabric, then add pushpins, decorative tacks, or small hooks. A pegboard works similarly but gives you more strength and a little more modular freedom.
This style is ideal for people who rotate accessories often. You can easily move hooks around as your collection changes. It is also perfect for renters who want a low-cost jewelry display that is easy to customize.
3. Branch or Driftwood Necklace Holder
This idea is simple, sculptural, and surprisingly chic. Clean and dry a sturdy branch or piece of driftwood, then mount it to the wall or set it into a weighted base. Hang necklaces and bracelets over the branch arms. If you want a more finished look, seal the wood or paint it in a matte neutral tone.
It works best for medium-length necklaces and lighter pieces. Bonus points if you want your room to say, “I am organized, but I also appreciate natural texture.”
4. Upcycled Dish, Bowl, or Cup Holder
Small dishes are excellent for rings, studs, and daily jewelry you remove before bed. You can group a few small bowls inside a drawer, on a dresser tray, or on a vanity shelf. Vintage teacups, saucers, tiny plates, and pinch bowls all work well.
This is the easiest project on the list because it barely qualifies as a project. It is more of an organizational plot twist. Still counts.
5. Paper Towel Holder Bracelet Stand
For bangles and chunky bracelets, a standing paper towel holder is a brilliant hack. Slide bracelets over the center rod and keep the base stable with felt pads underneath if needed. You can also use a decorative bottle, wooden dowel stand, or repurposed spindle for a similar effect.
This setup keeps bracelets from knocking around in a drawer and makes it easier to see what you own at a glance.
6. Drawer Tray Organizer With Everyday Items
If you prefer hidden storage, convert a shallow drawer into a custom jewelry drawer. Use muffin tins, ice cube trays, divided kitchen organizers, or small boxes covered in felt. Assign one section for rings, another for earrings, another for chain necklaces, and so on.
This approach is budget-friendly, fast, and great for people who want their surfaces clutter-free. It also helps keep smaller items from migrating into chaos.
7. Hidden Mirror or Cabinet Jewelry Holder
If you have limited space or want more protection for delicate pieces, consider a mirror-front organizer or a slim cabinet with hooks and shelves inside. You can make one from a shallow wall cabinet or modify an old medicine cabinet with pegs, hooks, and small trays.
This is a strong option for fine jewelry storage because it combines visibility with a little more protection from dust and accidental bumps.
Step-by-Step: Make a Simple Framed Jewelry Holder
If you want one project that is easy, attractive, and useful, start here.
Materials
- One picture frame, medium or large
- Metal mesh, decorative screen, cane webbing, or sturdy fabric backing
- Staple gun or strong craft adhesive
- 6 to 12 small cup hooks
- Sandpaper
- Paint or stain if desired
- Screws or wall hangers
- Optional felt strips, trim, or a small shelf ledge
Instructions
- Clean and prep the frame. Remove the glass and backing. Sand any rough areas and paint or stain the frame if you want a refreshed look.
- Cut your insert. Measure the inside opening and cut the mesh or backing material to fit snugly.
- Attach the insert. Staple or glue the material to the back of the frame. Make sure it is tight enough to support earrings without sagging.
- Add hooks. Screw cup hooks into the bottom edge or inner side rails of the frame. Space them far enough apart so necklaces do not overlap into a dramatic metal braid.
- Mount securely. Hang the organizer on the wall near your dresser, vanity, or closet. Use proper wall anchors if needed.
- Assign sections. Use hooks for necklaces and bracelets, mesh for earrings, and a tiny attached tray or nearby dish for rings.
The result is functional and decorative. It looks intentional, not improvised, which is the dream for almost every DIY project ever attempted.
Design Tips That Make a DIY Jewelry Holder Work Better
Keep Necklaces Separate
Long necklaces should hang individually whenever possible. If chains overlap too much, they will tangle no matter how positive your attitude is.
Use Soft Surfaces for Delicate Pieces
Velvet, felt, cork, and fabric-lined compartments are helpful for rings, pearls, and easily scratched jewelry. Hard metal rubbing against hard metal is not an organizing strategy. It is a future repair bill.
Avoid Bathroom Storage
It may seem convenient to keep jewelry near the mirror where you get ready, but humid bathrooms can encourage tarnish and wear. A bedroom dresser, closet wall, or dry vanity area is usually a better choice.
Store Pearls and Soft Stones Separately
Pearls, opals, and softer gemstones can scratch more easily than sturdier pieces. Give them their own pouch, compartment, or padded tray instead of tossing them in with metal chains and rings.
Clean Before Storing
A quick wipe with a soft cloth before putting jewelry away helps remove oils, perfume residue, and everyday grime. That tiny habit can make a big difference over time, especially for frequently worn pieces.
Common Jewelry Holder Mistakes to Avoid
- Making it too decorative to be useful. If your organizer looks great but cannot hold your actual collection, it is a wall sculpture, not a storage solution.
- Spacing hooks too close together. Necklaces need breathing room.
- Using weak adhesives. Jewelry may be light, but gravity is persistent.
- Ignoring weight balance. Heavy statement pieces need stronger hooks and more secure mounting.
- Mixing everything together. Rings, earrings, chains, and bracelets all behave differently. Organize accordingly.
- Leaving no room to grow. If you love accessories, your collection will probably expand. Plan for that now.
Best DIY Jewelry Holder Ideas for Small Spaces
If you are organizing a small bedroom, apartment, dorm, or compact closet, the smartest move is to use vertical or hidden storage.
- A frame organizer mounted above a dresser
- A narrow peg rail with hooks inside a closet
- A mini corkboard on the side of a wardrobe
- A drawer insert made from small trays
- A mirror cabinet with hooks and compartments inside
- A back-of-door necklace rack
In tight spaces, the best jewelry holder is usually the one that disappears into a wall, drawer, or door instead of competing with your limited surface area.
How to Match the Holder to Your Style
A jewelry holder should not feel like an afterthought. If it sits in plain view, it becomes part of the room. A black metal frame works well in modern or industrial spaces. Natural wood fits farmhouse, rustic, or Scandinavian looks. Painted corkboards can brighten a casual bedroom. Vintage dishes and gold hooks add a more classic, feminine feel. Acrylic trays look neat and minimal.
In other words, your organizer can absolutely be useful and pretty. We are not choosing between function and charm here. We are greedy. We want both.
Experience and Real-Life Lessons From Making Jewelry Holders at Home
One of the most interesting things about making a jewelry holder is that the first version teaches you more than any tutorial ever could. On paper, nearly every DIY jewelry organizer sounds perfect. In real life, you find out quickly whether your necklaces are longer than expected, whether your earrings actually fit through the mesh you picked, and whether the “cute little tray” you chose is really just a tiny landing pad for clutter.
A common experience is starting with a holder that is too small because it is easy to underestimate how much jewelry you own. A person may think they have a “simple collection” until they separate it by category and discover twelve pairs of hoops, nine rings, seven bracelets, three watches, and a necklace pile that could audition for a pirate movie. That is why measuring and sorting first makes such a difference. It prevents the classic DIY moment where the organizer is finished but half the jewelry is still sitting on the dresser looking personally offended.
Another lesson people often learn is that visibility changes habits. When jewelry is spread across individual hooks, dishes, or sections, it gets worn more often. Items that used to vanish into a tangled box suddenly become part of the daily rotation. That can make getting dressed faster and more creative. Instead of grabbing the same safe pair of studs every morning, you start noticing pieces you forgot you loved.
There is also the issue of placement. Many people instinctively want to keep jewelry in the bathroom because that is where the mirror is. Then they notice tarnish, dullness, or extra cleaning. Moving a jewelry holder into a dry bedroom corner, onto a closet wall, or above a vanity usually works much better over time. The holder stays cleaner, and the jewelry does too.
Material choice matters more than people expect. Metal hooks are great for necklaces, but soft-lined trays are better for rings and delicate pieces. Pearls and softer stones benefit from gentler storage, while costume jewelry often does fine in open compartments for easy access. The best homemade system is usually a combination setup rather than one single organizer doing all the work.
Perhaps the most satisfying part of the experience is that a jewelry holder solves more than storage. It also reduces visual stress. A neat arrangement of earrings, rings, and necklaces can make a bedroom feel calmer and more finished. It turns everyday accessories into part of the decor. That is a pretty good return for a weekend project built from a frame, some hooks, and a little trial and error.
And yes, there will probably be one moment when you hold up the finished piece, step back proudly, and realize you forgot to leave a spot for bracelets. That is normal too. DIY is not about perfection. It is about making your space work better, learning as you go, and ending up with something useful enough that future-you says, “Finally.”
Conclusion
If you have been wondering how to make a jewelry holder, the best answer is simple: start with the kind of jewelry you actually wear, choose a format that fits your space, and keep the design practical. A framed organizer, corkboard, drawer tray, branch display, bracelet stand, or hidden cabinet can all work beautifully when matched to your habits.
The smartest jewelry organization ideas do not just look nice. They make your life easier. They keep chains from tangling, pairs from separating, and delicate pieces from getting scratched or forgotten. And because a DIY jewelry holder can be built from affordable or repurposed materials, it is one of the easiest ways to make your room feel more organized without spending a fortune.
So go ahead and rescue your jewelry from that chaotic drawer, random dish, or suspiciously tangled corner of the dresser. Your earrings deserve better. Honestly, so do you.