Table of Contents >> Show >> Hide
- What Is a Palm Frond Cross (and Why Is Everyone Suddenly an Expert on Palm Sunday)?
- What You’ll Need
- Before You Fold: Picking and Prepping the Palm
- How to Make a Palm Frond Cross: 14 Steps
- Make It Look Good (Without Becoming a Palm Surgeon)
- Troubleshooting: Common Palm Cross Problems (and Fixes)
- Practice Hack: Use Paper Before You Use Palms
- How to Store, Display, and (When the Time Comes) Dispose Respectfully
- Conclusion: Your 3-Minute Craft That Carries All Week
- Experiences and Real-World Tips From Palm Cross Makers (Extra )
Palm Sunday hands you a long green frond and a short window of time to turn it into something meaningful
before it dries out, snaps in half, and becomes the world’s most dramatic bookmark. The good news:
folding a palm frond cross isn’t magic. It’s a repeatable little weavepart origami, part “don’t panic,”
and part muscle memory you build in about two crosses.
This guide walks you through a classic palm cross fold in 14 clear steps, plus troubleshooting,
sizing tips, and real-life “why did my cross turn into a pretzel?” fixes. You’ll end with a cross that looks tidy,
holds together without tape, and can be displayed throughout Holy Week (or longer, if you store it smartly).
What Is a Palm Frond Cross (and Why Is Everyone Suddenly an Expert on Palm Sunday)?
A palm frond cross is a small woven cross traditionally made from blessed palm leaves distributed on Palm Sunday.
Many churches teach the fold as a hands-on reminder of Jesus’ entry into Jerusalem and the beginning of Holy Week.
Practically speaking, it’s also a wholesome way to keep your hands busy during fellowship timelike a craft and a
meditation had a leafy baby.
What You’ll Need
- One palm frond strip (fresh is easiest). Ideal: roughly 1/4–1/2 inch wide and 12–26 inches long.
- Scissors (optional, for trimming ragged edges or splitting a double frond).
- A tiny bit of water (optional, for misting if the palm feels dry or stiff).
- A flat surface (optional, but helpful if you like your folds crisp and your sanity intact).
Before You Fold: Picking and Prepping the Palm
Not all palm strips are created equal. Some are smooth and flexible; others are basically nature’s version of a
stiff plastic straw. Your goal is a strip that bends without cracking.
Quick prep tips
-
Split “double” fronds: Many palm fronds have two long leaflets connected. Gently pull them apart to create
a single working strip, and remove stringy bits. -
Trim for consistency: If your strip is wide, trim it closer to 1/2 inch so folds stack neatly.
If one end is frayed or overly skinny, snip a little so it threads cleanly. -
Soften if needed: If the palm feels dry, lightly mist it or briefly wrap it in a barely damp paper towel.
(You’re going for “pliable,” not “soggy salad.”)
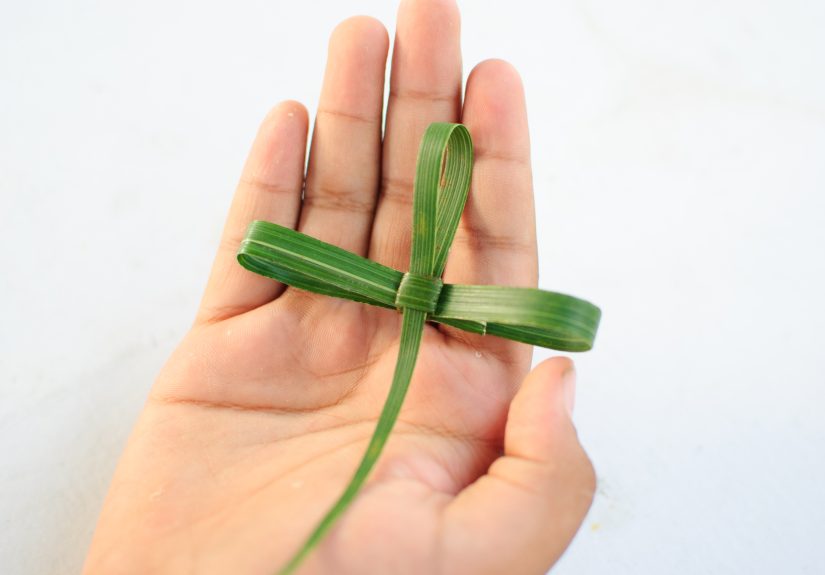
How to Make a Palm Frond Cross: 14 Steps
There are several legitimate folding patterns. This one is a widely taught, sturdy method that forms a clean center
“square” (the lock), even arms, and a secure tuck.
-
Orient the palm.
Hold the strip vertically with the tapered end up (usually the pointier end). The thicker end will become the base. -
Choose your cross length.
About 5–6 inches from the bottom, decide how tall you want the cross’s vertical shaft to look. Longer fold = longer cross.
(If your strip is shorter, scale down; proportional is better than ambitious.) -
Make the first fold (top comes down).
Fold the top portion down toward you to create a short section in front and a longer “tail” section behind.
Don’t crush the fold like you’re closing a suitcasefirm but not violent. -
Flip the piece over.
Turn it over so the longer tail is facing you. This keeps the layering consistent and sets you up for a cleaner lock. -
Form a right angle near the top.
Near the top of the folded section (often around 1–2 inches from the top edge),
fold the long tail diagonally to the right to create a crisp right-angle corner.
This corner helps define where the crossbar will sit. -
Wrap to build the center “square.”
Wrap the long tail around the upright section to create a small stacked square/rectangle at the center.
Many patterns use about 2 to 2½ wraps. Keep the wraps snug; this is your cross’s “belt.” -
Flip again (yes, again).
Turn the whole piece over so the layered square stays tight. This is the moment people usually bend instead of flipdon’t.
You’re rotating the whole work, not making a new fold. -
Create the first arm (right side).
Fold the tail to form an arm about 1½–2 inches long.
Fold toward you so the arm sits horizontally. Keep the arm length proportional to the shaft. -
Create the second arm (left side).
Fold the tail back across to form the second arm, matching the first.
If the arms aren’t equal, don’t worryyou can adjust before the final tightening. -
Angle the tail upward.
At the center where the arms meet, make a diagonal fold so the tail points upward.
This sets up the threading path through the center wraps. -
Thread the tail behind the center loops.
Slide the tapered tip behind the wrapped center layers (the “pocket” created by your wraps).
Aim for the tip to travel downward alongside the vertical shaft. -
Loop it through a second time (the lock).
Bring the tail around and thread it behind the center layers again.
This second pass is what makes the cross feel secure instead of “one gust of wind away from modern art.” -
Tighten and shape.
Hold the center square firmly with one hand and gently pull the tail with the other.
Adjust the arms so they sit level. If the top looks too short or too long, you can often fine-tune by pulling slightly at the base. -
Finish the base.
If you have extra tail length, tuck it neatly into the back pocket or wrap it once more around the center before tucking.
Trim only if absolutely necessary, and keep any trimmed pieces respectfully (especially if your palms were blessed).
Make It Look Good (Without Becoming a Palm Surgeon)
Size tweaks that actually work
- For a smaller cross: Use a shorter strip (around 13–18 inches) and make shorter arms (about 1 inch).
- For a larger cross: Choose a longer strip (24–26 inches) and keep the center square slightly bigger with wider wraps.
- For cleaner lines: Trim the strip to a consistent width before you start and remove stringy edges so layers stack flatter.
Troubleshooting: Common Palm Cross Problems (and Fixes)
“My palm keeps cracking.”
That usually means it’s too dry or you’re folding across a thick, stiff rib. Lightly mist the palm or wrap it briefly in a damp paper towel.
Also try trimming away the stiffest edge so you’re folding a more flexible strip.
“The center square won’t stay tight.”
Your wraps may be too loose, or you skipped the second threading/loop that locks everything in place.
Re-do the wraps snugly, then make sure you thread the tail behind the center layers at least twice before tightening.
“My arms are uneven.”
Fix this before the final tightening. Loosen slightly, re-measure the arm lengths (even visually), and re-fold the second arm to match the first.
If you tighten first, you’ll end up negotiating with a very stubborn square.
“I can’t find the pocket to tuck the tail.”
The pocket is created by the center wraps. If you wrapped too few times, the pocket is tiny or nonexistent.
If you wrapped too many times, the pocket becomes a traffic jam. Aim for about 2 to 2½ snug wraps, then flip and proceed.
Practice Hack: Use Paper Before You Use Palms
If you’re teaching kids (or you just like a low-stakes warmup), practice with a long strip of green construction paper.
Paper is forgiving, consistent in width, and doesn’t judge you when you redo step 7 four times.
Once your hands learn the sequencefold, wrap, flip, arm, arm, tuckthe palm version becomes much easier.
How to Store, Display, and (When the Time Comes) Dispose Respectfully
Keeping palms flexible
Palms dry quickly. If you need to fold them later, store unused palms in the refrigerator (not the freezer) and add a
wrung-out damp paper towel if they start to look dry. The same trick can help a finished palm cross stay nicer longer.
Displaying your palm cross
- Place it on a shelf or home altar area.
- Tuck it into a picture frame corner (gentle pressure helps it keep shape).
- Hang it discreetly with a small loop of thread if you want a floating look.
What many churches do with old palms
A common tradition is to return old palms to church to be burned and used for Ash Wednesday ashes the next year.
If that’s practiced in your community, it’s a meaningful full-circle moment: palms to ashes, celebration to repentance,
and back again.
Conclusion: Your 3-Minute Craft That Carries All Week
Once you’ve folded one palm frond cross, you’ll understand why people can do it while chatting, herding kids, and balancing a donut plate.
The secret is the center square: build it snug, flip when you’re supposed to flip, and thread the tail through the pocket twice to lock it in.
After that, it’s just shaping and small adjustments.
Whether you’re making one cross for your own home or a hundred for a parish table, the process is the same:
slow down for the first cross, then let your hands learn the rhythm. And if your first attempt looks “rustic,”
congratulationsyou’ve made a genuine, human, non-factory-made palm cross. That’s kind of the point.
Experiences and Real-World Tips From Palm Cross Makers (Extra )
If you’ve ever walked into a church hall on the Saturday before Palm Sunday, you know the scene: folding tables,
a pile of palms that looks like it could be used to thatch a small hut, and at least one person who can fold
a perfect cross while maintaining eye contact and discussing the potluck schedule. That’s the sneaky truth about
palm crossesonce the motion lives in your hands, the craft becomes almost conversational.
Beginners usually have the same “aha” moment: the cross isn’t held together by hope and good intentions; it’s held
together by the center wraps and the tuck. In real life, people tend to pull too gently at first (the square stays loose),
and then overcorrect by yanking (the palm tears, everyone gasps, and someone offers you a fresher frond like a medic
handing out bandages). The sweet spot is firm tension while you pinch the center square with your thumb and forefinger
that pinched grip is the difference between “finished cross” and “leafy accordion.”
Another universal experience: palms dry faster than you expect, especially in heated buildings or sunny rooms.
Many groups keep a spray bottle nearby and lightly mist the stack of palms as they work. Some people wrap unused palms
in a barely damp paper towel and tuck them into a bag until it’s their turn at the folding table. The goal is not to soak
themtoo much moisture makes the strips slippery and harder to controlbut to keep them bendable so the folds don’t crack.
When making palm crosses in bulk, most teams accidentally reinvent an assembly line. One person splits double fronds
and removes stringy bits. Another trims width so everyone starts with similar strips. A third person becomes the
“center-square specialist,” because the first few wraps determine whether the rest of the fold is smooth or stressful.
And then there’s always someone who tests the finished crosses by gently tugging the armsif it survives that tug,
it’ll survive the walk to the car and the ride home.
If you’re teaching kids, the experience is equal parts sweet and chaotic. Paper practice helps, but the real win is
giving them a target that feels achievable: “Let’s get the square in the middle,” not “Let’s make it perfect.”
Kids love the moment when the cross shape appears (arms and shaft), because it feels like the craft finally “clicked.”
They also love naming their crosses, which is how you end up with a fridge full of “Sir Cross-a-Lot” and “Palmela Anderson.”
Honestly? Let them have it. The tradition sticks when it’s joyful.
Finally, a quiet experience many people mention: folding a palm cross can feel surprisingly reflective. The repetitive
motion slows you down. The palm is humble, fragile, and realit won’t behave like a factory-cut ribbon. And when you finish,
you’re holding something handmade that connects celebration and sacrifice in one small shape. Even if your first cross is a
little lopsided, it still carries the message. And the second one will look better. (The third one might even earn you a seat
at the unofficial “expert folder” tablesnacks not guaranteed.)