Table of Contents >> Show >> Hide
- Understanding the Power Rangers Outfit Design
- Materials You Will Need
- Step 1: Choose Your Ranger Color and Style
- Step 2: Create the Bodysuit Base
- Step 3: Add the Classic Diamond Pattern
- Step 4: Make the Belt and Buckle
- Step 5: Create Gloves and Arm Details
- Step 6: Make Boots or Boot Covers
- Step 7: Build a Helmet or Helmet-Inspired Mask
- Step 8: Paint and Seal Foam Pieces
- Step 9: Add Personal Ranger Details
- Step 10: Test the Full Outfit Before Wearing It Out
- Budget-Friendly Tips for Making a Power Rangers Costume
- Common Mistakes to Avoid
- How to Make the Outfit Comfortable
- Cleaning and Storing Your DIY Power Rangers Outfit
- Extra Experience: What Making a Power Rangers Outfit Teaches You
- Conclusion
There are few costumes that say “I am ready to save the universe and still make it to the snack table” quite like a Power Rangers outfit. The bold color, the diamond-shaped chest design, the helmet, the gloves, the boots, the belteverything about it is loud in the best possible way. Whether you are preparing for Halloween, a comic convention, a school spirit event, a themed party, or a weekend cosplay build, learning how to make a Power Rangers outfit is a fun project that mixes sewing, crafting, painting, and just enough patience to keep your hot glue gun from becoming your arch-nemesis.
The good news? You do not need a Hollywood costume department. A strong DIY Power Rangers costume can be made with stretch fabric, foam, fabric paint, gloves, boots, and a few clever shortcuts. The goal is not to copy every tiny studio detail perfectly; it is to capture the clean superhero silhouette, the color-blocked suit, and the helmet-inspired look that makes people instantly say, “Go Go!” before they even finish walking past you.
This guide breaks down the process step by step, from choosing your Ranger color to building the suit, belt, gloves, boots, helmet, and finishing details. You will also find practical tips for comfort, safety, durability, and budget-friendly alternatives. Because yes, you can look heroic without spending your entire paycheck on spandex. That money may be needed later for pizza, which is also heroic.
Understanding the Power Rangers Outfit Design
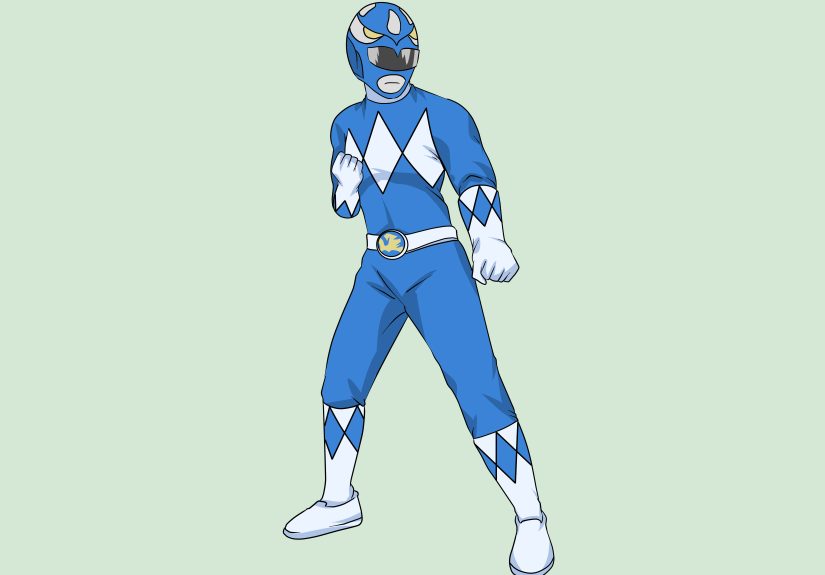
Before cutting fabric or painting foam, study the basic shape of a classic Power Rangers costume. Most Ranger outfits share a few recognizable features: a tight, color-coded bodysuit; white diamond or angular chest details; matching gloves and boots; a belt with a buckle; and a helmet or helmet-style mask. Different Ranger teams use different patterns, but the formula is usually simple: bright base color plus clean geometric accents.
If you want a classic look, the Mighty Morphin-style design is one of the easiest to recreate. It uses a solid color bodysuit with white diamond shapes across the chest, arms, and legs. Red, Blue, Black, Yellow, Pink, Green, and White are the most recognizable options. If you want something more original, you can design your own Ranger themespace, jungle, dragon, lightning, ocean, robot, or even “Laundry Ranger,” the hero who finally folds towels on the same day they come out of the dryer.
Materials You Will Need
Your materials depend on how detailed you want the final costume to be. A beginner-friendly DIY Power Rangers outfit can be made with accessible craft and sewing supplies. You do not need everything on this list, but having the right basics will make the project smoother.
Basic Costume Supplies
- Stretch bodysuit, unitard, leggings and fitted top, or stretch fabric for sewing your own suit
- White stretch fabric, iron-on vinyl, felt, or fabric paint for the diamond designs
- Matching gloves
- White boots, boot covers, or white fabric to make boot covers
- White belt or craft foam for making a belt
- EVA foam sheets for armor details, belt buckle, and helmet-style pieces
- Fabric glue, contact cement, or hot glue, depending on the material
- Fabric scissors, craft knife, measuring tape, ruler, and marker
- Acrylic paint or flexible fabric paint
- Clear sealant for foam pieces
- Elastic, Velcro, snaps, or zippers for closures
- Cardboard or poster board for pattern drafting
If you are sewing, use a stretch needle or ballpoint needle, polyester thread, and a zigzag or stretch stitch. Stretch fabric needs seams that can move with your body. A straight stitch on spandex can pop faster than a villain in a rubber monster suit.
Step 1: Choose Your Ranger Color and Style
The first big decision is your Ranger identity. The color sets the whole mood. Red feels bold and classic. Blue feels smart and steady. Black looks sleek. Yellow is bright and energetic. Pink is iconic. Green and White have legendary fan appeal. You can also make an original color like Purple, Orange, Silver, or Gold if you want a custom Power Rangers cosplay instead of a direct tribute.
After choosing the color, decide whether you want a simple costume or a detailed cosplay build. A simple version can use a store-bought bodysuit with painted designs. A more advanced version may include sewn panels, foam armor, a sculpted helmet, and custom boot covers. Both can look great when the proportions are clean.
Step 2: Create the Bodysuit Base
The bodysuit is the foundation of the entire Power Rangers outfit. You have three main options: buy a plain stretch bodysuit, combine leggings with a fitted long-sleeve top, or sew your own suit from spandex or athletic knit fabric.
Option A: Use a Ready-Made Bodysuit
This is the easiest route. Look for a solid-color unitard or dance bodysuit in your Ranger color. Make sure it fits closely but does not restrict breathing, sitting, walking, or dramatic superhero poses in front of the mirror. A matte fabric often looks more polished than shiny fabric, but shiny spandex can also work if you want that classic action-hero sparkle.
Option B: Use Leggings and a Fitted Shirt
If a full bodysuit feels uncomfortable or hard to find, use matching leggings and a compression shirt. This is easier for bathroom breaks, which is not glamorous but is deeply important. Choose pieces in the same shade if possible. Slight color differences are less noticeable once the white details, gloves, belt, and boots are added.
Option C: Sew Your Own Suit
For a custom fit, use a basic bodysuit pattern and stretch fabric. Cut carefully, follow the grain and stretch direction, and test your stitch on fabric scraps first. A narrow zigzag stitch is usually more forgiving than a straight stitch because it stretches with the fabric. Add a zipper at the back or front if needed, and avoid making the suit so tight that movement becomes a negotiation.
Step 3: Add the Classic Diamond Pattern
The diamond pattern is one of the easiest ways to make the costume instantly readable. For a classic Power Rangers look, add white diamond shapes across the chest, upper arms, and upper legs. The chest pattern usually sits like a row of connected diamonds wrapping from shoulder to shoulder.
Start by making a paper template. Hold it against the suit and adjust the size before cutting fabric or vinyl. Symmetry matters. A crooked diamond can turn a heroic Ranger into someone who lost a fight with a geometry worksheet.
Best Ways to Attach the Pattern
- Stretch fabric appliqué: Cut white stretch fabric and sew it onto the suit using a zigzag stitch.
- Iron-on stretch vinyl: Works well for clean shapes, but test heat settings so you do not damage the suit.
- Fabric paint: Great for beginners, especially if you use painter’s tape or freezer paper stencils.
- Felt: Cheap and easy, but less flexible and may look bulkier.
For the cleanest finish, stretch fabric or stretch vinyl usually works best. If painting, place cardboard inside the suit to prevent bleeding. Apply thin coats instead of one thick blob. Thick paint can crack when stretched, and nobody wants a chest diamond that sheds like a confused snowstorm.
Step 4: Make the Belt and Buckle
A Power Rangers belt helps separate the top and bottom of the costume and adds that official superhero uniform feel. You can use a plain white belt, make one from white vinyl, or create a foam belt covered with fabric or paint.
For the buckle, cut a simple oval, circle, rectangle, or custom symbol from EVA foam. Seal the foam with a flexible sealant or craft glue layer, then paint it silver, gold, or white. You can add a lightning bolt, animal symbol, or original team emblem. Keep the buckle lightweight. A giant heavy buckle may look cool for five minutes, then spend the rest of the day trying to drag your pants into another dimension.
Step 5: Create Gloves and Arm Details
Classic Ranger gloves are usually white with color accents or diamond-shaped cuffs. The simplest method is to buy white costume gloves and add colored foam or fabric cuffs. Measure around your wrist and forearm, cut cuff shapes from white or colored craft foam, and attach them with Velcro so they are easy to remove.
If you want a softer version, sew cuffs from stretch fabric and slide them over the gloves. Add a colored diamond or stripe to match your suit. Gloves can get warm, so choose breathable material if you plan to wear the outfit for several hours.
Step 6: Make Boots or Boot Covers
Boots complete the Ranger silhouette. White boots are ideal, but they are not always easy to find. A practical alternative is to make boot covers that slide over sneakers or comfortable shoes.
To create boot covers, wrap your lower leg and shoe loosely with plastic wrap, then cover it with painter’s tape. Draw the shape of the boot cover, cut the tape pattern off carefully, and transfer it to white stretch fabric or vinyl. Sew or glue the pieces together, leaving an opening at the back or side. Add elastic under the shoe to keep the cover in place.
Comfort matters. If you are going to a convention or trick-or-treating, wear real shoes underneath. Your feet should feel like they are on a mission, not filing a complaint with management.
Step 7: Build a Helmet or Helmet-Inspired Mask
The helmet is the most recognizable and most challenging part of a Power Rangers costume. You can make a full helmet from EVA foam, use a motorcycle-style costume helmet base, modify a plastic mask, or create a lightweight helmet-inspired face piece.
Beginner Helmet Option
For beginners, start with a simple half-mask or visor design. Use EVA foam to create a forehead band, cheek shapes, and a visor frame. Paint it to match your Ranger color. Use black mesh, tinted plastic, or sheer black fabric for the visor area, making sure you can see clearly.
Advanced Helmet Option
For a fuller helmet, make a paper pattern first. Build the shape from EVA foam panels, glue the seams, heat-form curves carefully, seal the foam, then paint. Add ventilation holes in hidden areas and padding inside for fit. Never make the helmet so tight or sealed that breathing becomes difficult. Costume accuracy is fun; oxygen is better.
For safety, avoid wearing a helmet that blocks vision while walking through crowds, crossing streets, or climbing stairs. A removable helmet is a smart choice. You can carry it for photos and remove it when moving around.
Step 8: Paint and Seal Foam Pieces
EVA foam is popular for cosplay because it is lightweight, flexible, and easy to shape. For cuffs, belt buckles, chest armor, and helmet pieces, foam works beautifully when finished properly.
First, cut with a sharp blade to avoid ragged edges. Sand rough spots lightly. Heat-form curves only in a safe, ventilated area, and do not overheat the foam. Seal the surface with flexible glue, foam primer, or another cosplay-safe sealant before painting. Acrylic paint works for many foam details, but flexible paints are better for parts that bend.
Use thin coats and let each layer dry. A rushed paint job is like teleporting into battle before morphing: technically possible, but not recommended.
Step 9: Add Personal Ranger Details
This is where your DIY Power Rangers costume becomes yours. Add a symbol to the belt buckle, a matching emblem on the chest, or a custom team logo. You might create a dinosaur theme, galaxy theme, martial arts theme, animal theme, or tech theme. Keep the design bold and simple so it reads from a distance.
For example, a Dragon Ranger outfit might use green fabric, gold cuffs, and a dragon-scale belt emblem. A Galaxy Ranger could use navy blue with silver stars and a helmet visor shaped like a comet. A Thunder Ranger might use red or black with lightning details. The best designs look intentional, not like the craft drawer sneezed on your costume.
Step 10: Test the Full Outfit Before Wearing It Out
Do a full test wear at least a day before the event. Put on the suit, gloves, belt, boots, and helmet. Walk, sit, bend, reach, and take a few photos. Check whether seams pull, paint cracks, Velcro scratches, gloves slip, or boot covers twist around like they have their own side quest.
Make a small repair kit with safety pins, fabric tape, extra Velcro, glue dots, and a mini sewing kit. Costumes often behave perfectly at home and then choose chaos in public. A repair kit gives you Ranger-level preparedness.
Budget-Friendly Tips for Making a Power Rangers Costume
You can make a strong costume without buying premium materials. Start with clothing you already own, such as leggings, athletic shirts, gloves, or white sneakers. Use craft foam for cuffs and buckles. Use fabric paint instead of sewn appliqué if you do not sew. Buy secondhand pieces when possible. A thrift-store belt, old boots, or plain fitted shirt can save money and still look great after a little crafting magic.
If your budget is very tight, focus on the most recognizable elements: color, white diamonds, gloves, belt, and helmet-style mask. Those five details carry the look. People do not need to inspect every seam to understand the costume. Most viewers will be too busy smiling and asking which Ranger you are.
Common Mistakes to Avoid
Using Non-Stretch Details on Stretch Fabric
If you attach stiff fabric to a stretchy suit, the design may pull, wrinkle, or pop off. Use stretch materials whenever possible.
Skipping the Test Fit
A costume that looks great flat on a table may behave differently on a moving body. Always test the complete outfit.
Making the Helmet Unsafe
Clear vision and airflow are essential. A cool helmet is not worth tripping over a curb like a defeated foot soldier.
Overloading the Design
Power Rangers outfits are bold but clean. Too many random details can make the costume confusing. Choose a theme and stick with it.
How to Make the Outfit Comfortable
Comfort is the difference between wearing your costume all day and wanting to morph back into sweatpants after ten minutes. Choose breathable stretch fabric. Avoid rough seams inside the suit. Add soft backing to foam pieces that touch your skin. Use Velcro closures where you need adjustability. Wear moisture-wicking underlayers if the suit is thin or warm.
Plan for breaks, especially if wearing a helmet. Bring water. Keep your phone accessible. If you are making the costume for a child or teen, make sure the outfit allows easy movement, safe walking, and quick removal. Superheroes should be able to run, laugh, eat, and sit down without needing a pit crew.
Cleaning and Storing Your DIY Power Rangers Outfit
After wearing the costume, let it air out before storing. Hand-wash stretch fabric if it has paint, appliqué, or glued details. Do not throw foam armor or painted pieces into a washing machine. Wipe foam parts gently with a damp cloth. Store the helmet and cuffs in a box so they do not get crushed.
If the suit has removable belt, cuffs, and boot covers, take them off before cleaning. Store small pieces in labeled bags. Future you will be grateful when the belt buckle does not vanish into the mysterious realm where missing socks and craft scissors live.
Extra Experience: What Making a Power Rangers Outfit Teaches You
Making a Power Rangers outfit is more than a costume project. It is a mini crash course in design, patience, problem-solving, and the noble art of pretending you meant to do that when something goes slightly wrong. The first thing most makers learn is that simple shapes are not always simple. A white diamond looks easy until you try to place it evenly across stretchy fabric that keeps moving like it has personal goals.
One helpful experience is learning to build in stages. Do not try to finish the bodysuit, gloves, boots, belt, and helmet in one frantic night unless you enjoy crafting with panic as your co-pilot. Start with the suit base, then add the chest design, then move to accessories. Each finished piece gives you momentum. By the time the belt and gloves are done, the outfit starts to feel real, and you may catch yourself standing in a heroic pose for absolutely no practical reason. This is normal. Possibly required.
Another important lesson is that comfort should be designed from the beginning, not added at the end. A costume can look amazing in photos but become miserable if the gloves are too tight, the helmet is too hot, or the boot covers keep sliding under your shoes. Experienced cosplayers often test movement early because they know the truth: a costume is not just a picture; it is something you have to live in for hours. Sit down, walk around, raise your arms, and check whether anything pulls or scratches.
You also learn that materials have personalities. Spandex stretches. Felt behaves. Vinyl shines but can be stubborn. EVA foam is forgiving, but rough cuts show unless you sharpen your blade and take your time. Paint needs patience. Glue needs drying time. Hot glue needs respect, because it has no problem reminding you that it is hot. The more you work with these materials, the better your instincts become.
For group costumes, the experience gets even better. A team of friends can each choose a Ranger color and share templates so the designs match. One person can handle belts, another can cut diamonds, another can paint foam pieces, and one very organized person can keep everyone from losing the scissors every six minutes. Group builds are fun because Power Rangers costumes are naturally team-based. When the colors line up together, even a simple DIY version looks impressive.
The best part is the reaction. People recognize the outfit immediately. Kids point. Adults get nostalgic. Someone will probably shout a catchphrase from across the room. A handmade Power Rangers outfit has charm because it shows effort. It does not need to be flawless. In fact, tiny handmade imperfections often make it more memorable. The goal is to create something bold, wearable, and funsomething that lets you step into a colorful hero role for a day.
So when you make your Power Rangers outfit, give yourself permission to experiment. Use templates, test scraps, repaint mistakes, and adjust the fit. The project is part sewing, part crafting, part engineering, and part childhood joy wearing boots. When it finally comes together, you will not just have a costume. You will have a story, a skill upgrade, and possibly a new respect for anyone who fights imaginary monsters while wearing a full helmet.
Conclusion
Learning how to make a Power Rangers outfit is a rewarding DIY costume project because the design is bold, recognizable, and flexible enough for beginners or advanced cosplayers. Start with a comfortable stretch suit, add clean geometric details, build lightweight accessories, and keep safety in mind when making the helmet. Whether you choose a classic Ranger color or invent your own team, the secret is balance: strong shapes, good fit, bright color, and enough comfort to enjoy wearing it.
You do not need perfection to make an outfit people love. You need planning, patience, and a willingness to cut one more paper template because the first one looked like a confused kite. With the right materials and a little creativity, your DIY Power Rangers costume can look polished, feel comfortable, and bring a big nostalgic grin to anyone who sees it.
Note: This guide is intended for personal costume-making, cosplay, parties, and fan creativity. If you plan to sell costumes or use official logos commercially, check trademark and licensing rules first.