Table of Contents >> Show >> Hide
- What Are Elf Shoe Covers?
- Best Materials for DIY Elf Shoe Covers
- Choose the Right Shoes Before You Start
- Step-by-Step Guide: How to Make Elf Shoe Covers
- How to Attach Elastic Under the Sole
- Add a Back Closure With Hook-and-Loop Tape
- Create the Classic Curled Elf Toe
- Decorating Ideas for Elf Shoe Covers
- How to Make No-Sew Elf Shoe Covers
- Make the Bottom Safer With Grip
- Common Mistakes and How to Fix Them
- How to Care for Elf Shoe Covers
- Real-World Experience: What I Learned Making Elf Shoe Covers
- Conclusion
Elf shoe covers are the magical little finishing touch that can turn ordinary sneakers into North Pole-approved footwear. You can have a green shirt, striped socks, a pointy hat, and a cheerful “I definitely work in toy logistics” attitude, but if your regular running shoes are still peeking out, the costume feels unfinished. The good news? You do not need to buy expensive costume boots or permanently ruin a pair of shoes with glue, glitter, and festive regret.
This guide explains how to make elf shoe covers using felt, elastic, simple pattern-making, and a few decorative details. The project works for kids, adults, school performances, holiday parties, Christmas parades, office costume days, theater productions, and anyone who has ever looked at their shoes and thought, “These need bells.”
The method below focuses on removable elf shoe covers, which means the covers slide over shoes you already own. That makes them more comfortable, safer for walking, and easier to reuse. You can sew them for a cleaner, sturdier finish, or use fabric glue for a no-sew version. Either way, the result is charming, budget-friendly, and far less dramatic than trying to walk around in actual curled elf slippers with no support.
What Are Elf Shoe Covers?
Elf shoe covers are decorative fabric pieces that fit over regular shoes to create the look of pointy elf footwear. Unlike full handmade shoes or slippers, covers do not replace your real shoes. They hide them. This is a big advantage because your feet still get the comfort, grip, and support of footwear you already trust.
Most elf shoe covers are made from felt because felt is affordable, easy to cut, widely available, and stiff enough to hold a playful pointed shape. Felt also does not fray much, so beginners can work with it without feeling personally attacked by unraveling fabric. You can add curled toes, cuffs, bells, pompoms, ribbon, faux fur trim, or contrasting colors to match your costume.
Best Materials for DIY Elf Shoe Covers
You do not need a workshop full of fancy supplies. A kitchen table, a good pair of scissors, and a little patience will do the job. Before starting, choose a pair of shoes that fit comfortably and have decent soles. Flat shoes, sneakers, loafers, and low boots usually work best. Avoid high heels for children or any shoe that already feels awkward before you add festive fabric armor.
Supplies You Will Need
- Green, red, brown, or gold felt by the yard or large felt sheets
- Paper for making a pattern
- Pencil or washable marker
- Fabric scissors
- Straight pins or sewing clips
- Sewing machine, needle and thread, or strong fabric glue
- Elastic, about 1/2 inch to 3/4 inch wide
- Hook-and-loop tape, also called Velcro, for the back closure
- Jingle bells, pompoms, ribbon, or felt scraps for decoration
- Puffy fabric paint, shelf liner, or thin rubber sole material for grip
For a child’s pair, one-half yard of felt is usually enough. For adult shoe covers, especially if you want tall cuffs or dramatic curled toes, buy closer to one yard. If you are making several pairs for a Christmas play, buy a little extra. Someone will inevitably need a replacement cover because a bell disappeared, a toe got stepped on, or an elf named Brayden decided to test whether felt survives pudding. It does not enjoy pudding.
Choose the Right Shoes Before You Start
The most important part of this project is not the glitter. It is the base shoe. Your elf shoe covers will only work as well as the shoes underneath them. Pick shoes that are already broken in, easy to walk in, and close-fitting enough that the covers do not slide around.
Sneakers are great for children because they offer comfort and traction. Ballet flats or slip-on shoes work well for adults who want a sleeker costume look. Ankle boots can create a taller elf boot shape, but they require a slightly larger pattern. Whatever you choose, make sure the wearer can walk, bend, sit, climb stairs, and do a tiny celebratory elf jig without tripping.
Step-by-Step Guide: How to Make Elf Shoe Covers
Step 1: Trace the Shoe Shape
Place one shoe on its side on a sheet of paper. Trace around the shoe, following the sole, heel, top edge, and toe. Do not trace too tightly. Add about 1 inch around the heel and sides, and about 1 1/2 inches above the top of the shoe. This extra space allows room for seams, movement, and sliding the cover over the shoe.
At the toe, extend the pattern into a soft point. For a classic elf look, curve the toe upward slightly. Think “holiday mischief,” not “dangerous garden tool.” If you want a curled toe, make the point longer and more dramatic. If the wearer is very young, keep the toe shorter so it does not catch on steps or rugs.
Step 2: Add a Back Opening
Elf shoe covers are much easier to put on when they have an opening at the back. Mark a vertical line at the heel area of your pattern. This will be where your hook-and-loop tape closes the cover. The back opening also lets you adjust the fit after sewing.
If you want a very simple version, you can skip the back opening and make the cover loose enough to slide on. However, a back closure usually looks neater and stays in place better, especially for adults walking around at events.
Step 3: Cut the Felt Pieces
Fold your felt or place two layers together. Pin the pattern to the felt and cut two mirrored pieces for each shoe cover. You will need four main pieces total: two for the left cover and two for the right cover. If you want lined or extra-sturdy covers, cut eight pieces total and sew them in pairs.
Before sewing anything, place the felt pieces around the shoe and check the shape. The felt should cover the shoe top and sides without pulling tightly. Trim only a little at a time. Cutting too much too soon is the crafting version of saying “I know a shortcut” and immediately getting lost.
Step 4: Sew or Glue the Top Seam
Place two felt pieces together with the right sides facing inward if your felt has a right side. Sew along the top curve from the back opening toward the toe, then around the pointed toe. Leave the bottom edge open because the cover needs to sit over the shoe, not become a mystery pouch.
If sewing by hand, use small, strong stitches. If using a sewing machine, a straight stitch works well. Felt is forgiving, but go slowly around the curved toe. For a no-sew elf shoe cover, apply fabric glue along the same seam area, press firmly, and let it dry fully before turning or testing the cover.
Step 5: Turn and Test the Fit
Turn the cover right side out and slide it over the shoe. The pointed toe should sit over the shoe toe without collapsing completely. The back edges should meet or slightly overlap at the heel. If the cover is too loose, take in the seam a little. If it is too tight, trim the opening or make a new pattern with more allowance.
Repeat the same steps for the second shoe. Try both covers on the shoes at the same time and compare them. They do not have to be mathematically identical, but they should look like siblings, not strangers who met at a holiday craft fair.
How to Attach Elastic Under the Sole
Elastic is what keeps elf shoe covers from flapping, twisting, or migrating toward freedom. Cut two or three elastic straps for each cover. One strap should go under the ball of the foot, one near the middle, and one near the heel if the cover needs extra stability.
Place the cover on the shoe. Gently stretch elastic from one bottom edge of the cover to the opposite bottom edge, passing under the sole. The elastic should be snug but not so tight that it bends the shoe or pulls the cover out of shape. Pin or clip the elastic ends in place, then remove the cover and sew the elastic securely. Stitch back and forth several times over each elastic end.
If you are making a no-sew version, use strong fabric glue and let the elastic dry under pressure. However, sewn elastic is more reliable, especially for active kids, theater use, or anyone planning to dance like they just got promoted to Head Elf.
Add a Back Closure With Hook-and-Loop Tape
Cut a piece of hook-and-loop tape slightly shorter than the back opening. Sew or glue one side to the inside of one back edge and the matching side to the outside or inside of the opposite edge, depending on how the cover overlaps. Test the closure while the cover is on the shoe. The heel should look smooth, and the real shoe should not show through large gaps.
Hook-and-loop tape is better than tying long ribbons around the ankle, especially for children. Long strings can drag, catch, or come untied. If you want ribbon for decoration, stitch it flat to the cuff or use short bows that do not hang near the floor.
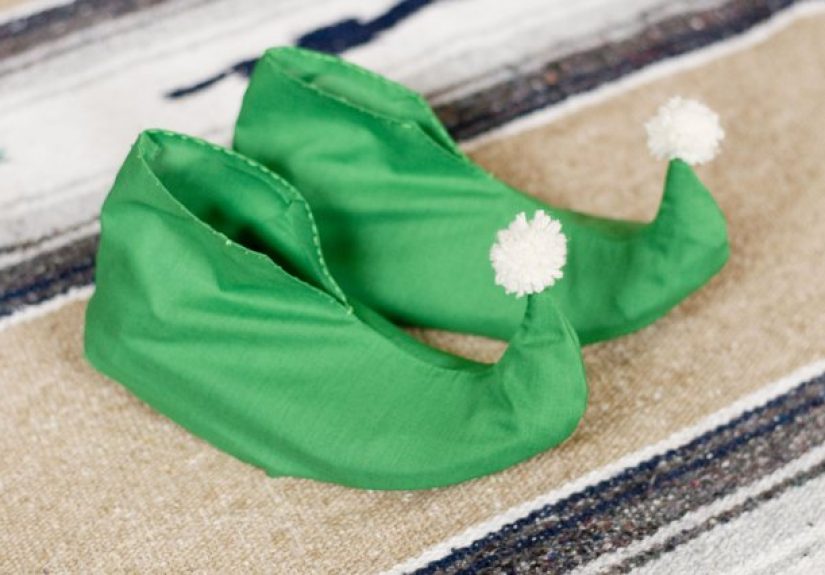
Create the Classic Curled Elf Toe
The curled toe is the personality department of the elf shoe. To make it stand up, stuff a small amount of fiberfill, felt scraps, or tissue into the point. Do not overstuff it, or the toe may look like it is smuggling a marshmallow. Shape it gently upward with your fingers.
For extra structure, slide a short piece of flexible craft wire inside the toe before closing the seam, then bend it into a curl. Use caution with wire for children’s costumes. The ends must be fully covered and secure. For a safer kid-friendly version, skip the wire and use lightweight stuffing plus a bell at the tip. The bell adds enough weight and charm to make the toe look intentional.
Decorating Ideas for Elf Shoe Covers
Once the basic shoe covers fit well, the fun begins. Add a zigzag cuff around the ankle using contrasting felt. Red felt cuffs on green covers create a classic Christmas elf look. Gold trim adds a storybook feel. White faux fur makes the covers look cozy and wintery.
You can glue or sew small jingle bells to the toe tips, but choose bells that are securely attached and not too heavy. Pompoms are softer and quieter if you are making covers for a school play where twenty jingling elves might cause the music teacher to reconsider all life choices.
Other easy decorations include glitter fabric paint, felt holly leaves, candy-cane stripes, stitched snowflakes, ribbon bands, gold buttons, or small felt buckles. Keep decorations away from the bottom of the shoe and avoid anything that could fall off and become a slipping hazard.
How to Make No-Sew Elf Shoe Covers
A no-sew version is perfect for last-minute costumes. Use the same pattern method, but replace stitching with strong fabric glue or hot glue. Fabric glue usually creates a more flexible seam, while hot glue dries quickly but can feel stiff. Apply a thin, even line of glue along the top seam, press the felt together, and let it cure according to the glue instructions.
For elastic, glue the ends to the inside bottom edges of the cover and reinforce them with small felt patches. Think of each felt patch as a tiny security guard for the elastic. Let everything dry completely before wearing. If the covers are for a one-time photo, glue may be enough. If they are for a parade, stage show, or energetic child, sewing is the better choice.
Make the Bottom Safer With Grip
Because elf shoe covers sit around real shoes, you should leave most of the actual shoe sole exposed. Do not cover the entire sole with smooth felt. Felt can be slippery on tile, wood floors, school stages, and polished hallways.
If your design wraps slightly under the shoe, add grip. You can paint dots or lines of puffy fabric paint on the underside and let them dry completely. You can also sew or glue a strip of shelf liner or thin rubber sole material where the cover touches the floor. Always test the finished covers indoors before wearing them to an event.
Common Mistakes and How to Fix Them
The Covers Slide Around
Add another elastic strap under the sole, especially near the toe or heel. Also check that the back closure is snug. If the cover is too wide, take in the top seam slightly.
The Toe Flops Down
Add a little stuffing, shorten the toe, or use a firmer felt. Heavy decorations can drag the toe downward, so choose lightweight bells or pompoms.
The Real Shoe Shows at the Heel
Move the hook-and-loop tape so the back overlaps more tightly. If the opening is too wide, add a small felt extension tab.
The Covers Look Too Flat
Add a cuff, trim, or layered felt pieces. Even a simple zigzag ankle band can make the covers look more finished and costume-ready.
The Felt Wrinkles Around the Toe
Trim the seam allowance inside the toe carefully and clip small notches along the curve. Do not cut through the seam. This helps the felt turn smoothly.
How to Care for Elf Shoe Covers
Elf shoe covers are best spot-cleaned. Use a damp cloth to remove dust or small stains. If you used glue, avoid soaking the covers because water can weaken the seams. If you sewed them, they may survive gentle hand cleaning, but always test a hidden area first.
Store the covers flat or lightly stuffed so the toes keep their shape. If bells are attached, wrap them in tissue before storing so they do not snag the felt. Label each pair if you are making several sizes for a group. There is nothing merry about sorting twelve nearly identical green shoe covers ten minutes before curtain call.
Real-World Experience: What I Learned Making Elf Shoe Covers
The first thing you learn when making elf shoe covers is that shoes are surprisingly weird shapes. They look simple until you trace one and realize the toe curves, the heel leans, the sole flares, and suddenly your sneaker has the architectural complexity of a tiny sports car. That is why the pattern stage matters so much. A generous pattern is easier to fix than a tiny one. Extra felt can be trimmed. Missing felt can only be replaced by sighing dramatically and starting over.
For the most comfortable result, I prefer using the actual shoes the person will wear with the costume. Borrowing “a similar pair” sounds harmless, but even small differences in height or sole width can change the fit. If the covers are for a child, have the child walk around during the fitting. Kids are honest product testers. They will immediately announce if something feels “scratchy,” “floppy,” or “like a potato.” Listen to them. A cute costume is not worth a miserable wearer.
Felt weight also makes a big difference. Thin craft felt is easy to cut and fine for quick school costumes, but it can collapse around the toe. Thicker felt or felt by the yard gives the shoe cover more body. If thin felt is all you have, double the toe area or add a second decorative layer on top. That little reinforcement helps the elf point stay perky instead of looking like it gave up after lunch.
Elastic placement is another lesson learned the practical way. One elastic strap under the middle may work for photos, but it often allows the toe to twist while walking. Two straps are better. Three straps are excellent for active wearers. Put one near the ball of the foot, one around the arch area, and one closer to the heel. Make each strap snug, not tight. If the elastic pulls too hard, the felt bunches and the cover starts looking like a crumpled gift bag.
Decorations should be added after the fit is right. It is tempting to glue on bells first because bells are adorable and have no respect for project order. Resist. Fit the cover, add elastic, test walking, and then decorate. Otherwise, you may discover that the perfect bell placement is exactly where your seam needs adjustment. That is how holiday crafting becomes a negotiation with tiny metal objects.
For events with lots of walking, I strongly recommend leaving the real shoe sole exposed. If the felt wraps too far underneath, add grip or trim it back. A festive look should not turn the wearer into a skating elf. On smooth floors, puffy fabric paint dots can help, but they need enough drying time. Do not apply them ten minutes before leaving unless you want your elf to collect lint, hair, and possibly one small carpet sample.
The best part of making elf shoe covers is how customizable they are. You can make a polished theater version with clean seams and symmetrical cuffs, or a goofy family-party version with oversized toes and ridiculous bells. Both are valid. The goal is not perfection. The goal is a costume piece that makes people smile, stays on the shoes, and lets the wearer walk comfortably while looking like they might know Santa’s Wi-Fi password.
Conclusion
Learning how to make elf shoe covers is a simple way to upgrade a holiday costume without buying special footwear. With felt, elastic, a basic shoe pattern, and a little creativity, you can create covers that slide over regular shoes and instantly add Christmas character. The key is to start with comfortable shoes, leave enough room in the pattern, secure the covers with elastic, and avoid slippery bottoms. Once the fit is right, decorations like bells, cuffs, pompoms, and trim bring the whole look to life.
Whether you are dressing a child for a school program, preparing a family Christmas photo, building a theater costume, or simply answering the call of festive footwear, DIY elf shoe covers are practical, affordable, and surprisingly fun. They are also forgiving. A slightly crooked cuff? Charming. A toe curl with extra personality? Even better. The elves are not filing a quality-control report. They are too busy making toys.