
Table of Contents >> Show >> Hide
- What Is Red Food Coloring?
- Best Natural Ingredients for Homemade Red Food Colouring
- How to Make Red Food Colouring: 10 Steps
- Step 1: Choose Your Red Color Source
- Step 2: Wash and Prepare the Ingredients
- Step 3: Simmer the Color Source Gently
- Step 4: Strain the Liquid
- Step 5: Reduce the Dye for Stronger Color
- Step 6: Add a Tiny Acid Boost
- Step 7: Cool Completely Before Using
- Step 8: Test the Color in a Small Sample
- Step 9: Adjust the Shade Slowly
- Step 10: Store It Safely
- Simple Homemade Red Food Coloring Recipe
- How to Use Homemade Red Food Coloring in Baking
- Common Mistakes to Avoid
- Homemade vs. Store-Bought Red Food Coloring
- Extra Experience: What I Learned Making Red Food Colouring at Home
- Conclusion
Red food colouring has one job: make food look as if it arrived wearing its finest party outfit. A pale cupcake becomes Valentine-ready. Plain frosting suddenly has holiday confidence. A bowl of cookie icing goes from “school cafeteria beige” to “main character energy.” The good news? You do not always need a store-bought bottle to get there.
You can make red food coloring at home using ingredients such as beets, beet powder, freeze-dried raspberries, strawberries, pomegranate juice, hibiscus tea, or even red cabbage with the right acidity. The trick is understanding that natural red color is not magicit is pigment, concentration, pH, heat, and patience working together like a tiny kitchen science team.
This guide explains how to make homemade red food colouring in 10 practical steps, including the best ingredients, how to extract the color, how to thicken or intensify it, and how to use it in frosting, cake batter, drinks, candy, pancakes, cookies, and more. It also includes real-world tips from the kind of kitchen experience that usually begins with optimism and ends with beet-stained fingers.
What Is Red Food Coloring?
Red food coloring is any edible ingredient used to add red, pink, burgundy, or crimson color to food. Commercial versions may be liquid, gel, paste, or powder. Homemade versions usually come from plant-based pigments, especially the deep red compounds found in beets, berries, hibiscus, and pomegranate.
The most reliable natural red coloring for home kitchens is beet-based dye. Beets contain betalain pigments, which create a strong red-purple color. Berries and hibiscus contain anthocyanins, which can look red, pink, purple, or even bluish depending on acidity. That is why a spoonful of lemon juice can brighten berry dye, while too much baking soda can push it toward dull purple. Food color has moods. Apparently, so does frosting.
Best Natural Ingredients for Homemade Red Food Colouring
1. Beets
Fresh red beets are the classic choice for homemade red food dye. They produce a strong pink-red liquid that works beautifully in frosting, drinks, glazes, pancakes, icings, and some cake batters. Beet dye can taste earthy if overused, so the goal is to concentrate the color without dumping half a vegetable garden into your buttercream.
2. Beet Powder
Beet powder is the easiest option when you want color without extra liquid. It blends well into royal icing, buttercream, dry mixes, and cookie dough. For many bakers, beet powder is the low-drama friend of natural red food coloring: shelf-stable, concentrated, and not likely to splash red juice across the counter like a tiny culinary crime scene.
3. Freeze-Dried Raspberries or Strawberries
Freeze-dried berries can be ground into a fine powder and used to create a soft pink-red color. They also add real fruit flavor, which is wonderful in frosting, whipped cream, macarons, fillings, and sugar cookies. The color is usually less fire-engine red and more “pretty bakery window.”
4. Hibiscus
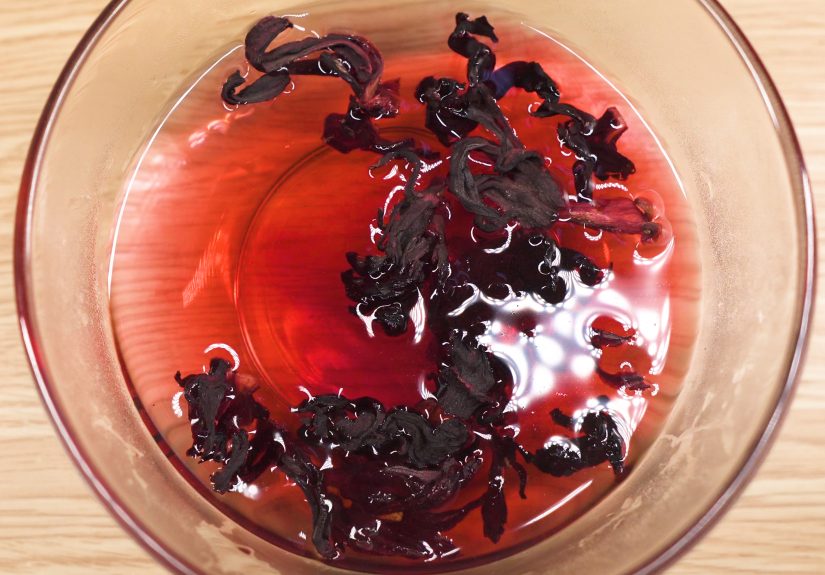
Dried hibiscus flowers make a vivid ruby liquid when steeped in hot water. Hibiscus works especially well in drinks, syrups, glazes, jams, gummies, and fruit-based desserts. Its tart flavor is strong, so use it where a floral-cranberry note makes sense.
5. Pomegranate Juice
Pomegranate juice gives a lovely red tone and a fruity tartness. It is not always concentrated enough for frosting, but it is excellent for syrups, drinks, dessert sauces, and reductions.
How to Make Red Food Colouring: 10 Steps
Step 1: Choose Your Red Color Source
Start by deciding what kind of food you are coloring. For frosting, royal icing, and cookie dough, use beet powder or freeze-dried berry powder because they add less water. For drinks, syrups, glazes, and sauces, use beet juice, hibiscus tea, or pomegranate reduction. For cake batter, beet puree or concentrated beet liquid can work, but color may fade during baking.
If you want the deepest red, choose beets or beet powder. If you want a fruitier red, choose raspberries, strawberries, hibiscus, or pomegranate. If you want a perfectly neutral flavor, beet powder is usually better than fresh beet liquid because you can use a smaller amount.
Step 2: Wash and Prepare the Ingredients
For fresh beet dye, wash the beets thoroughly, trim the ends, peel them, and cut them into small chunks. Smaller pieces release color faster. If using berries, choose ripe fruit or freeze-dried fruit. If using hibiscus, measure dried flowers and check that they are food-grade.
Clean preparation matters because homemade dye is made from real food. Use clean cutting boards, clean jars, and clean hands. Red dye is beautiful in cupcakes, less charming under your fingernails during a business meeting.
Step 3: Simmer the Color Source Gently
Place chopped beets in a small saucepan and add just enough water to cover them. Simmer gently for 25 to 35 minutes, or until the liquid turns deep red and the beets look less vibrant. Avoid aggressive boiling because too much heat can weaken natural pigments and reduce the fresh color.
For hibiscus dye, steep 2 to 3 tablespoons of dried hibiscus in 1/2 cup hot water for 10 to 15 minutes. For pomegranate dye, simmer pomegranate juice until it reduces by half. For berry dye, simmer mashed berries with a splash of water, then strain.
Step 4: Strain the Liquid
Pour the mixture through a fine-mesh strainer, cheesecloth, or coffee filter into a clean bowl. Press gently to extract as much liquid as possible without forcing pulp through the strainer. Pulp can make frosting grainy, which is not the charming homemade texture most people are hoping for.
For a very smooth dye, strain twice. This is especially helpful for royal icing, macarons, mirror glaze, and any dessert where texture matters.
Step 5: Reduce the Dye for Stronger Color
Return the strained liquid to the saucepan and simmer it over low heat until it becomes more concentrated. Reducing the liquid removes water and intensifies the pigment. This step is important because watery dye can thin frosting, loosen icing, and make cookie dough sticky.
A good target is to reduce 1 cup of beet liquid to about 1/4 cup. The final liquid should be deep red and slightly syrupy, but not burned or sticky like candy. Keep the heat low and stir occasionally.
Step 6: Add a Tiny Acid Boost
For many natural red dyes, a few drops of lemon juice or vinegar can brighten the color. This is especially useful for berry, hibiscus, and pomegranate dyes, which contain pigments that respond strongly to acidity. Add only a littleabout 1/8 teaspoon per 1/4 cup of dyethen check the color.
Do not add baking soda unless you are intentionally experimenting. It can shift berry and hibiscus colors toward purple or blue. That may be fun for a science project, but less fun when your “red velvet” cupcakes come out looking like they are going through a goth phase.
Step 7: Cool Completely Before Using
Let homemade red food coloring cool before adding it to frosting, whipped cream, buttercream, or batter. Warm dye can melt butter, loosen icing, and change texture. For the cleanest result, chill liquid dye for 20 to 30 minutes before using it in butter-based recipes.
If using powder, sift it first to remove clumps. Then mix it with a small amount of liquid from the recipe, such as milk, water, lemon juice, or vanilla extract, before adding it to the full batch.
Step 8: Test the Color in a Small Sample
Before coloring an entire bowl of frosting, test the dye in one tablespoon of the mixture. Natural red coloring can change depending on fat, sugar, acidity, heat, and the base color of the food. White buttercream turns pink faster than beige cookie dough. Chocolate batter may turn burgundy or mahogany instead of bright red.
Testing saves ingredients and prevents the classic baker’s panic: adding more and more dye until the frosting tastes like a beet wearing a birthday hat.
Step 9: Adjust the Shade Slowly
Add homemade red dye gradually. For liquid dye, start with 1/2 teaspoon per cup of frosting or batter. For beet powder or berry powder, start with 1/4 to 1/2 teaspoon per cup. Mix thoroughly and wait several minutes before adding more because some colors deepen as they sit.
For a warmer red, add a tiny pinch of cocoa powder or a drop of yellow food coloring if you are using commercial colors alongside natural dye. For a deeper burgundy, add a little more beet powder or a small amount of reduced pomegranate juice. For a brighter pink-red, use beet dye with a drop of lemon juice.
Step 10: Store It Safely
Homemade red food coloring should be stored in a clean, airtight container in the refrigerator. Use fresh liquid dyes within 2 to 3 days for best quality and safety. If you want to keep it longer, freeze it in an ice cube tray, then transfer the cubes to a freezer bag. Powdered beet or berry coloring lasts much longer when kept dry in a sealed container away from heat and light.
Always smell and inspect homemade dye before using it. If it smells fermented, looks moldy, or seems fizzy when it should not be, throw it away. Homemade food coloring is easy to make again. Food poisoning is not a cute kitchen memory.
Simple Homemade Red Food Coloring Recipe
Ingredients
- 2 medium red beets, peeled and chopped
- 1 cup water, or just enough to cover the beets
- 1/8 teaspoon lemon juice or white vinegar, optional
Instructions
- Add chopped beets and water to a small saucepan.
- Simmer gently for 25 to 35 minutes.
- Strain through a fine-mesh strainer or cheesecloth.
- Return the liquid to the pan and reduce over low heat until concentrated.
- Cool completely.
- Add lemon juice if you want a brighter tone.
- Store in the refrigerator in a clean airtight jar.
This recipe usually produces about 1/4 cup of concentrated beet dye, depending on beet size and simmering time. Use it in frosting, pancake batter, whipped cream, smoothies, glazes, or drinks.
How to Use Homemade Red Food Coloring in Baking
For Buttercream Frosting
Buttercream is rich and pale, so it accepts color well, but too much liquid can make it loose. Use beet powder for the strongest result, or add concentrated beet dye a few drops at a time. Let the frosting rest for 30 minutes because red tones often deepen after sitting.
For Royal Icing
Royal icing needs a precise texture, so powder is usually best. Dissolve beet powder in a tiny amount of water or lemon juice before mixing it in. If the icing becomes too thin, add a little more powdered sugar.
For Cake Batter
Natural red color can fade in the oven, especially in recipes with high heat, cocoa, baking soda, or alkaline ingredients. For red velvet cake, beet puree, beet powder, or a concentrated beet reduction can help, but expect a softer red than commercial gel coloring. Natural cocoa and acidic ingredients such as buttermilk or vinegar can support a warmer red-brown tone.
For Drinks and Syrups
Hibiscus, pomegranate, and beet dye work beautifully in drinks. Add a teaspoon at a time to lemonade, cocktails, mocktails, tea, soda, or fruit punch. Hibiscus gives the brightest ruby color and a tangy flavor that pairs well with citrus.
Common Mistakes to Avoid
Using Too Much Liquid
Liquid dye can thin frosting and batter. Reduce your dye first, or use powder when texture matters.
Expecting Neon Red From Natural Ingredients
Homemade red food coloring is beautiful, but it is usually softer than synthetic red dye or concentrated gel color. Think ruby, rose, berry, coral, or burgundynot traffic-light red.
Skipping the Test Batch
Natural colors behave differently in different recipes. Always test a spoonful before coloring the whole batch.
Overheating the Dye
Gentle simmering is better than hard boiling. Too much heat can dull natural pigments and create cooked flavors.
Ignoring Flavor
Every natural dye brings some flavor. Beet is earthy, hibiscus is tart, berries are fruity, and pomegranate is tangy. Match the dye to the recipe so the flavor feels intentional.
Homemade vs. Store-Bought Red Food Coloring
Homemade red food coloring is ideal when you want a plant-based option, a softer natural color, or a dye made from ingredients you recognize. It is great for family baking, naturally colored frostings, fruit desserts, holiday drinks, and creative kitchen projects.
Store-bought red food coloring is better when you need a very specific, bold, repeatable color. Gel colors are especially useful for cake decorating because they are concentrated and do not add much liquid. Commercial red dye is still the easiest way to get a strong red for fondant, candy, deep red buttercream, and dramatic red velvet cake.
The best choice depends on your goal. If you want bright red roses on a wedding cake, gel coloring is your dependable friend. If you want naturally pink frosting for cupcakes, beet powder may be perfect. If you want to impress guests by saying, “I made the color myself,” homemade dye wins the conversation.
Extra Experience: What I Learned Making Red Food Colouring at Home
Making red food colouring at home sounds simple: boil something red, strain it, and proudly tint your dessert. In reality, it is simple, but it also teaches you a few kitchen truths very quickly. The first truth is that beets are powerful. One beet can color water, frosting, a cutting board, your fingertips, and possibly your emotional outlook for the afternoon. Wear an apron. Use a dark towel. Do not prepare beet dye while wearing a white shirt unless you enjoy living dangerously.
The second lesson is that concentration matters more than quantity. The first time many people try homemade red dye, they add regular beet juice straight into frosting and wonder why the frosting becomes loose before it becomes red. The solution is reduction. Simmer the beet liquid until it is darker, stronger, and slightly syrupy. A small amount of concentrated dye performs better than a large amount of watery dye. This is the same reason gel food coloring works so well: less water, more color.
Another useful discovery is that homemade red dye often improves after resting. Buttercream that looks pink at first may become deeper after 30 minutes. Royal icing can dry slightly darker than it looks wet. Cake batter, however, can move in the opposite direction because oven heat may soften the color. That means you should make peace with natural variation. Homemade red food coloring is less like printing with a machine and more like painting with fruit, roots, and patience.
Flavor is also important. Beet dye is mild when used carefully, but too much can bring an earthy taste. In chocolate cake, that earthiness may disappear. In vanilla whipped cream, it may wave hello from across the room. Berry powders are safer for delicate desserts because they add a pleasant fruit flavor. Hibiscus is stunning in lemonade, glaze, and syrup, but it can be too tart for plain vanilla frosting unless balanced with sugar.
The most reliable approach is to choose the dye based on the food. For cookies and royal icing, beet powder or freeze-dried berry powder gives control. For drinks and glazes, hibiscus or pomegranate reductions shine. For cakes, use beet powder or puree, but keep expectations realistic: natural red velvet cake may look more burgundy, rose, or mahogany than the bright red bakery version.
Finally, homemade food coloring is fun because it makes you pay attention. You notice how acid brightens berry colors, how heat changes pigments, how white frosting accepts color differently from chocolate batter, and how a tiny spoonful can change the whole personality of a dessert. It turns baking into a small experiment, but the delicious kindthe kind where the worst-case scenario is still probably a cupcake.
Conclusion
Learning how to make red food colouring at home gives you more control over ingredients, flavor, and final color. Beets, beet powder, berries, hibiscus, and pomegranate can all create beautiful red or pink tones when handled correctly. The key steps are simple: choose the right ingredient, extract the pigment gently, strain carefully, reduce for strength, test in a small sample, and store safely.
Homemade red food coloring may not always produce the intense red of commercial gel dye, but it offers something different: a natural, creative, customizable color that works beautifully in frostings, drinks, glazes, icings, and everyday baking. Start small, adjust slowly, and let the color deepen before adding more. Your desserts will look charming, taste better, and avoid the dreaded “I accidentally made soup frosting” problem.
Note: Homemade liquid food coloring is best for home use and should be refrigerated in a clean airtight container. Use it within a few days, or freeze it in small portions for longer storage.


