Table of Contents >> Show >> Hide
- What Are Walnut Crescent Cookies?
- Best Walnut Crescent Cookies Recipe (Buttery, Toasty, Snowy)
- Ingredients
- Equipment You’ll Actually Use
- Step 1: Toast the Walnuts (Quick Flavor Upgrade)
- Step 2: Grind the Walnuts Fine
- Step 3: Cream Butter + Sugar (Don’t Skip This “Fluff” Moment)
- Step 4: Add Dry Ingredients Without Overmixing
- Step 5: Chill the Dough (So Your Crescents Stay Crescents)
- Step 6: Shape the Crescents
- Step 7: Bake Until Just Golden at the Edges
- Step 8: The Snowy Powdered Sugar Finish
- Why This Recipe Works (A Little Cookie Science, No Lab Coat Required)
- Troubleshooting: Fix Common Walnut Crescent Cookie Problems
- Flavor Variations (Because Walnut Crescents Love Options)
- Make-Ahead, Storage, and Freezing Tips
- FAQ: Walnut Crescent Cookies
- Conclusion
- Extra: of Real-Life Walnut Crescent Cookie Experiences
Walnut crescent cookies are what happens when buttery shortbread decides to put on a fancy outfit, do a little crescent-shaped pose,
and then roll around in powdered sugar like it’s making snow angels. They’re tender, nutty, lightly sweet, and holiday-party famous
but honestly, they also taste phenomenal on a random Tuesday when you’re “just checking” if the coffee is working.
This guide walks you through a reliable, bakery-level walnut crescent cookies recipe with practical explanations,
step-by-step photos-in-your-head instructions, and fixes for the classic problems (crumbly dough, broken crescents, sugar that won’t stick).
If you’ve ever wanted a cookie that melts in your mouth and makes your kitchen smell like a cozy winter movie, you’re in the right place.
What Are Walnut Crescent Cookies?
Walnut crescent cookies are buttery, egg-free (in many versions) nut cookies shaped into small crescents and finished with a generous coating of powdered sugar.
You’ll also hear them called “vanilla crescents” or compared to European-style crescent cookies like vanillekipferl.
The vibe is the same: rich butter, finely ground nuts, delicate crumb, and a snowy sugar finish.
The secret isn’t some mystical ingredient. It’s simple technique: lightly toast the walnuts for deeper flavor, grind them fine so the dough holds together,
and chill the dough so those crescents keep their shape instead of turning into “walnut abstract art.”
Best Walnut Crescent Cookies Recipe (Buttery, Toasty, Snowy)
Yield: About 28–32 cookies (depending on size)
Time: 20 minutes prep + 45 minutes chill + 12–14 minutes bake
Ingredients
- 1 cup (226g) unsalted butter, softened to cool room temperature
- 1/2 cup (60g) powdered sugar (confectioners’ sugar), plus more for rolling
- 2 teaspoons pure vanilla extract
- 1/4 teaspoon fine salt (use a touch more if your butter is very unsalted/neutral)
- 2 1/4 cups (270–285g) all-purpose flour, spooned and leveled
- 1 tablespoon cornstarch (optional, for extra “melt-in-your-mouth” tenderness)
- 1 cup (100–115g) walnuts, toasted and very finely chopped or ground
- 1 to 1 1/2 cups powdered sugar, for coating
- Optional: 1/2 teaspoon almond extract, or a pinch of cinnamon for a warm background note
Equipment You’ll Actually Use
- Mixing bowl + hand mixer (or stand mixer)
- Sheet pan + parchment paper
- Food processor (helpful for grinding walnuts; not mandatory, but nice)
- Wire rack
- Small bowl for powdered sugar “snow bath”
Step 1: Toast the Walnuts (Quick Flavor Upgrade)
- Preheat oven to 350°F.
- Spread walnuts on a sheet pan in a single layer.
- Toast 7–10 minutes, stirring once halfway, until fragrant and lightly browned.
- Cool completely. (Warm nuts can melt butter in your dough, and nobody wants buttery walnut soup.)
Tip: If you’re short on time, you can toast in a skillet, but the oven tends to brown more evenly.
Step 2: Grind the Walnuts Fine
Once cooled, chop the walnuts very finely or pulse in a food processor.
You want a texture like coarse sandsmall enough to bind into the dough, not big enough to create weak points that snap your crescents.
Step 3: Cream Butter + Sugar (Don’t Skip This “Fluff” Moment)
- In a large bowl, beat softened butter and 1/2 cup powdered sugar for about 2 minutes, until creamy and lighter in texture.
- Beat in vanilla (and almond extract, if using) plus salt.
This step adds air and helps the cookies bake up tender. You’re not trying to whip it into frostingjust smooth, creamy, and cohesive.
Step 4: Add Dry Ingredients Without Overmixing
- In a separate bowl, whisk flour and cornstarch (if using).
- Add to the butter mixture in 2–3 additions, mixing on low just until combined.
- Mix in the ground walnuts until evenly distributed.
The dough should look soft but not sticky, like a buttery modeling clay. If it seems dry and crumbly, don’t panicsee the troubleshooting section below.
Step 5: Chill the Dough (So Your Crescents Stay Crescents)
Cover and refrigerate for 30–60 minutes. Chilling firms the butter, makes shaping easier, and helps prevent spreading.
It can also improve flavor as the dough rests.
Step 6: Shape the Crescents
- Heat oven to 350°F. Line 2 baking sheets with parchment.
- Scoop about 1 tablespoon dough (roughly 18–22g). Roll into a short log (about 2 inches).
- Taper the ends slightly, then gently bend into a crescent shape.
- Place on sheet about 1–2 inches apart. These don’t spread wildly, but they do relax a little.
Pro move: If the dough cracks while rolling, let it sit at room temp 5 minutes, then try again.
Cold dough can be stubbornlike a cat being asked to move off your laptop.
Step 7: Bake Until Just Golden at the Edges
- Bake 12–14 minutes, rotating the pan halfway through.
- Look for pale tops and light golden edges. Overbaking dries them out fast.
- Cool on the pan for 5 minutes, then transfer carefully to a wire rack.
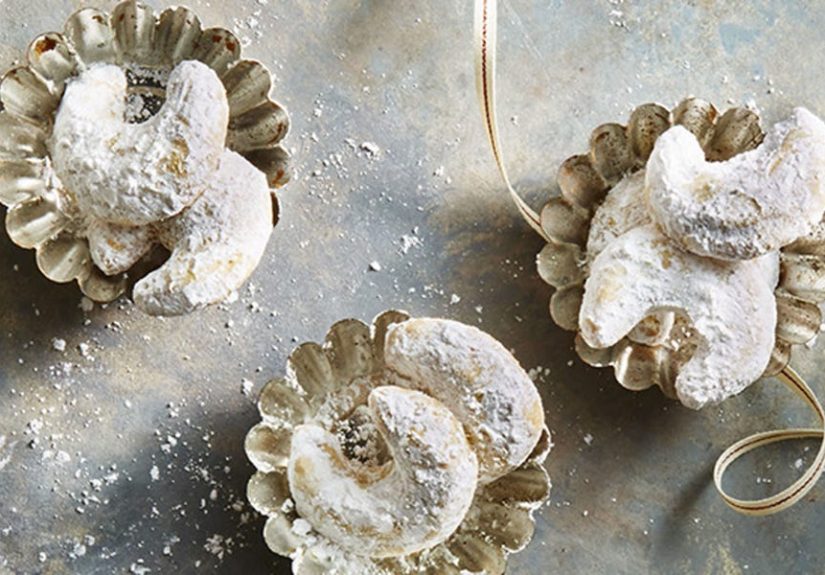
Step 8: The Snowy Powdered Sugar Finish
- While cookies are still warm (but not scorching), gently roll them in powdered sugar.
- Let them cool fully, then roll again for that iconic, extra-white “fresh snowfall” look.
Why roll twice? The first coat slightly melts and bonds; the second coat makes them look like they just came back from a ski trip.
Why This Recipe Works (A Little Cookie Science, No Lab Coat Required)
1) Toasted walnuts = deeper flavor
Toasting wakes up the walnuts’ natural oils and builds a richer, rounder nuttiness. It’s the difference between “nice” and “wait… what did you put in these?”
2) Finely ground nuts help the dough hold together
Big chunks create weak spots. Fine walnut meal distributes evenly, giving the cookies a tender bite without crumbling into walnut confetti.
3) Chilling keeps shapes sharp and texture tender
Cold butter melts slower in the oven. That means less spread, cleaner crescents, and a cookie that stays delicate instead of greasy-flat.
Resting time can also improve flavor and handling.
4) Powdered sugar gives sweetness without heaviness
Because the dough itself isn’t aggressively sweet, the powdered sugar coating provides the “dessert!” moment while keeping the bite buttery and balanced.
Troubleshooting: Fix Common Walnut Crescent Cookie Problems
“My dough is too crumbly and won’t roll.”
- Check flour measurement: If you scooped flour straight from the bag, you may have packed in extra. Next time, spoon and level.
- Add moisture carefully: Mix in 1–2 teaspoons milk or water (or even softened butter) until it holds when pressed.
- Let it warm slightly: Dough straight from the fridge can crack. Give it 5–10 minutes on the counter.
“My cookies spread and lost their crescent shape.”
- Dough too warm: Chill longer, especially if your kitchen is warm.
- Butter too soft: Soft is good; melted is chaos. Butter should be pliable, not shiny or oily.
- Pan too warm: Don’t put dough on a hot baking sheet from a previous batch.
“The powdered sugar won’t stick.”
- Roll while warm: Not blazing hotwarm enough to help the sugar cling.
- Use a bowl, not a dusting: Rolling coats better than sprinkling.
- Do the second roll: The first coat bonds; the second makes it pretty.
“They’re dry.”
- Likely overbaked: Pull them when edges are lightly golden, not when the whole cookie turns tan.
- Don’t overmix flour: Mix just until combined to keep them tender.
Flavor Variations (Because Walnut Crescents Love Options)
Classic vanilla-sugar style
Mix a little vanilla bean paste (or vanilla powder) into your powdered sugar for a fragrant finish.
Orange-walnut crescents
Add 1 teaspoon orange zest to the dough. Walnuts and citrus are best friends who pretend they’re just coworkers.
Chocolate-dipped crescents
Dip cooled cookies halfway into melted semisweet chocolate, then let set. Roll in powdered sugar first if you want the “tuxedo” look.
Swap the nuts
Walnuts are traditional and bold, but hazelnuts or almonds work too. Keep the grind fine for the same tender texture.
Gluten-free option
Use a trusted 1:1 gluten-free baking flour. Expect a slightly different crumb, but still buttery and deliciousespecially with finely ground nuts.
Vegan option
Use a high-quality plant-based butter stick. Chill the dough a bit longer (plant butters can soften faster), and bake just until edges color.
Make-Ahead, Storage, and Freezing Tips
How to store walnut crescent cookies
Store in an airtight container at room temperature for up to 5–7 days. Keep them cool and dry so the powdered sugar stays fluffy.
Can you freeze walnut crescent cookies?
Yes. Freeze baked, fully cooled cookies in a sealed container for up to 2–3 months.
For best looks, refresh with a light powdered sugar roll after thawing.
Freeze the dough (my favorite “future you” gift)
- Shape crescents and freeze on a tray until firm.
- Transfer to a freezer bag or container.
- Bake from frozen, adding 1–3 minutes as needed.
This is how you become the person who “just happens” to have holiday cookies ready. Pure magic. Completely legal.
FAQ: Walnut Crescent Cookies
Do I need eggs in walnut crescent cookies?
Not necessarily. Many traditional versions are egg-free, which helps create that tender, shortbread-like crumble.
Some recipes add an egg yolk for richness and extra binding. If you struggle with crumbly dough, a yolk can helpbut it’s optional.
What’s the best way to get a “melt-in-your-mouth” texture?
Use softened (not melted) butter, avoid overbaking, grind nuts fine, and consider the optional cornstarch for extra tenderness.
Why do my crescents break so easily?
They’re delicate by design. Let them cool a few minutes on the pan before moving, and keep your walnut grind fine.
Very large nut pieces can make cookies fragile.
Can I reduce the sugar?
You can slightly reduce the powdered sugar in the dough, but don’t skip the coatingpowdered sugar is the “signature look + flavor” of this cookie.
If you want less sweetness overall, do one roll instead of two.
Conclusion
If you want the best walnut crescent cookies recipe, focus on three things: toast the walnuts, grind them fine, and chill the dough.
From there, it’s just shaping, baking until lightly golden, and giving them that iconic powdered sugar snowfall (preferably twice).
Make a batch for the holidays, bake them for a cookie swap, or keep a stash of frozen crescents for “emergency joy.”
Either way, these cookies have a talent for disappearingsometimes before they even cool.
Extra: of Real-Life Walnut Crescent Cookie Experiences
The first time I made walnut crescent cookies, I learned an important lesson: walnuts are dramatic. Not “reality TV reunion” dramatic,
but “one minute they’re pale and polite, the next minute they smell like campfire regret” dramatic. Toasting nuts is fast, and the line between
golden and burnt is thin. Now I set a timer for 7 minutes, stir, and then hover like a concerned lifeguard. The moment I smell that warm, nutty aroma,
they come outbecause the pan stays hot and walnuts keep cooking even after you remove them. (Walnuts don’t believe in brakes.)
Experience #2: cookie dough has a mood, and that mood depends on your kitchen temperature. On a cool day, the dough behaves like a dream:
roll, taper, bendeasy. On a warm day, the dough turns into buttery play-doh that wants to nap on your fingers. That’s when chilling stops being
“optional” and becomes “the only thing standing between you and walnut pancake cookies.” I’ve also noticed that shaping goes faster when you portion
the dough firstlittle tablespoon scoops lined up like tiny recruitsthen roll them into crescents assembly-line style.
The powdered sugar step is also more strategic than it looks. If you roll the cookies when they’re too hot, the sugar melts and disappears,
leaving you with sad beige crescents that look like they missed the snowstorm. If you wait until they’re fully cool, the sugar doesn’t stick well.
The sweet spot is warm: five-ish minutes after the oven, when they’re still cozy but no longer fragile lava rocks.
And yes, double-rolling feels extra… until you see the final result. That second coat gives you the classic white, velvety finish that makes people
reach for them first on the cookie tray.
I’ve also played around with walnut texture. Chunky walnuts give you occasional nut “surprises,” but they can weaken the cookie structure.
Finely ground walnuts make the crescents more uniform, tender, and less likely to snap at the bend.
When I want the best of both worlds, I grind most of the walnuts fine and keep a small handful finely chopped (not big chunks) for a little texture.
Finally, the most reliable “wow” moment: serving them the next day. Something about resting overnight lets the butter-nut flavor settle in.
The powdered sugar also dries into a soft, dreamy coating instead of a dusty mess. I’ve stopped calling it “staling.”
I call it “cookie maturity.” And if anyone asks why you made them ahead, tell them you’re practicing patience.
Then accept your compliments like the calm, sugar-dusted wizard you clearly are.